
Running JavaScript SDK Examples
This document uses Windows as an example to explain how to run the JavaScript SDK examples.
Prerequisites
Create a JavaScript project in WebStorm.
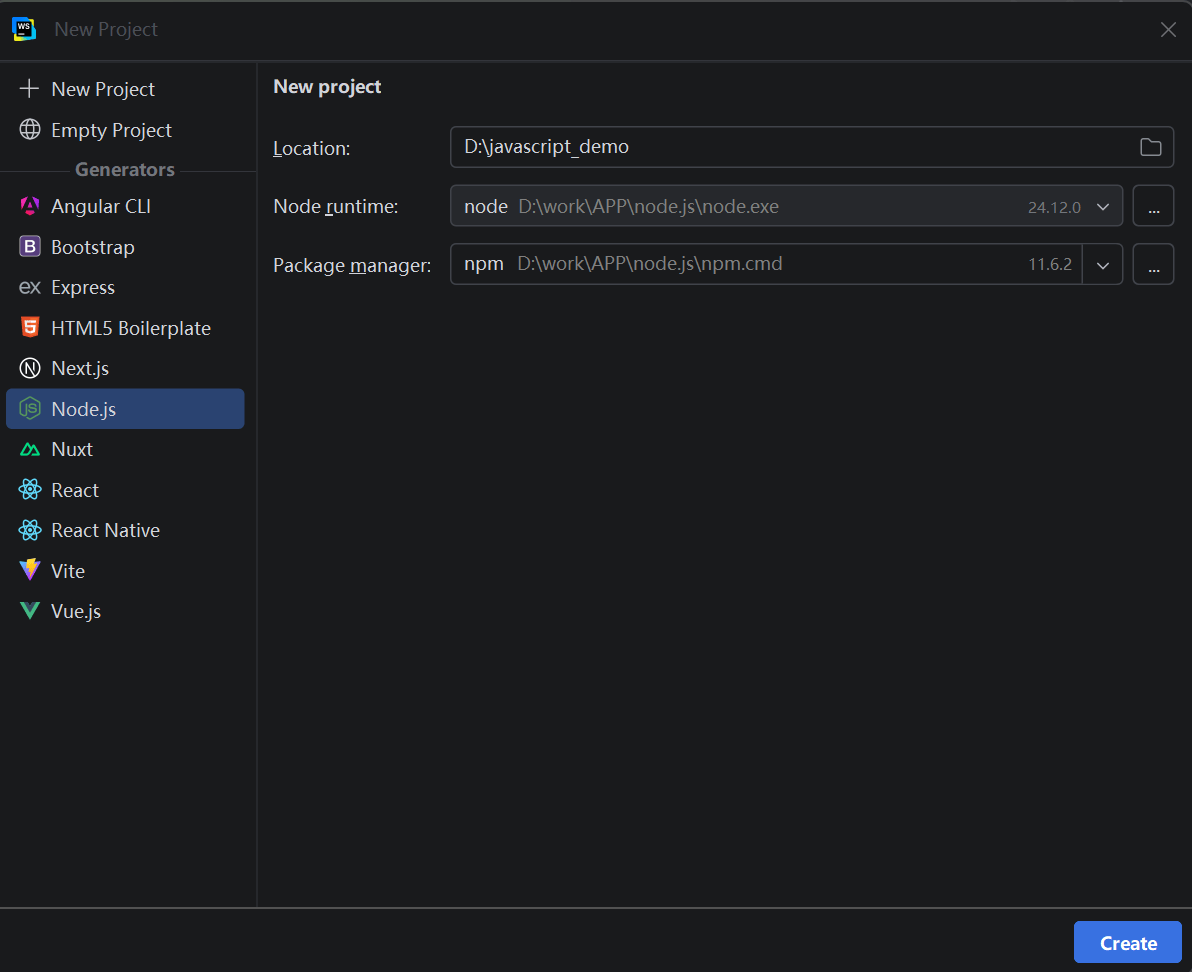
Refer to Running Environment Requirements and make sure that Node.js 8 or above is installed.
Refer to Installation Guide to configure the JavaScript project.
Example Code
There are two ways to communicate with the robot: using RobotProxy or using an individual client.
Using
RobotProxy(recommended)RobotProxyis the unified entry point for the SDK. A singleconnectServer()call establishes RPC (9012), RTDE (9013), and Script (30003) connections, and a singledisConnectFromServer()call closes them together. It maintains the currently selected robot and provides a unifiedrobot.xxx()interface, making it suitable for regular application development and examples.Using an individual client
Create and use only one specific channel client:
RpcClient(9012 only),RtdeClient(9013 only), orScriptClient(30003 only). Each client must be connected and disconnected separately. This is suitable when only one channel is needed or when troubleshooting a specific port.
Note:
Before running an example, make sure that:
Robot-arm communication is working normally.
The JavaScript development package is installed.
When the SDK client connects to a real robot, set the IP address in the code to the robot controller's IP address.
When running the project in an Aubo Sim virtual machine and the SDK client connects to the virtual machine, use the virtual machine's IP address.
Using RobotProxy
Reading Robot Joint Positions Example
This example uses the following APIs to connect to the controller, log in, read the joint positions, and disconnect:
APIs
RobotProxy
connectServer: Establishes RPC (9012), RTDE (9013), and Script (30003) connections simultaneously.login: Logs in to the controller.selectRobot: Selects the robot to operate.disConnectFromServer: Disconnects from the controller.
RobotState
getJointPositions: Reads the current joint positions in radians.
Procedure
Create the
robot_connect.jsfile and add the following example code.Click to view the example code
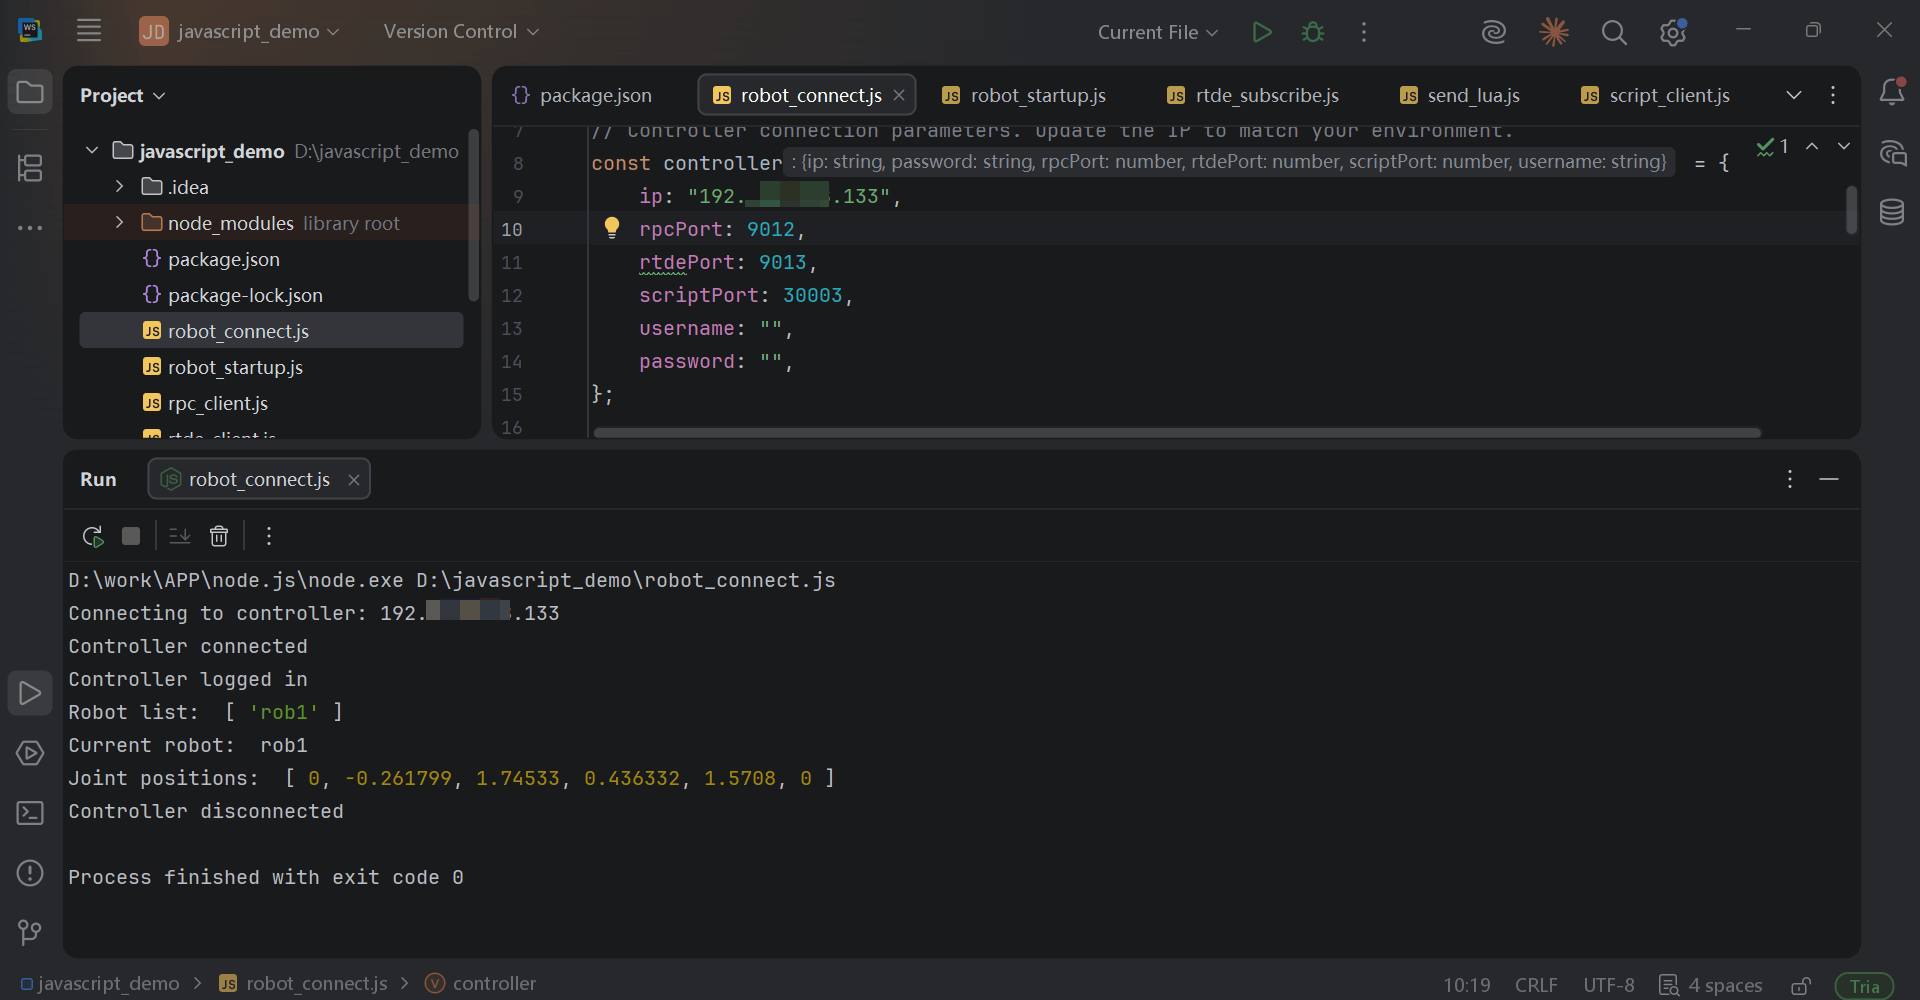
js// AUBO JavaScript SDK example: connect to controller -> read joint positions -> disconnect // Run: node robot_connect.js const { RobotProxy } = require("@aubo/aubo_sdk"); const robot = new RobotProxy(); // Controller connection parameters. Update the IP to match your environment. const controller = { ip: "192.XXX.XXX.133", rpcPort: 9012, rtdePort: 9013, scriptPort: 30003, username: "", password: "", }; async function main() { let connected = false; try { // Connect to the controller console.log(`Connecting to controller: ${controller.ip}`); const connectResult = await robot.connectServer( controller.ip, controller.rpcPort, controller.rtdePort, controller.scriptPort ); if (!connectResult) { throw new Error("Failed to connect to controller. Please check IP, ports and network status."); } connected = true; console.log("Controller connected"); // Login const loginResult = await robot.login( controller.username, controller.password ); if (!loginResult) { throw new Error("Controller login failed. Please check username, password and SDK version."); } console.log("Controller logged in"); // Get the robot list const robotNames = robot.getRobotNames() || []; if (robotNames.length === 0) { throw new Error("No robots found on the controller"); } console.log("Robot list: ", robotNames); // Select the first robot (index starts at 0) const selectResult = robot.selectRobot(0); if (selectResult !== 0) { throw new Error(`Failed to select robot, return value: ${selectResult}`); } console.log("Current robot: ", robot.getCurrentRobotName()); // Read joint positions (unit: radians) const jointPositions = await robot.getRobotState().getJointPositions(); if (!Array.isArray(jointPositions)) { throw new Error("Failed to read joint positions"); } console.log("Joint positions: ", jointPositions); } finally { // Disconnect if (connected) { try { await robot.disConnectFromServer(); console.log("Controller disconnected"); } catch (error) { console.error("Failed to disconnect from controller: ", error); } } } } main().catch((error) => { console.error("SDK example failed: ", error); process.exitCode = 1; });Run the example and view the robot joint positions in the terminal.
Powering On and Starting the Robot Example
This example uses the following APIs to connect to the controller, log in, power on the robot, wait until it is ready, start it, and disconnect:
APIs
RobotProxy
connectServer: Establishes RPC (9012), RTDE (9013), and Script (30003) connections simultaneously.login: Logs in to the controller.selectRobot: Selects the robot to operate.disConnectFromServer: Disconnects from the controller.
RobotManage
poweron: Powers on the robot.startup: Starts the robot.
RobotState
isSteady: Checks whether the robot is steady.isPowerOn: Checks whether the robot is powered on.
Warning:
This example powers on the robot, releases the brake, and puts it into a runnable state. This changes the robot state. Before running it, confirm that the work area, emergency-stop device, tool load, and safety configuration are under control, and debug at low speed.
Procedure
Create the
robot_startup.jsfile and add the following example code.Click to view the example code
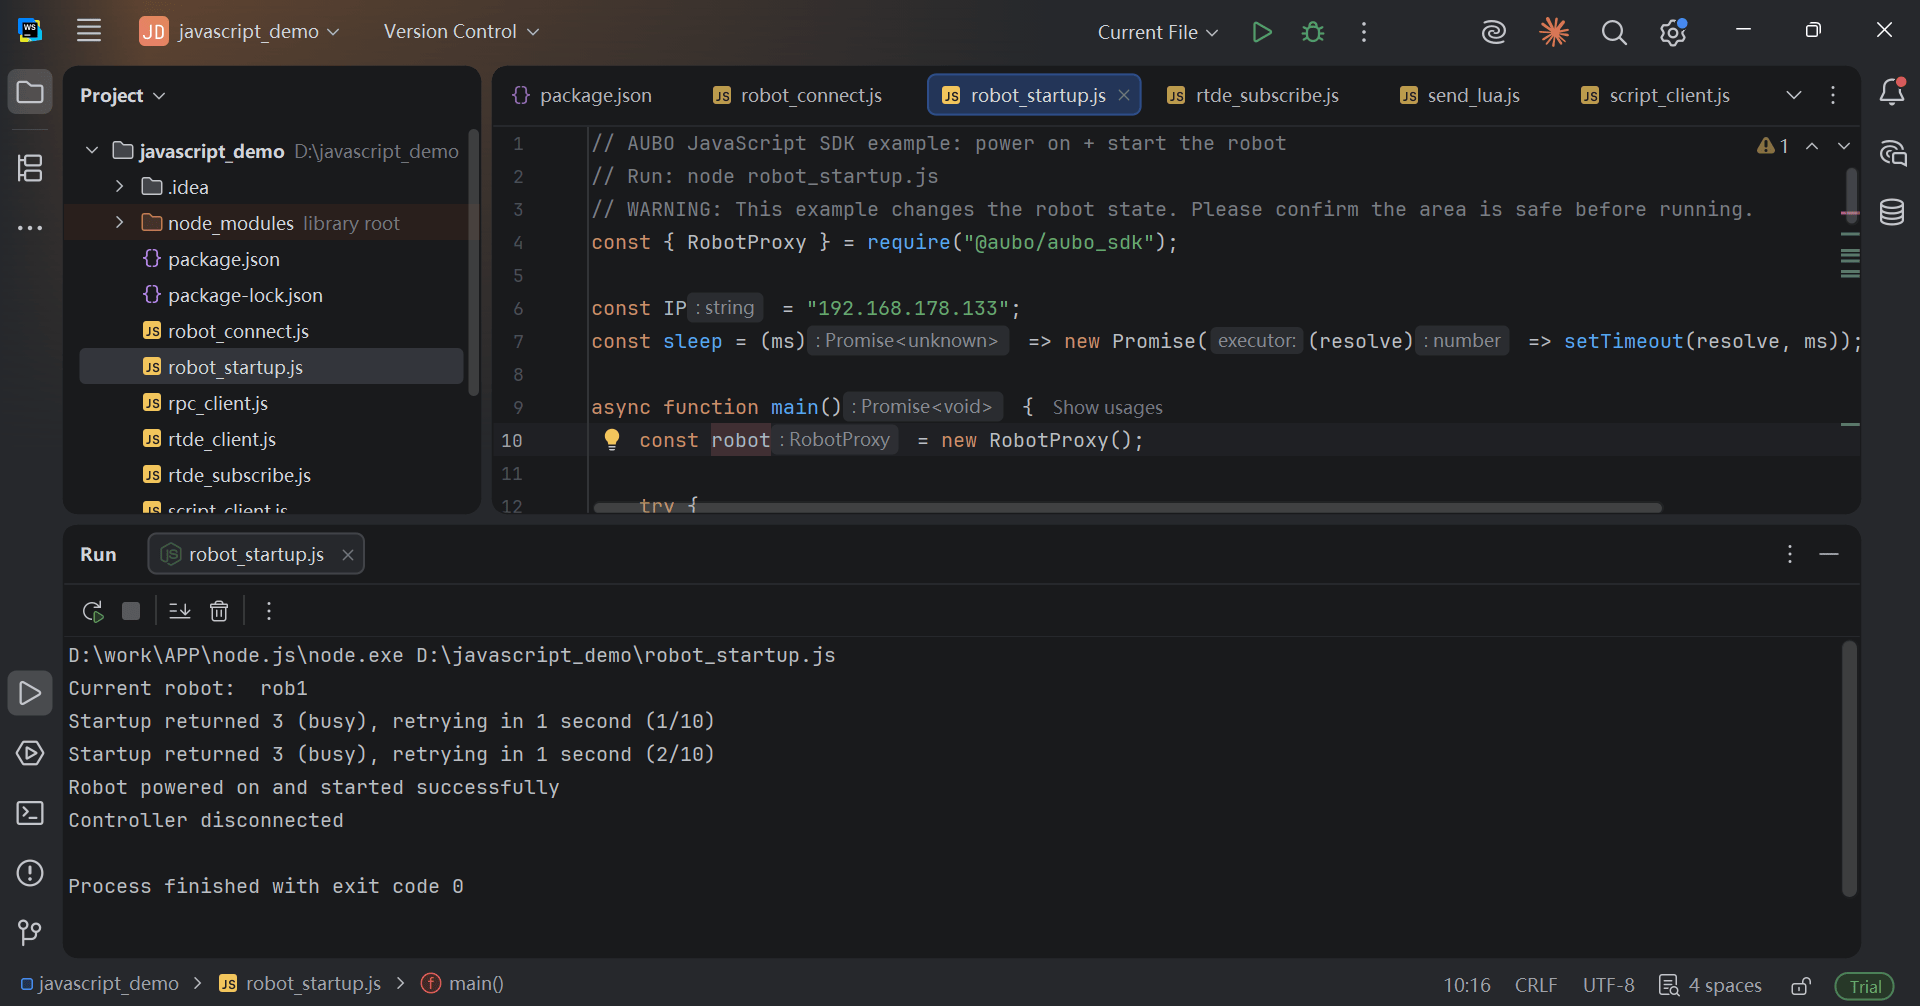
js// AUBO JavaScript SDK example: power on + start the robot // Run: node robot_startup.js // WARNING: This example changes the robot state. Please confirm the area is safe before running. const { RobotProxy } = require("@aubo/aubo_sdk"); const IP = "192.XXX.XXX.133"; const sleep = (ms) => new Promise((resolve) => setTimeout(resolve, ms)); async function main() { const robot = new RobotProxy(); try { // Connect / login / select robot if (!(await robot.connectServer(IP, 9012, 9013, 30003))) { throw new Error("Controller connection failed"); } if (!(await robot.login("", ""))) throw new Error("Controller login failed"); if (robot.selectRobot(0) !== 0) throw new Error("Robot selection failed"); console.log("Current robot: ", robot.getCurrentRobotName()); const manage = robot.getRobotManage(); const state = robot.getRobotState(); // Power on (async; the robot is ready only when both isSteady and isPowerOn are true) const powerOnResult = await manage.poweron(); if (powerOnResult !== 0) throw new Error(`Power-on failed, error code: ${powerOnResult}`); for (let i = 0; i < 60; i++) { if ((await state.isSteady()) && (await state.isPowerOn())) break; if (i === 59) throw new Error("Timeout waiting for power-on to complete"); await sleep(500); } // Start; when the return value is 3 (busy), wait 1 second and retry for (let i = 1; i <= 10; i++) { const startupResult = await manage.startup(); if (startupResult === 0) { console.log("Robot powered on and started successfully"); return; } if (startupResult !== 3 || i === 10) { throw new Error(`Startup failed, error code: ${startupResult}`); } console.log(`Startup returned 3 (busy), retrying in 1 second (${i}/10)`); await sleep(1000); } } finally { // Disconnect try { await robot.disConnectFromServer(); console.log("Controller disconnected"); } catch (error) { console.error("Failed to disconnect from controller: ", error); } } } main().catch((error) => { console.error("Robot startup flow failed: ", error.message); process.exitCode = 1; });Run the example and check the terminal output. You can see the robot started message.
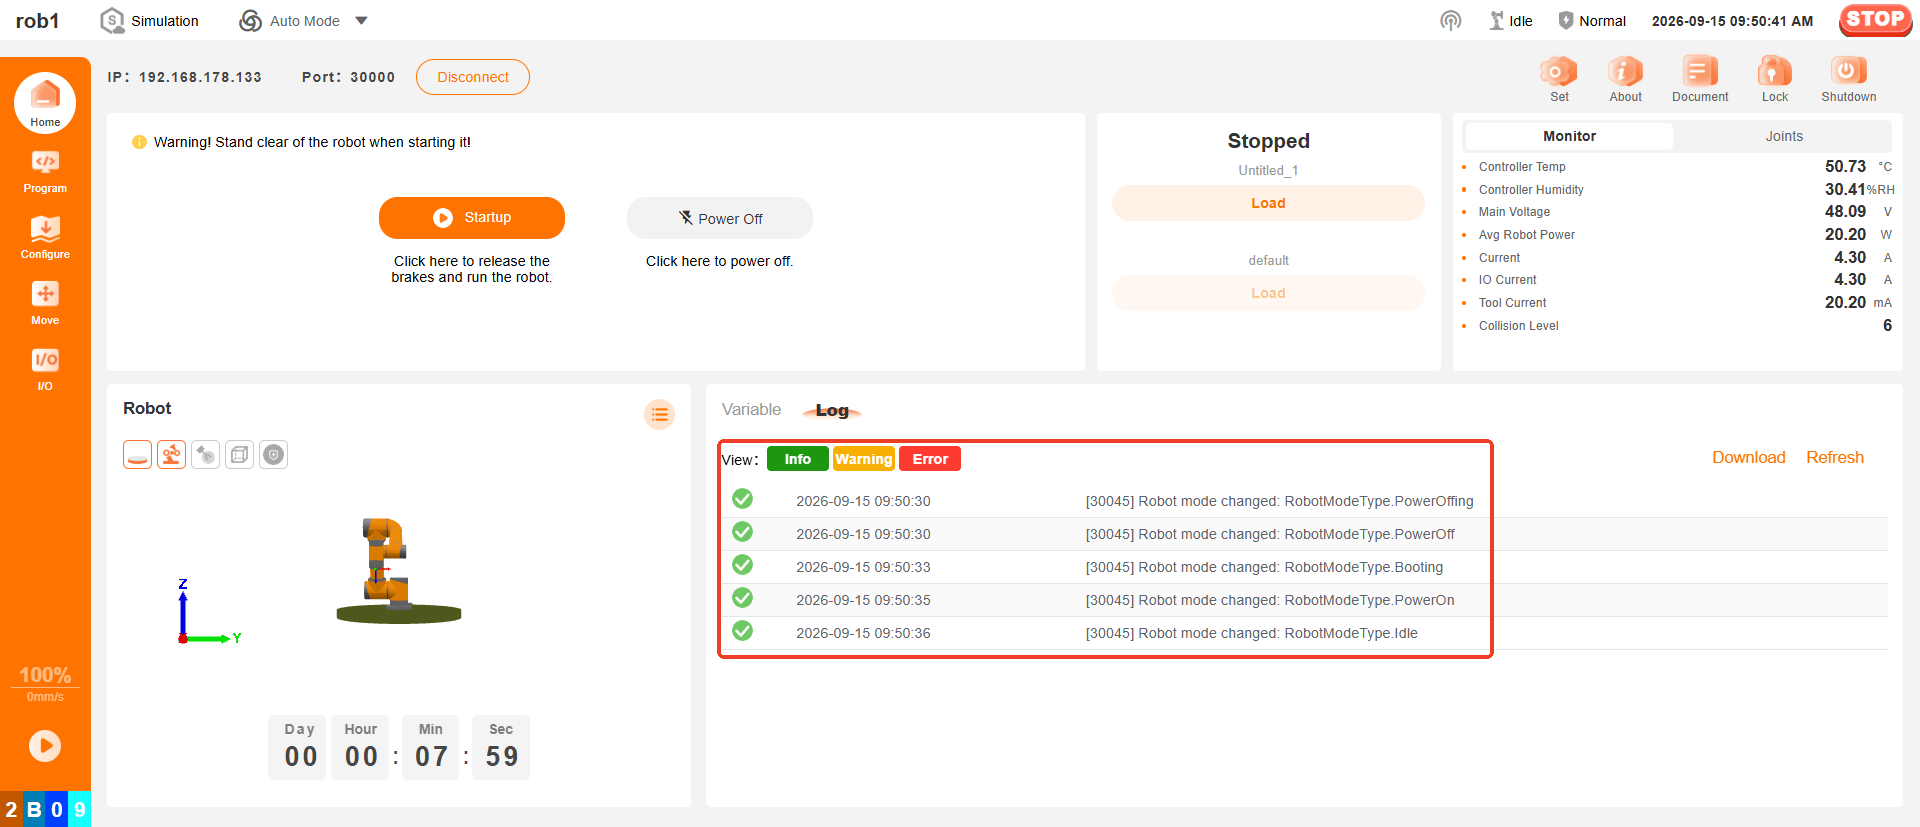
View the AuboStudio APP log. You can see that the robot has started.
RTDE Real-Time Data Subscription Example
This example uses the following APIs to connect, log in, subscribe to topics, receive real-time data, cancel the subscription, and disconnect:
APIs
RobotProxy
connectServer: Establishes RPC (9012), RTDE (9013), and Script (30003) connections simultaneously.login: Logs in to the controller.selectRobot: Selects the robot to operate.disConnectFromServer: Disconnects from the controller.batchAddRtdeTopicCallbacks: Subscribes to RTDE topics in batches and registers callbacks. .deleteRtdeTopicCallbacks: Cancels the subscribed RTDE topics.
Procedure
Create the
rtde_subscribe.jsfile and add the following example code.Click to view the example code
js// RTDE real-time data subscription example: subscribe to actual_q / robot_mode, throttle print rate // Run: node rtde_subscribe.js const { RobotProxy } = require("@aubo/aubo_sdk"); const IP = "192.XXX.XXX.133"; // Controller IP, update to match your environment // Topic names do not need the R1_ prefix; the SDK adds it automatically: const TOPICS = ["actual_q", "robot_mode"]; // Order must match the callback array 1:1 const INTERVAL_MS = 100; // Push interval (ms) const DURATION_MS = 10000; // Runtime duration (ms) const PRINT_INTERVAL_MS = 1000; // Print throttle interval (ms) const sleep = (ms) => new Promise((resolve) => setTimeout(resolve, ms)); async function main() { const robot = new RobotProxy(); // Only store values in the callback; printing is throttled by printIfDue let frames = 0; let lastPrint = 0; let latestQ = null; let latestMode = null; const printIfDue = () => { // Only print once both topics have a value if (latestQ === null || latestMode === null) return; const now = Date.now(); if (now - lastPrint < PRINT_INTERVAL_MS) return; lastPrint = now; console.log( `[Frame ${frames}] Joints (rad): ${latestQ.map((v) => v.toFixed(4)).join(", ")} Mode: ${latestMode}` ); }; try { // 1. Connect if (!(await robot.connectServer(IP, 9012, 9013, 30003))) { throw new Error("Controller connection failed"); } // 2. Login if (!(await robot.login("", ""))) throw new Error("Controller login failed"); // 3. Select robot const robotIndex = 0; if (robot.selectRobot(robotIndex) !== 0) throw new Error("Robot selection failed"); console.log("Current robot: ", robot.getCurrentRobotName()); // 4. Batch subscribe: callbacks and topics correspond by index robot.batchAddRtdeTopicCallbacks( robotIndex, TOPICS, [ (q) => { // actual_q: joint positions (rad) frames++; latestQ = q; printIfDue(); }, (mode) => { // robot_mode: robot mode latestMode = mode; }, ], INTERVAL_MS ); console.log(`Subscribed to ${TOPICS.join(", ")}, running for ${DURATION_MS / 1000} seconds (Ctrl+C to stop early)`); // 5. Keep running to receive data continuously await sleep(DURATION_MS); // 6. Unsubscribe robot.deleteRtdeTopicCallbacks(robotIndex, TOPICS); console.log(`Unsubscribed: received ${frames} frames in total, average ${(frames / (DURATION_MS / 1000)).toFixed(1)} frames/sec`); } finally { // 7. Disconnect try { await robot.disConnectFromServer(); console.log("Controller disconnected"); } catch (error) { console.error("Failed to disconnect from controller: ", error); } } } main().catch((error) => { console.error("RTDE subscription example failed: ", error.message); process.exitCode = 1; });In the AuboStudio APP, create a simple loop program. The robot will perform a cyclic joint movement between waypoint 0 and waypoint 1.
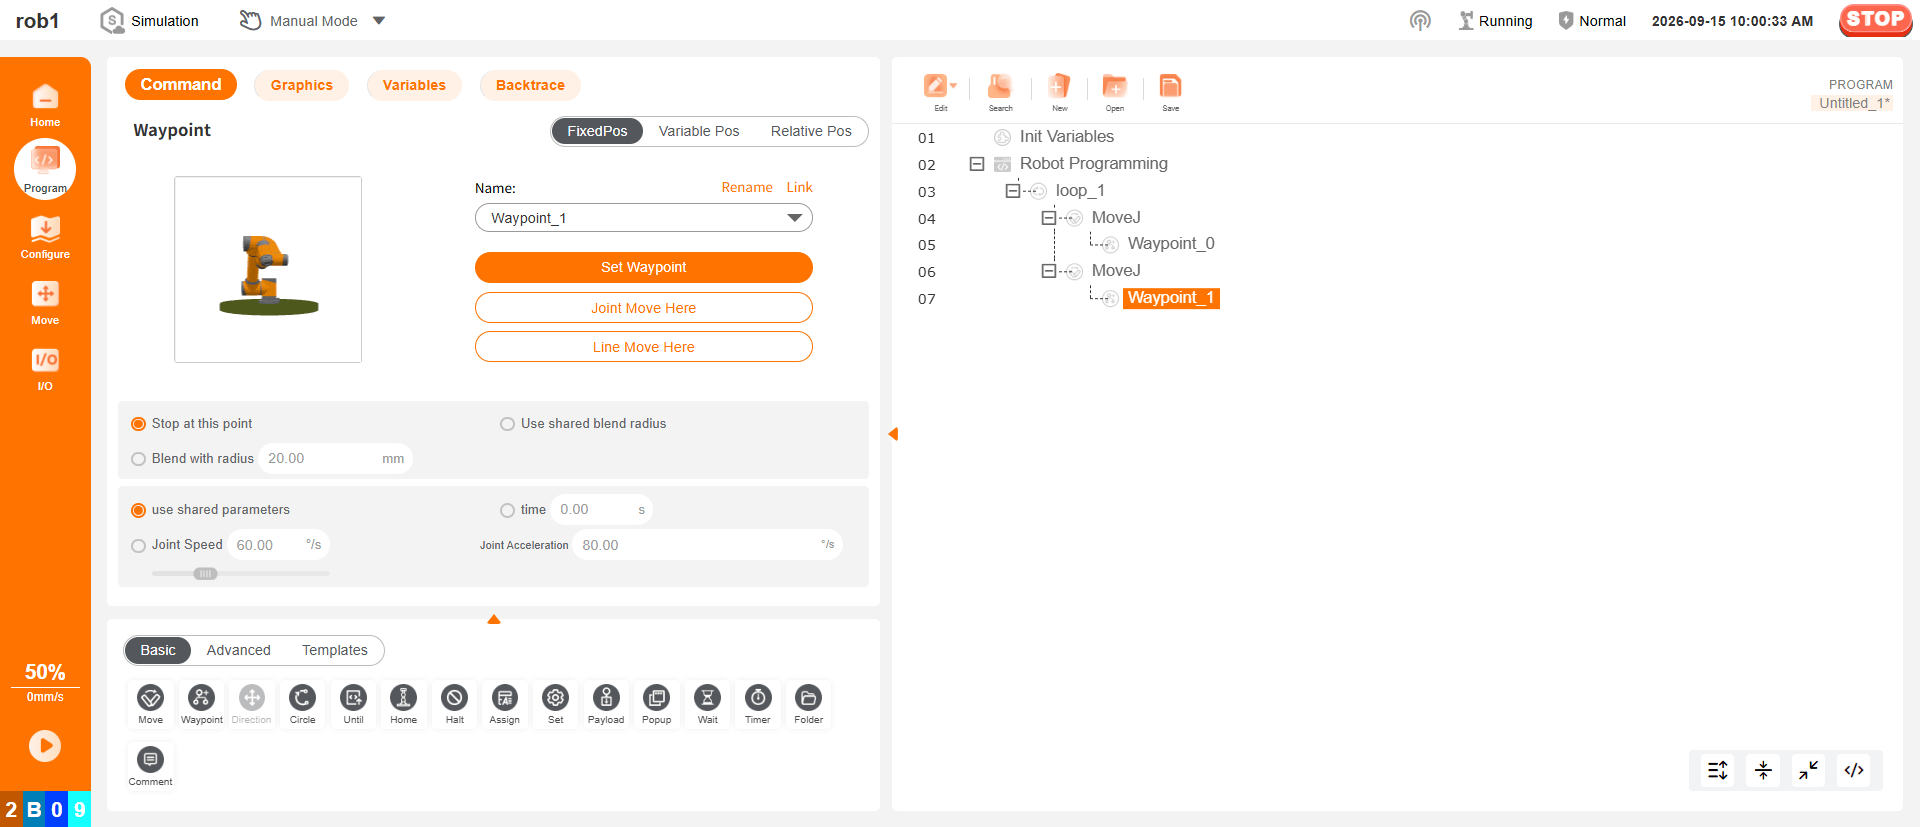
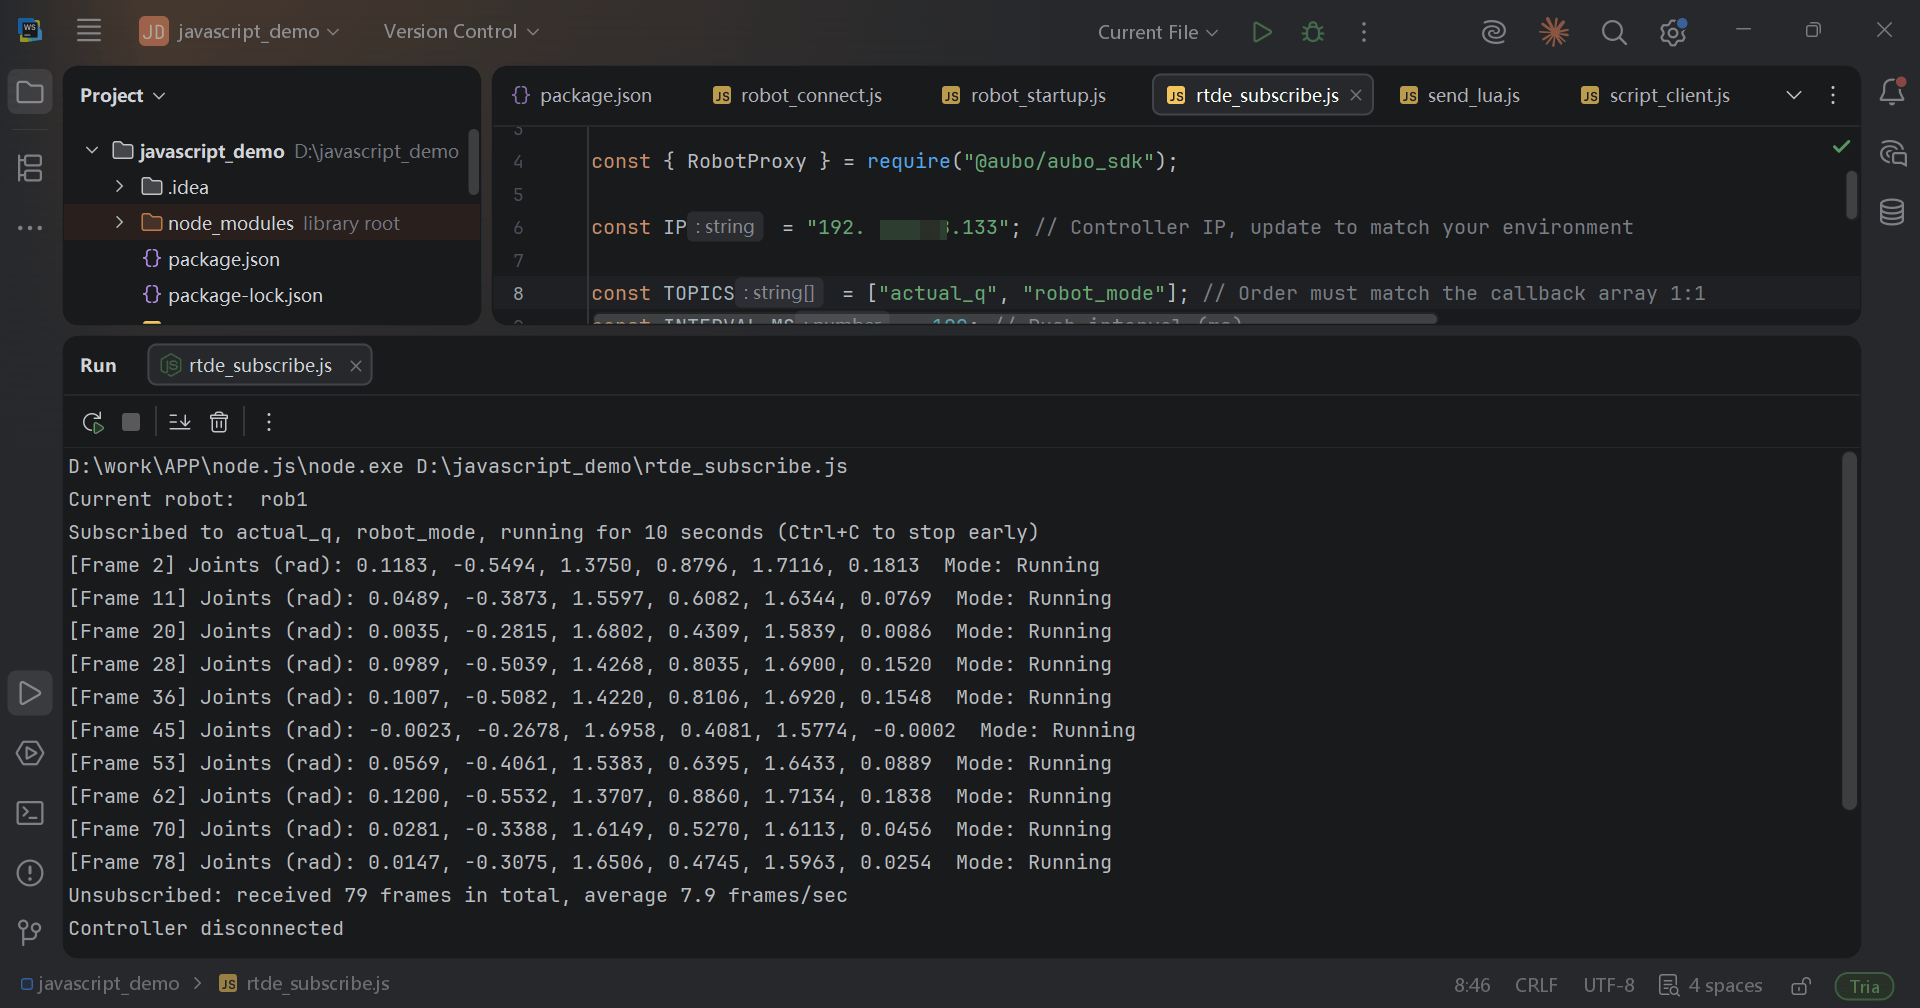
Run the program in the AuboStudio APP, then run the example script in WebStorm.
The terminal displays the real-time pose changes of the robot's joints.
Sending a Lua Script Example
This example uses the following APIs to connect, log in, send a Lua script, and disconnect:
APIs
RobotProxy
connectServer: Establishes RPC (9012), RTDE (9013), and Script (30003) connections simultaneously.login: Logs in to the controller.selectRobot: Selects the robot to operate.disConnectFromServer: Disconnects from the controller.sendScriptStrByWs: Sends and executes a Lua script through WebSocket (port 30003).sendScriptStrByHttpcan also be used.registerScriptError: Registers a callback for script execution errors. Errors inside the script can only be received through this callback.
Note:
The Lua script is executed on the robot controller. Features such as require('aubo') and textmsg in the script are built-in controller-side Lua libraries and are unrelated to the JavaScript SDK.
Procedure
Create the
send_lua.jsfile and add the following example code.Click to view the example code
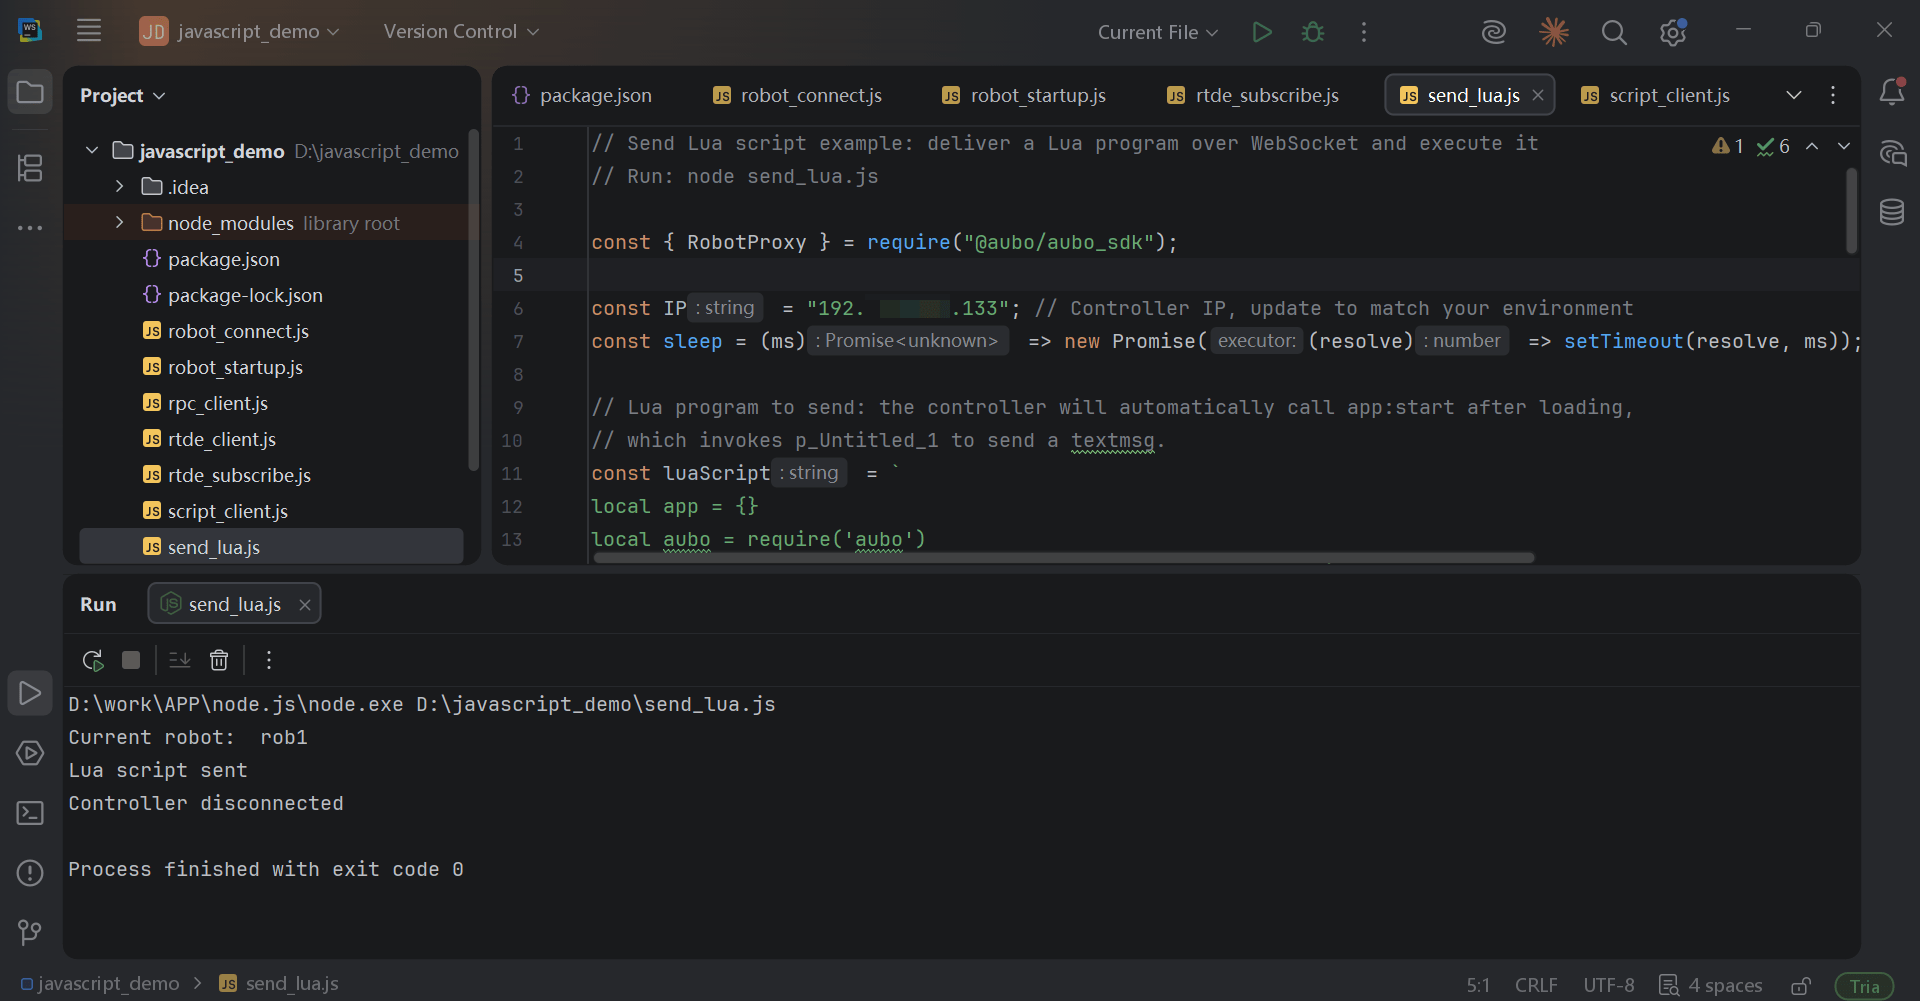
js// Send Lua script example: deliver a Lua program over WebSocket and execute it // Run: node send_lua.js const { RobotProxy } = require("@aubo/aubo_sdk"); const IP = "192.XXX.XXX.133"; // Controller IP, update to match your environment const sleep = (ms) => new Promise((resolve) => setTimeout(resolve, ms)); // Lua program to send: the controller will automatically call app:start after loading, // which invokes p_Untitled_1 to send a textmsg. const luaScript = ` local app = {} local aubo = require('aubo') local sched = sched or aubo.sched -- no global sched, get it from aubo function p_Untitled_1() local _ENV = sched.select_robot(1) -- get the robot command environment which provides textmsg, etc. textmsg("Hello from JavaScript SDK") end function app:start(api) -- startup callback, called automatically by the controller self.api = api p_Untitled_1() end return app -- must return the program object `; async function main() { const robot = new RobotProxy(); // Connect / login / select robot if (!(await robot.connectServer(IP, 9012, 9013, 30003))) throw new Error("Controller connection failed"); if (!(await robot.login("", ""))) throw new Error("Controller login failed"); if (robot.selectRobot(0) !== 0) throw new Error("Robot selection failed"); console.log("Current robot: ", robot.getCurrentRobotName()); // Script errors can only be received via this callback robot.registerScriptError((error) => console.error("Script execution error: ", error.data)); robot.sendScriptStrByWs(luaScript); // or robot.sendScriptStrByHttp(luaScript) console.log("Lua script sent"); await sleep(3000); // wait for script execution / error to come back await robot.disConnectFromServer(); console.log("Controller disconnected"); } main().catch((error) => { console.error("Example failed: ", error.message); process.exitCode = 1; });Run the example. The terminal displays that the Lua script has been sent.
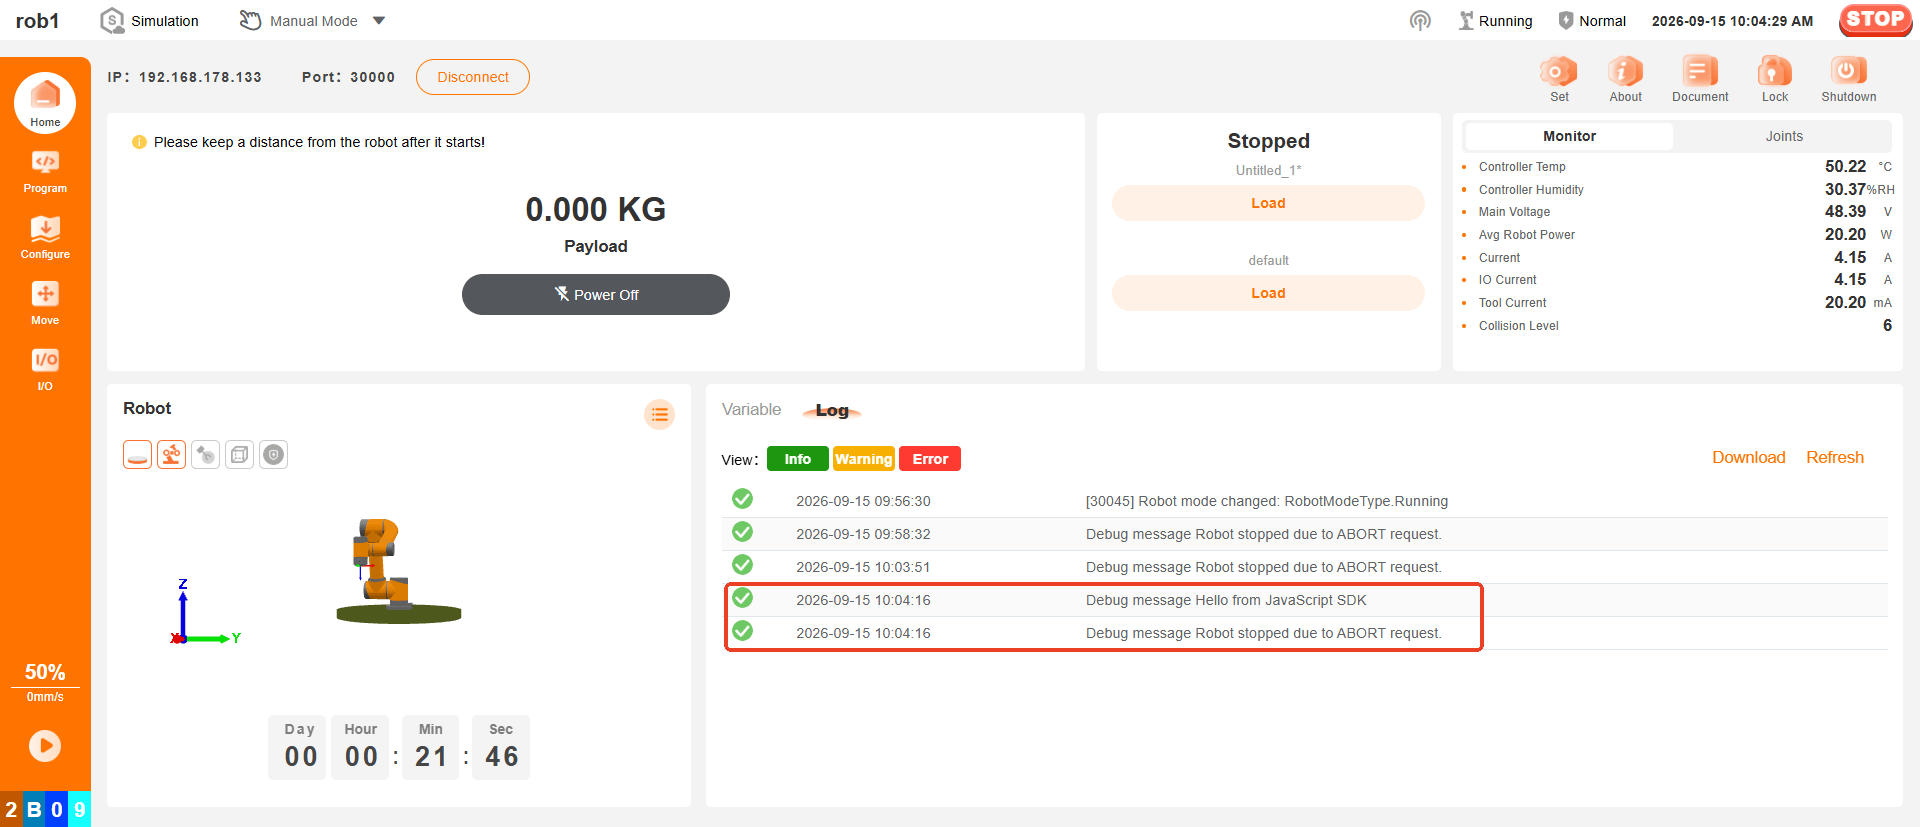
View the log in the AuboStudio APP. The Lua script's debug message is displayed.
Using Individual Clients
RPC Client Example
This example does not use RobotProxy. It uses RpcClient directly to connect to RPC, log in, get the robot list, read joint positions, and disconnect.
APIs
RpcClient
connectRpcServer: Connects to the RPC service (port 9012).login: Logs in to the controller.getRobotNamesreturns data after login succeeds.getRobotNames: Gets the list of robot names on the controller.getRobotInterface: Gets aRobotInterfaceobject by robot name.disconnectRpcServer: Disconnects from RPC.
RobotInterface
getRobotState: Gets theRobotStateinterface. APIs such asgetJointPositionsare provided by this interface.
Procedure
Create the
rpc_client.jsfile and add the following example code.Click to view the example code
js// RPC client example: connect RPC service (9012) -> login -> read joint positions -> disconnect // Run: node rpc_client.js const { RpcClient } = require("@aubo/aubo_sdk"); const IP = "192.XXX.XXX.133"; // Controller IP, update to match your environment async function main() { // RpcClient only manages the RPC connection. You need to establish and tear it down yourself. const rpc = new RpcClient(); try { // Connect to RPC service (returns true when the connection succeeds) if (!(await rpc.connectRpcServer(IP, 9012))) { throw new Error("RPC connection failed"); } console.log("RPC connected"); // Login (this internally fetches the robot list; getRobotNames only returns data after login succeeds) if (!(await rpc.login("", ""))) throw new Error("RPC login failed"); // Get the robot list (synchronous method, returns an array of strings) const robotNames = rpc.getRobotNames() || []; if (robotNames.length === 0) throw new Error("No robots found on the controller"); console.log("Robot list: ", robotNames); // Get the interface object by robot name (note: by name, not by index). // RobotInterface provides getRobotState / getRobotManage, etc., // and is used the same way as the same-named methods in RobotProxy. const robotInterface = rpc.getRobotInterface(robotNames[0]); const jointPositions = await robotInterface.getRobotState().getJointPositions(); console.log("Joint positions: ", jointPositions); } finally { // Disconnect RPC await rpc.disconnectRpcServer(); console.log("RPC disconnected"); } } main().catch((error) => { console.error("RPC client example failed: ", error.message); process.exitCode = 1; });Run the example and view the terminal output.
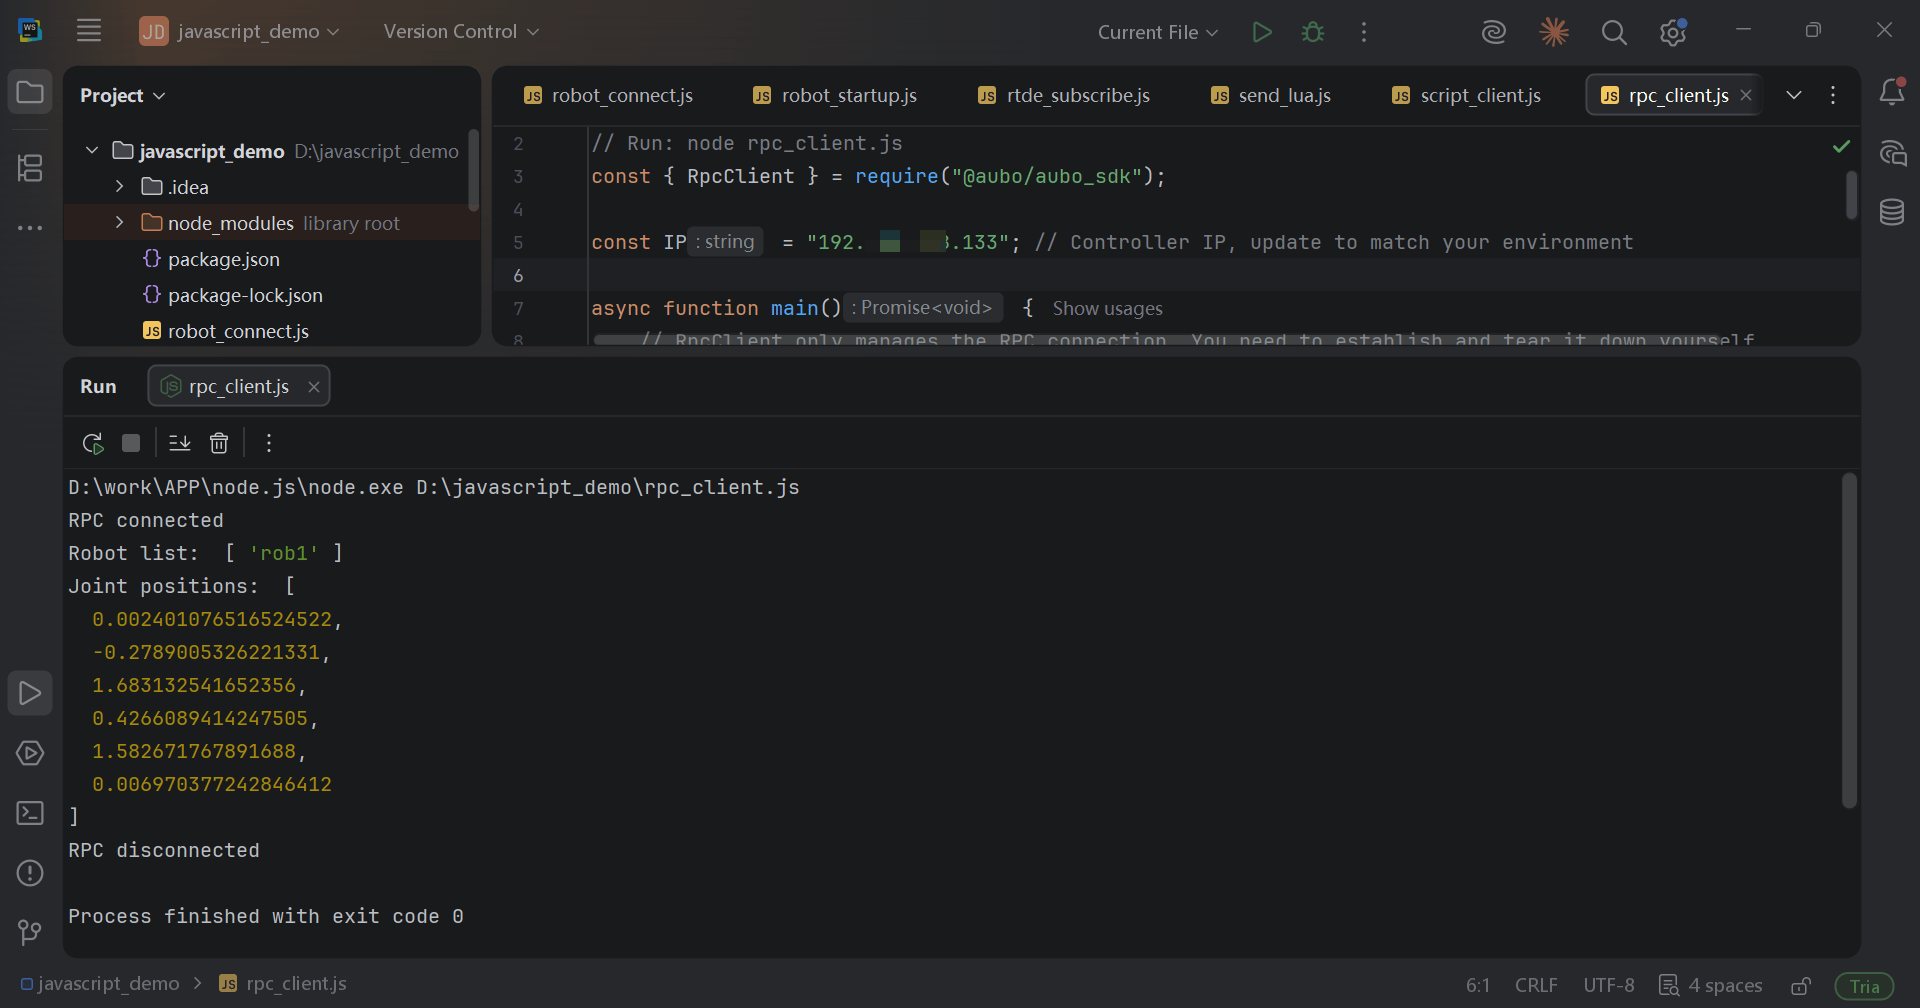
RTDE Client Example
This example does not use RobotProxy. It uses RtdeClient directly to connect to RTDE, subscribe to topics, receive real-time data, cancel the subscription, and disconnect.
APIs
RtdeClient
connectRtdeServer: Connects to the RTDE service (port 9013).registeredMsgCallBack: Registers a received-message callback.subscribeTopicWithChannel: Subscribes to topics by channel.unsubscribeChannel: Cancels a subscription by channel.disconnectRtdeServer: Disconnects from RTDE.
Note:
When using RtdeClient directly, topic names do not automatically receive the R1_ prefix. You must use the complete controller-side name, such as R1_robot_mode. This is the opposite of the RobotProxy behavior.
Procedure
Create the
rtde_client.jsfile and add the following example code.Click to view the example code
js// RTDE client example: connect RTDE service (9013) -> subscribe topics -> receive data -> unsubscribe -> disconnect // Run: node rtde_client.js const { RtdeClient } = require("@aubo/aubo_sdk"); const IP = "192.XXX.XXX.133"; // Controller IP, update to match your environment const sleep = (ms) => new Promise((resolve) => setTimeout(resolve, ms)); // Topic names must be the full names used on the controller side; the SDK will not auto-add prefixes: // robot-related topics must be written as R + (robotIndex + 1) + "_" + topic name, e.g. R1_robot_mode const topics = ["line_number", "runtime_state", "R1_robot_mode"]; async function main() { const rtde = new RtdeClient(); try { // Connect to RTDE service if (!(await rtde.connectRtdeServer(IP, 9013))) { throw new Error("RTDE connection failed"); } console.log("RTDE connected"); // Receive callback: channel is the channel number used at subscription time, // and data is one frame on that channel (order matches the topics). let lastPrint = 0; rtde.registeredMsgCallBack((channel, data) => { const now = Date.now(); if (now - lastPrint < 1000) return; // Print at most once per second to avoid flooding lastPrint = now; console.log(`[Channel ${channel}]`, data); }); // Subscribe: subscribeTopicWithChannel(topics, push interval ms, channel number 0~99) rtde.subscribeTopicWithChannel(topics, 100, 1); console.log(`Subscribed: ${topics.join(", ")}, channel 1, push every 100 ms`); // Keep the process alive so the callback keeps receiving data await sleep(10000); // Unsubscribe (pass the channel number used at subscription time) rtde.unsubscribeChannel(1); console.log("Unsubscribed"); } finally { // Disconnect RTDE await rtde.disconnectRtdeServer(); console.log("RTDE disconnected"); } } main().catch((error) => { console.error("RTDE client example failed: ", error instanceof Error ? error.message : error); process.exitCode = 1; });Run the loop program again in the AuboStudio APP.
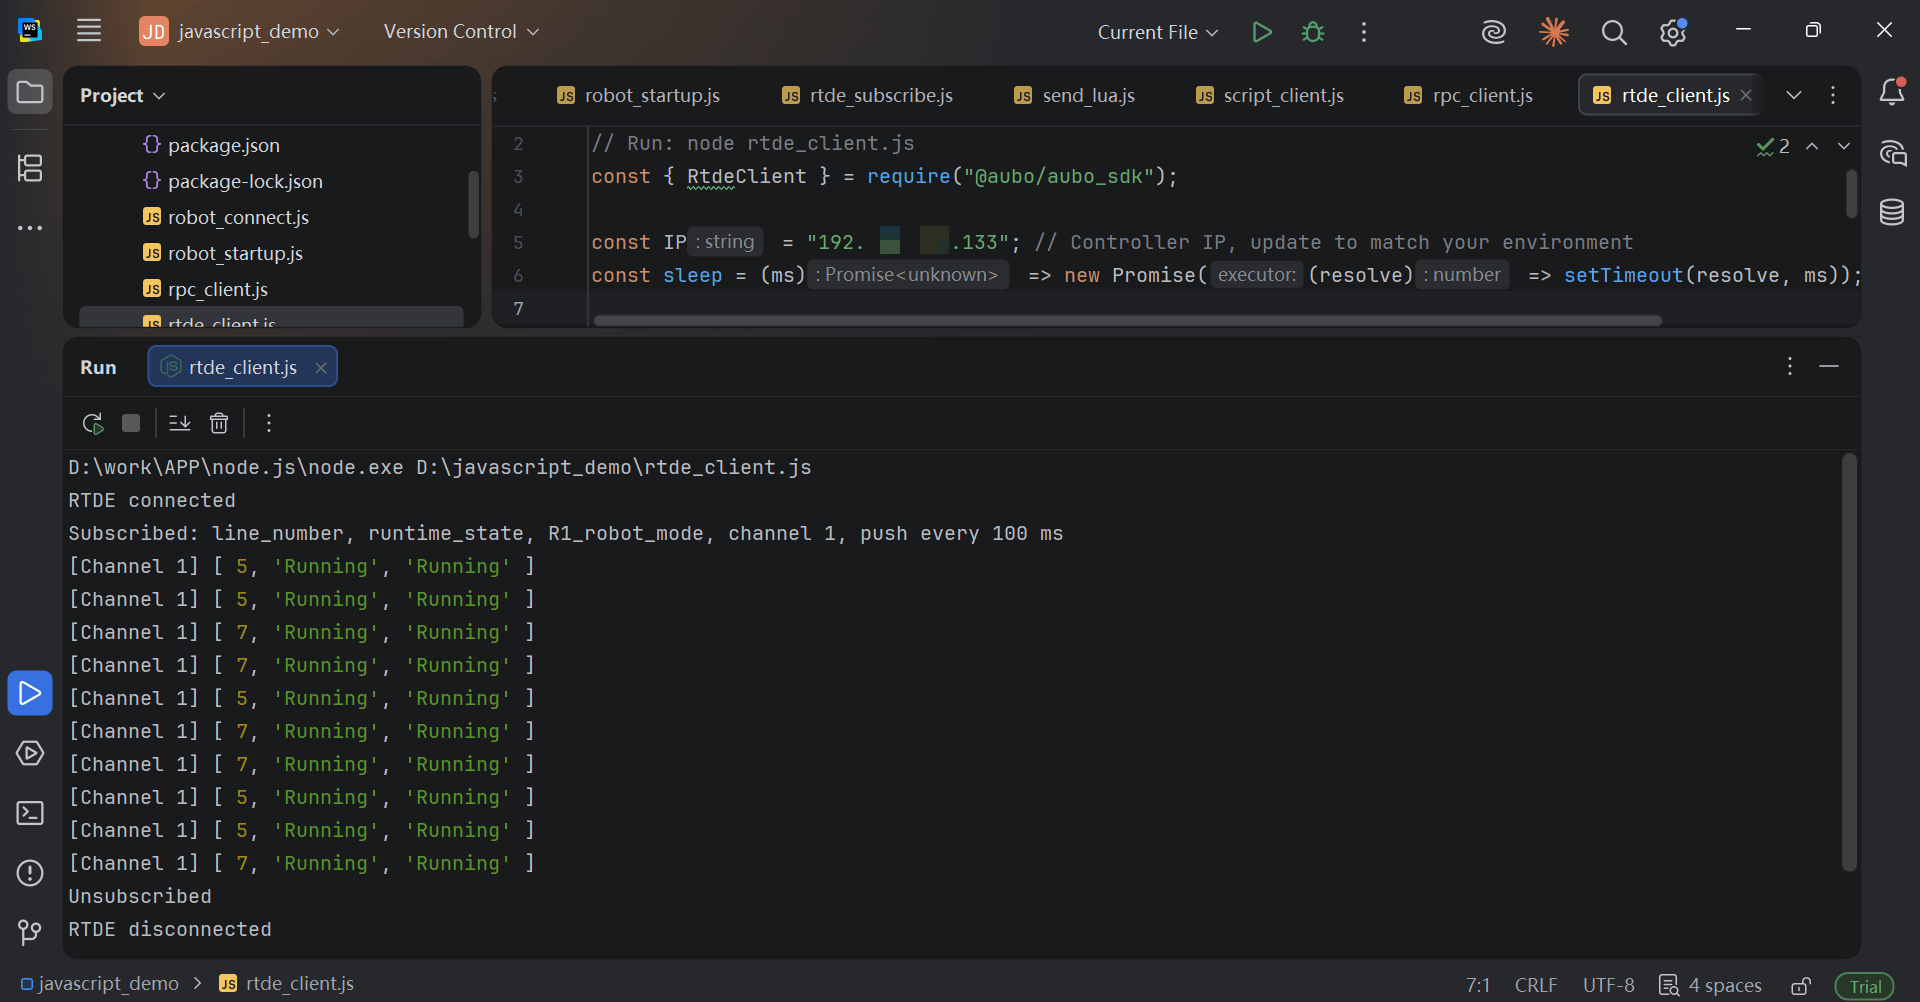
Run the example and view the terminal output.
Note:
The terminal output follows
["line_number", "runtime_state", "R1_robot_mode"].line_number: The line number of the running program.runtime_state: The controller's runtime state.R1_robot_mode: The robot mode.
Script Client Example
This example bypasses RobotProxy and uses ScriptClient directly to connect to the Script service, send a Lua script, and disconnect.
APIs
ScriptClient
connectScriptServer: Connects to the Script service (port 30003).registerScriptError: Registers a callback for script execution errors.sendScriptStrByWs: Sends and executes a Lua script through WebSocket.disconnectScriptServer: Disconnects from the Script service.
Note:
The script is executed on the controller. sendScriptStrByWs is synchronous and returns void; successful sending does not mean successful execution. Use the registerScriptError callback to determine whether execution failed.
Procedure
Create the
script_client.jsfile and add the following example code.Click to view the example code
js// Script client example: connect only to the Script service (30003) and send a Lua script // Run: node script_client.js const { ScriptClient } = require("@aubo/aubo_sdk"); const IP = "192.XXX.XXX.133"; // Controller IP; update it to match your environment const sleep = (ms) => new Promise((resolve) => setTimeout(resolve, ms)); // Lua program to send. After loading, the controller automatically calls app:start, // which runs p_Untitled_1 and sends a textmsg. // Note: textmsg is provided by the robot command environment. Select the environment // with sched.select_robot(1) before calling it. const luaScript = ` local app = {} local aubo = require('aubo') local sched = sched or aubo.sched function p_Untitled_1() local _ENV = sched.select_robot(1) -- Get the robot command environment, including textmsg textmsg("Hello from ScriptClient") end function app:start(api) -- Startup callback, called automatically by the controller self.api = api p_Untitled_1() end return app -- The program object must be returned `; async function main() { const script = new ScriptClient(); try { // Connect to the Script service if (!(await script.connectScriptServer(IP, 30003))) { throw new Error("Script connection failed"); } console.log("Script connected"); // Register the script error callback. This is optional but recommended. // The callback is invoked when script execution fails on the controller. script.registerScriptError((error) => { console.error("Script execution error: ", error); }); // Send the script through WebSocket script.sendScriptStrByWs(luaScript); console.log("Lua script sent"); // Wait for script execution and possible error callbacks await sleep(3000); } finally { // Disconnect from the Script service await script.disconnectScriptServer(); console.log("Script disconnected"); } } main().catch((error) => { console.error("Script client example failed: ", error.message); process.exitCode = 1; });Run the example and check the terminal for the Lua script sent message.
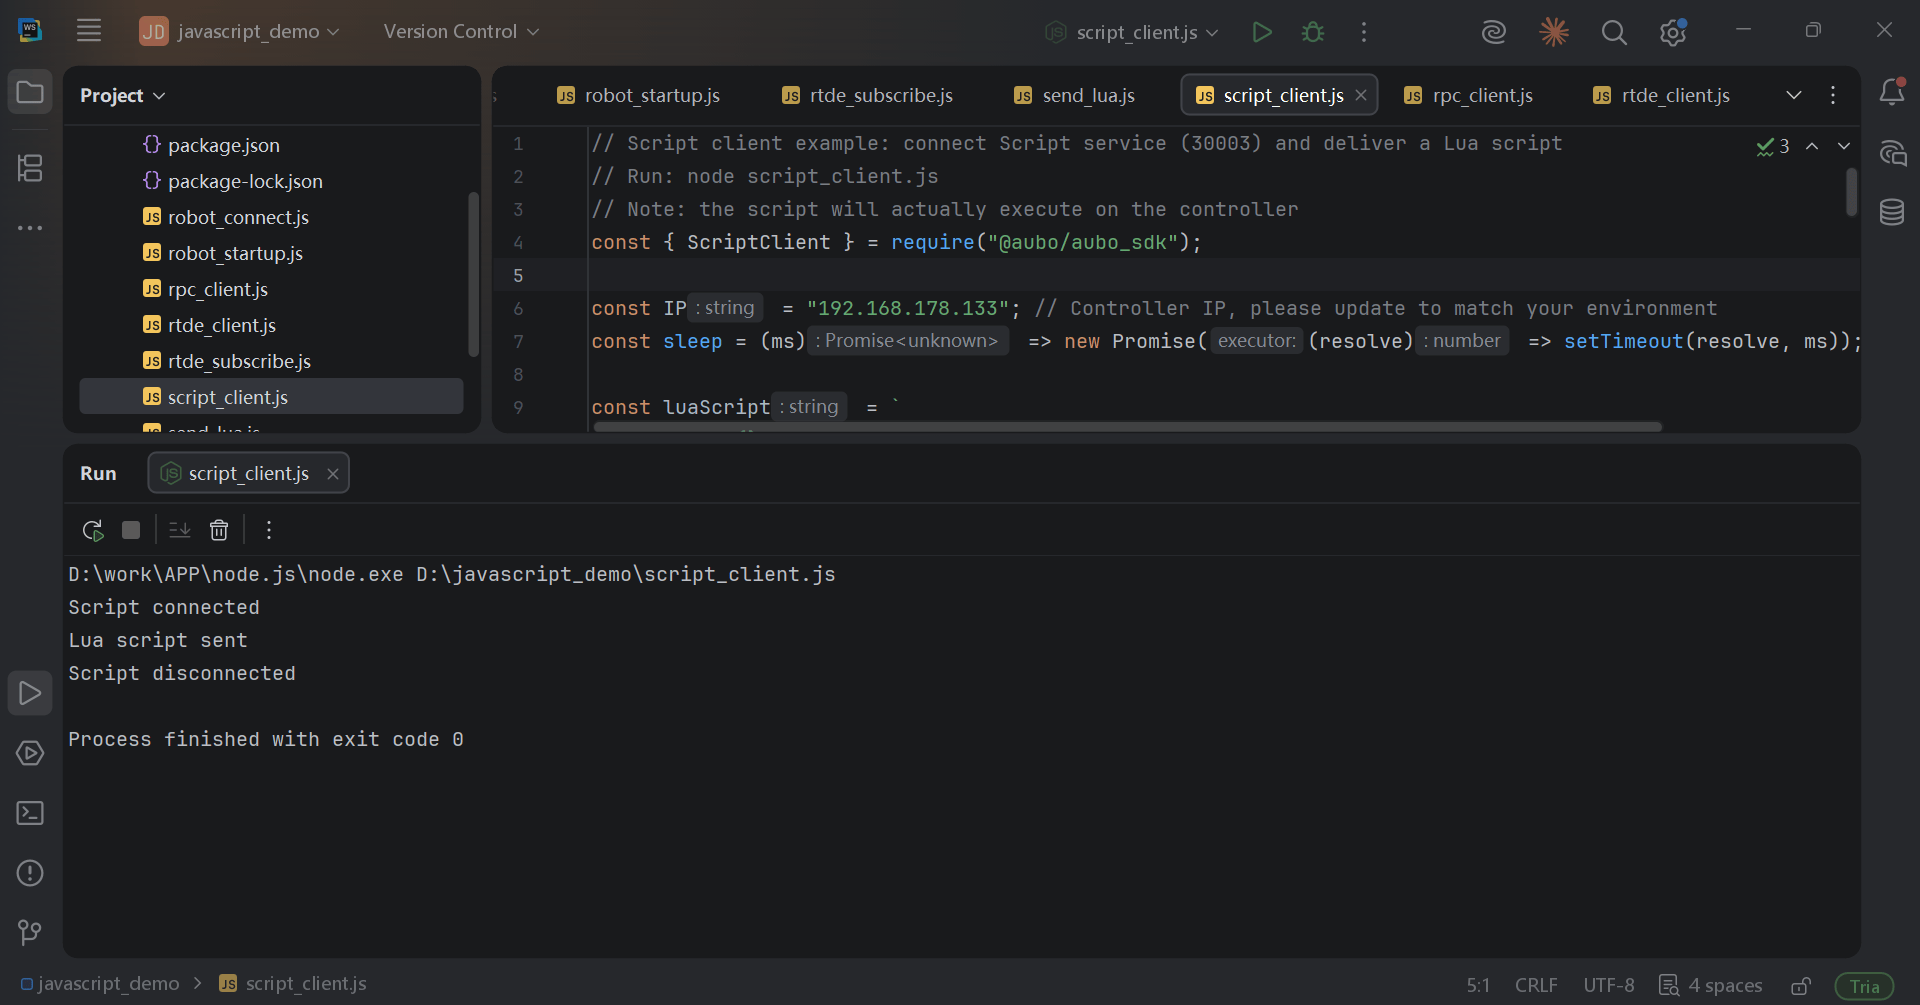
View the log in the AuboStudio APP to see the Lua script debug message.
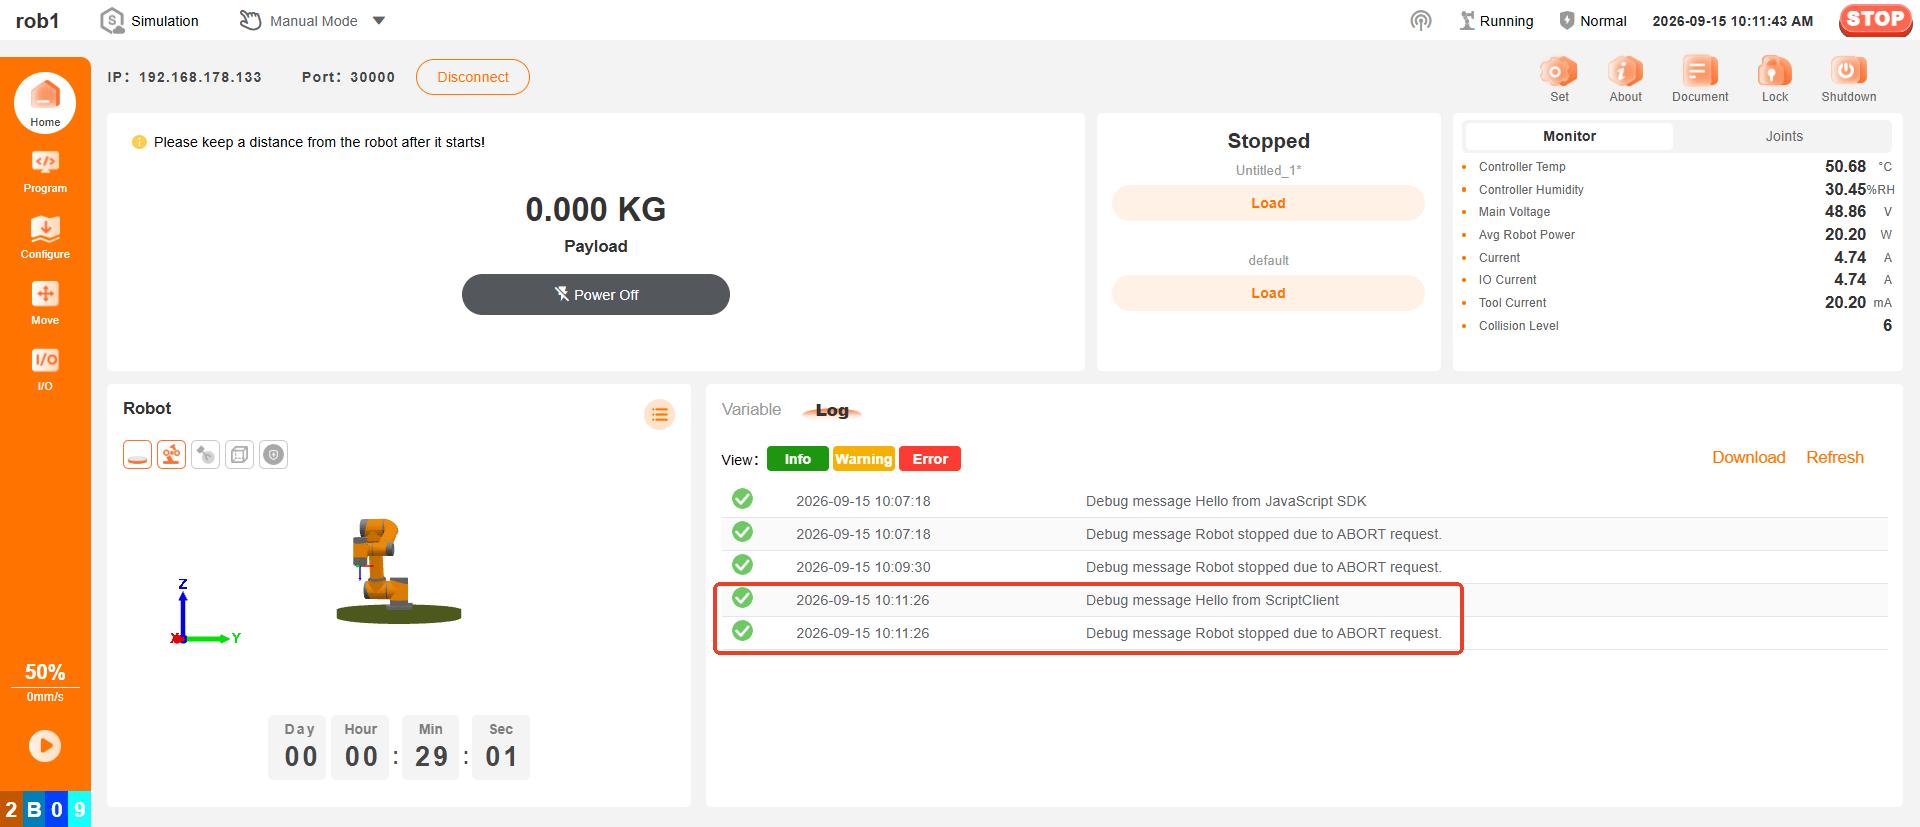
API Summary
Common Interfaces of RobotProxy:
Category Common APIs Connection connectServer(),hasConnect(),disConnectFromServer()Session login(),logout(),getRobotNames(),selectRobot()Robot state getRobotState(),getCurrentRobotName(),getRobotIndex()Robot control getRobotManage(),getMotionControl(),getIoControl(),getForceControl()Configuration and algorithms getRobotConfig(),getRobotAlgorithm(),getMath()Controller interfaces getRuntimeMachine(),getRegisterControl(),getSystemInfo()Real-time data addRtdeTopicCallback(),batchAddRtdeTopicCallbacks(),deleteRtdeTopicCallbacks()Scripts sendScriptStrByWs(),sendScriptStrByHttp(),registerScriptError()For individual clients, see the
RpcClient,RtdeClient,ScriptClient, andRobotInterfacesections above.