AUBOPE to ARCS Upgrade Guide (Maintenance Paused)
Please operate this tutorial under the guidance of technical support. Unauthorized operation may cause damage to the system or hardware, which may lead to loss of warranty qualification.
1. Making u disk system startup disk
Take Windows 10 family Chinese version system as an example.
1.Prepare an empty u disk.
2.download Ventoy
Ventoy is easy to use and supports Windows and Linux. Here, take the Windows version as an example.
download link:https://aubocdn.aubo-robotics.cn/build_system/ventoy-1.0.73-windows.zip
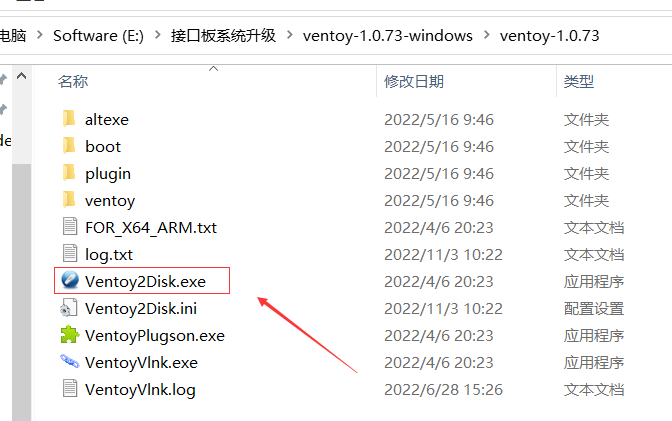
Insert the USB flash drive, take the ventoy-1.0.73-windows.zip version as an example, unzip it and run the Ventoy2Disk.exe executable file, select your USB flash drive device as shown below:
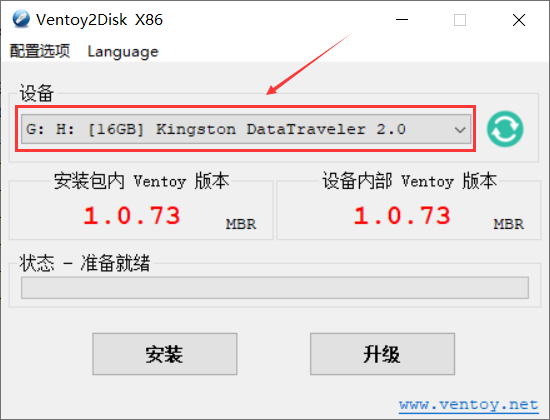
Click Install to start Ventoy installation, the USB flash drive will be formatted, all the data inside will be lost, so USB flash drive files remember to back up, do not choose the wrong USB flash drive.
3.Download the xubuntu image
xubuntu 16.04 download link:https://aubocdn.aubo-robotics.cn/build_system/iso/xubuntu-16.04.3-rt94-amd64.iso
xubuntu 22.04 download link:https://aubocdn.aubo-robotics.cn/build_system/iso/xubuntu-22.04.3-rt71-amd64.iso
Copy the ISO image file into the USB flash drive, either into the root directory of the USB flash drive or into a specified directory. The ISO file name should not be in Chinese, the directory should not be in Chinese, and the ISO file should not be put into too deep a directory, the USB flash disk boot disk creation is complete.


2. Install the operating system
Install xubuntu-16.04.3
1.Turn off the power of the demonstrator and insert the USB flash disk with the system boot disk in the control cabinet.
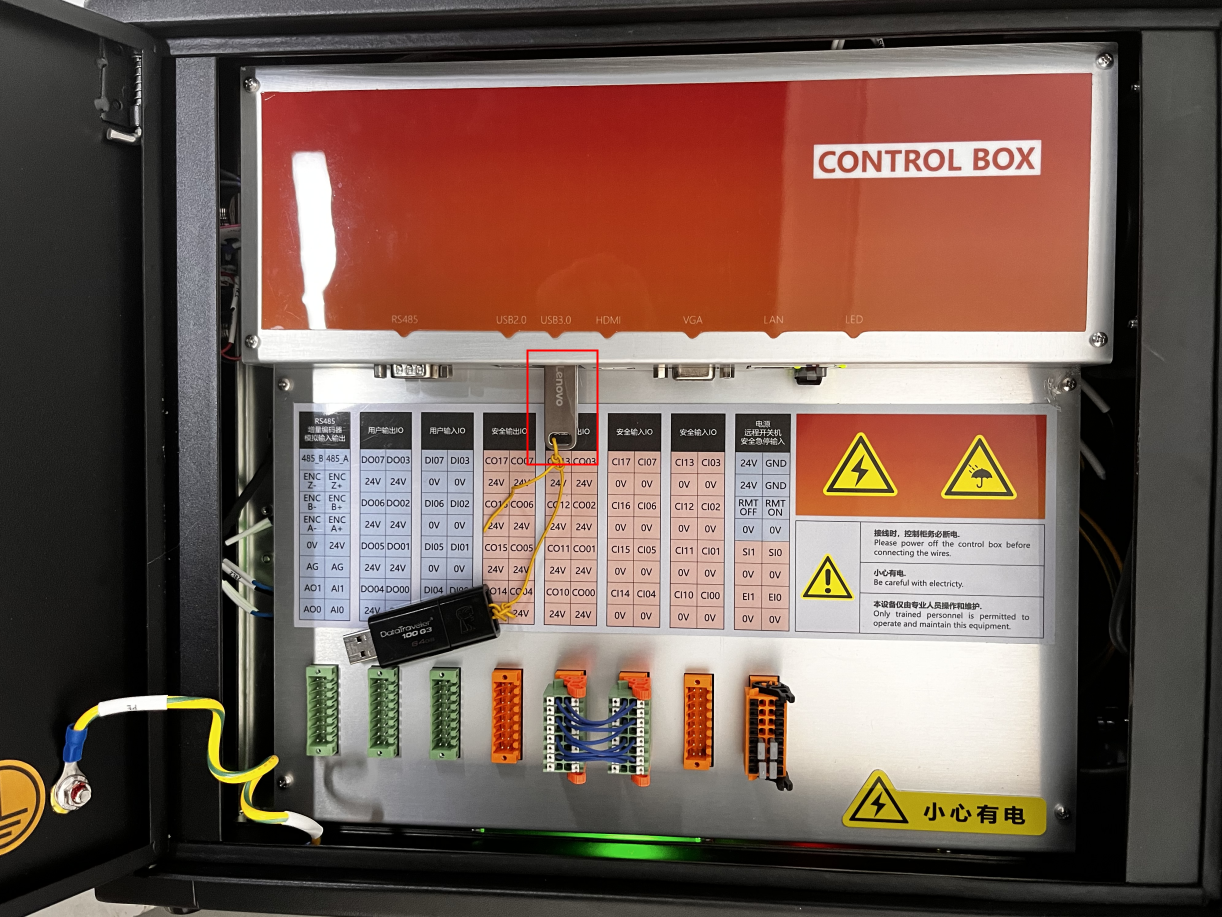
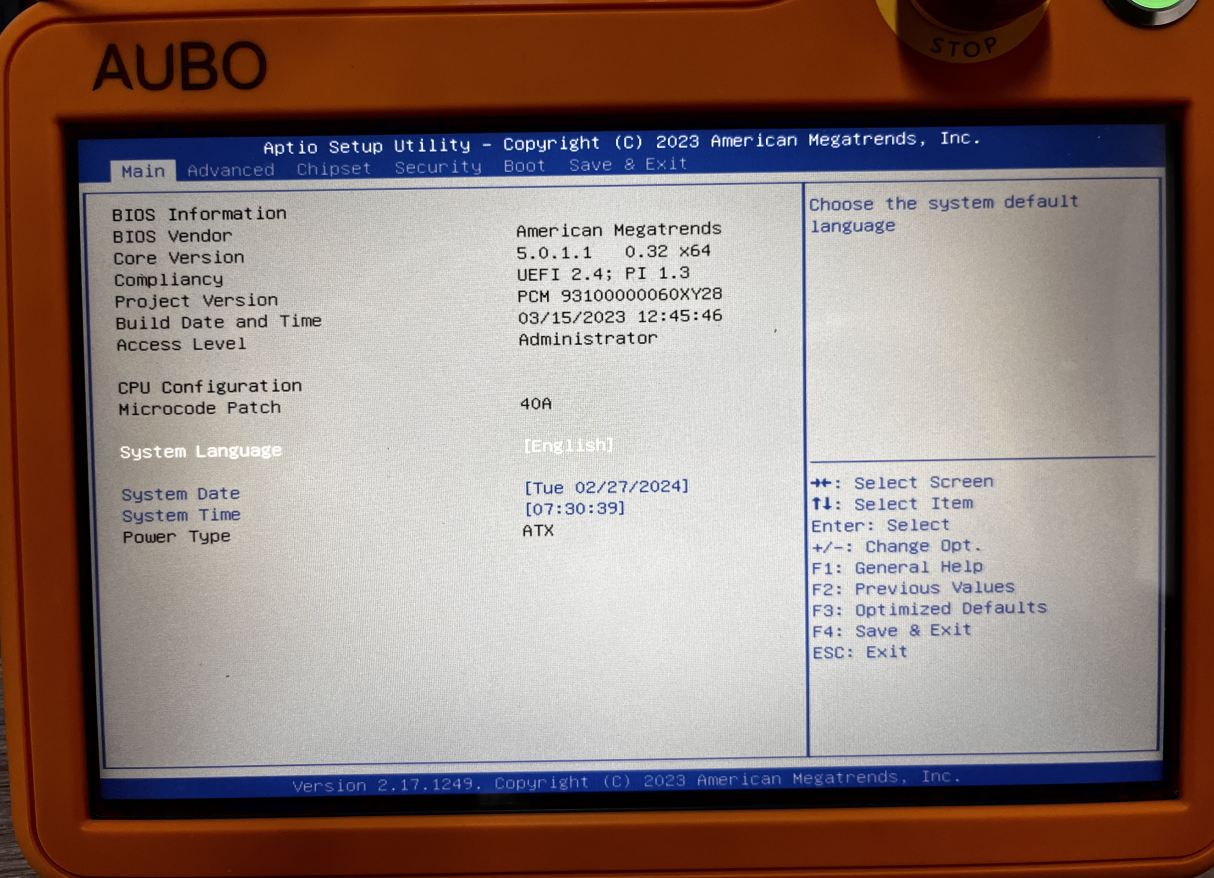
2.Plug in the keyboard and start the demonstrator. When the following pattern is displayed on the demonstrator
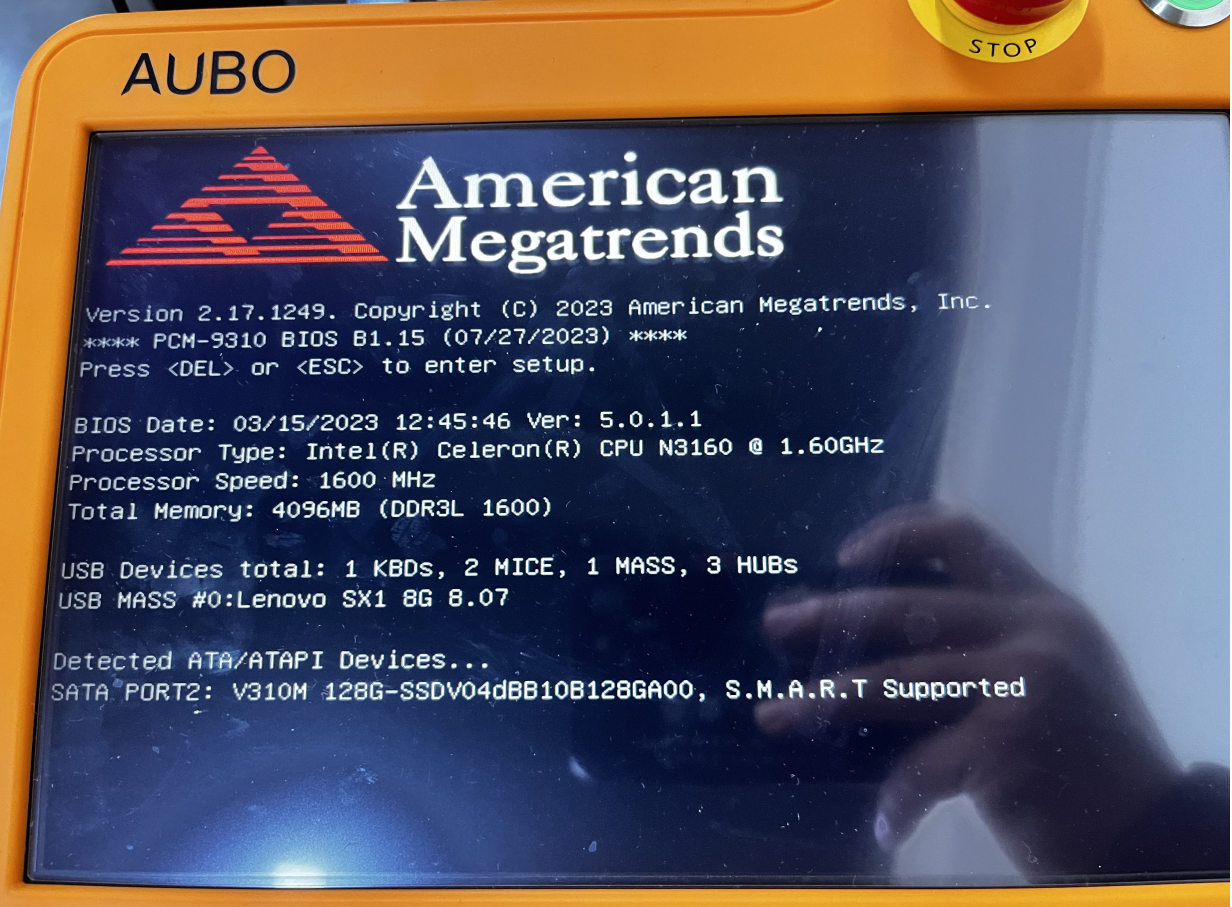
Click the Delete on the keyboard continuously immediately until entering the BIOS (different devices enter the BIOS in different ways).
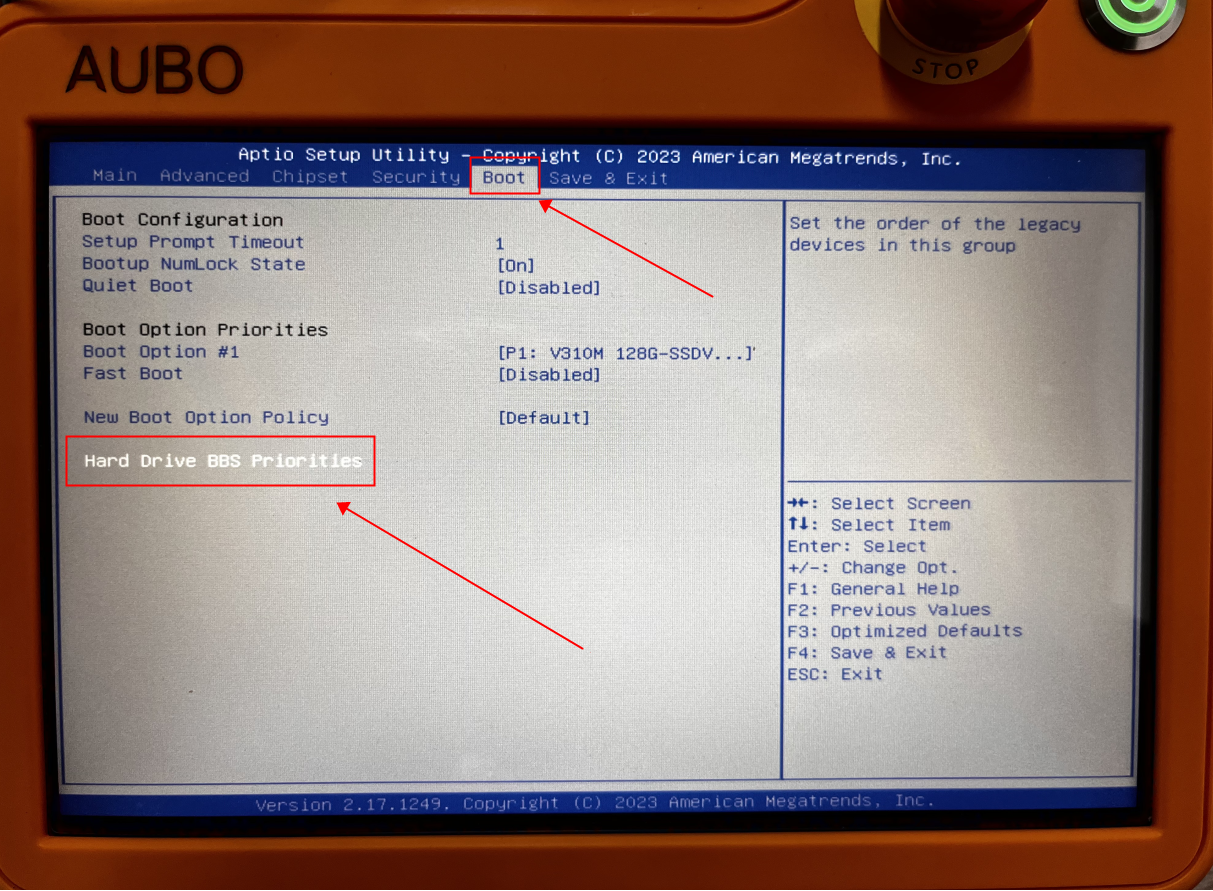
Switch to the Boot page and select Hard Drive BBS Priorities and enter.
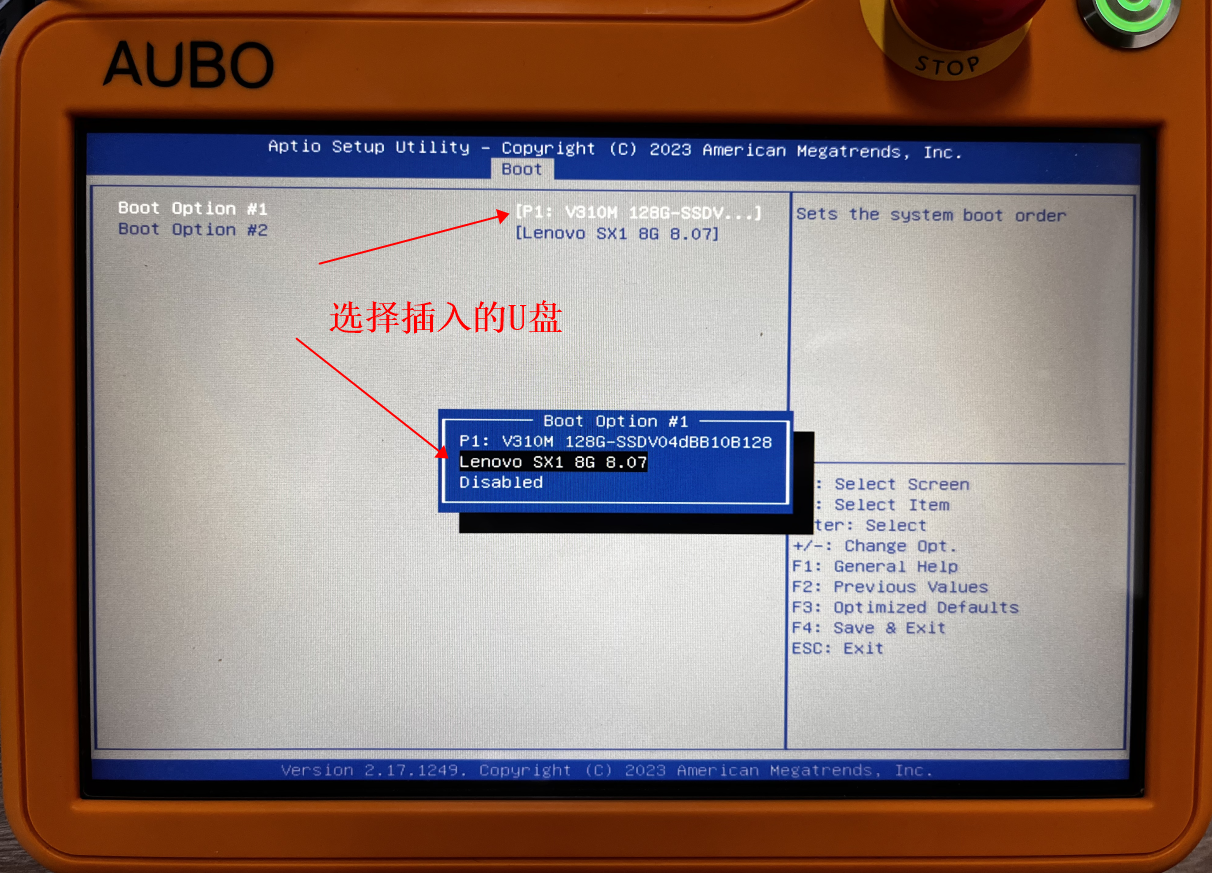
Select the startup item Boot Option #1 to switch to the name of the inserted USB flash drive (here, the inserted U disk Lenovo is taken as an example), and press enter.
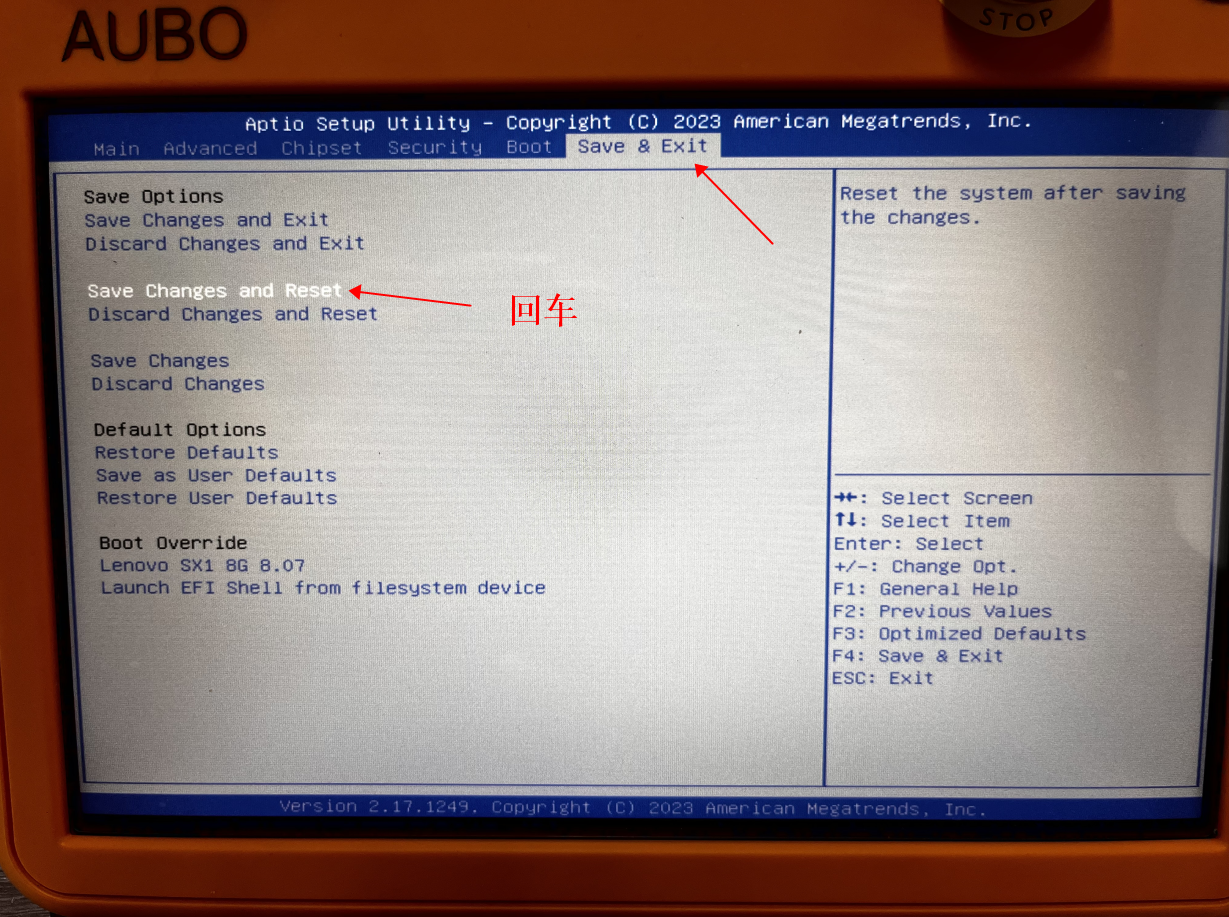
After completing the settings, switch to Save & Exit and select Save Changes and Reset, then enter and select Yes to turn off the demonstrator.
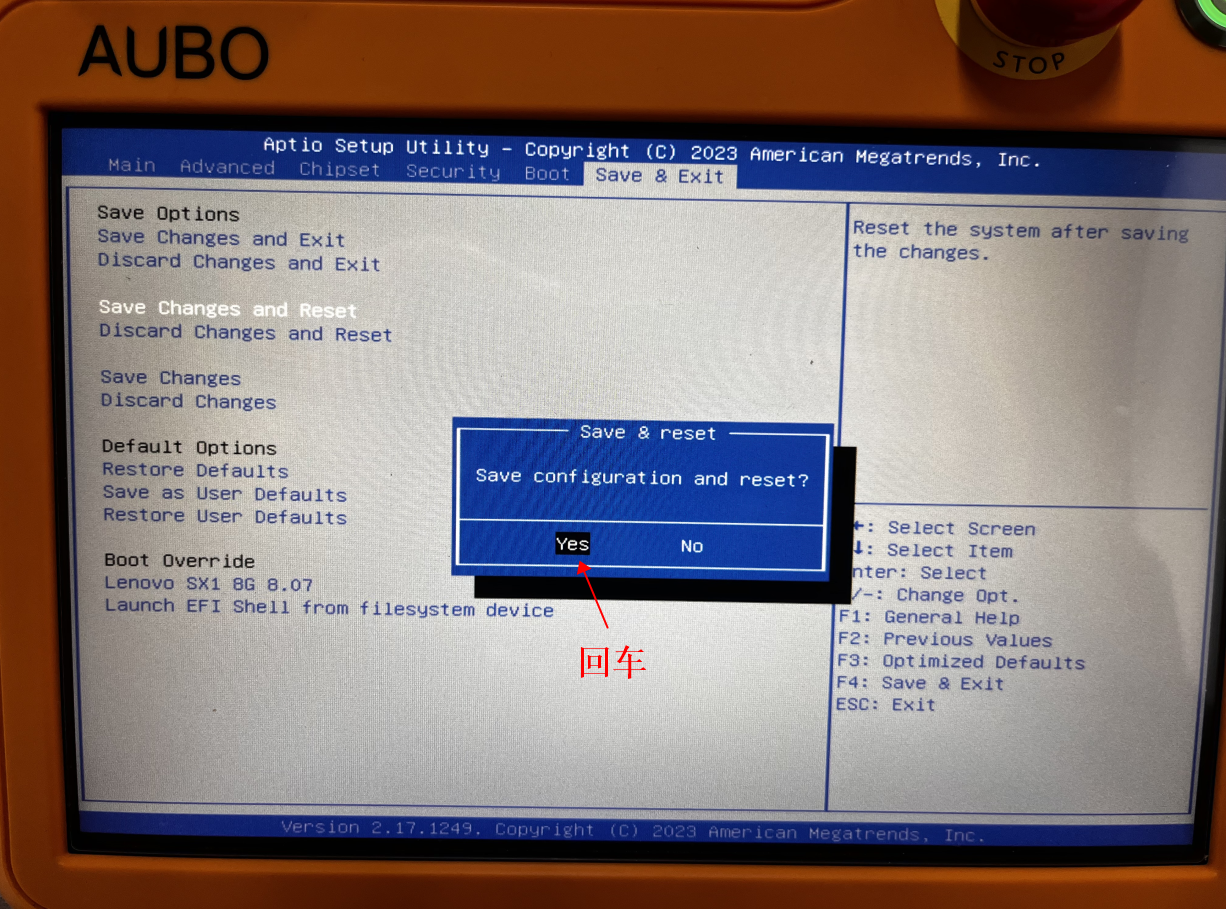
3.Install xubuntu
Start the tutorial again, select xubuntu-16.04.3-rt94-amd64.iso and enter to install the xubuntu system.
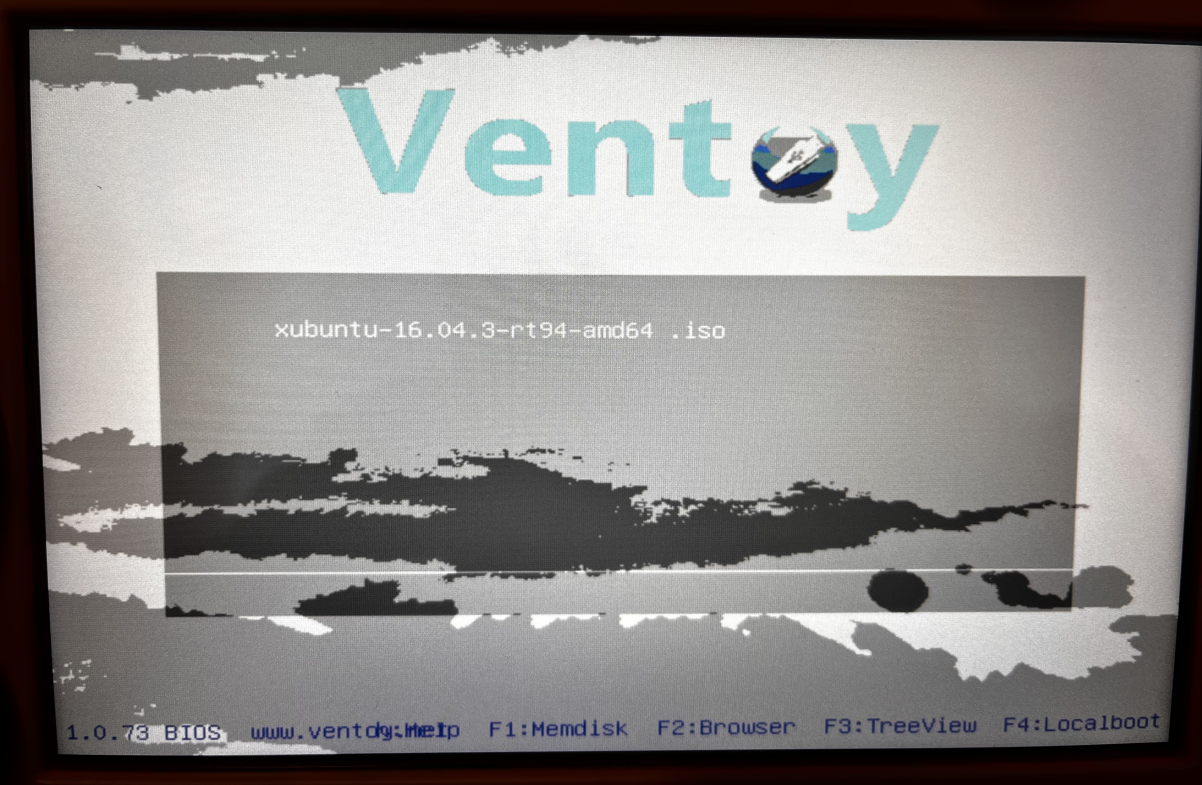
The installation process is as follows:
Click Install Xubuntu
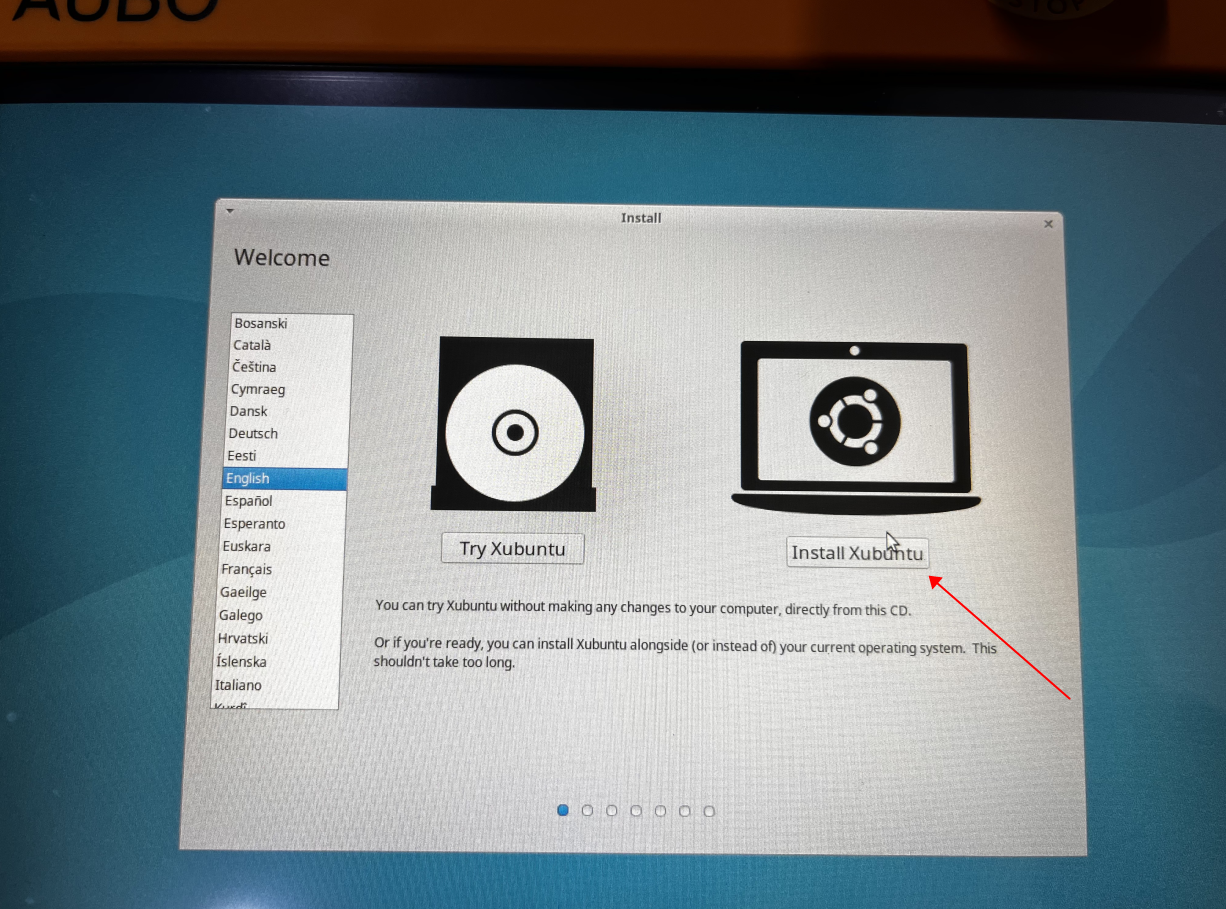
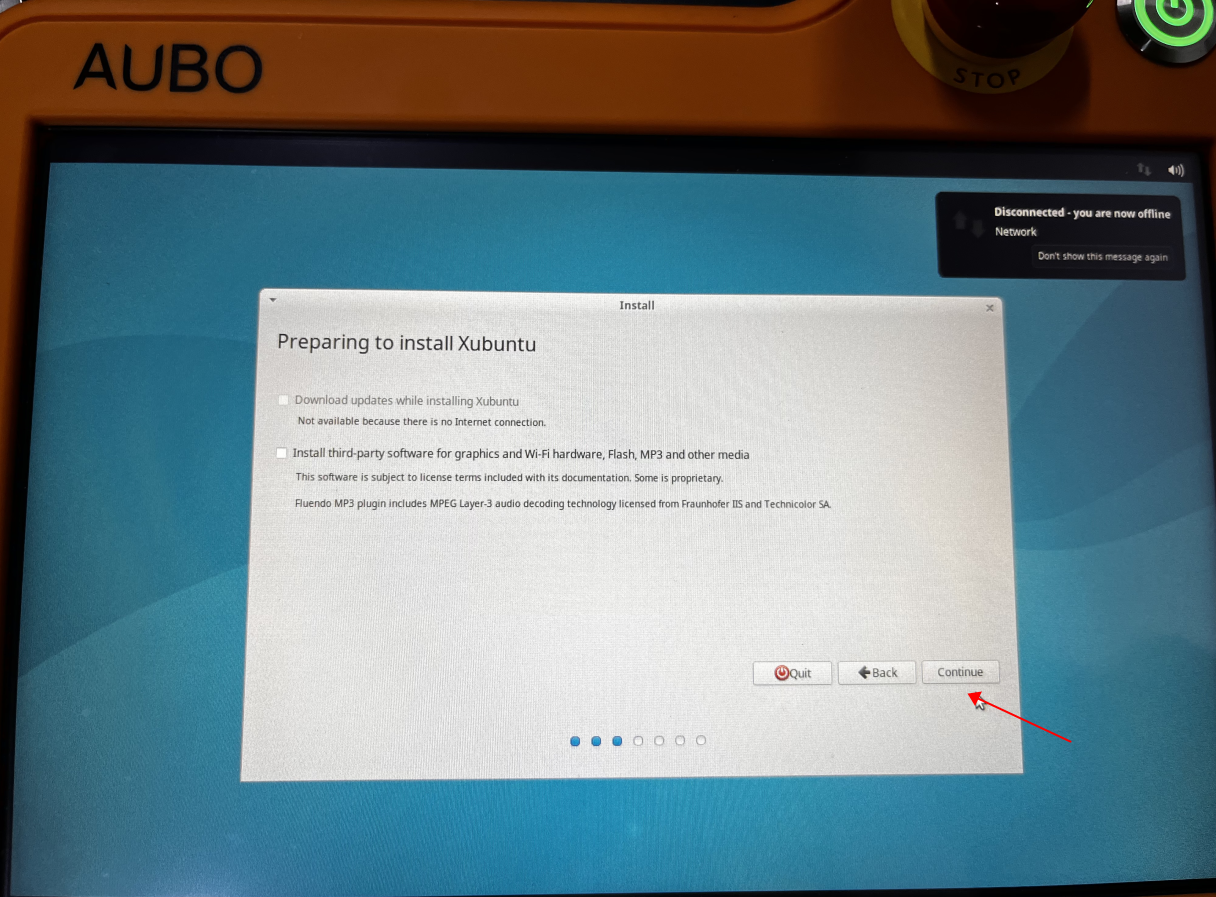
Click Erase Disk and install xubuntu
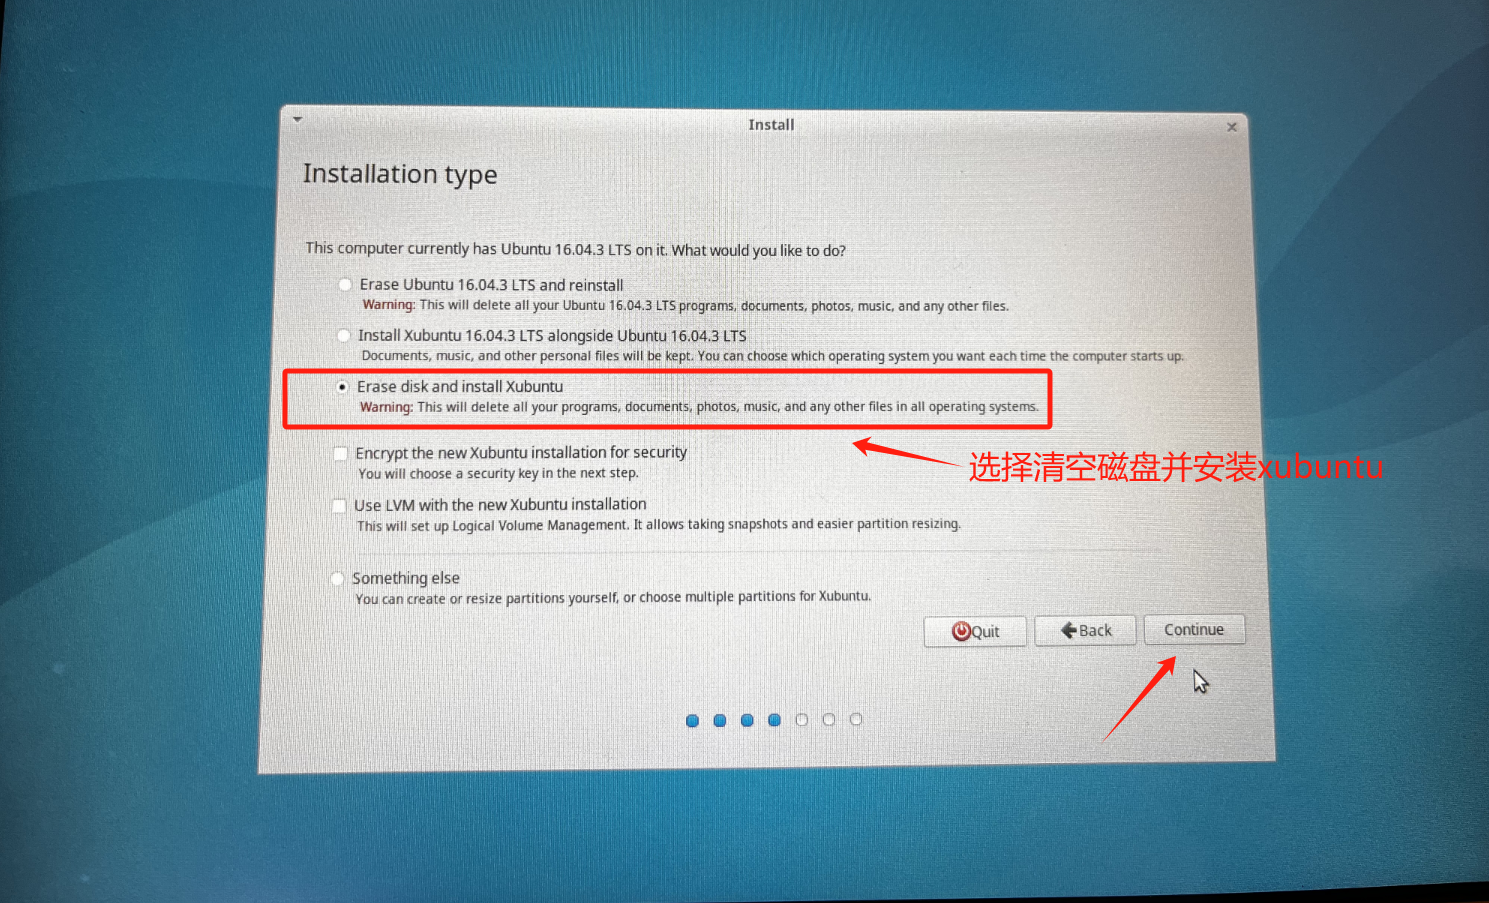
Note: Select the system to be installed on the hard disk of the control cabinet, and do not select the inserted U disk.
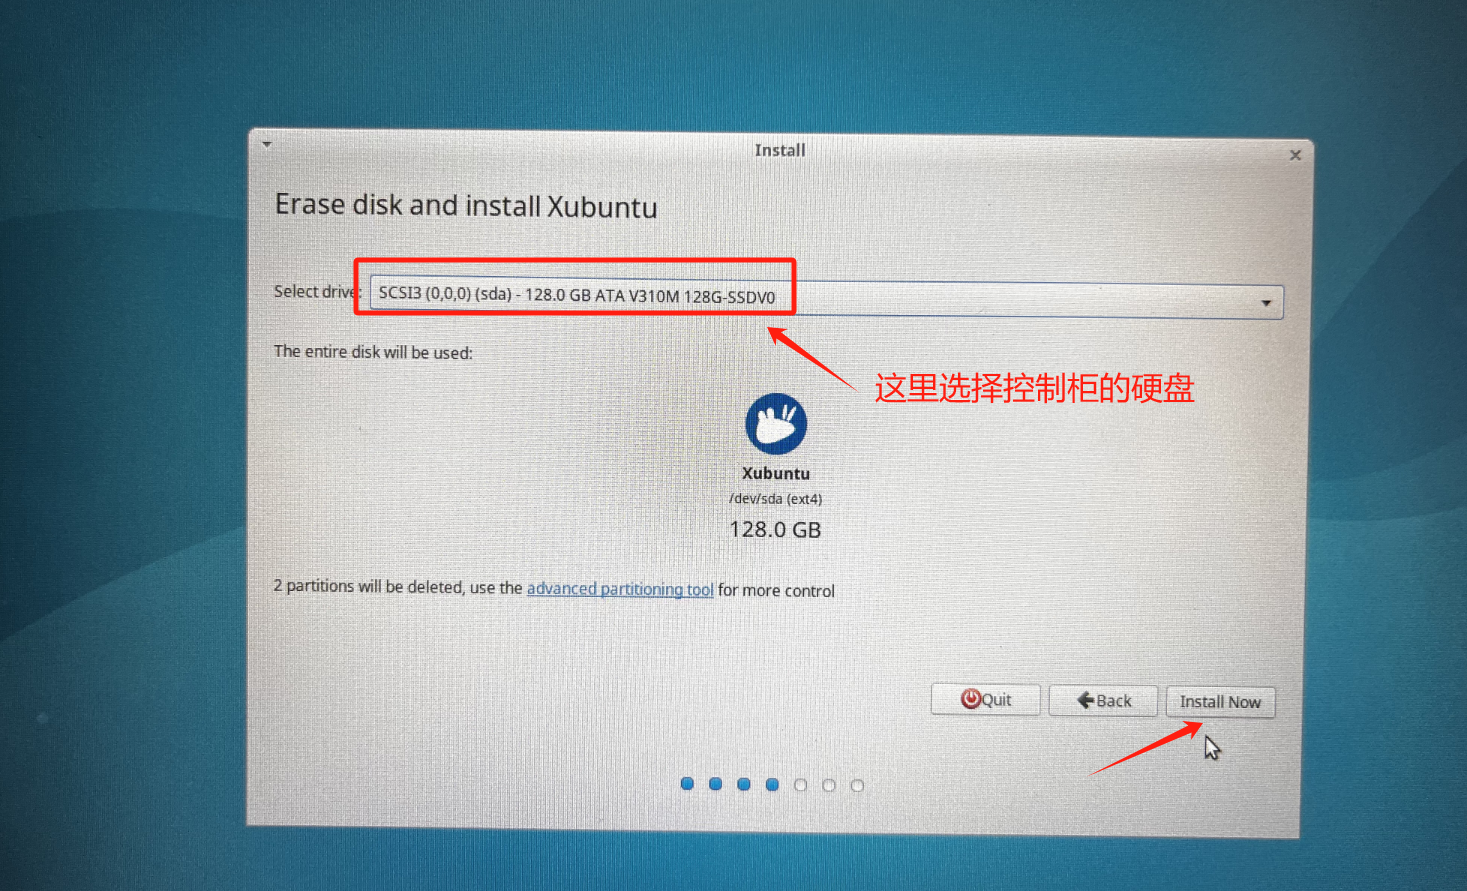

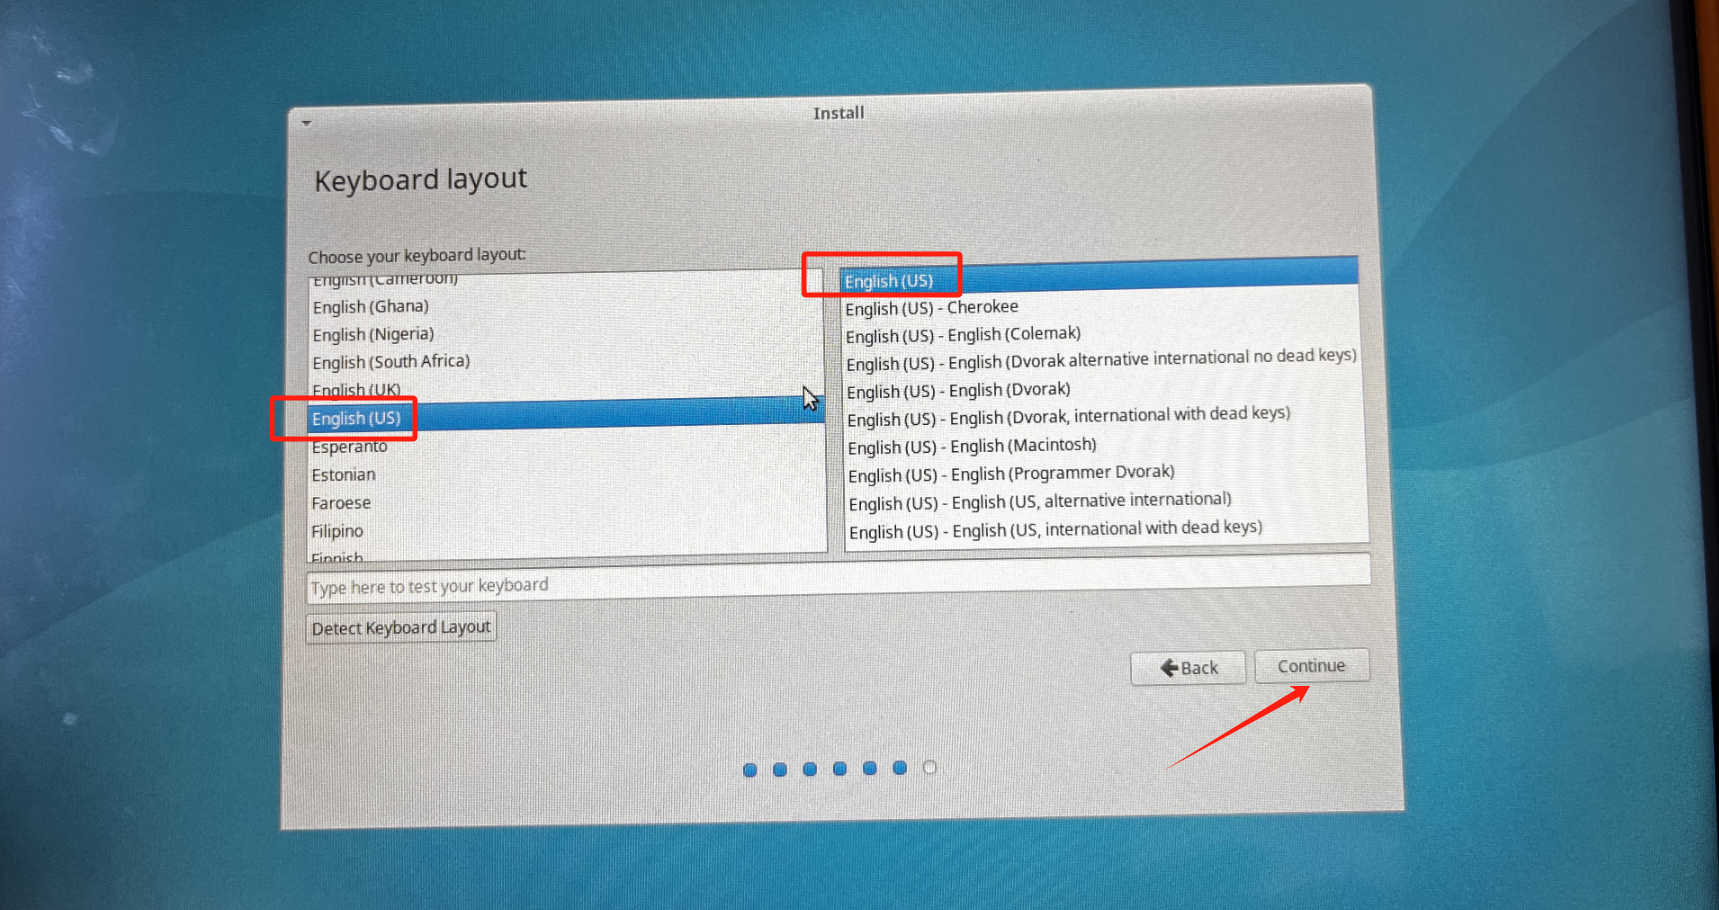
Select a region and click Continue

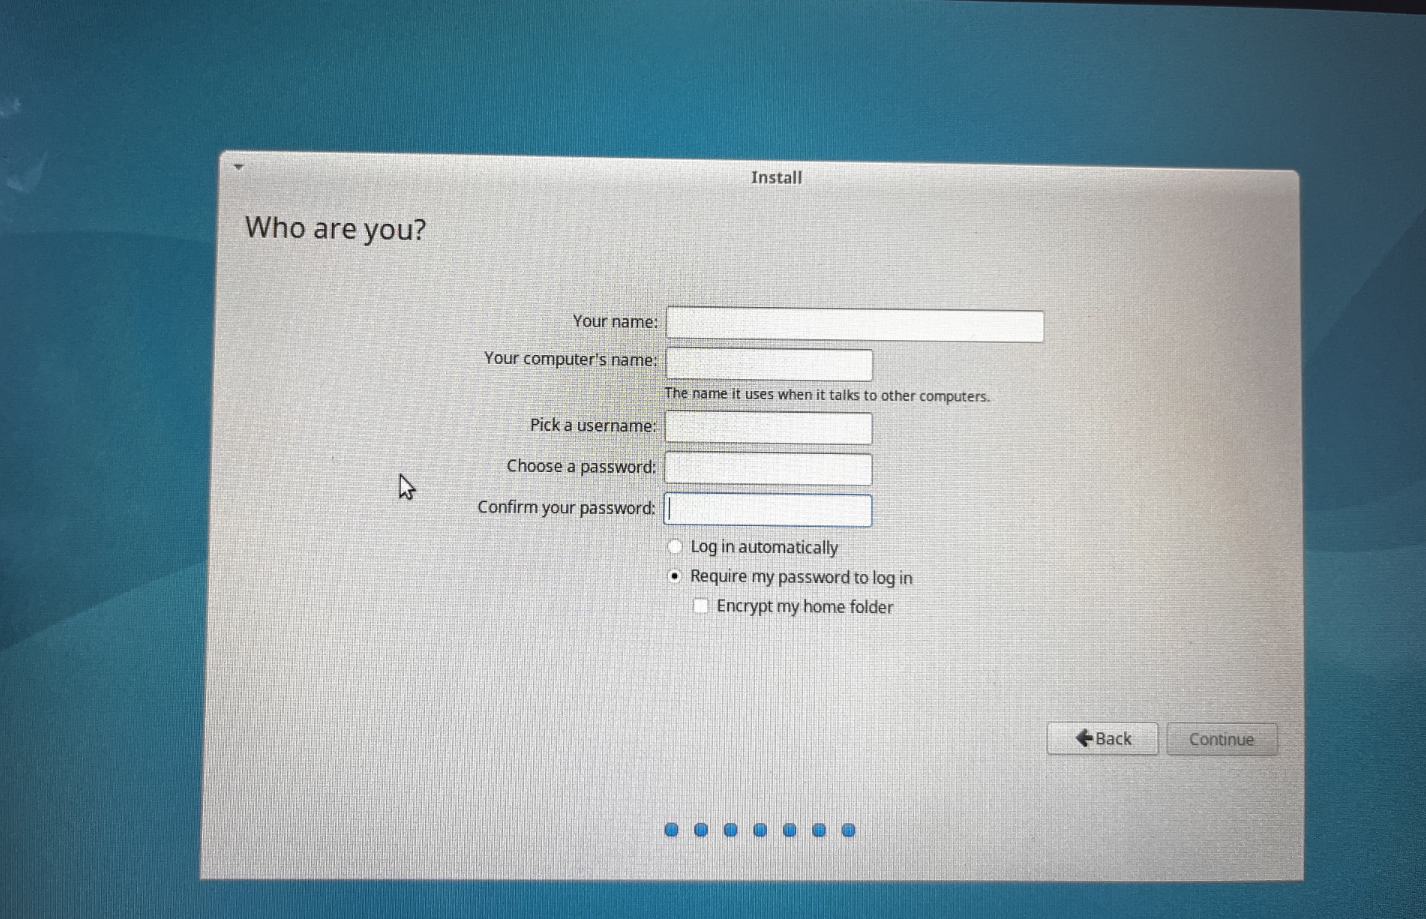
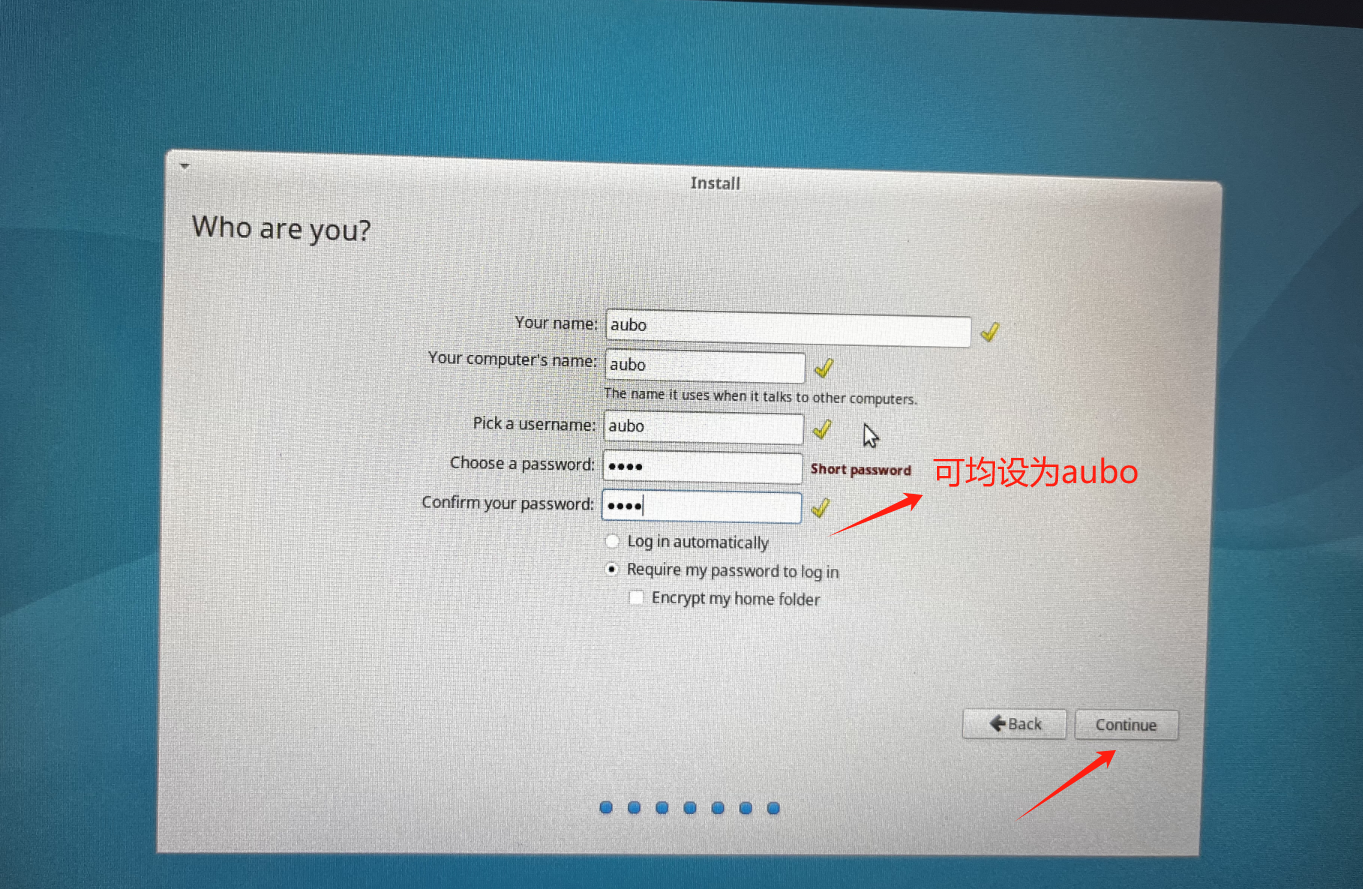
Your name、Your computer's name、Pick a username、Choose a password、Confirm your password can be set to aubo, click Continue after setting.
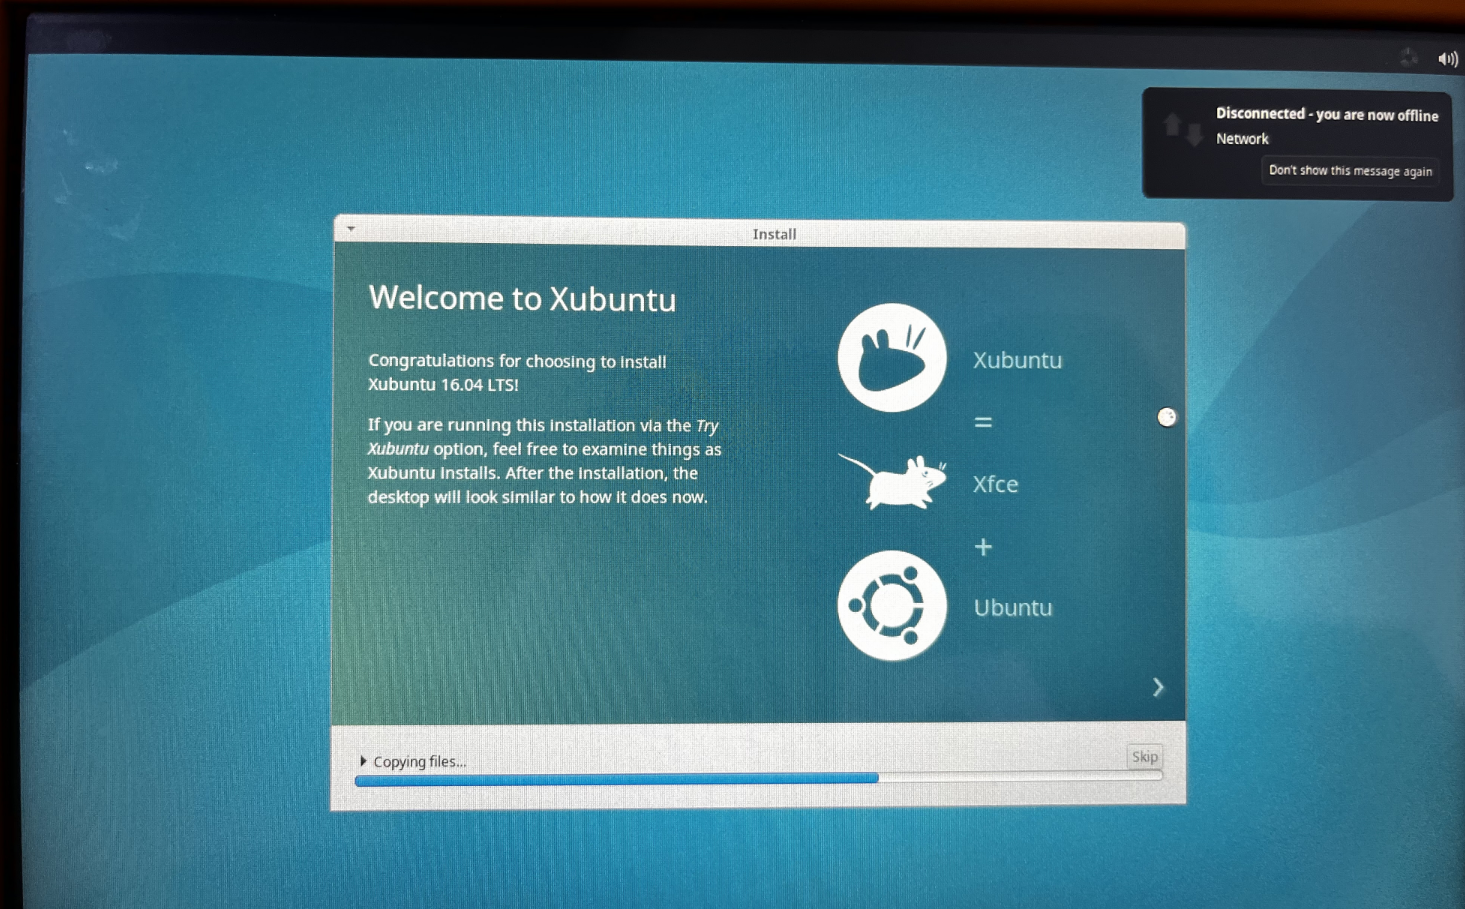
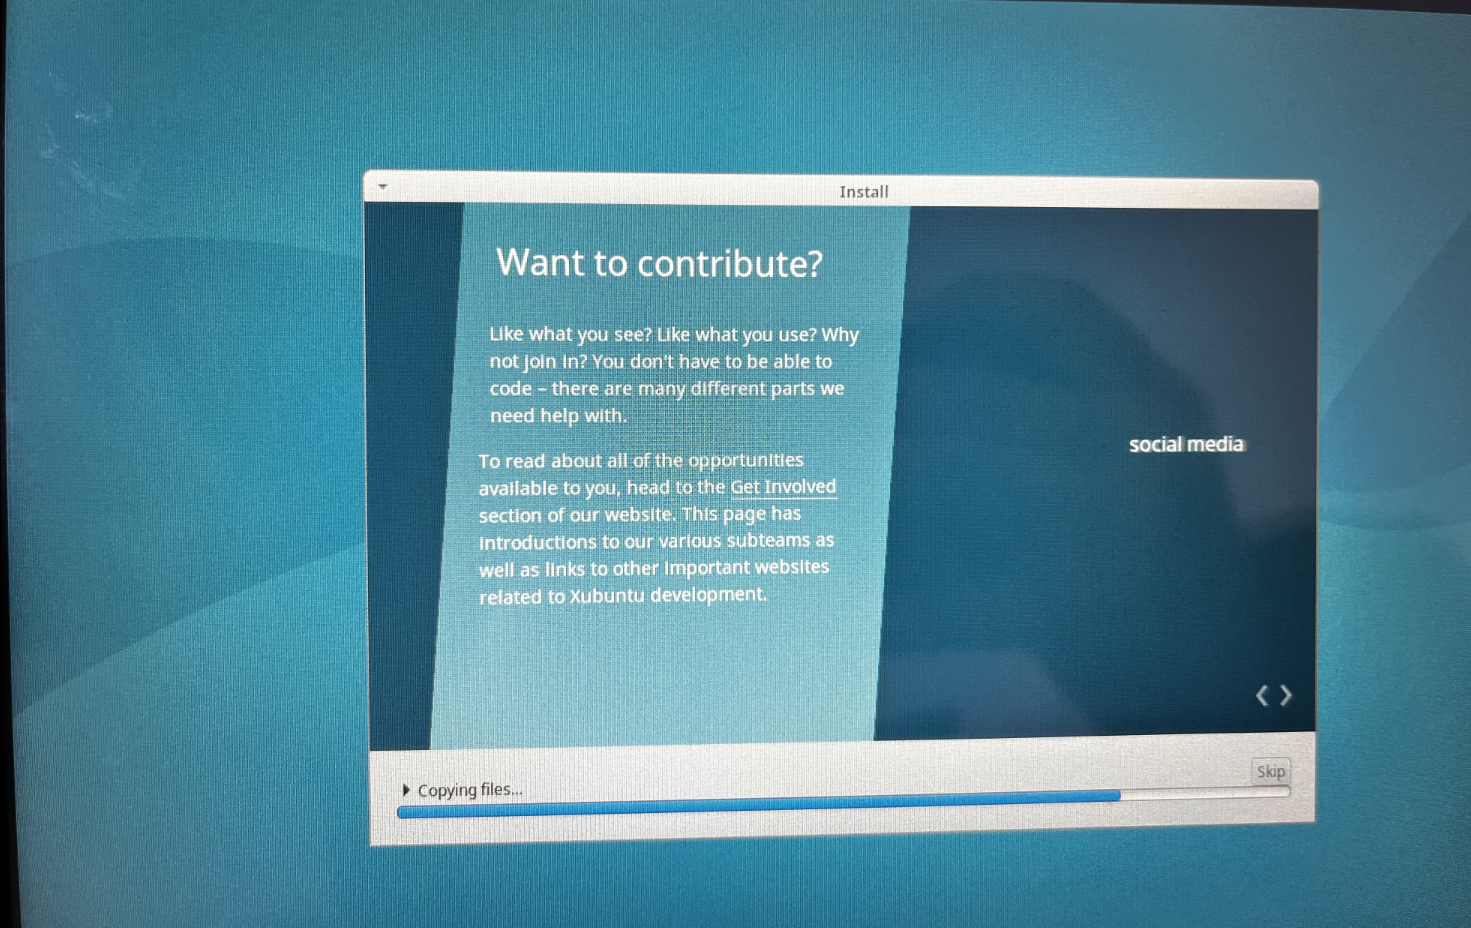
Wait for the installation of xubuntu system to be completed. If the screen is off, touch the screen slightly.
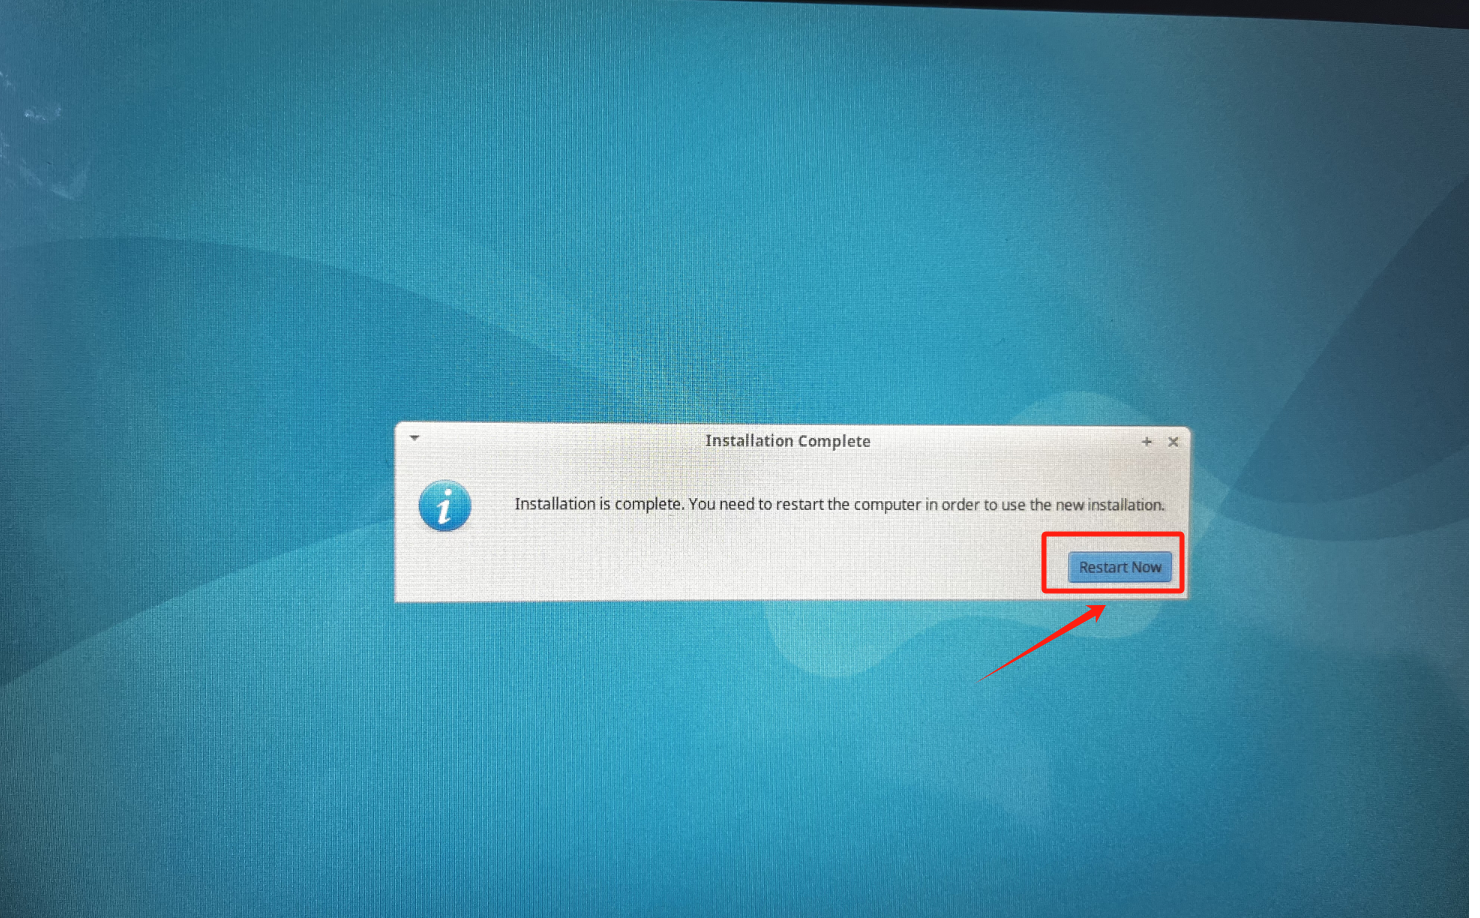
When the following picture appears, click Restart Now to turn the trainer off and immediately pull the USB flash drive from the control cabinet.
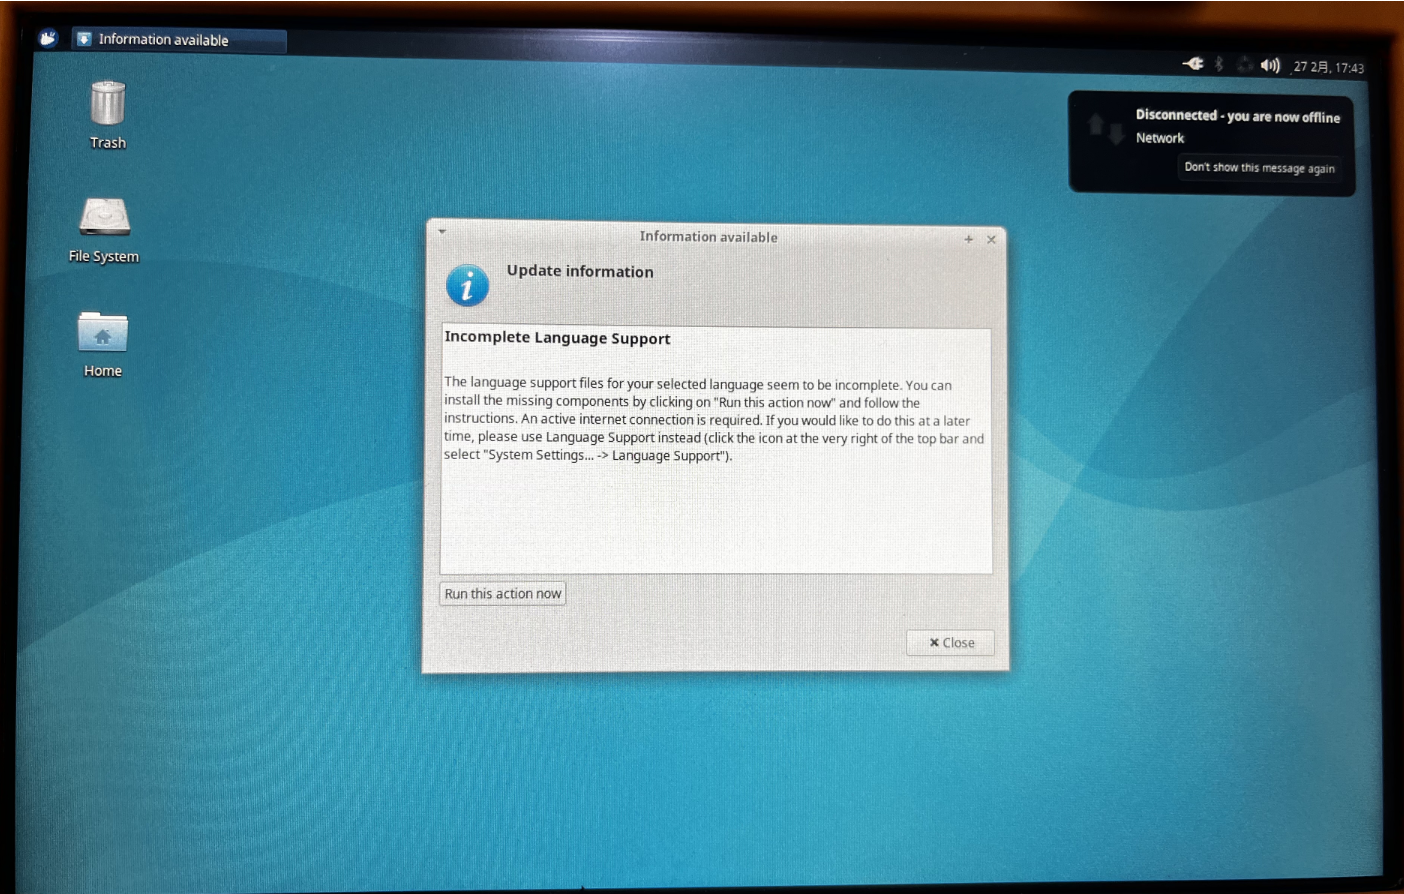
Start the tutor again and enter the login password aubo to enter the xubuntu interface and complete the installation of xubuntu.

Install xubuntu-22.04.3
1.Turn off the power of the demonstrator and insert the USB flash disk with the system boot disk in the control cabinet.
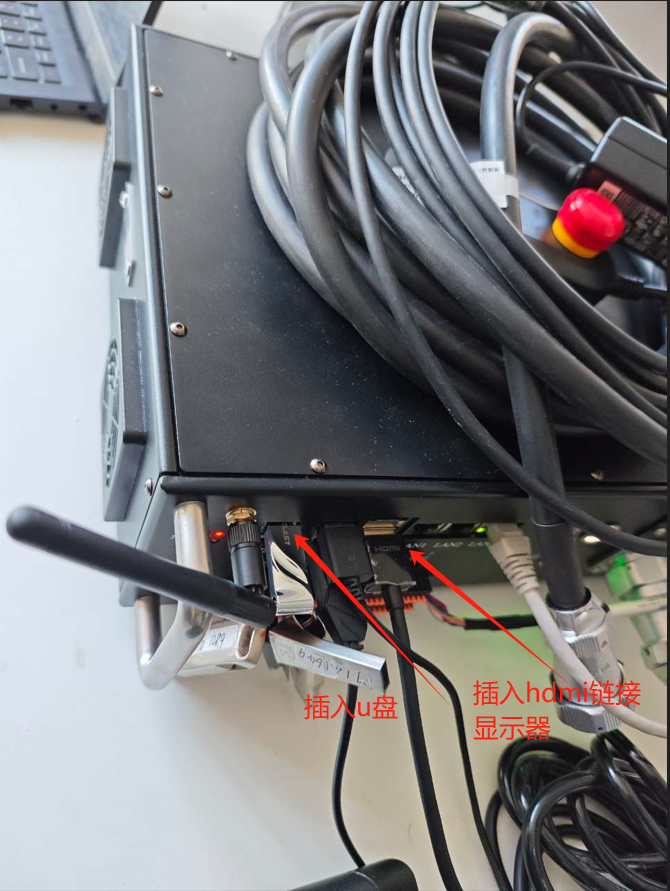
2.Plug in the keyboard and connect the monitor. When the following pattern appears on the display

Press the Delete button on the keyboard repeatedly immediately until entering the BIOS (different devices enter the BIOS in different ways).
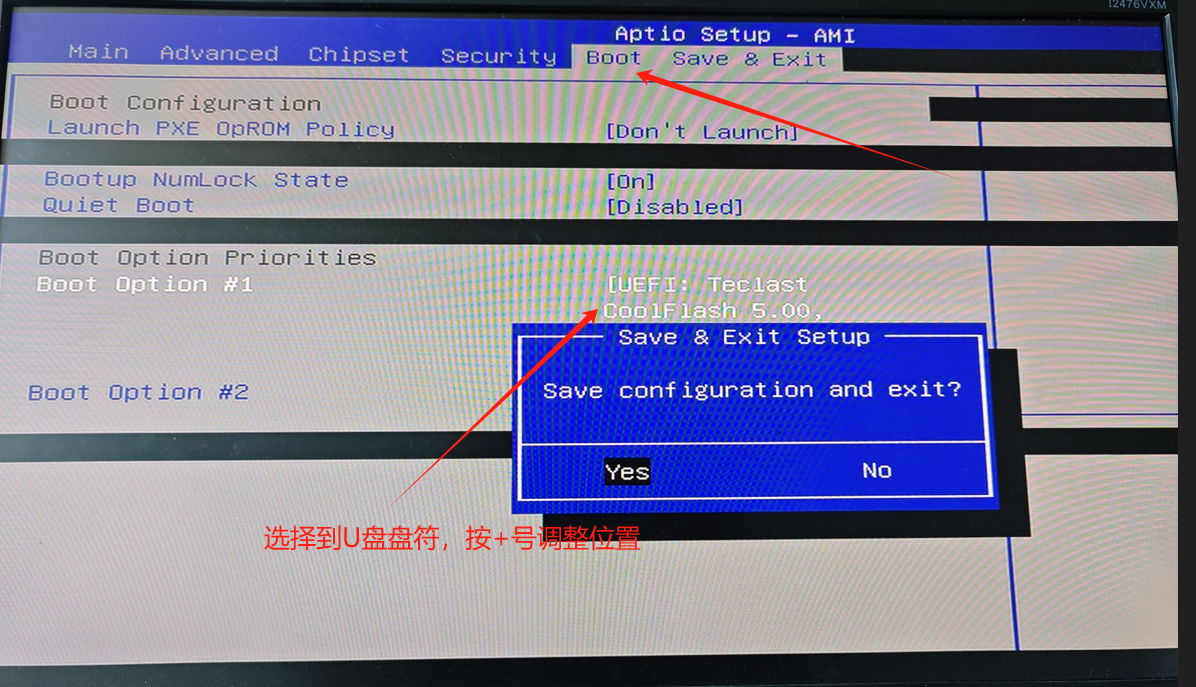
Switch to the Boot page, move to the Boot Option and insert the USB flash drive name position press the + sign to adjust the boot position, place it on top of the system disk, press F4 on the keyboard to select yes to save and exit.
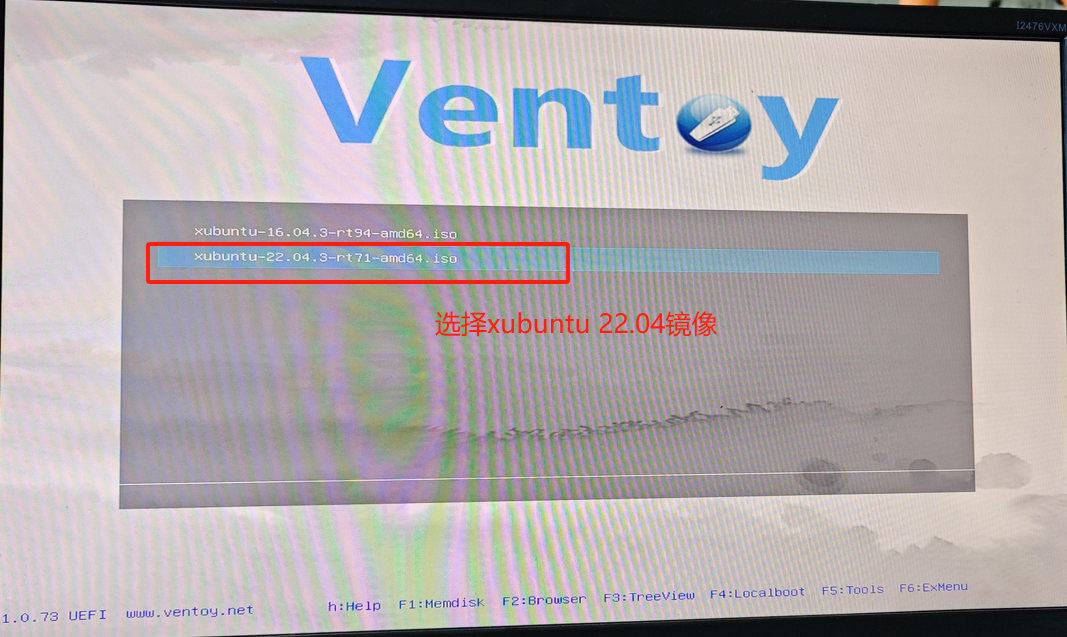
3.Install xubuntu
Start the tutorial again, select xubuntu-22.04.3-rt94-amd64.iso and enter to install the xubuntu system.

The installation process is as follows:
Select Install Xubuntu
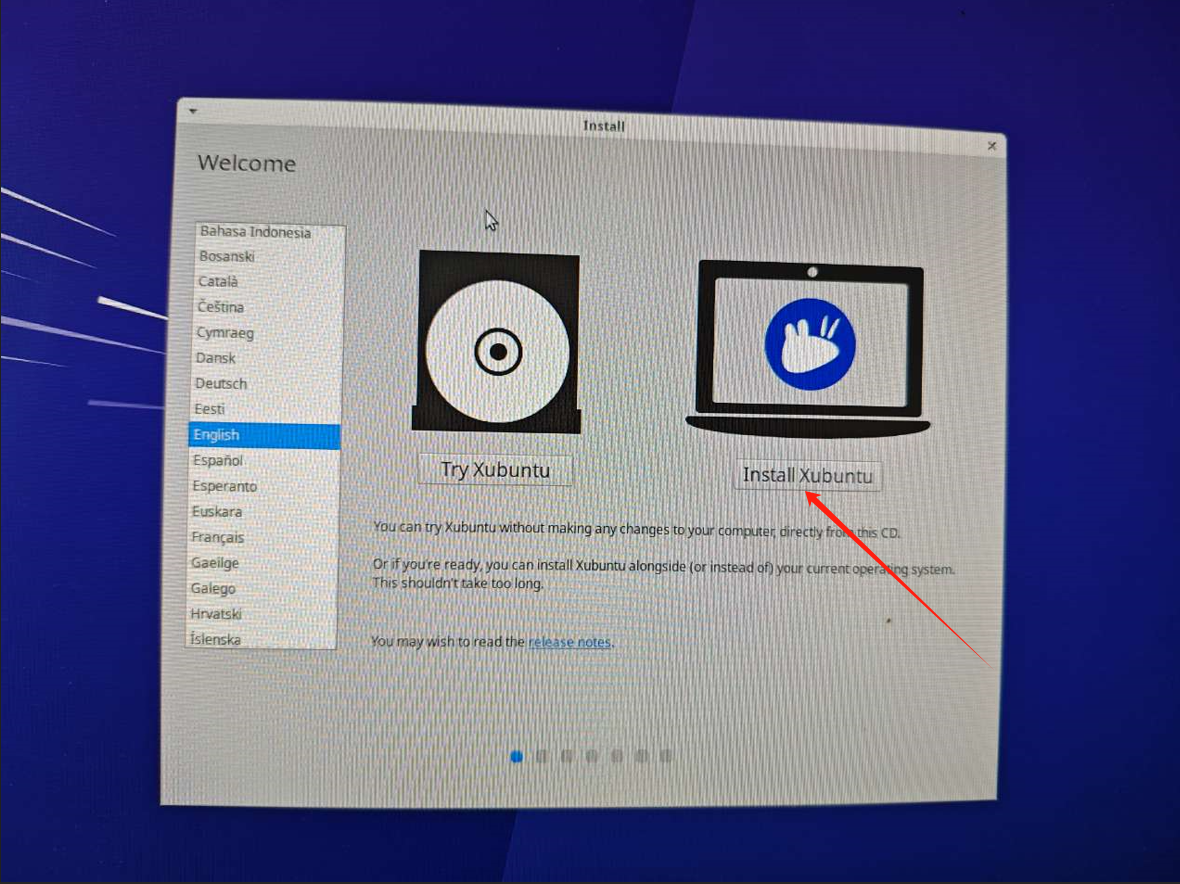
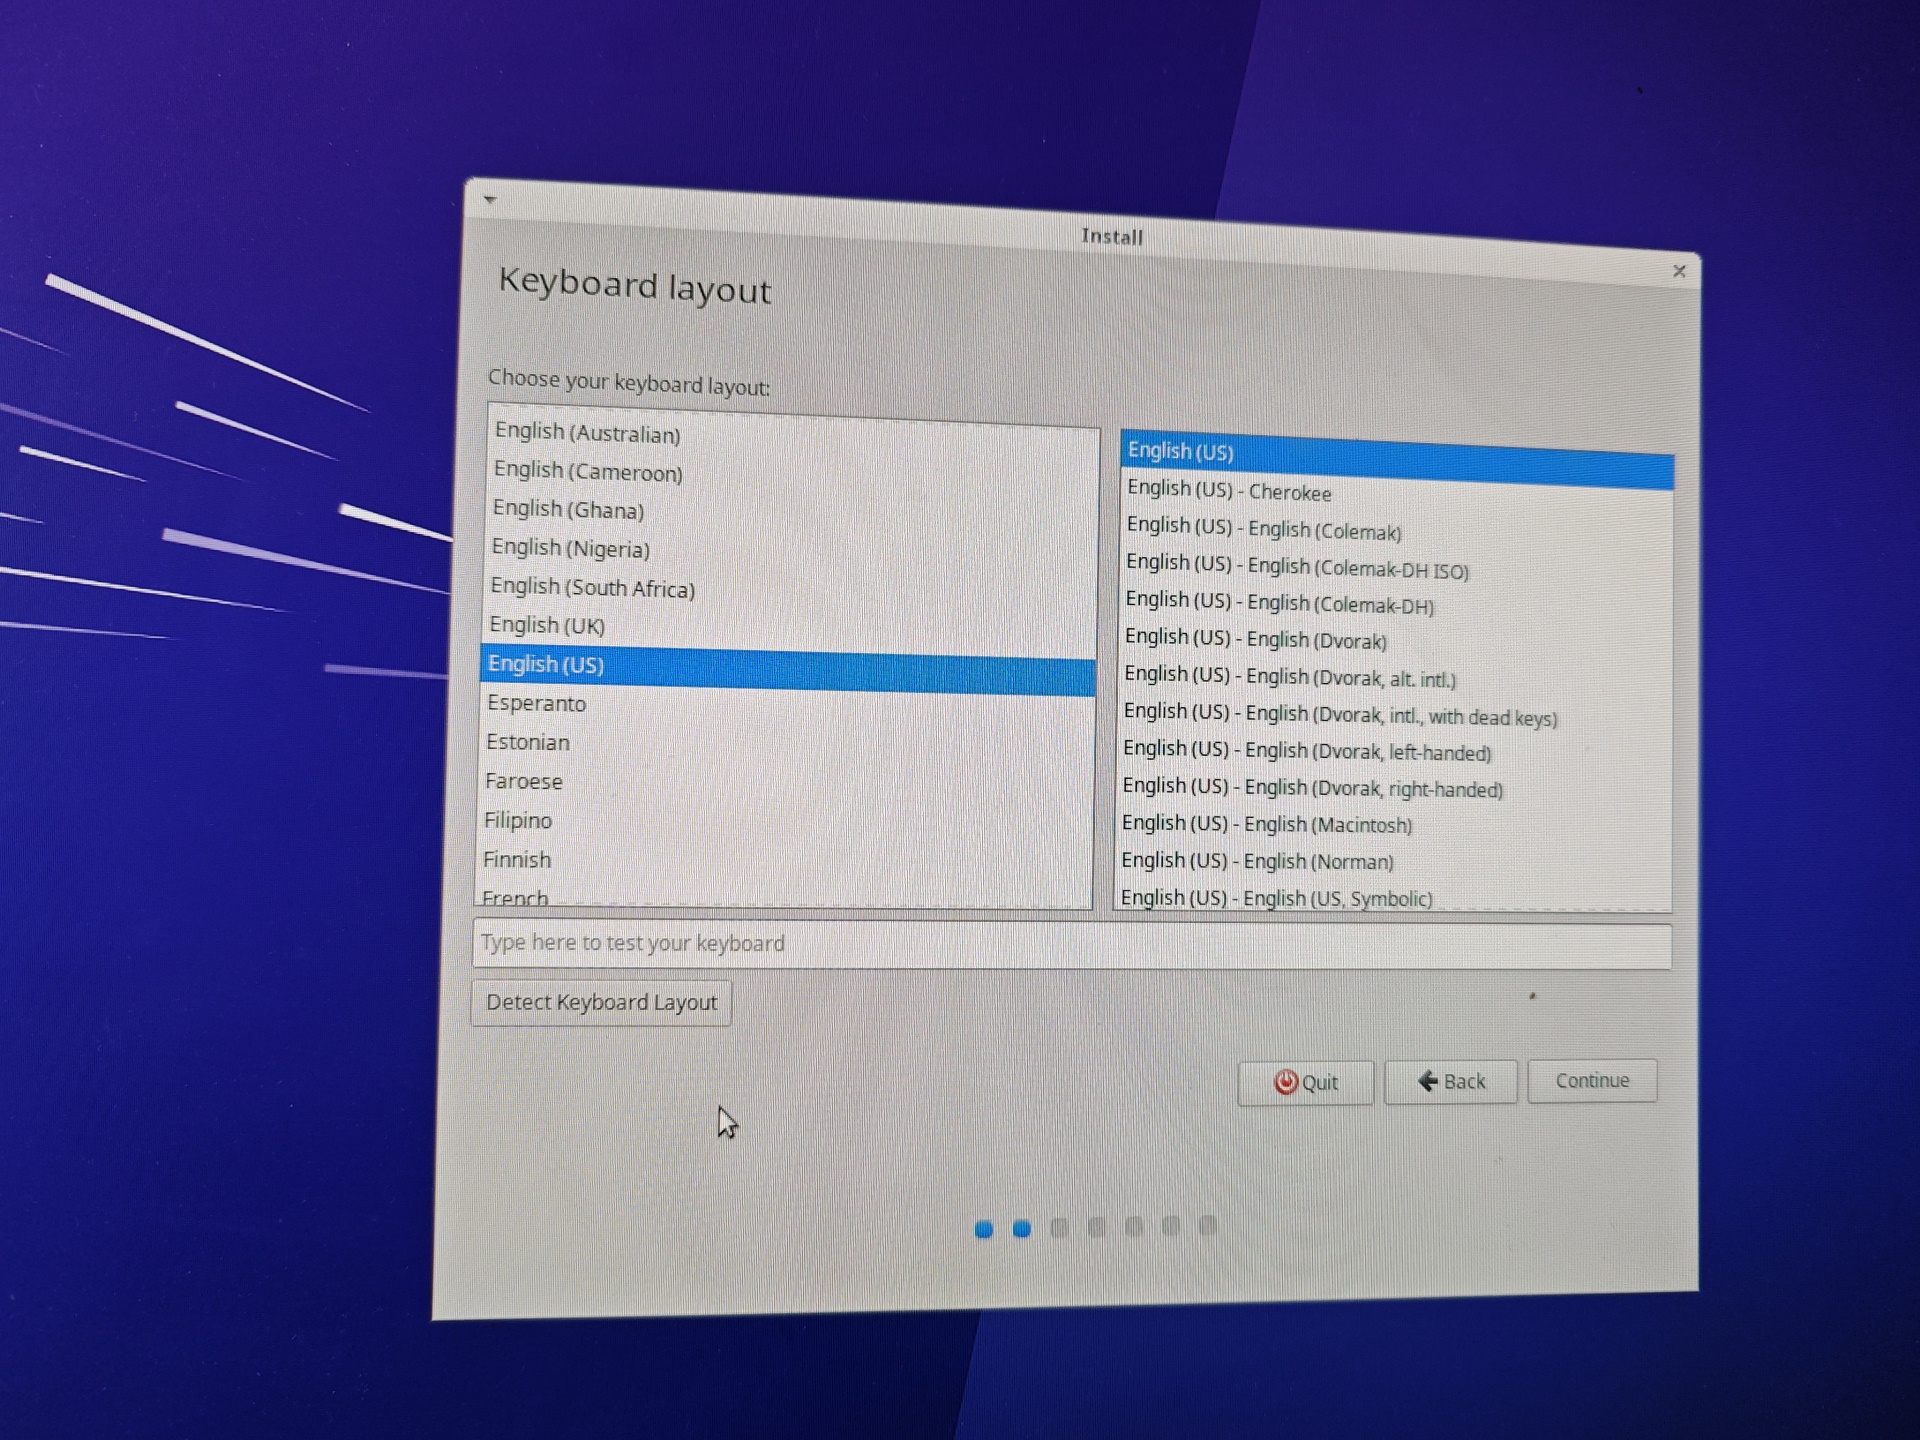
Select the English and click continue
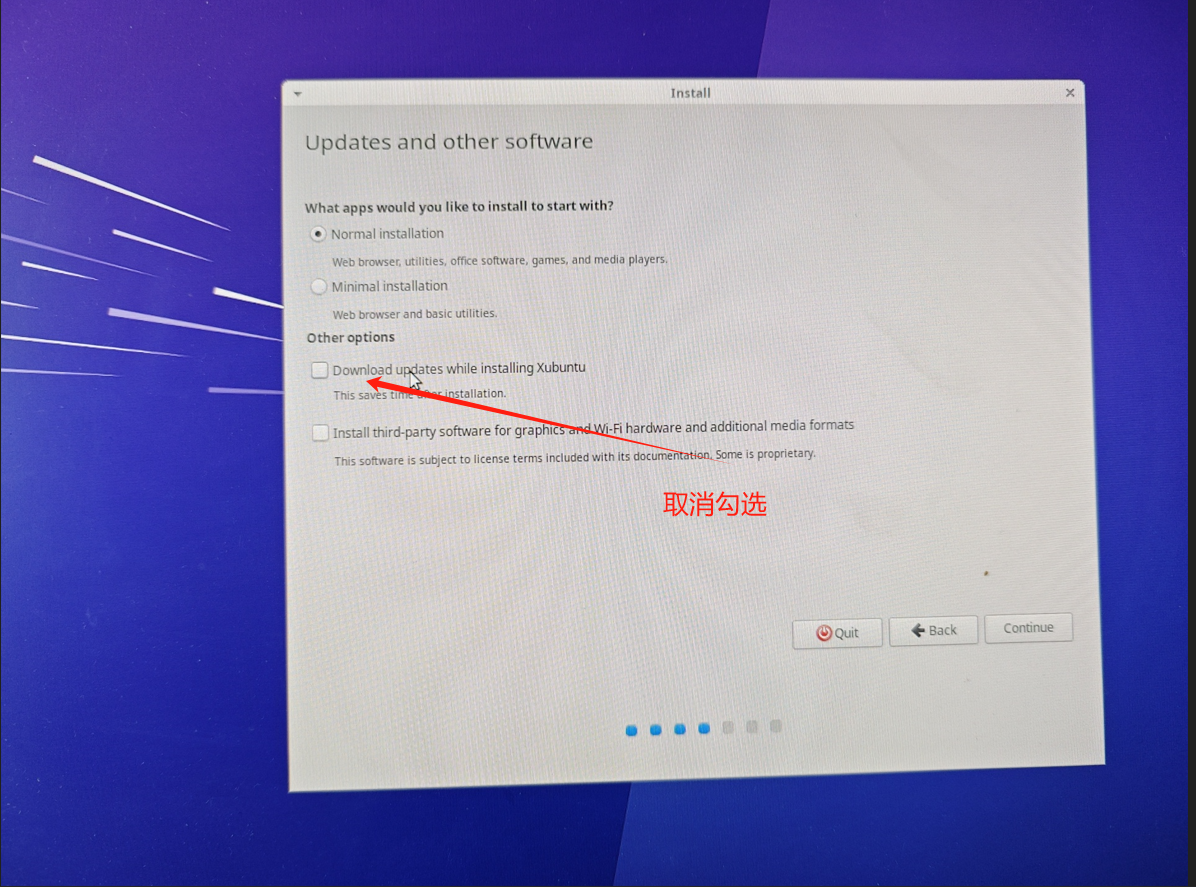
Cancel Download updates while installing xubuntu to speed up the installation and click continue
Select Erase disk and install Xubuntu Click continue
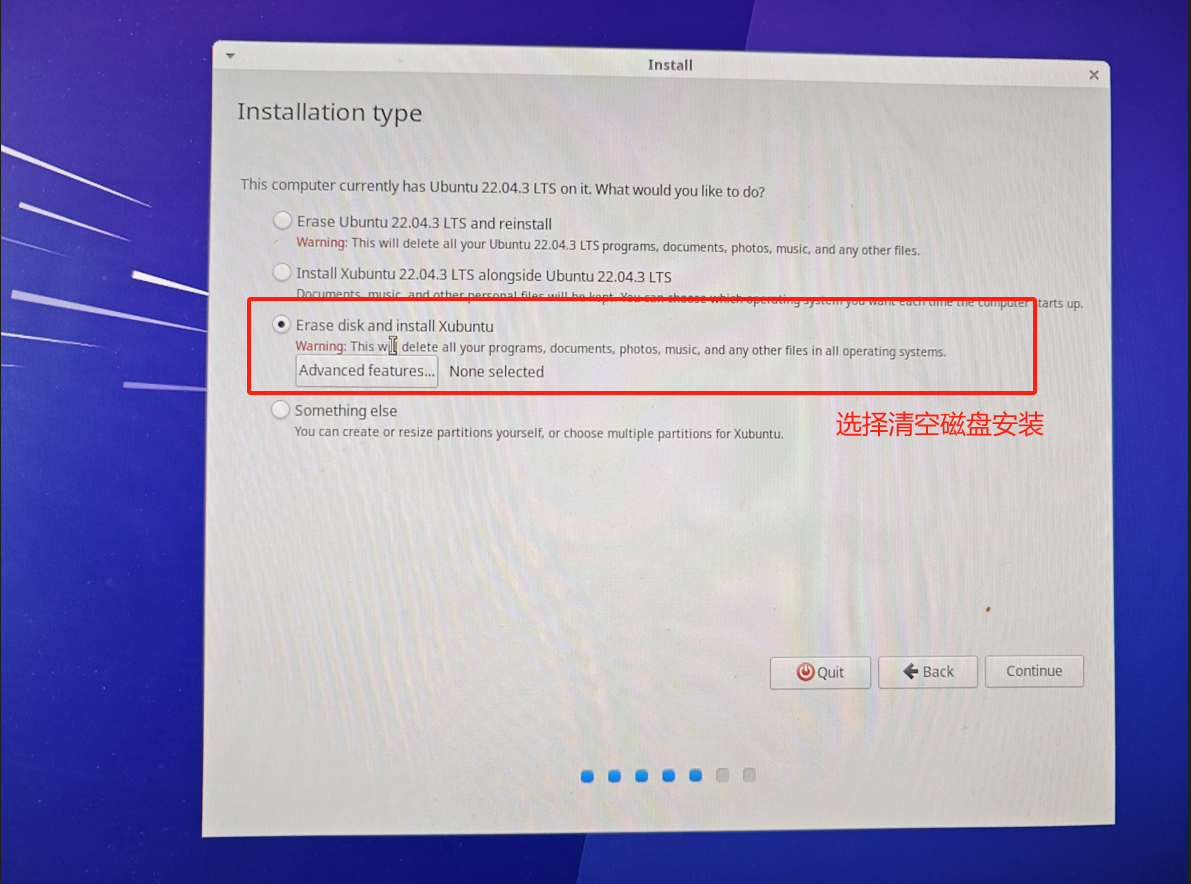
Note: Select the system to be installed on the hard disk of the control cabinet, do not select the inserted U disk.
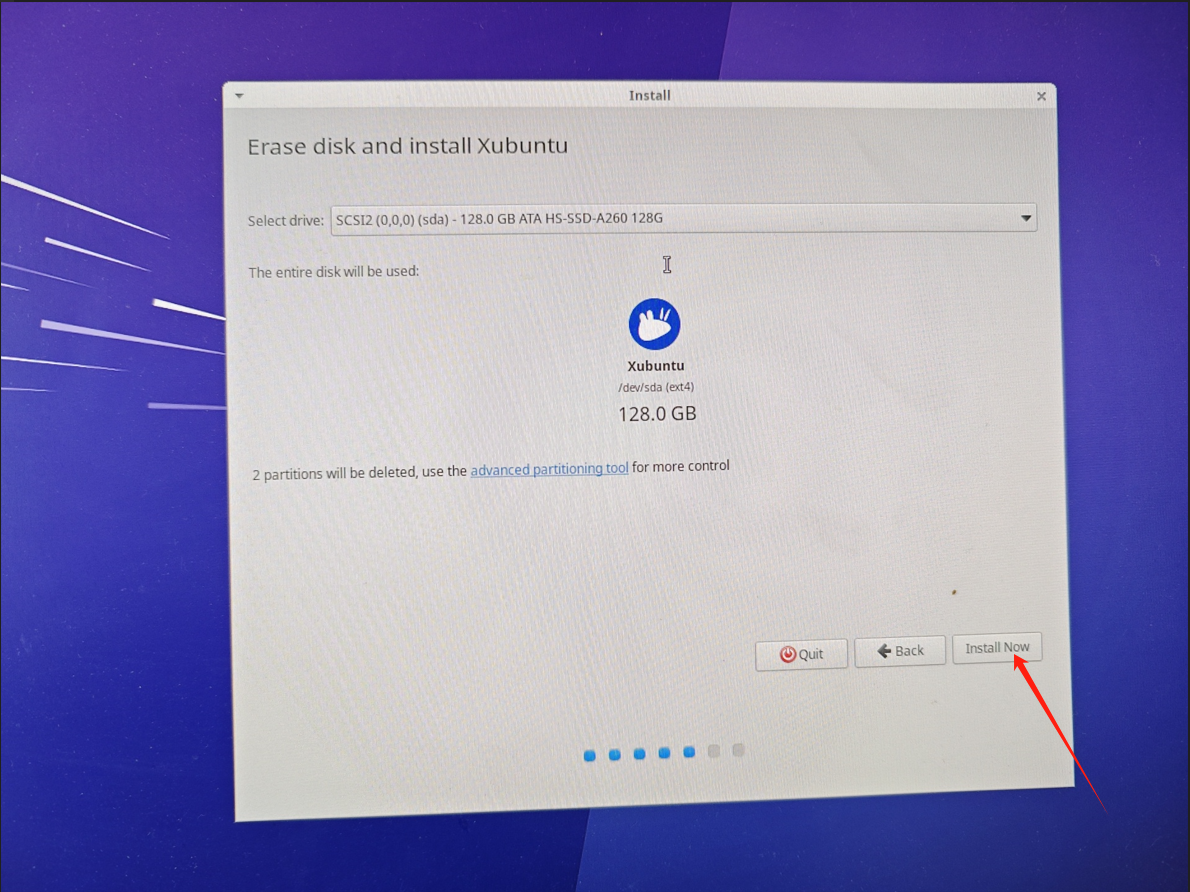
Click continue
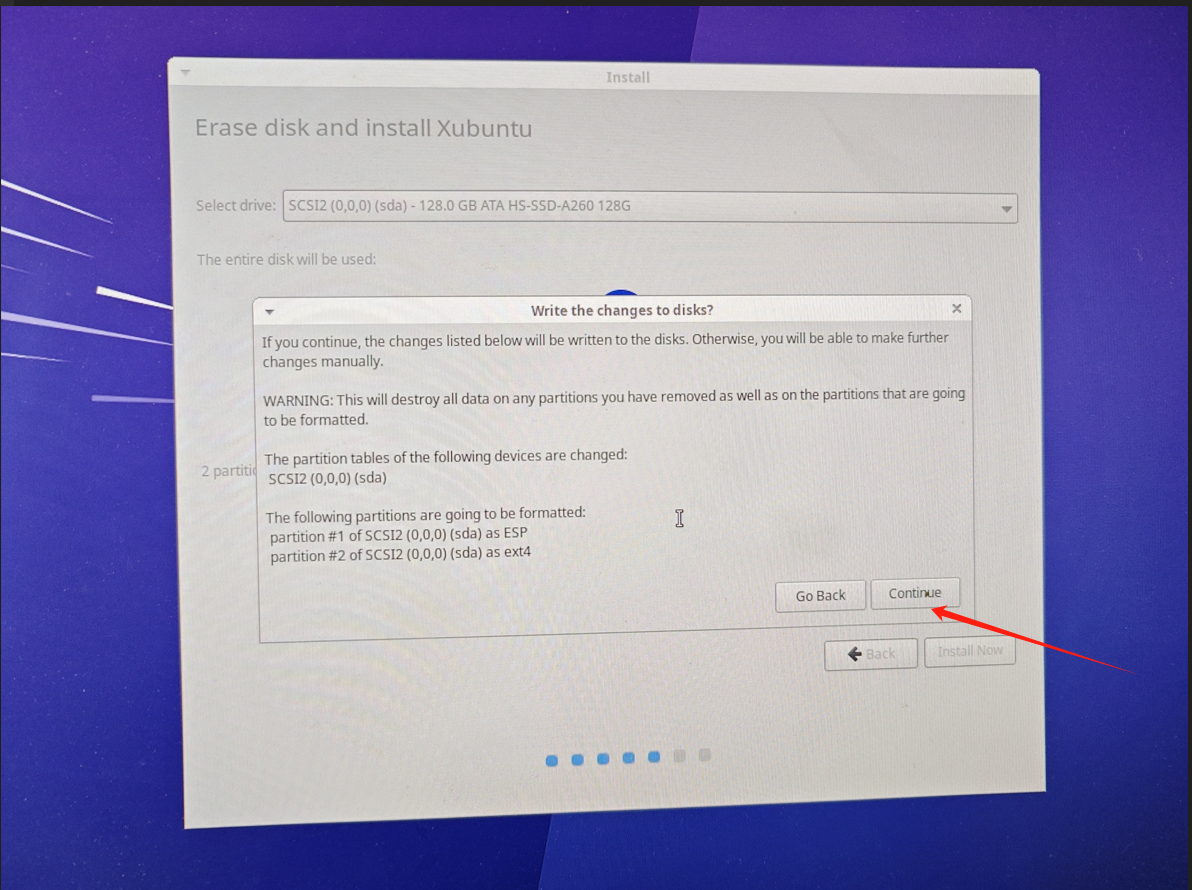
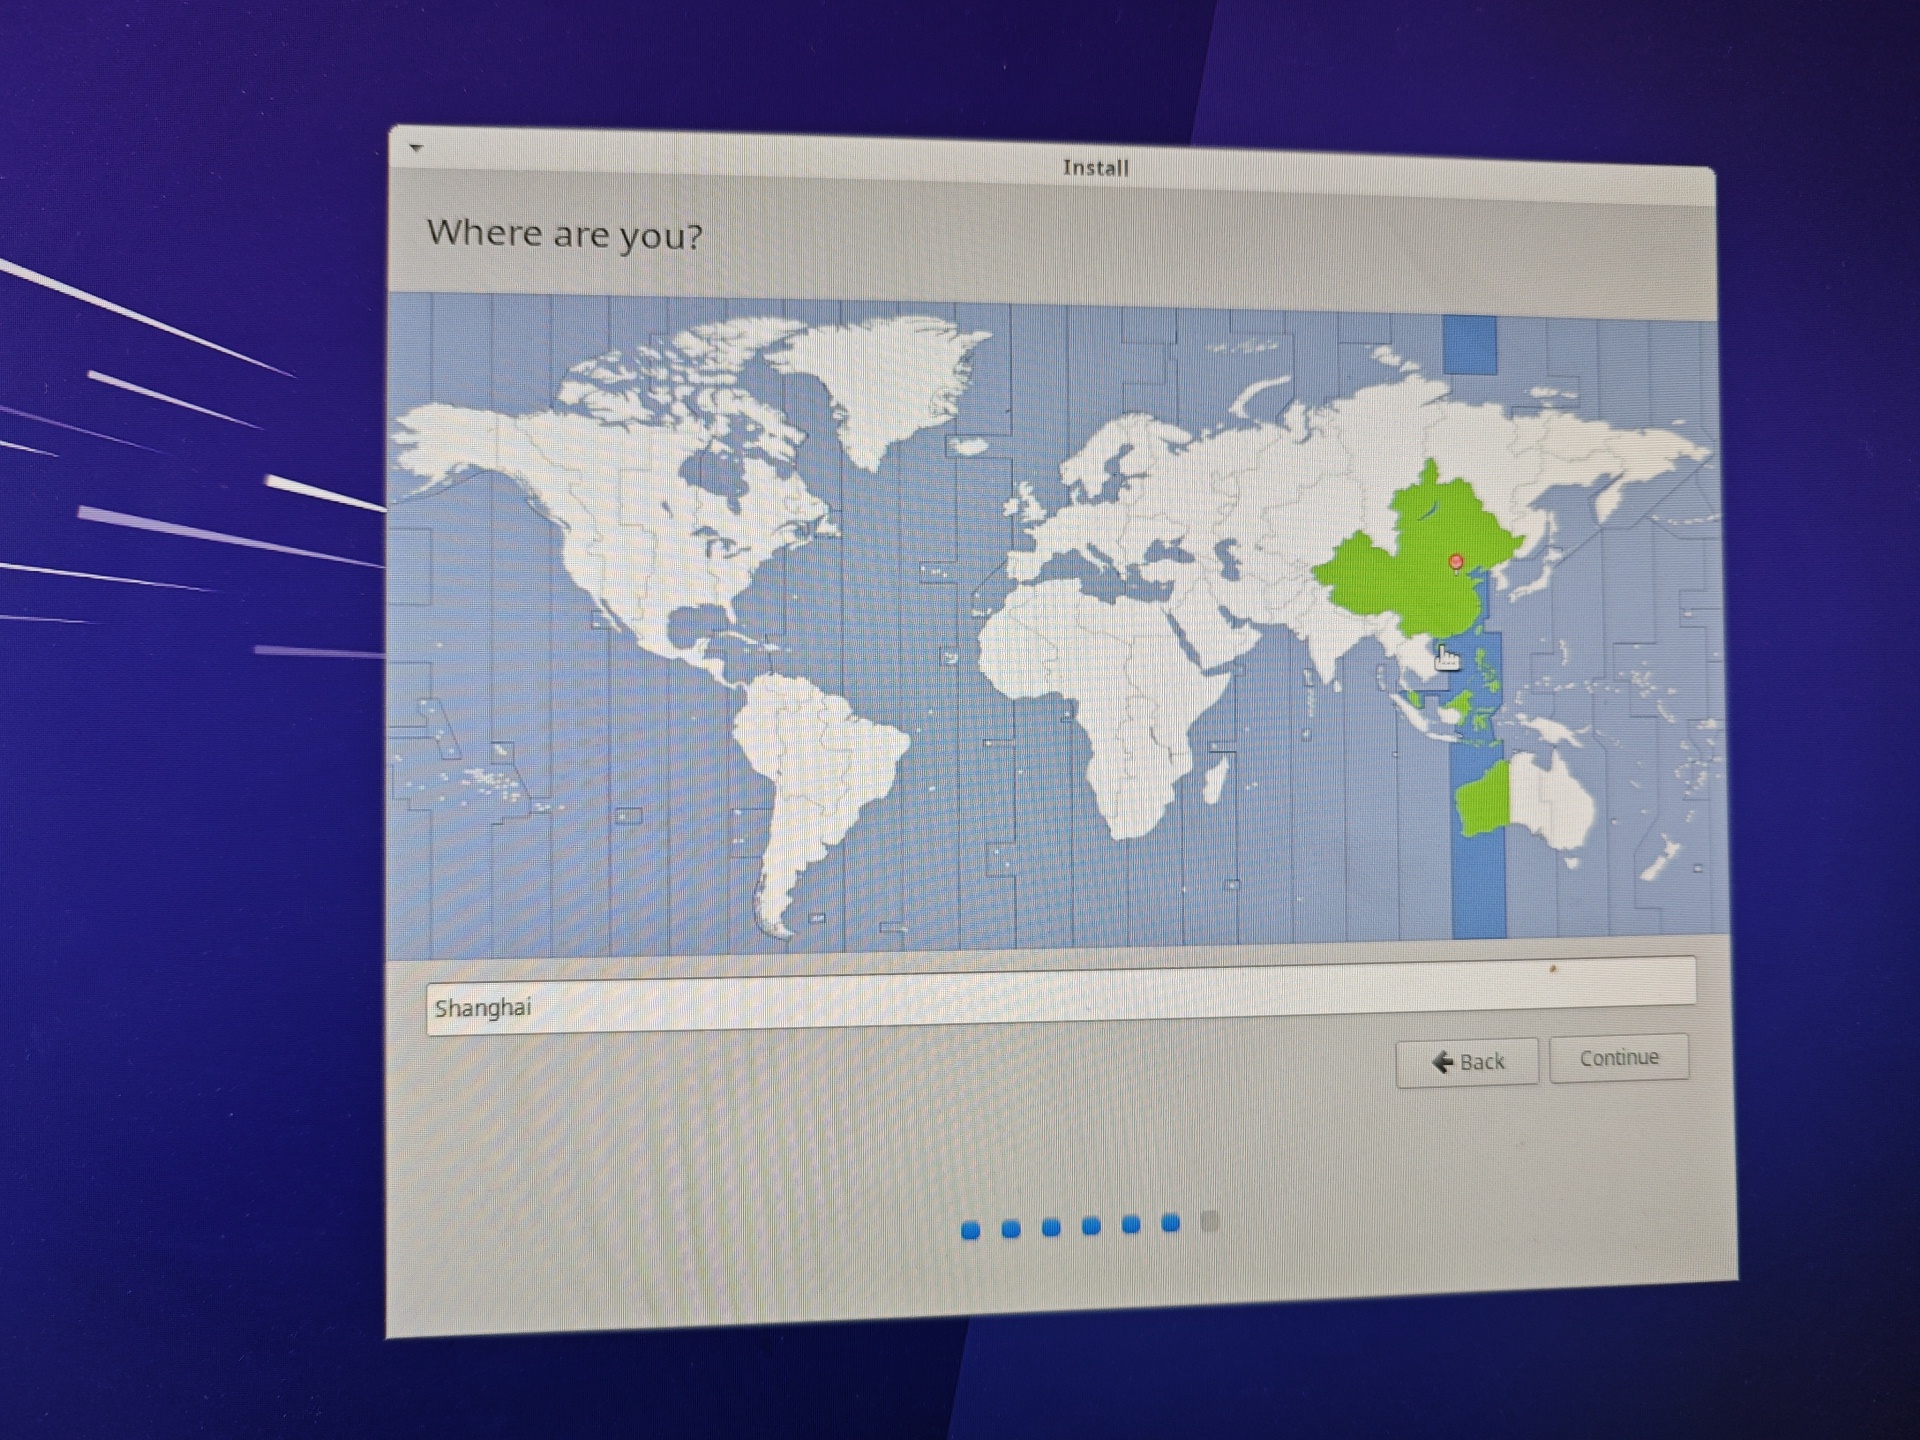
Select the region and click Continue
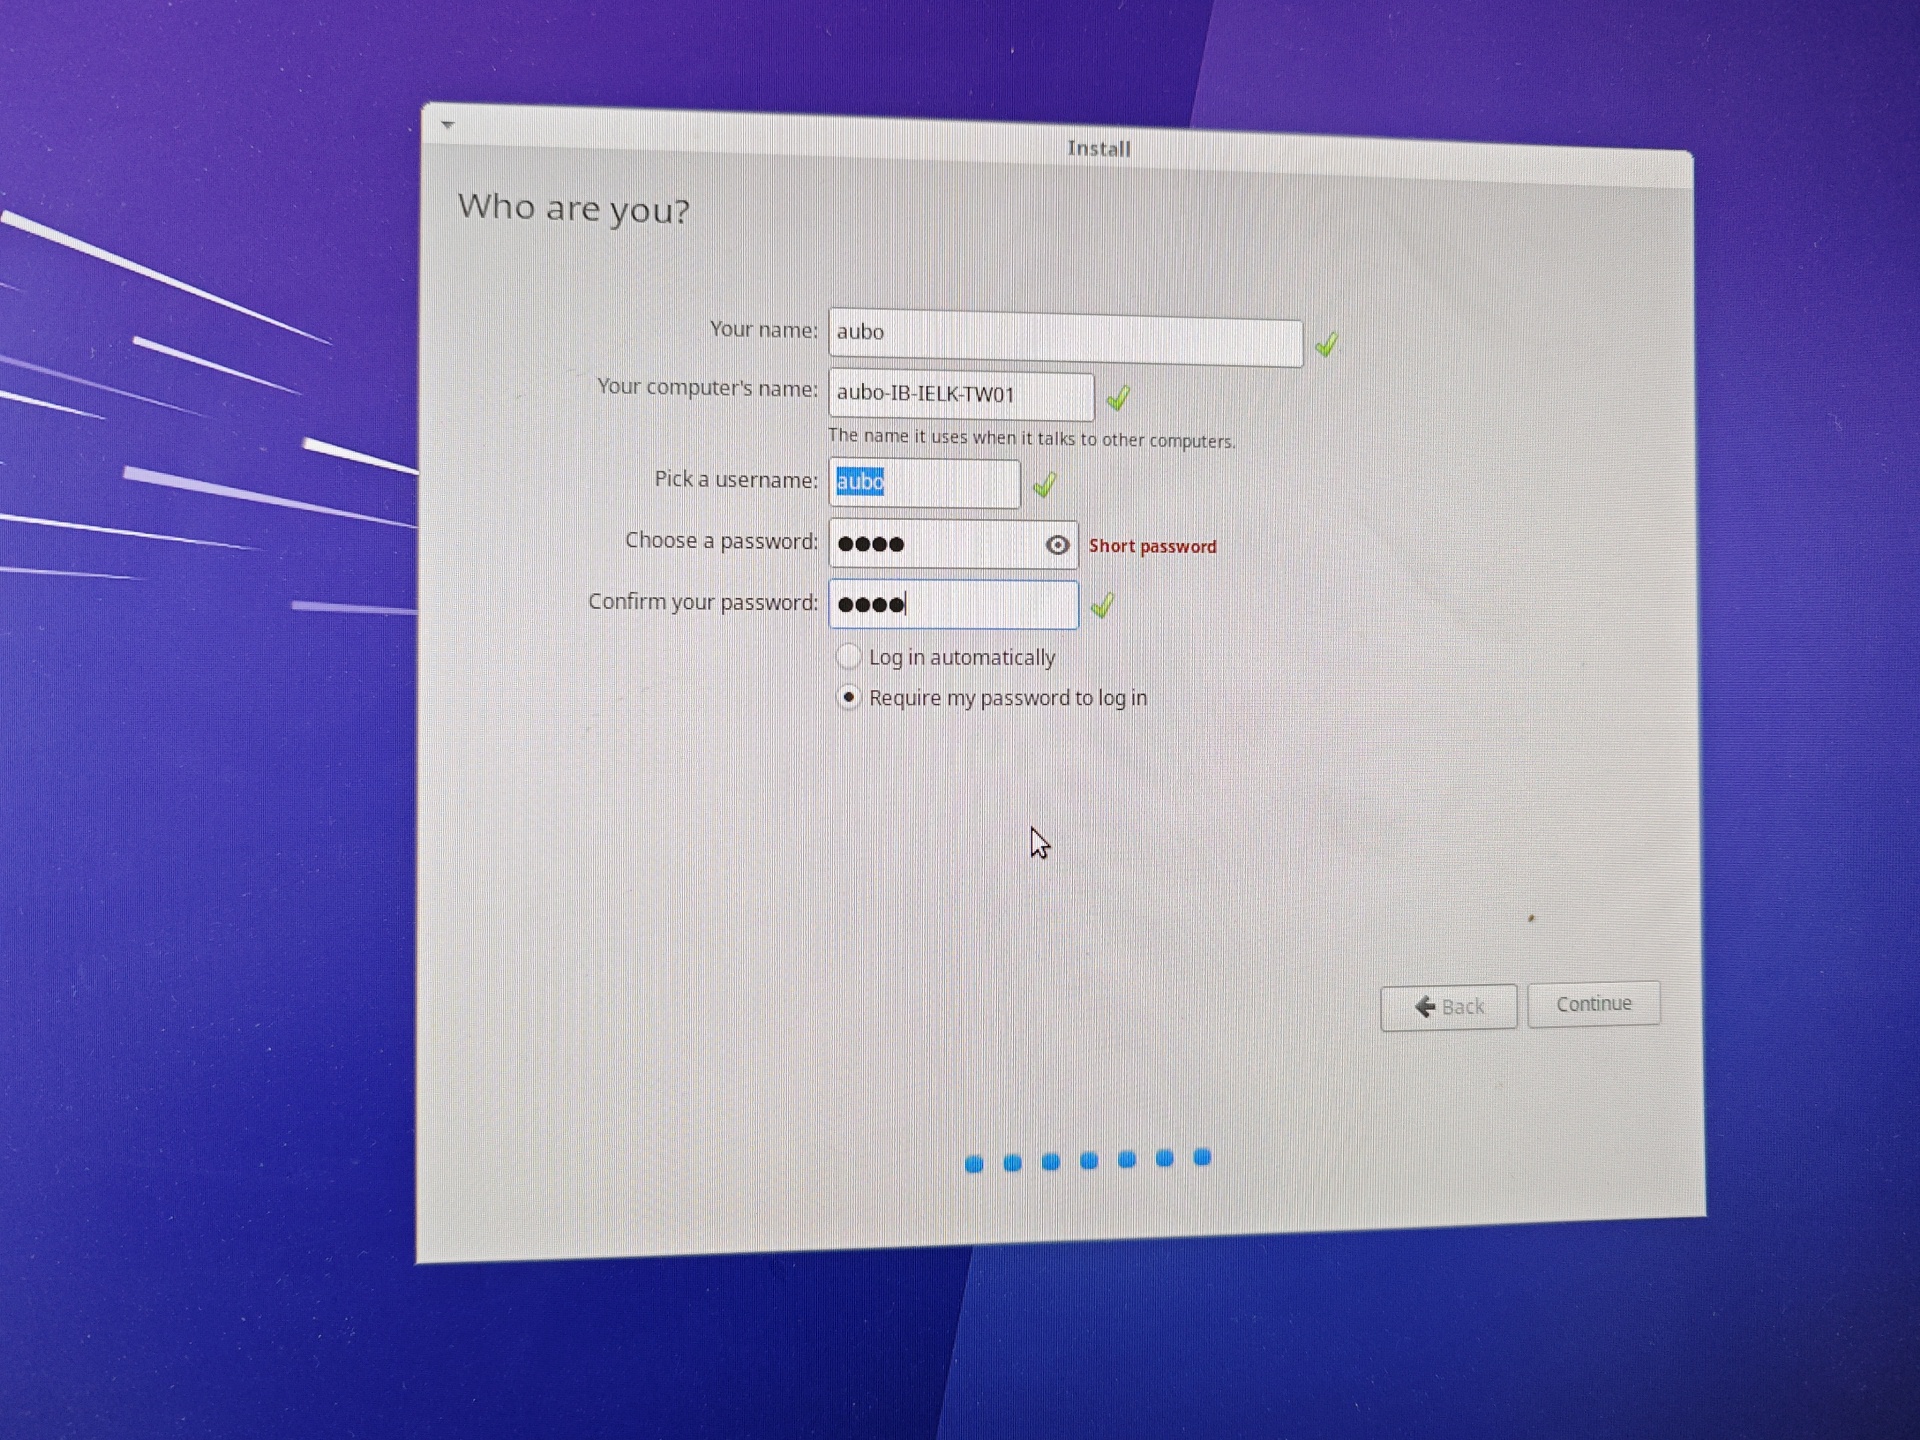
Your name、Your computer's name、Pick a username、Choose a password、Confirm your password can be set to aubo, click Continue after setting.
Wait for the installation of xubuntu system to be completed. If the screen is off, touch the screen slightly.
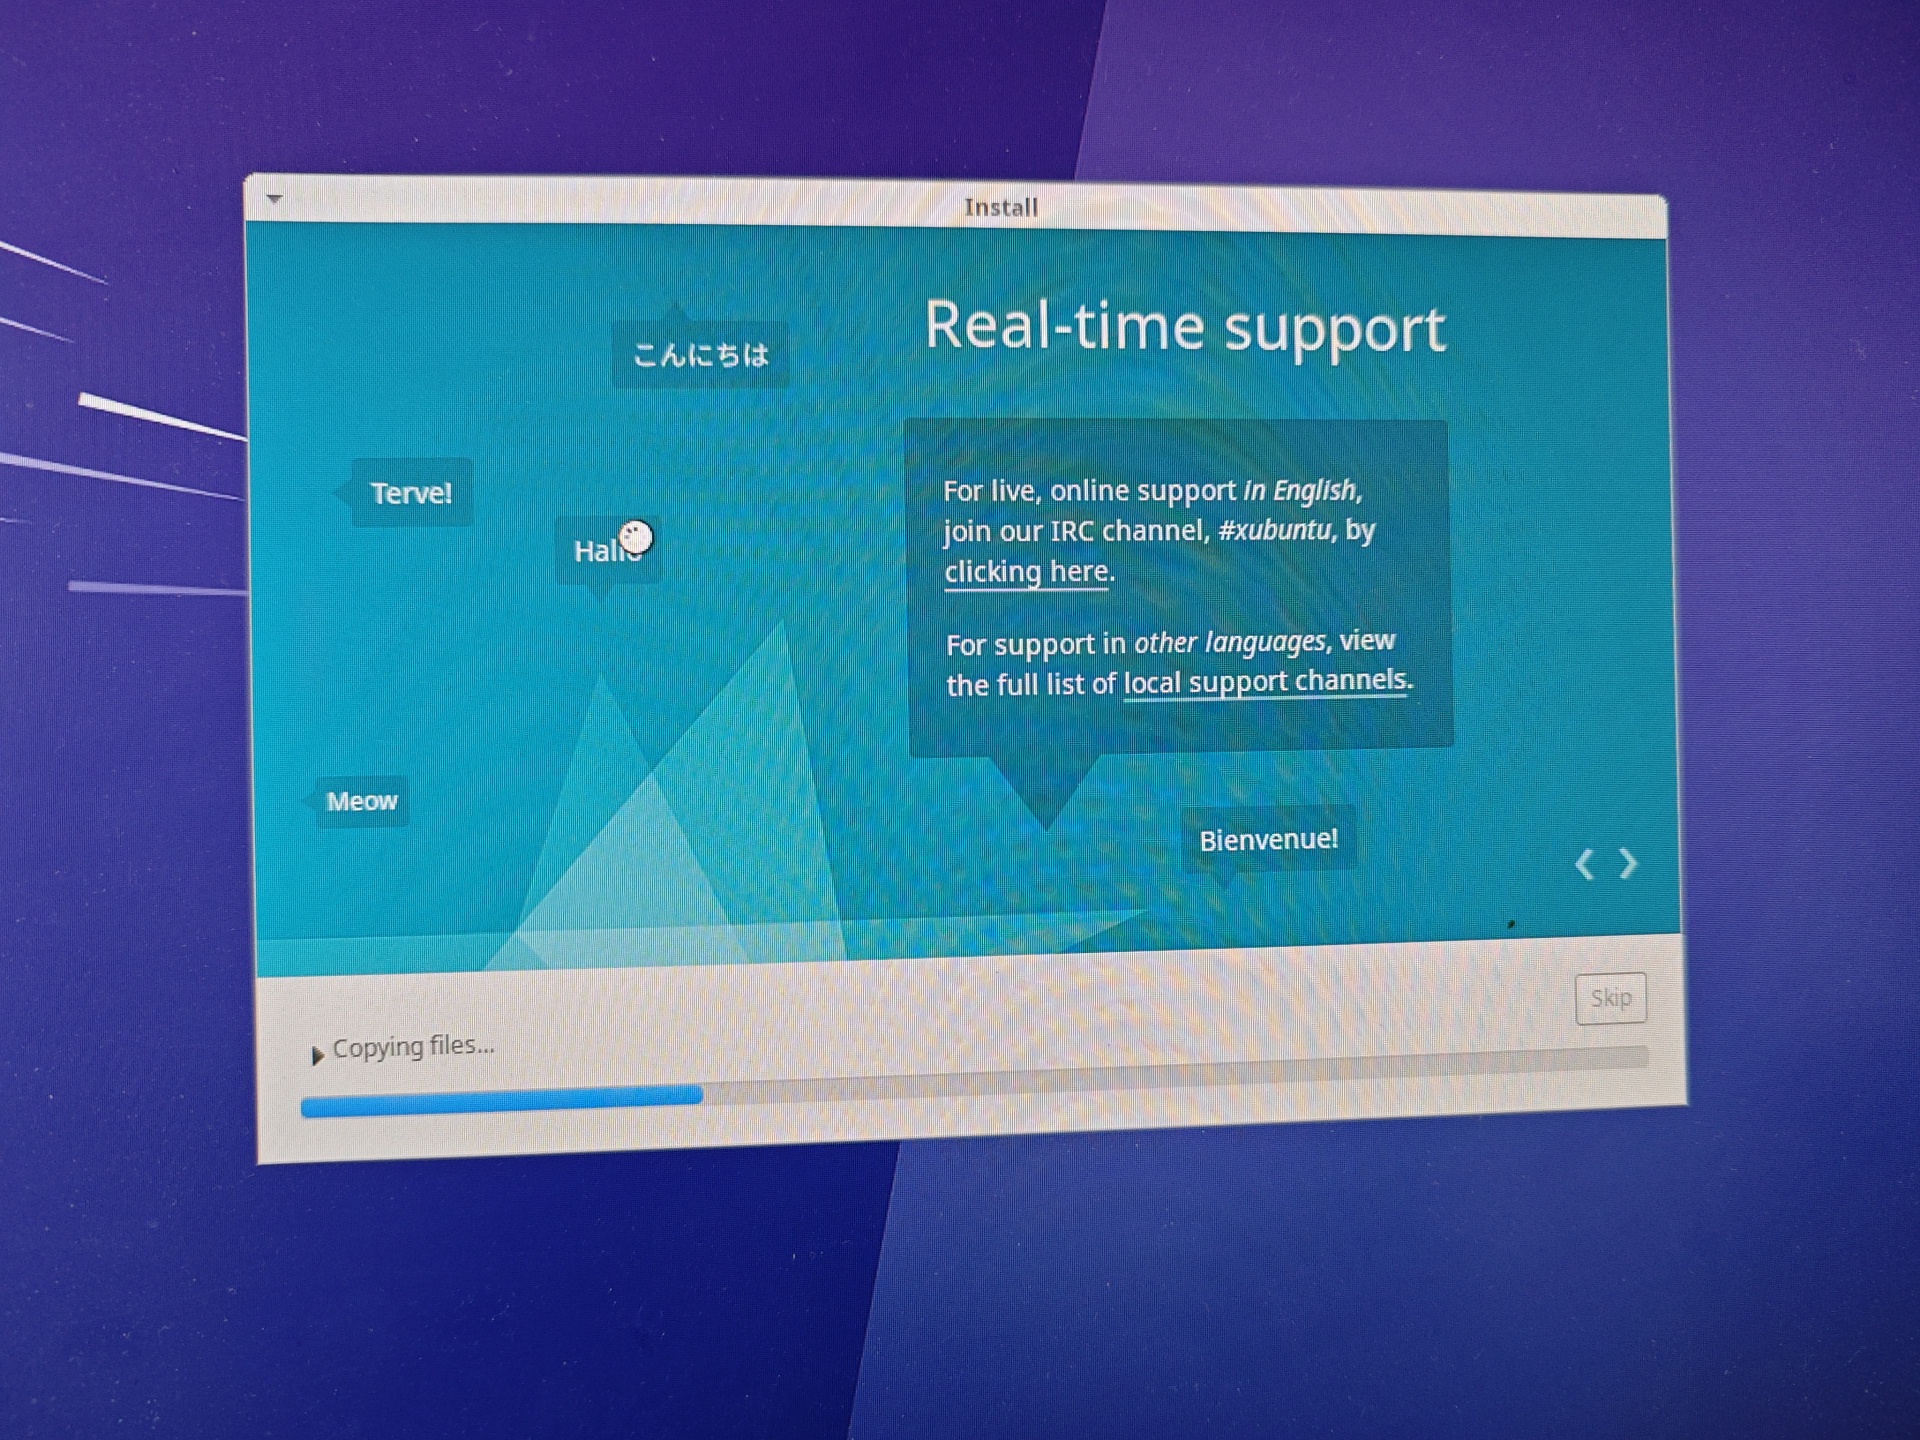
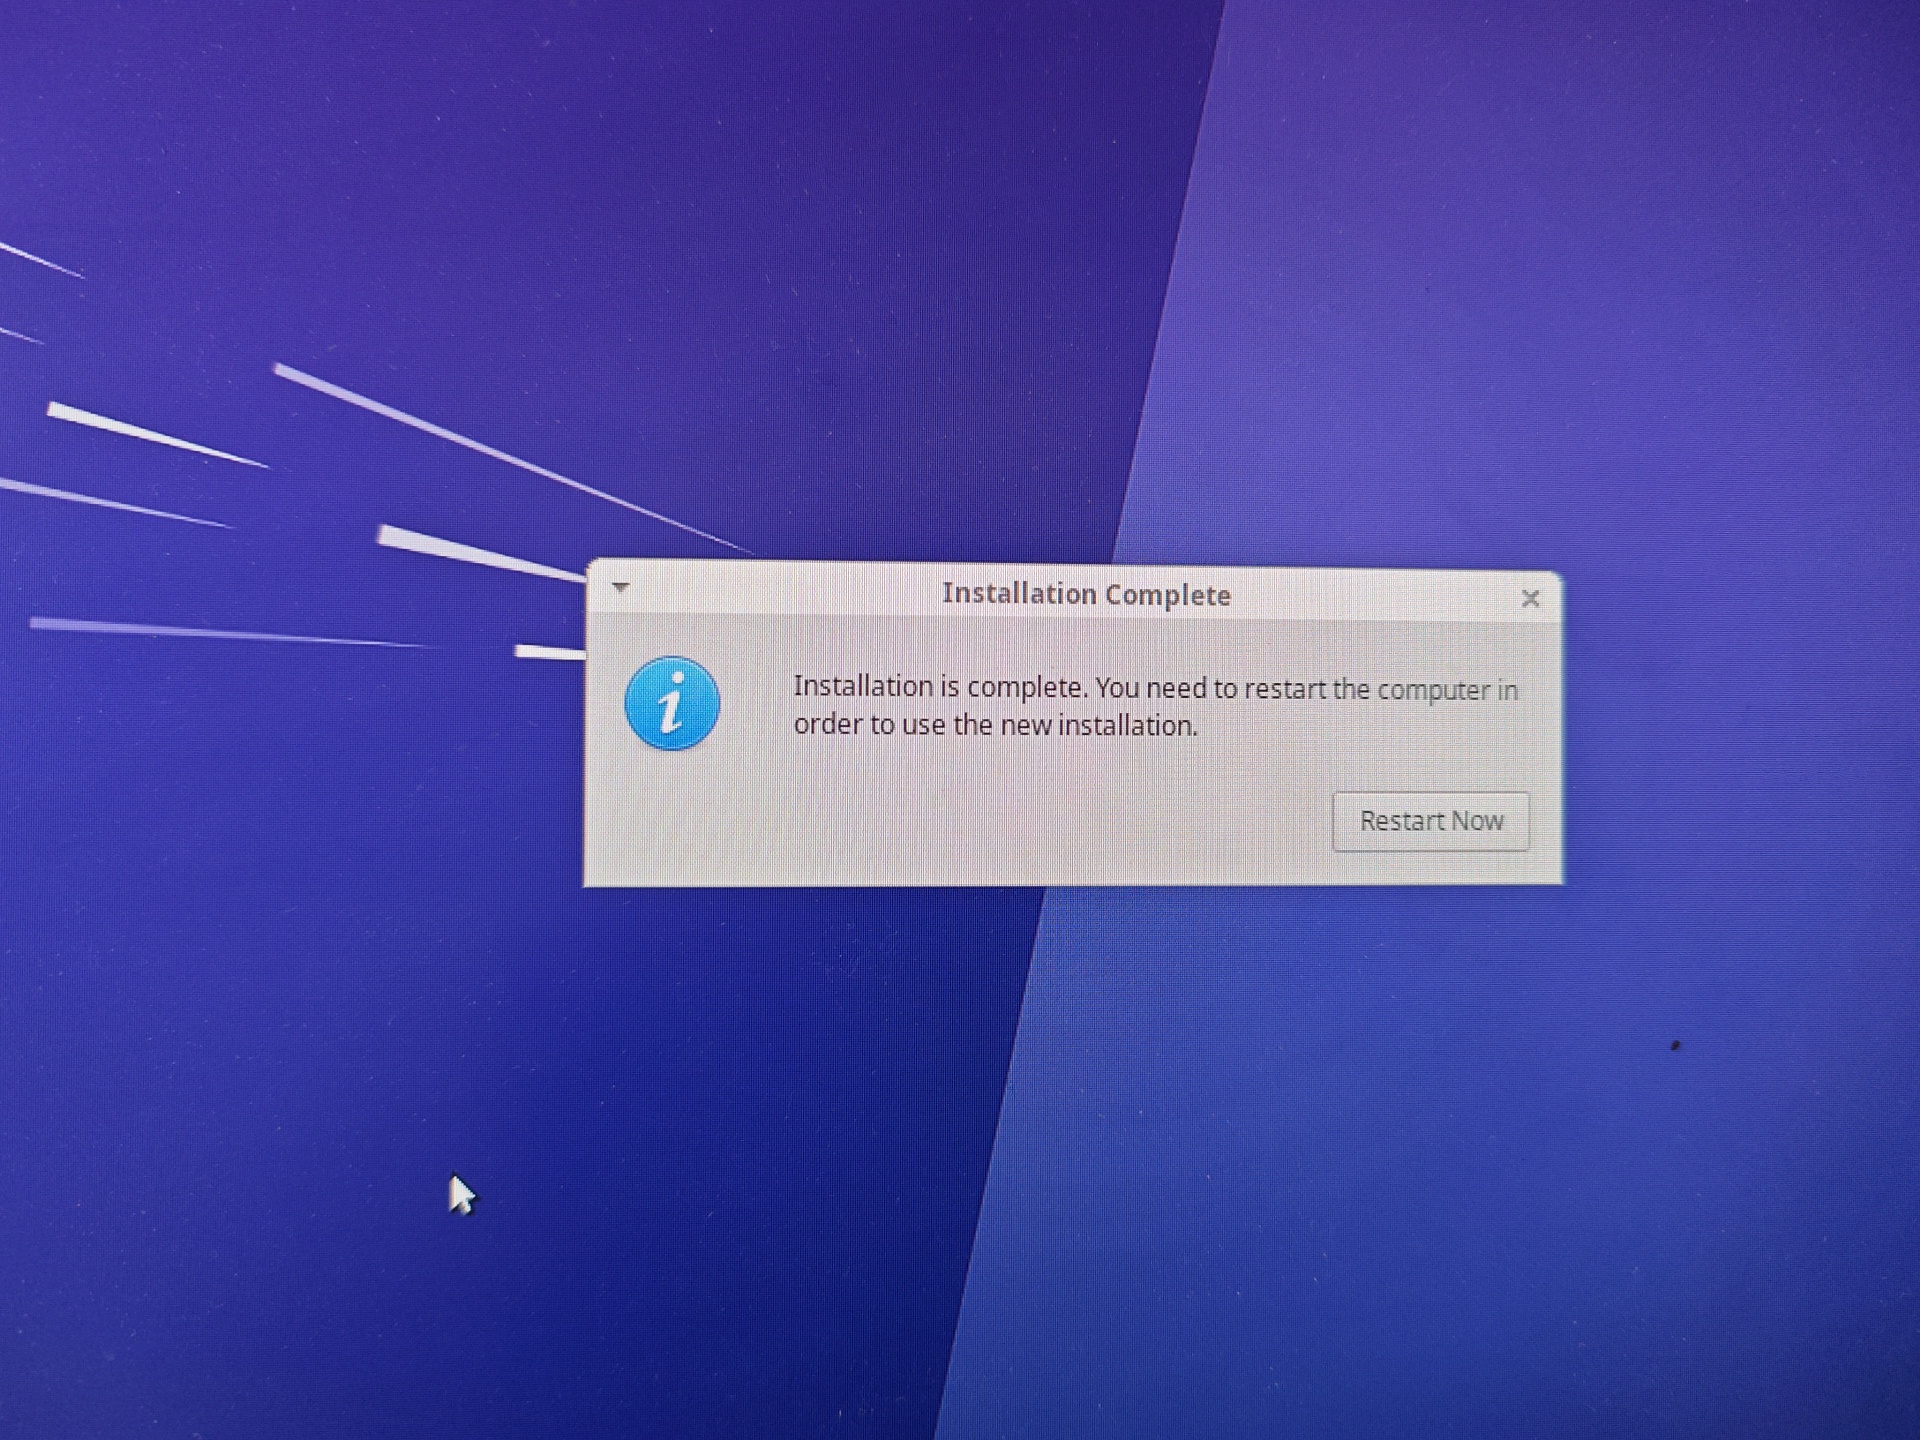
When the following image appears, click Restart Now, the teaching device is closed, Pull out the USB flash drive from the control cabinet immediately.
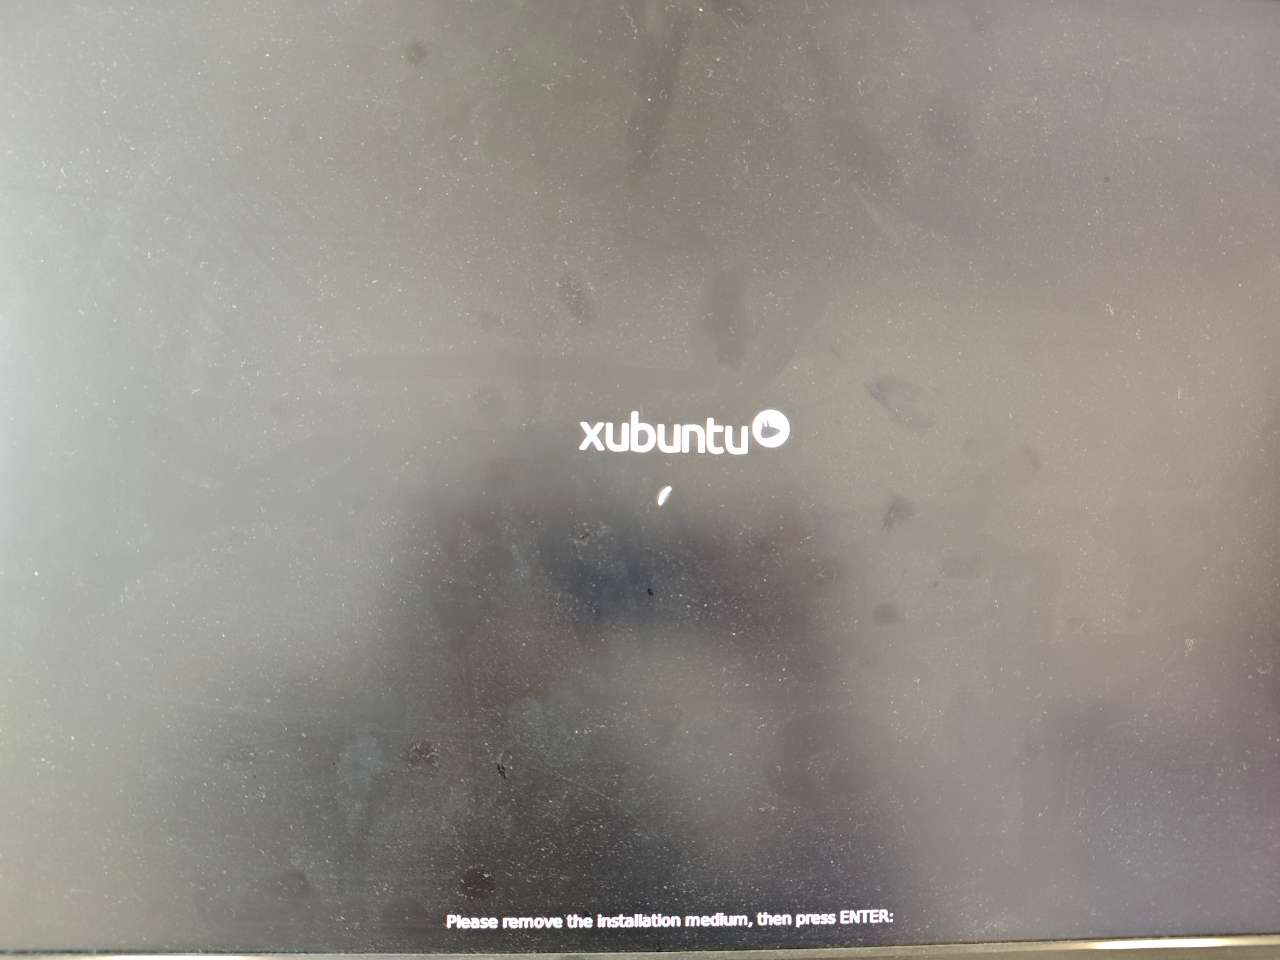
Click on the screen and press Enter to enter the system.
Start the teaching device again, and enter the login password aubo to enter the interface of xubuntu to complete the installation of xubuntu.
3.Development environment
xubuntu 16.04.3 Initialize environment
download link: https://aubocdn.aubo-robotics.cn/build_system/setup_ubuntu_1.0.1-76676d9.zip
PS: The touch screen driver is not installed at this time. Please use the mouse first.
Copy the setup_ubuntu_1.0.1-76676d9.zip file to the target device, right-click and select Extract Here to extract it.
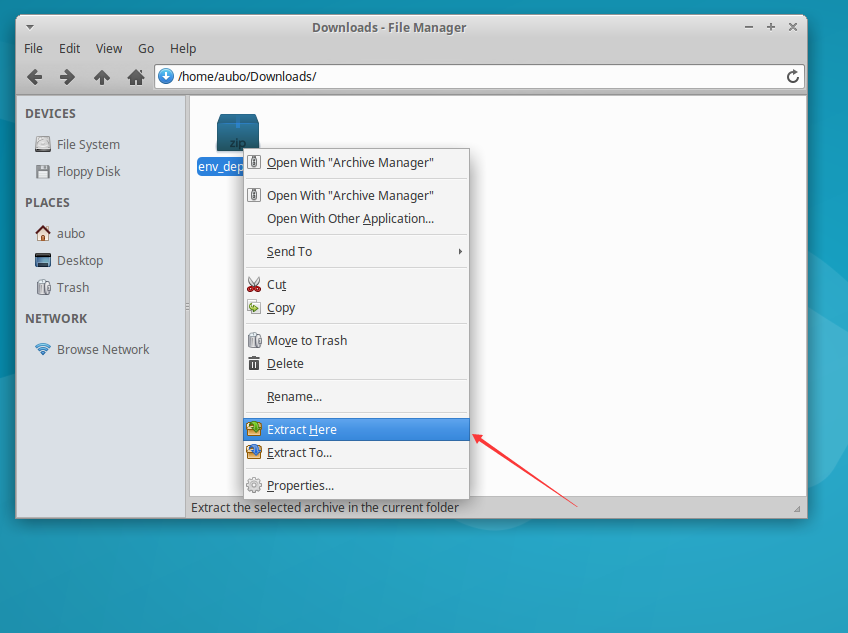
Click env_deploy to go to the folder and right-click to open the terminal.
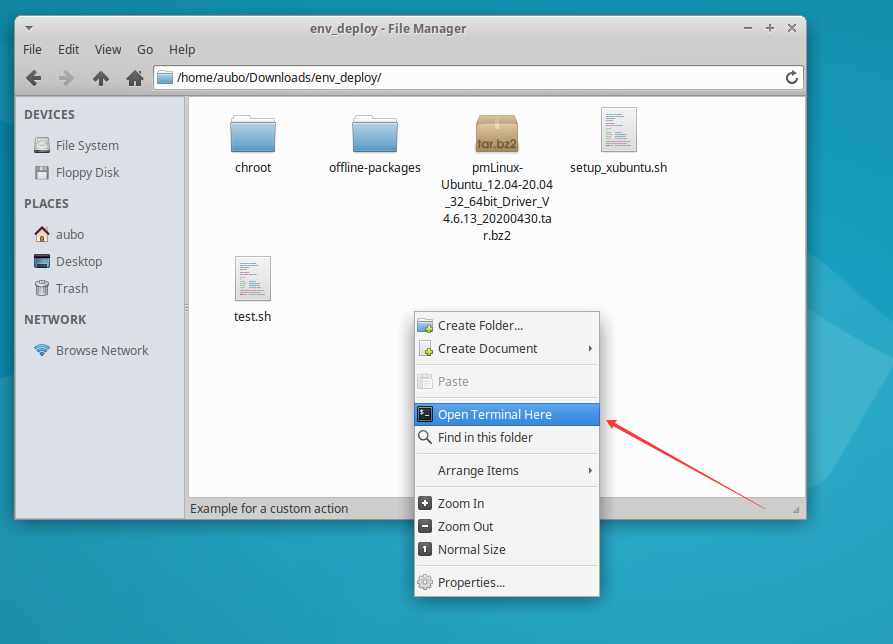
Type the following command and enter:
sudo chmod +x setup_xubuntu.shInput password: aubo
Continue typing the following command and enter:
sudo ./setup_xubuntu.sh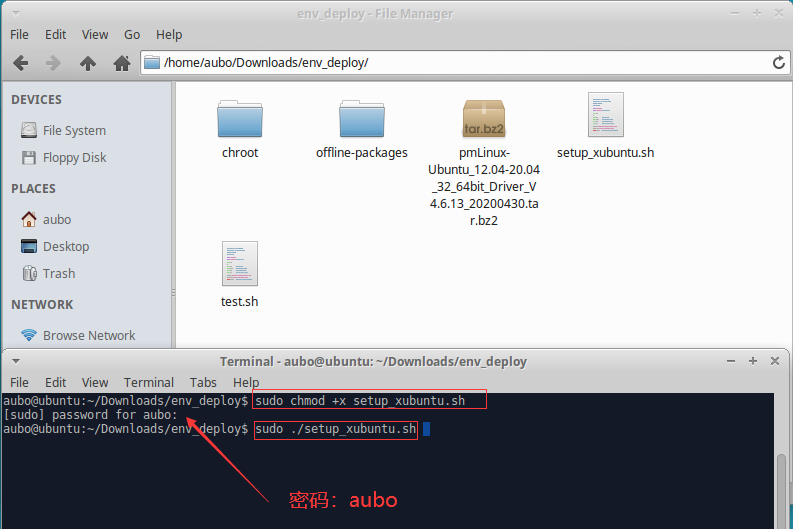
The following image appears after the script has finished executing, indicating that the environment has been configured successfully.
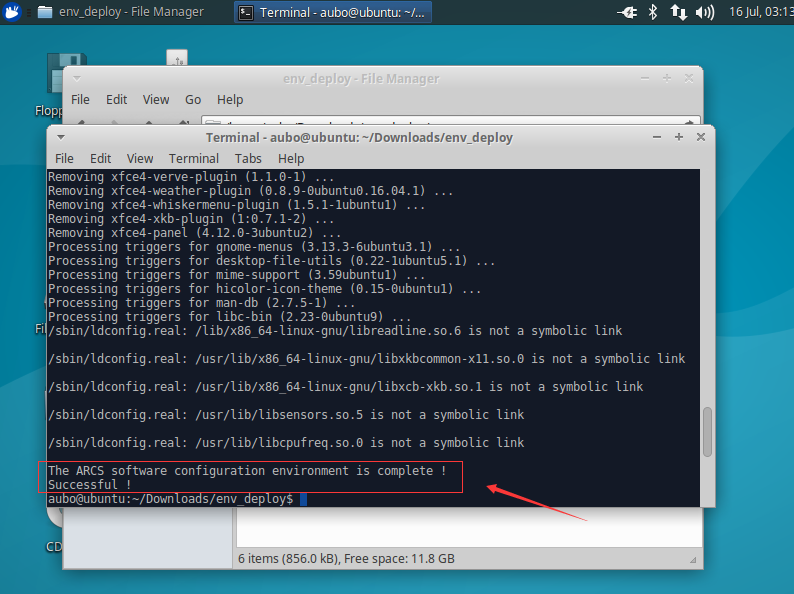
Shut down and restart the teaching device, which can complete the deployment of the environment and the installation of the touch screen driver, and enter the root user.
xubuntu 22.04.3 Initialize environment
download link:https://aubocdn.aubo-robotics.cn/build_system/setup_ubuntu22.04_1.0.0-4a41ebb.zip
PS: Touch screen driver is not installed, please use the mouse to operate first.
Copy setup_ubuntu22.04_1.0.0-4a41ebb.zip file to the target device, right-click and select Extract Here to extract it.
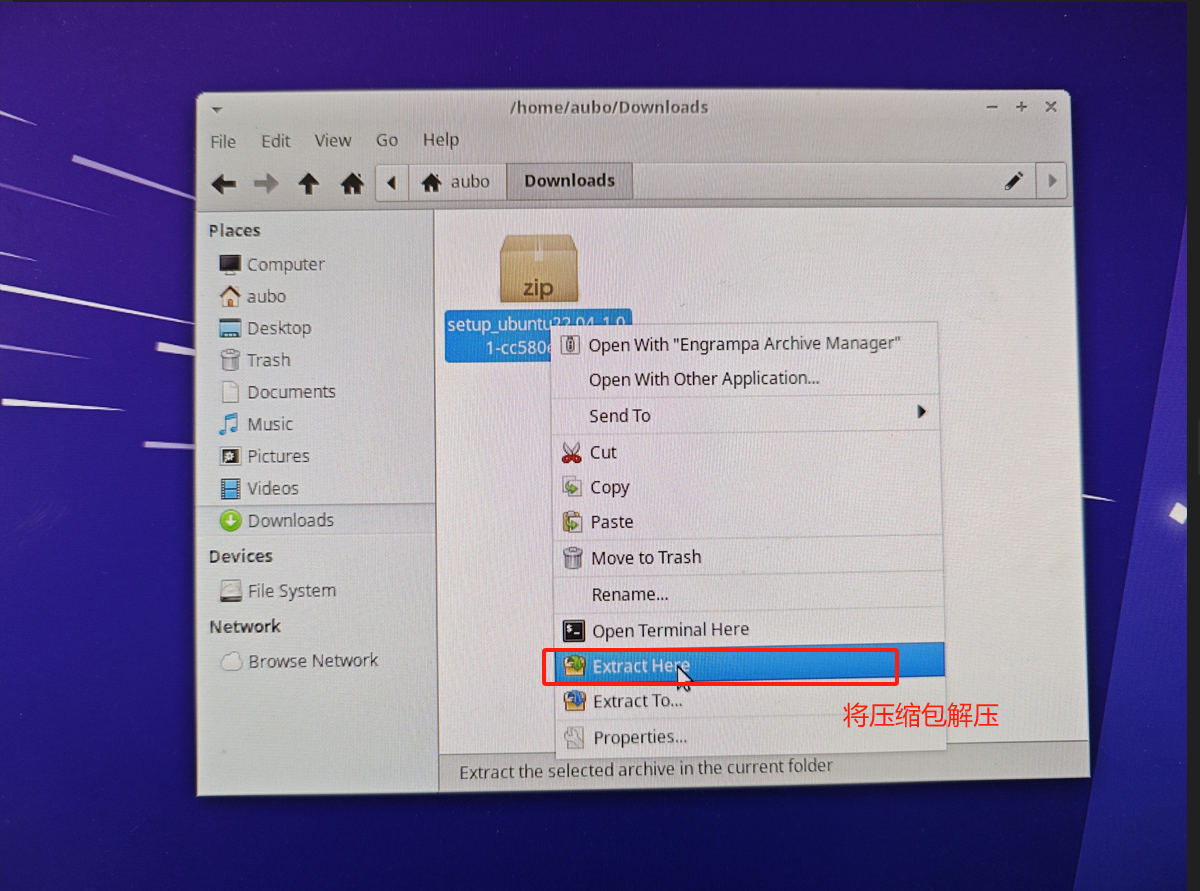
Click env_deploy go to the folder and right-click to open the terminal.
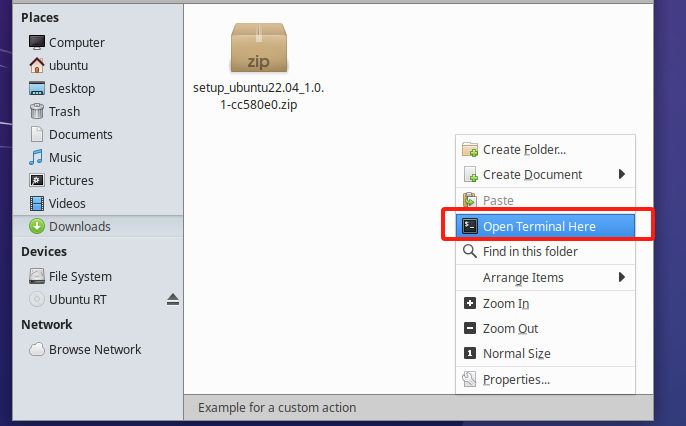
Type the following command and enter:
sudo chmod +x setup_xubuntu.shInput password: aubo
Continue typing the following command and enter:
sudo ./setup_xubuntu.sh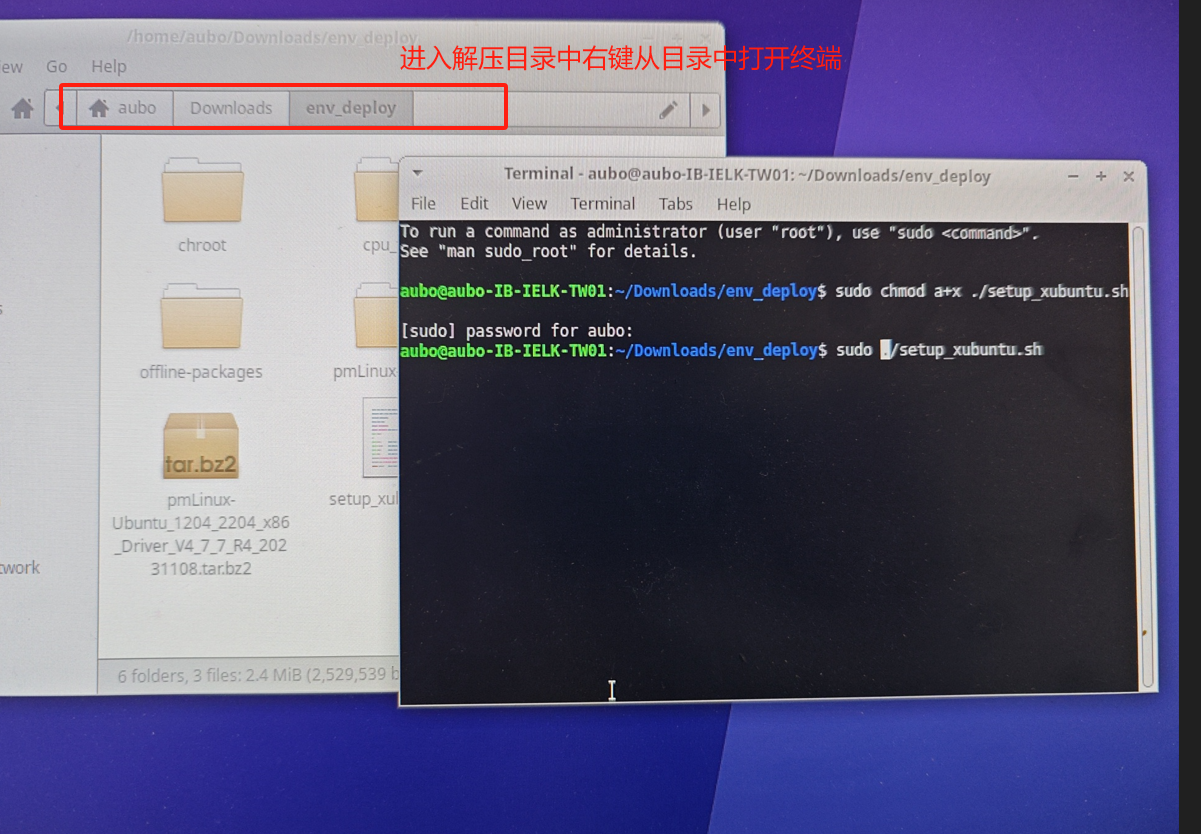
The following image appears after the script has finished executing, indicating that the environment has been configured successfully.
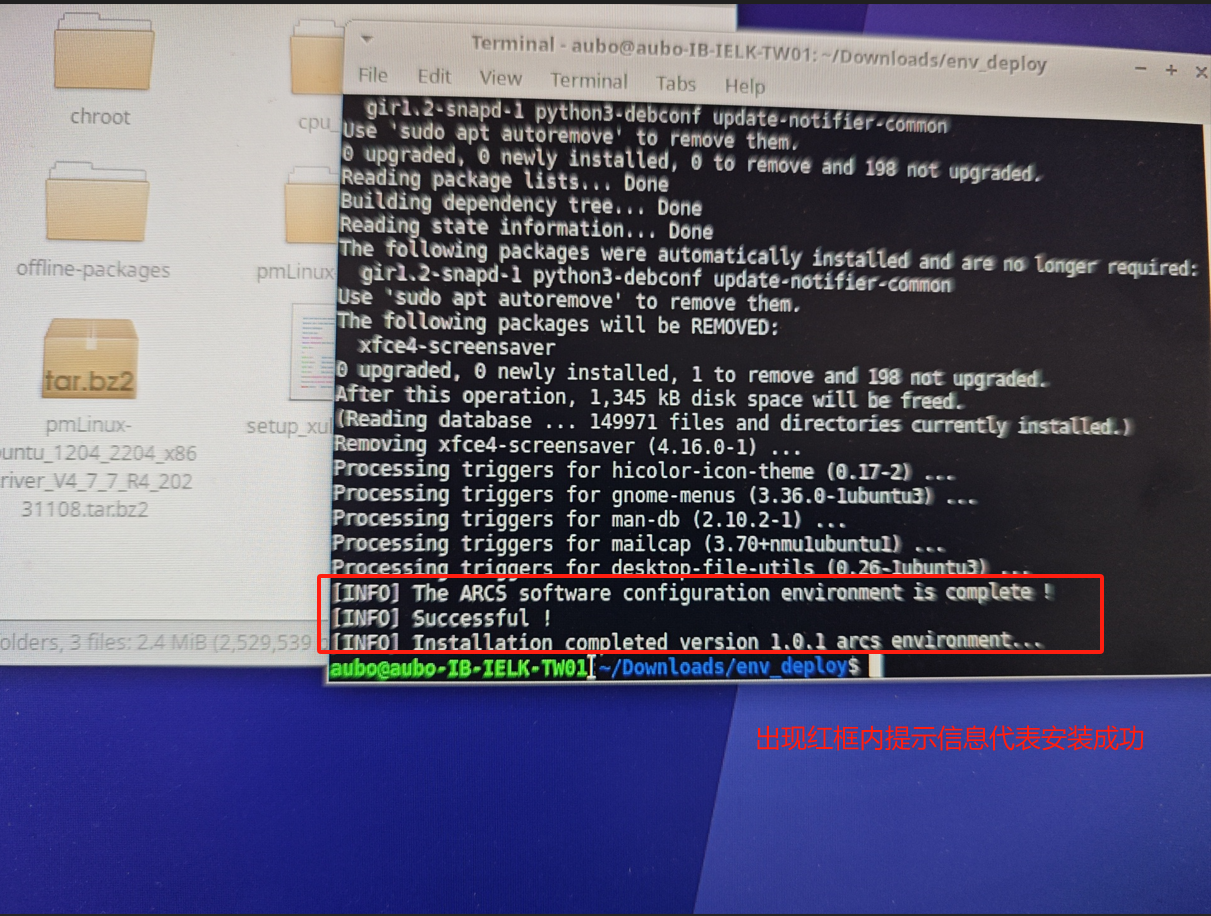
Shut down and restart the teaching device, which can complete the deployment of the environment and the installation of the touch screen driver, and enter the root user.
Problem solving
Touch screen calibration problem
After rebooting and finding that the touchscreen is not calibrated correctly, reinstall pmLinux by going into the env_deploy directory and executing the following command text.
cd ./pmLinux-Ubuntu16.04
# If 22.04 is installed, replace 16.04 with 22.04 and execute the following command after entering the directory.
./install.sh
echo 127.0.0.1 $(hostname) >> /etc/hostsAfter that re-execute the following command to install the touch screen driver.
cd ./pmLinux-Ubuntu16.04
# If 22.04 is installed, replace 16.04 with 22.04 and execute the following command after entering the directory.
./install.sh
After the installation is complete, run the reboot command to reboot the machine and test if the touchscreen driver takes effect.
4.Install the ARCS Software
download link: https://download.aubo-robotics.cn/arcs/
Select the latest version of the ARCS software installer from the download address above. (using arcs_update-0.29.0-alpha.87+b630244.nightly-x86_64.run as an example)
Copy the ARCS installation package to the target device and open the terminal with a right mouse click.

Type the following command and enter:
chmod +x arcs_update-0.29.0-alpha.87+b630244.nightly-x86_64.runType the following command again and enter:
./arcs_update-0.29.0-alpha.87+b630244.nightly-x86_64.run install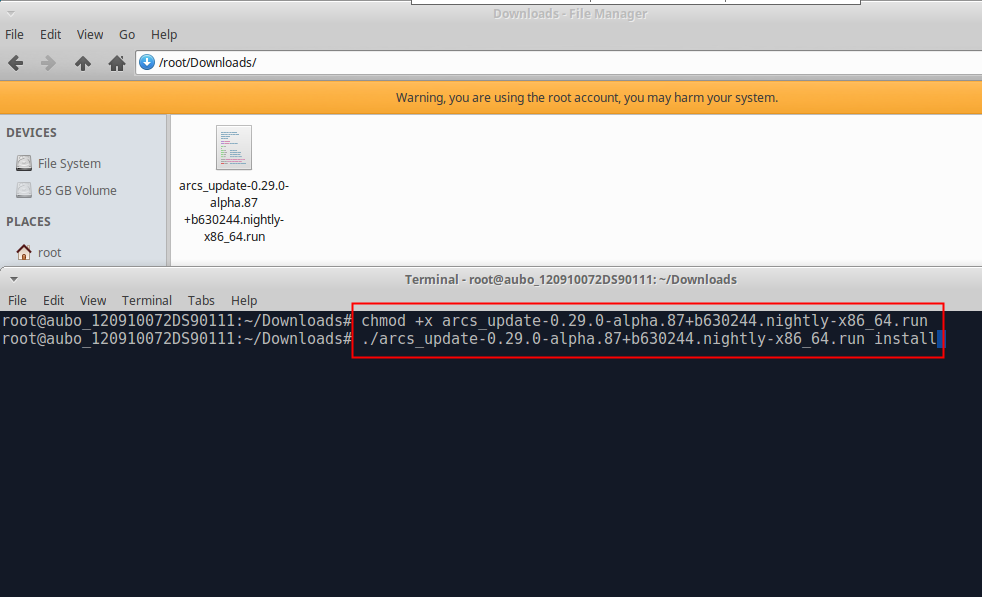
Wait for the ARCS installation to complete. The following figure shows that the ARCS installation was successful.
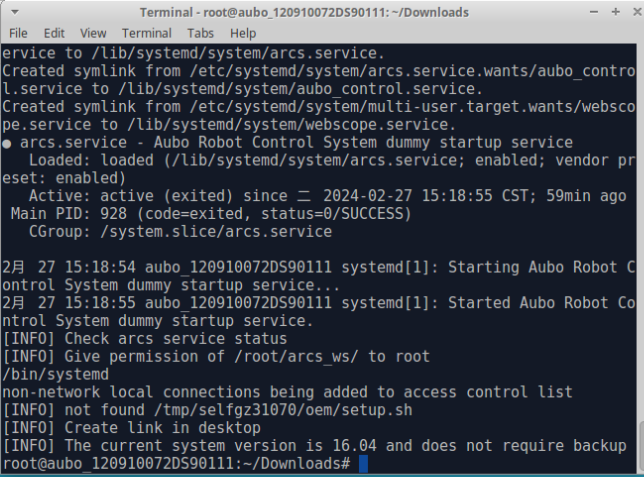
Restart the teaching device to complete the ARCS installation.
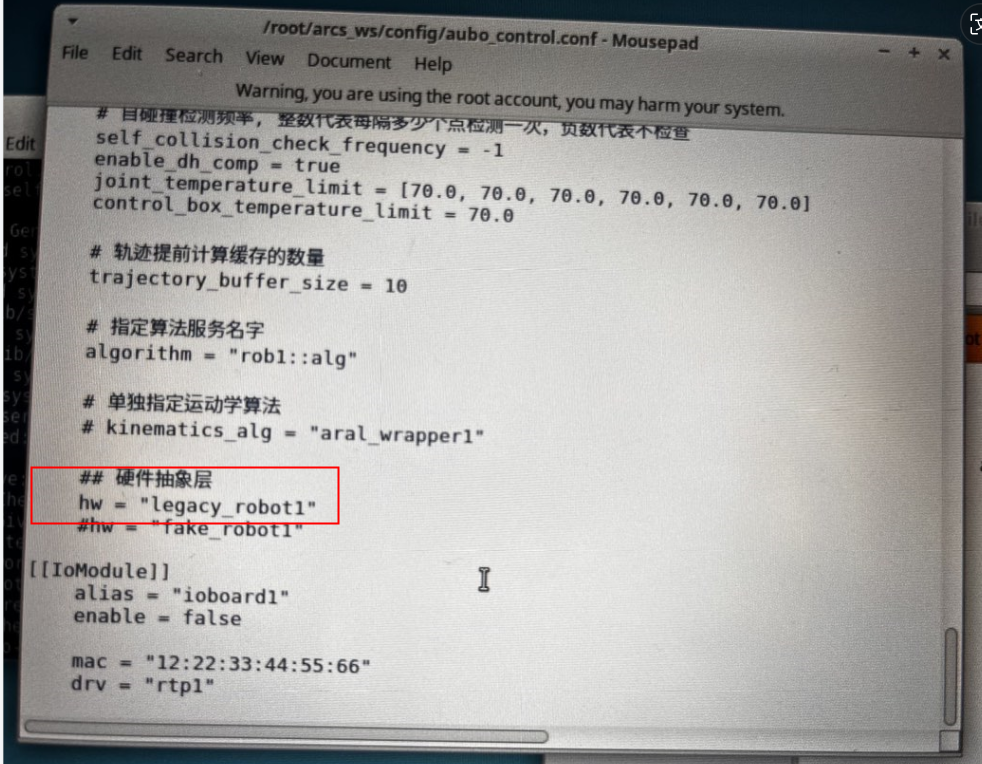
Configuration file aubo_control.conf hardware abstraction layer hw = 'legacy_robot1' for old protocol robot arm
For a new protocol arm, select the corresponding arm type file, copy it to the /root/arcs_ws/config/ directory, replace the aubo_control.conf file, and rename the file.
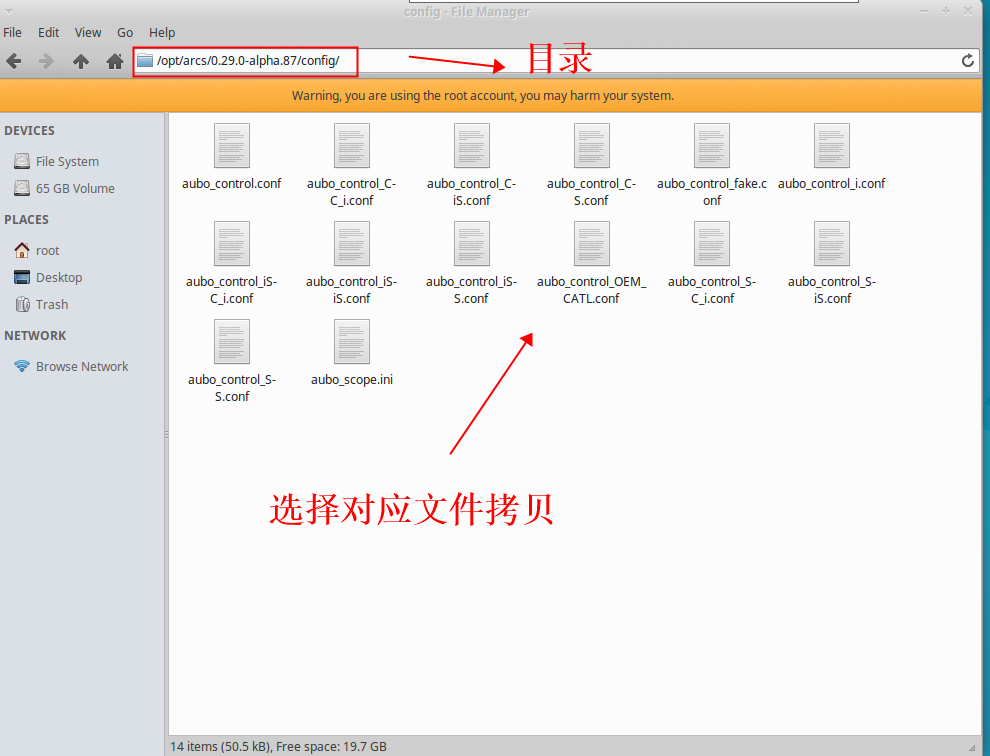
Configuration file description:
The first capital letter of the profile name specifies the type of control cabinet, and the second and third capital letters following the connection symbol “-” indicate the type of robot arm. For example:
aubo_control_C- C_i Specify C control robot arm cabinet + C series robot arm or i series robot arm.
aubo_control_iS-C_i Specify IS control robot arm cabinet + C-series robot arm or i-series robot arm.
Firmware upgrade method, old protocol conversion new protocol method reference https://docs.aubo-robotics.cn/application_notes/16-firmware-update/ Software/firmware upgrade operation instructions
5.Serial Number Entry
Click yes to enter the serial number page.
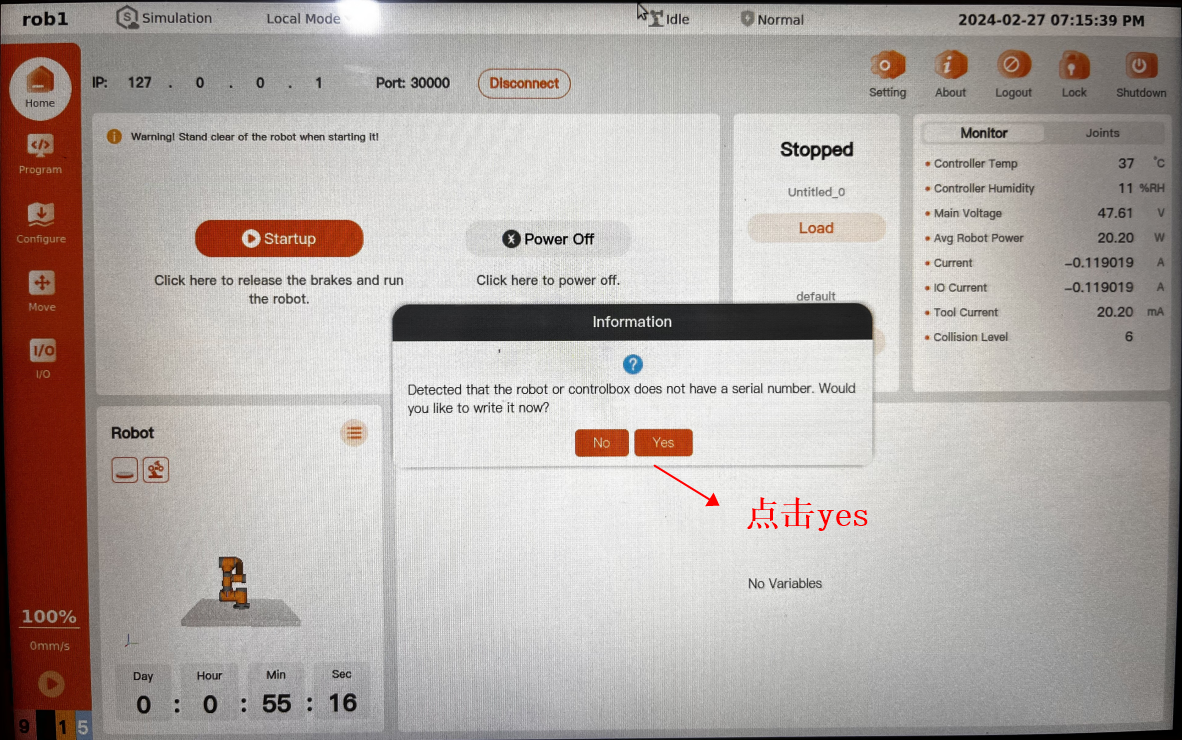
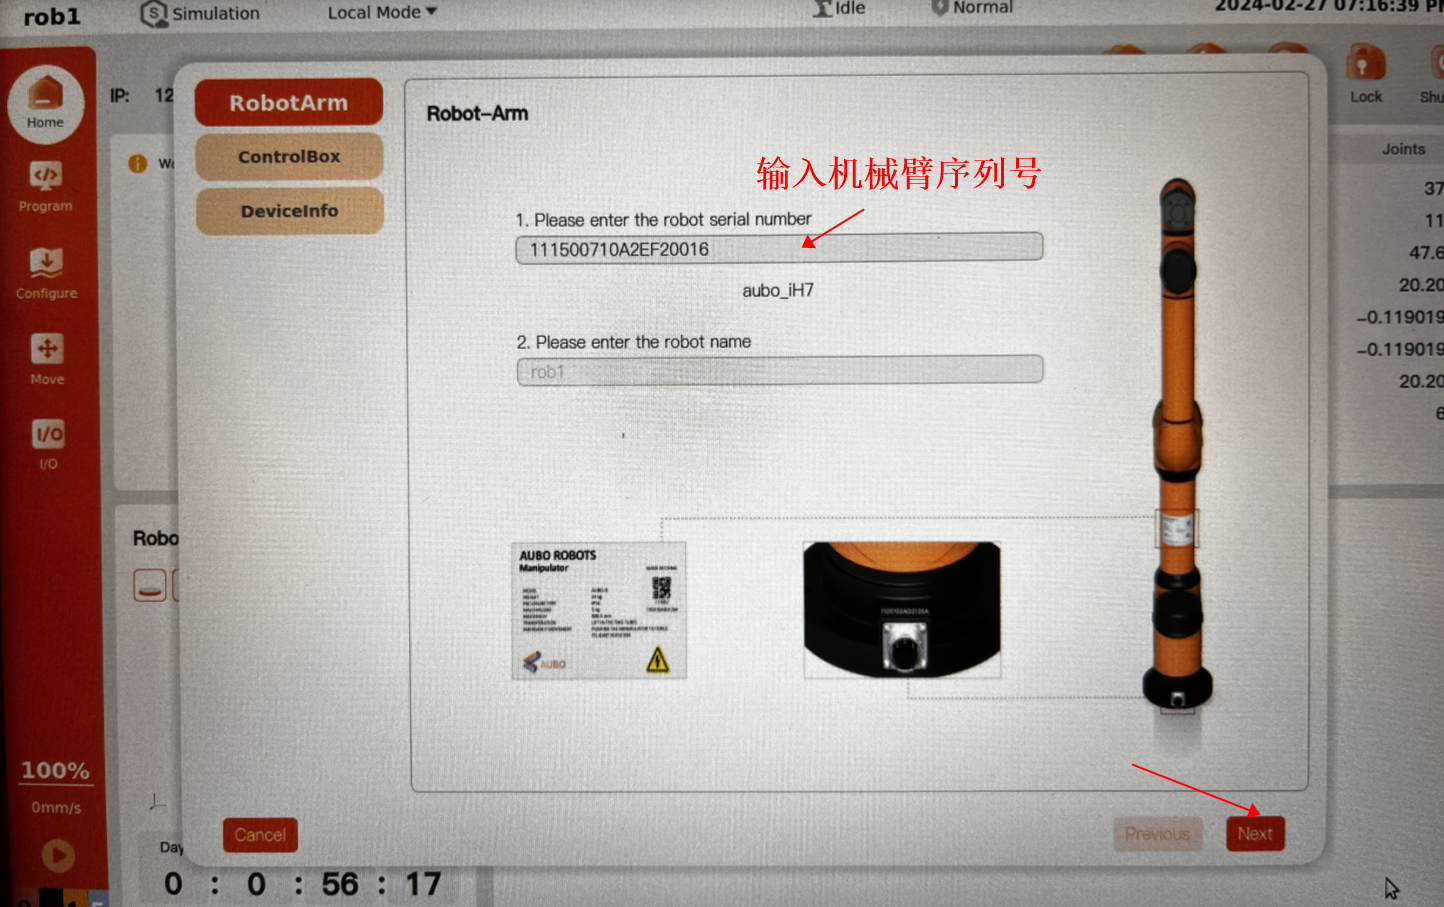
Enter robot serial number in turn, and click next.
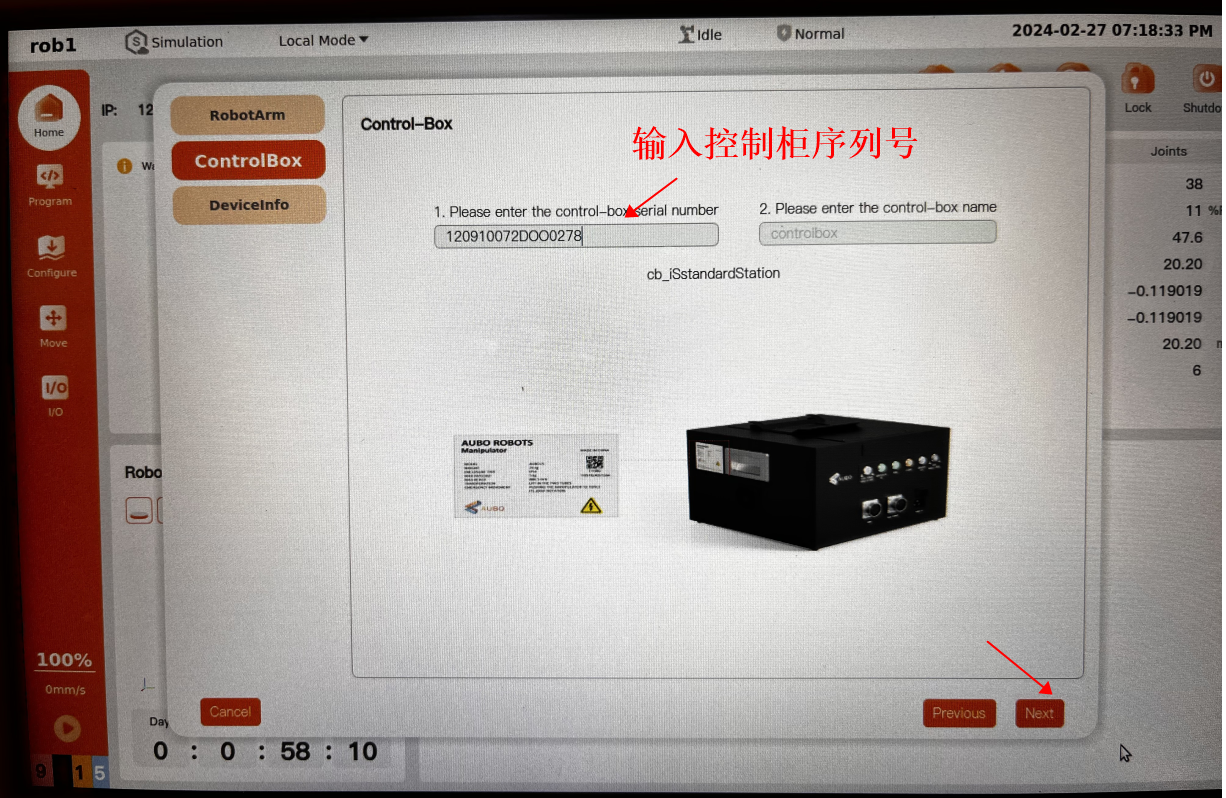
Enter control cabinet serial number control-box serial number , and click next.
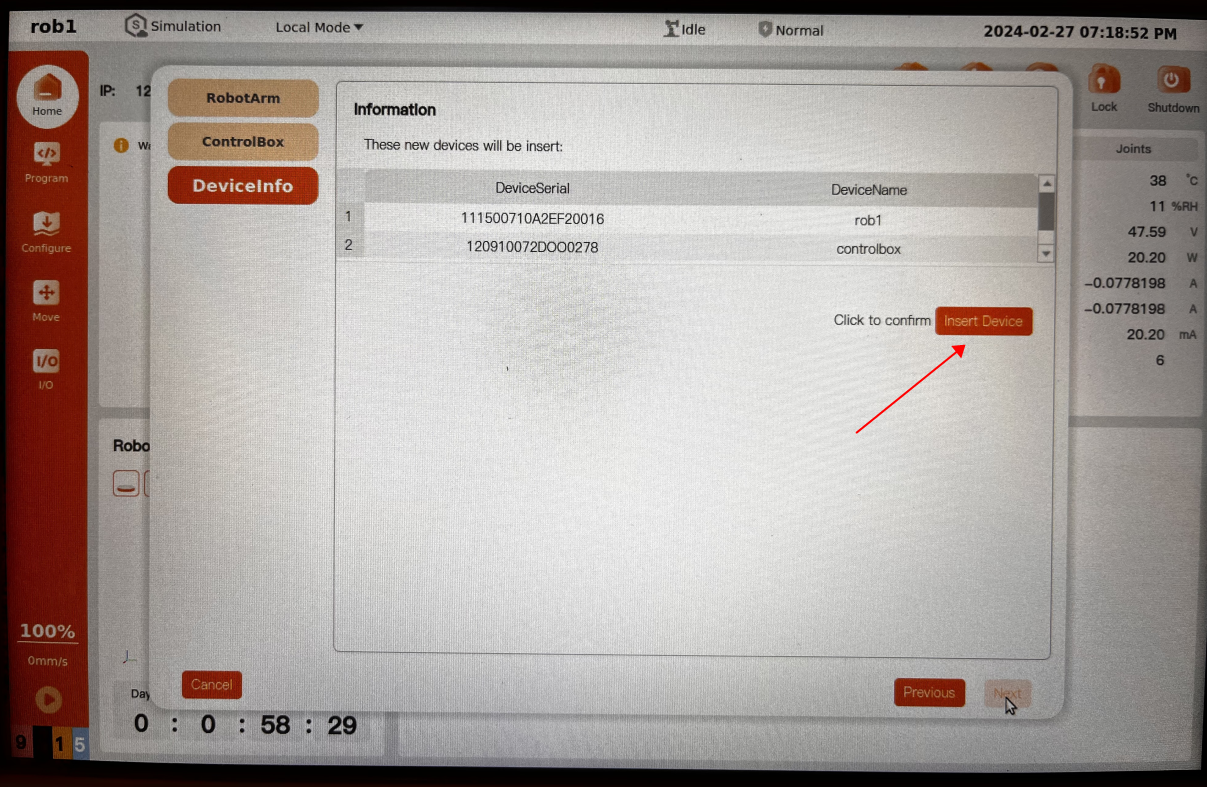
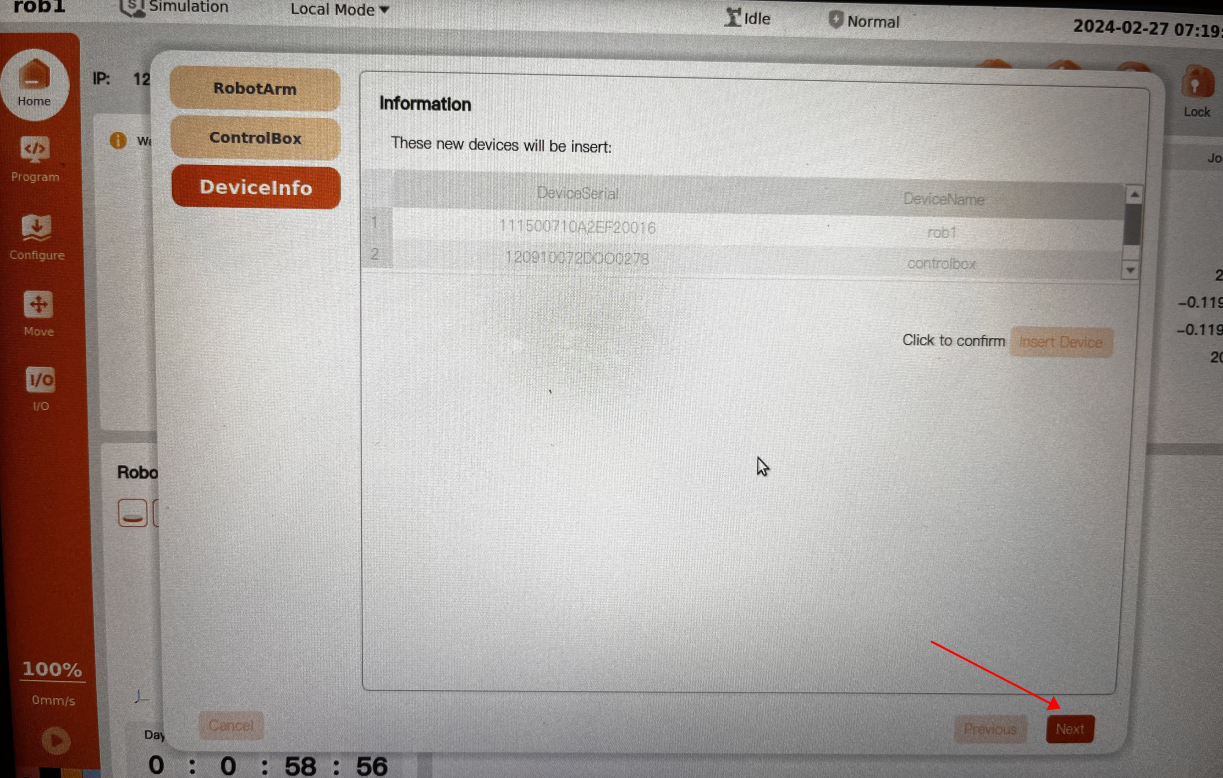
Click Insert Device
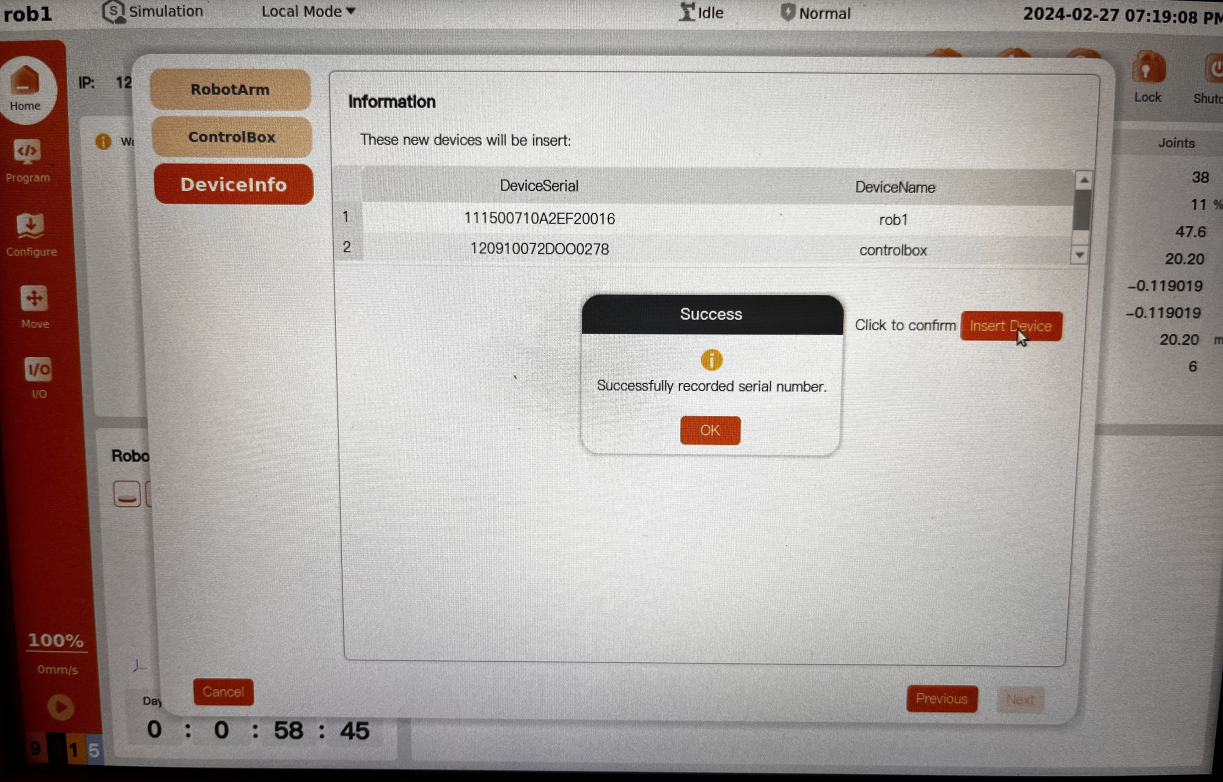
In the successfully inserted device dialog box, click the OK
Click next
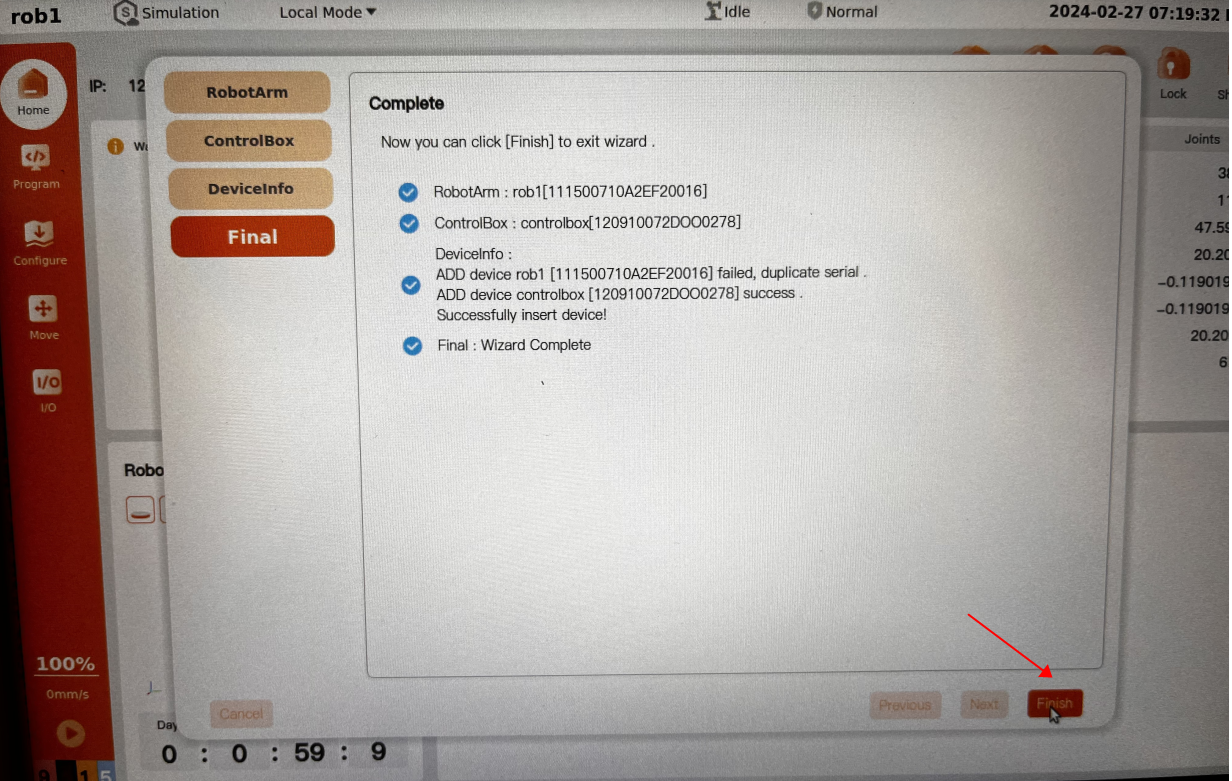
On the Final page, click Finish.
In the Success dialog box, click OK.
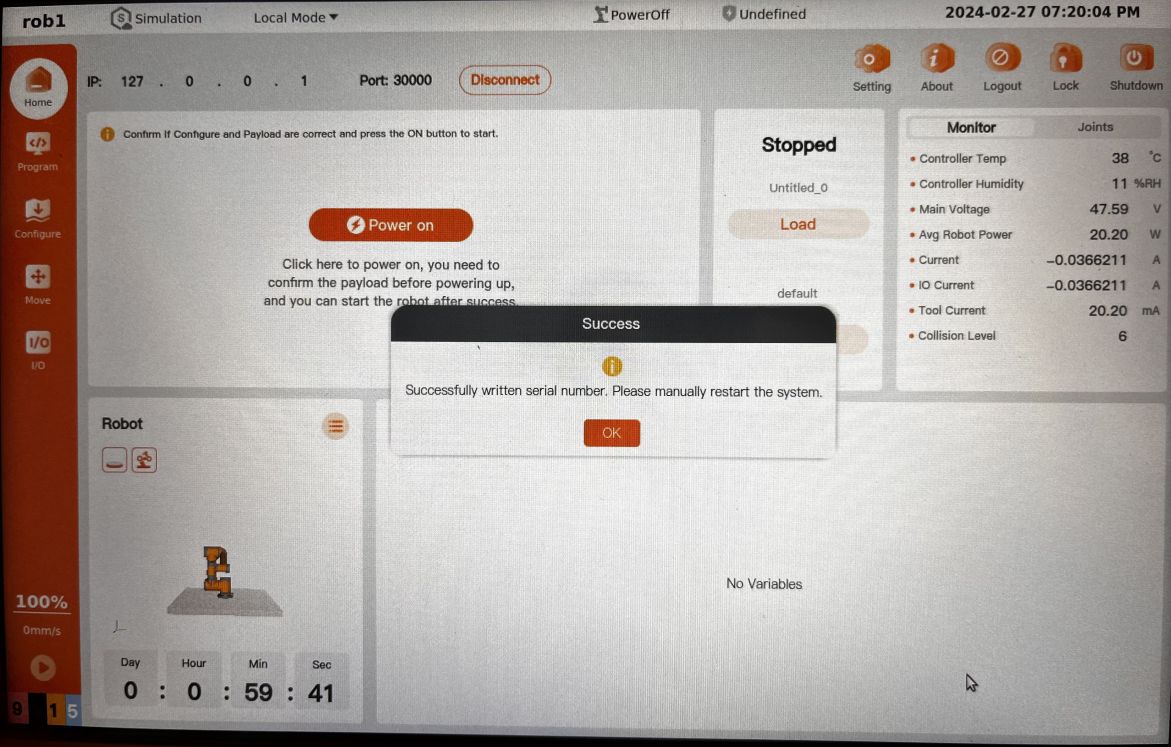
Complete serial number entry.
