Send Script via Browser and TCP Debugging Assistant
1. Based on the WebSocket communication protocol
Click to open the webpage for sending scripts
This site requires an active internet connection
Image of browser connection tool
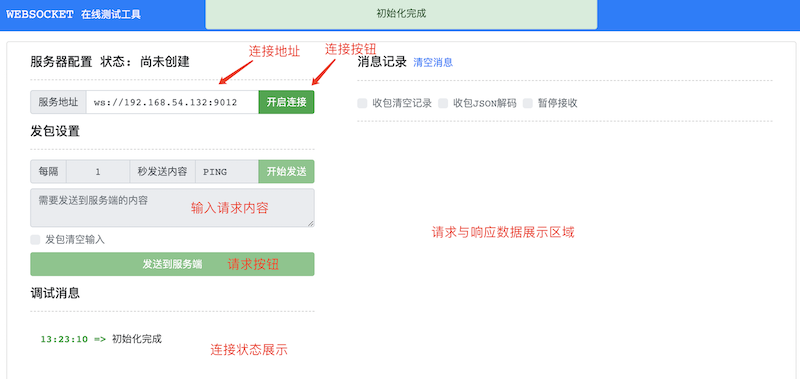
Aubo-control port list
When using the WebSocket communication protocol, the URL must start with ws://
- 9012 RPC WebSocket communication port
- 9013 RTDE WebSocket communication port
- 30003 Script WebSocket communication port
Steps for Operation
- Enter the corresponding
aubo_controladdress in the service address field.
- Enter the corresponding
- Click the [Open Connection] button. A green status message [Connection Successful] will appear, and [Server Configuration Status: Connected] will be displayed. If the connection fails, a red status message [Server Configuration Status: Disconnected] will appear.
Connection Successful


Connection Failed
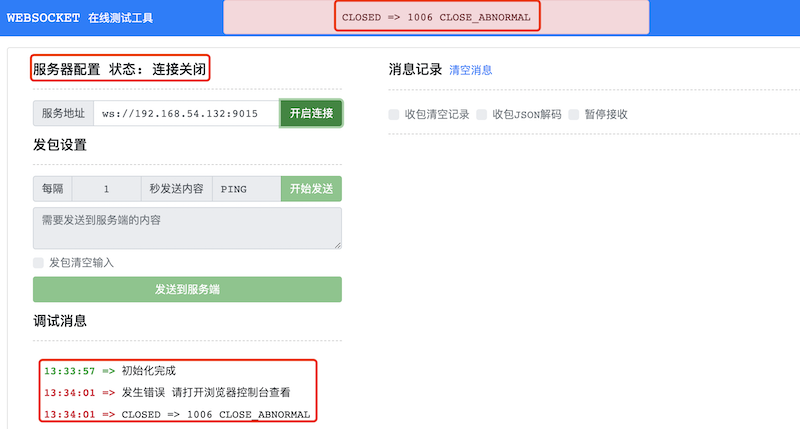
3.Send a request by entering the corresponding information in the [Content to Send to Server] box.

4.It is recommended to open two browser tabs to simultaneously operate RPC and Script communication.

Basic Robot Operations (RPC Connection)
"localhost" here refers to the controller's IP address
Connection URL: ws://localhost:9012/
Retrieve robot name list
//Request
{"jsonrpc":"2.0","method":"getRobotNames","params":[],"id":1}

//Response
{"id":1,"jsonrpc":"2.0","result":["rob1"]}
Power on
//Request
{"jsonrpc":"2.0","method":"rob1.RobotManage.poweron","params":[],"id":1038}

//Response
{"id":1038,"jsonrpc":"2.0","result":0}
Enable (release brakes)
//Request
{"jsonrpc":"2.0","method":"rob1.RobotManage.startup","params":[],"id":1210}

//Response
{"id":1210,"jsonrpc":"2.0","result":0}
Check operational status
//Request
{"jsonrpc":"2.0","method":"RuntimeMachine.getStatus","params":[],"id":1211}

//Response
{"id":1211,"jsonrpc":"2.0","result":"Stopped"}
Stop operation
//Request
{"jsonrpc":"2.0","method":"RuntimeMachine.abort","params":[],"id":1221}

//Response
{"id":1221,"jsonrpc":"2.0","result":0}
Sending Script
"localhost" here refers to the controller's IP address
Connection URL:ws://localhost:30003/
Enter the following script as the request:
local aubo = require('aubo')
local sched = sched or aubo.sched
local math = aubo.math or math

local sleep = sched.sleep
local thread = sched.thread
local sync = sched.sync
local run = sched.run
local kill = sched.kill
local halt = sched.halt
function p_3()
    _ENV = sched.select_robot(1)
    setCollisionStopType(0)
    setCollisionLevel(6)
    setHomePosition({0,-0.2617993877991494,1.74532925199433,0.4363323129985824,1.570796326794897,0}    )
    modbusDeleteAllSignals()
    setDigitalInputActionDefault()
    setDigitalOutputRunstateDefault()
    setStandardDigitalInputAction(0, StandardInputAction.PowerOn)
    setStandardDigitalInputAction(1, StandardInputAction.PauseProgram)
    setStandardDigitalInputAction(2, StandardInputAction.ResumeProgram)
    modbusAddSignal("192.168.1.1,502", 1, 1, 0, "MODBUS_0", 0)
    modbusAddSignal("192.168.1.1,502", 1, 2, 1, "MODBUS_1", 0)
    setPayload(0, {0,0,0}, {0,0,0}, {0,0,0,0,0,0,0,0,0})
    setTcpOffset({0,0,0,0,0,0})
    setPlanContext(sched.current_thread_id(), 1, "Initial variable")
    u57fau5ea7 = {0,0,0,0,0,0}
    u5de5u5177 = {0,0,0,0,0,0}
    Plane_0 = {0.768350098497211,-0.191,0.386240389635923,1.57079632679509,-0.729398907067939,1.37279501958681}
    Waypoint_0_p = {0.4088231104893066,-0.1323967385977438,0.4347702182194097,2.72087314652665,0.4388892171971361,1.558508144688528}
    Waypoint_0_q = {0.0640218,-0.0704569,1.31411,0.242477,1.13968,-0.114125}
    Waypoint_1_p = {0.4153092841363478,-0.1219412898255656,0.2555375392691158,3.052929290665242,0.09279123623776417,1.600158873255395}
    Waypoint_1_q = {0.01351444380551069,-0.2214086568455021,1.654302627486244,0.395411146553418,1.479791428899058,-0.02409079250042809}

    function str_cat(str1, str2)
        return tostring(str1) .. tostring(str2)
    end

    local function calculate_point_to_move_towards(feature, direction, position_distance)
        local posDir={direction[1], direction[2], direction[3]}
        if (math.norm(posDir) < 1e-6) then
            return getTargetTcpPose()
        end
        local direction_vector_normalized=math.normalize(posDir)
        local displacement_pose={direction_vector_normalized[1] * position_distance,direction_vector_normalized[2] * position_distance,direction_vector_normalized[3] * position_distance,0,0,0}

        local wanted_displacement_in_base_frame=poseSub(poseTrans(feature, displacement_pose), feature)
        return poseAdd(getTargetTcpPose(), wanted_displacement_in_base_frame)
    end
    setPlanContext(sched.current_thread_id(), 2, "Program")
    while true do
        setPlanContext(sched.current_thread_id(), 3, "Articulation")
        setPlanContext(sched.current_thread_id(), 4, "Waypoint_0")
        setTcpOffset({0,0,0,0,0,0})
        moveJoint(inverseKinematics(Waypoint_0_q, Waypoint_0_p), 1.39626, 1.0472, 0, 0)

        setPlanContext(sched.current_thread_id(), 5, "Waypoint_1")
        setTcpOffset({0,0,0,0,0,0})
        moveJoint(inverseKinematics(Waypoint_1_q, Waypoint_1_p), 1.39626, 1.0472, 0, 0)
        sched.cancel_point()
    end
end

local app = {
  PRIORITY = 1000, -- set the app priority, which determines app execution order
  VERSION = "0.1",
  VENDOR = "Aubo Robotics",
}

function app:start(api)
  --
  self.api = api
  print("start---")
  p_3()
end

function app:robot_error_handler(name, err)
  --
  print("An error hanppen to robot "..name)
end

-- return our app object
return app
Received response:
{"type":"table","name":"Waypoint_0_q","value":[0.0640218,-0.0704569,1.31411,0.242477,1.13968,-0.114125],"event":"updateVariable","robot_index":1}2. Based on HTTP Communication Protocol
Using the curl Command to Send HTTP Requests
“curl” is a command-line tool and library used for data transfer across various operating systems. It supports the “HTTP” protocol, allowing you to send “HTTP” requests and receive server’s “Response” from the command line.
Before using the “curl” command, ensure it is installed on your operating system. You can verify the installation by running the command curl --version in the terminal or command prompt.
An example of sending a “POST Request” using “curl” is as follows:
curl --location --request POST 'http://localhost:9012/jsonrpc' \
--data-raw '{"jsonrpc":"2.0","method":"getRobotNames","params":[],"id":1}'--location:This option tells “curl” to automatically follow redirects when the server returns a redirect “Response”. If the server returns a “3xx” status code, “curl” will automatically send a request to the new redirect URL.--request POST:This option specifies that “curl” will use the “POST” method for the request. In the “HTTP” protocol, the “POST” method is used to submit data to the server. By using this option, “curl” sends the request as a “POST”, allowing the server to receive data included in the “Request” body.http://localhost:9012/jsonrpc:The target URL for the RPC module represents the server address and endpoint to which the “Request” will be sent.http://localhost:9012specifies the server's location, wherelocalhostis the robot's IP address and9012is the RPC port number./jsonrpcis the specific endpoint path that identifies the resource or service on the server handling JSON-RPC requests.--data-raw:Used to specify the content of the “Request” body. In this example, “Request” body contains a JSON-formatted string to retrieve the list of robot names.
Example of calling JSON-RPC interface using the "curl" command:
The following demonstrates how to perform operations such as powering on the robot, joint movement, and linear movement. Assume the robot's IP address is 192.168.1.36:
Get the list of robot names using getRobotNames()
JSON-RPC Request:
shellcurl --location --request POST 'http://192.168.1.36:9012/jsonrpc' \ --data-raw '{"jsonrpc":"2.0","method":"getRobotNames","params":[],"id":1}'JSON-RPC Response:
shell{"id":1,"jsonrpc":"2.0","result":["rob1"]}According to the response result, the retrieved robot name is
rob1.
Send a power-on request using Request poweron()
JSON-RPC Request:
shellcurl --location --request POST 'http://192.168.1.36:9012/jsonrpc' \ --data-raw '{"jsonrpc":"2.0","method":"rob1.RobotManage.poweron","params":[],"id":2}'JSON-RPC Response:
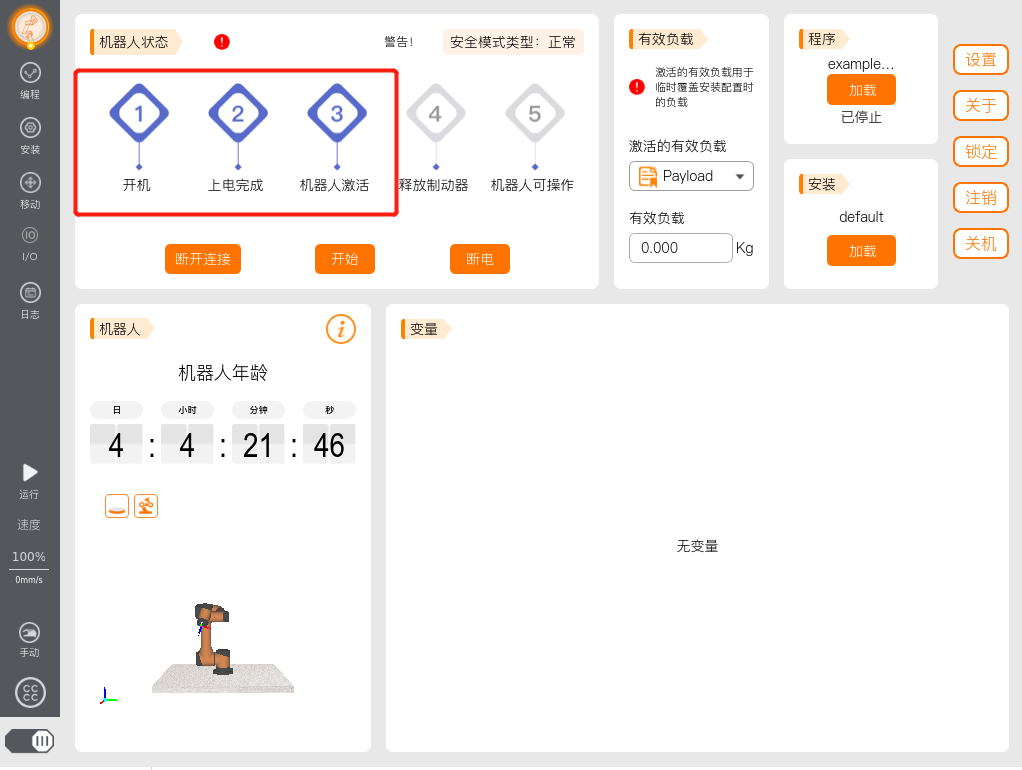
shell{"id":2,"jsonrpc":"2.0","result":0}Note: When all three indicators on the teach pendant are lit, it indicates that the power-on command has been executed. Only then should you send the startup() command.
Send a startup request using Request startup()
JSON-RPC Request:
shellcurl --location --request POST 'http://192.168.1.36:9012/jsonrpc' \ --data-raw '{"jsonrpc":"2.0","method":"rob1.RobotManage.startup","params":[],"id":3}'JSON-RPC Response:
shell{"id":3,"jsonrpc":"2.0","result":0}When all five indicators on the teach pendant are lit, it indicates that the startup command has been executed.
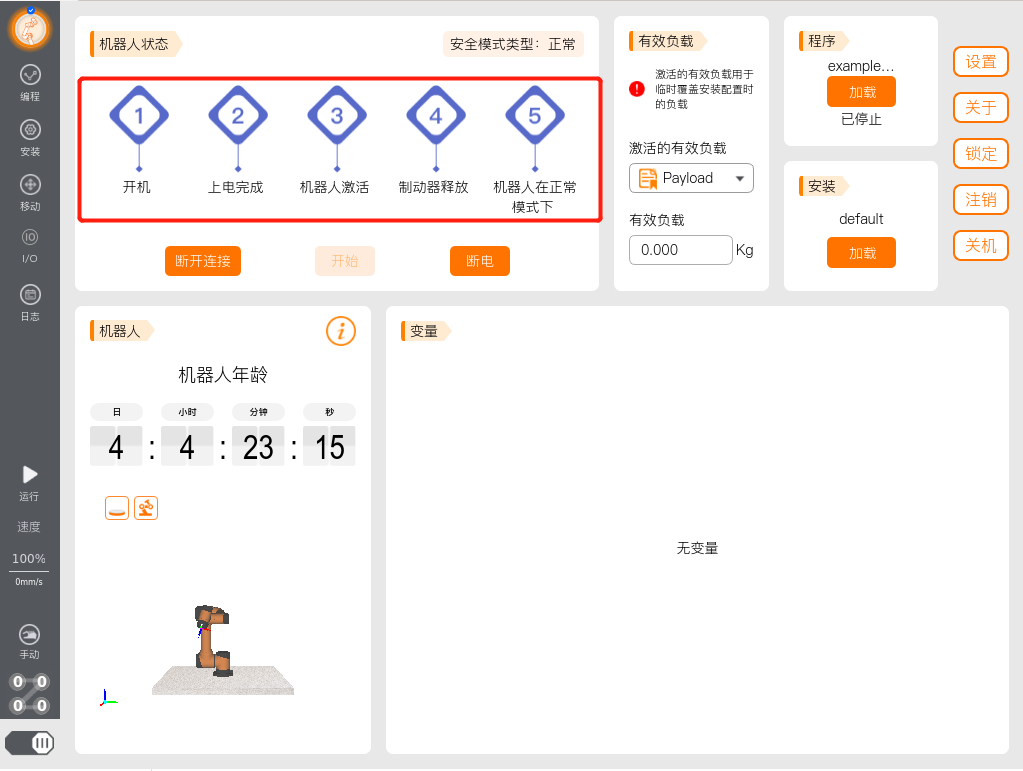
Perform joint movement using moveJoint()
JSON-RPC Request:
shellcurl --location --request POST 'http://192.168.1.36:9012/jsonrpc' \ --data-raw '{"jsonrpc":"2.0","method":"rob1.MotionControl.moveJoint","params":[[-2.05177, -0.400292, 1.19625,0.0285152, 1.57033, -2.28774],0.3,0.3,0,0],"id":4}'- The first parameter is the six joint angles, in radians (rad).
- The second parameter is the joint acceleration, in rad/s^2.
- The third parameter is the joint velocity, in radians per second.
- The fourth parameter is the blend radius, in meters (m), usually set to 0.
- The fifth parameter is the duration, in seconds (s). If there is no specific duration required, it can be set to 0.
JSON-RPC Response:
shell{"id":4,"jsonrpc":"2.0","result":0}Switch to the Move interface on the teach pendant to observe the current angles of the six joints. As shown in the figure below, the robot joints move to the specified angles.
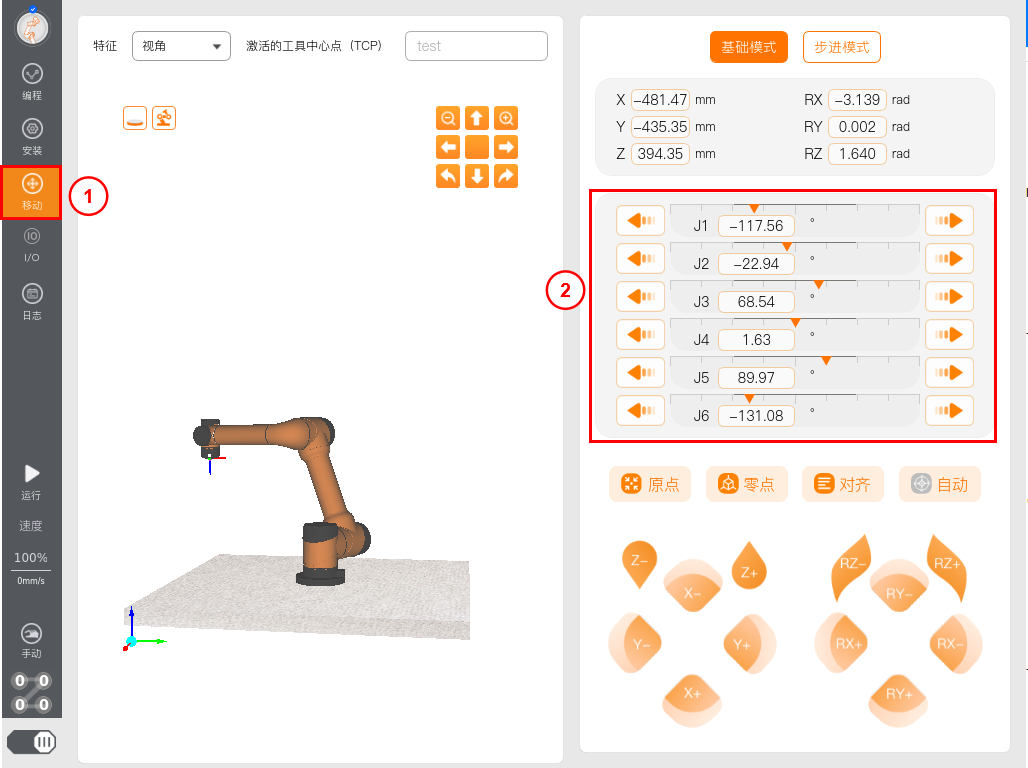
Perform linear movement using moveLine()
JSON-RPC Request:
shellcurl --location --request POST 'http://192.168.1.36:9012/jsonrpc' \ --data-raw '{"jsonrpc":"2.0","method":"rob1.MotionControl.moveLine","params":[[0.54887, -0.12150, 0.43752, 3.142, 0.000, 1.571],0.3,0.3,0,0],"id":5}'- The first parameter is the TCP position and orientation, [x,y,z,rx,ry,rz], where x, y, z represent position in meters (m), and rx, ry, rz represent orientation in radians (rad).
- The second parameter is the linear acceleration, in m/s^2.
- The third parameter is the linear velocity, in m/s.
- The fourth parameter is the blend radius, in meters (m), usually set to 0.
- The fifth parameter is the duration, in seconds (s). If there is no specific duration required, it can be set to 0.
JSON-RPC Response:
shell{"id":5,"jsonrpc":"2.0","result":0}Switch to the Move interface on the teach pendant, set the Reference to Base, which is in the base coordinate system. You can observe the current position and orientation of the TCP in the base coordinate system. As shown in the figure below, the robot performs linear movement to the specified pose.
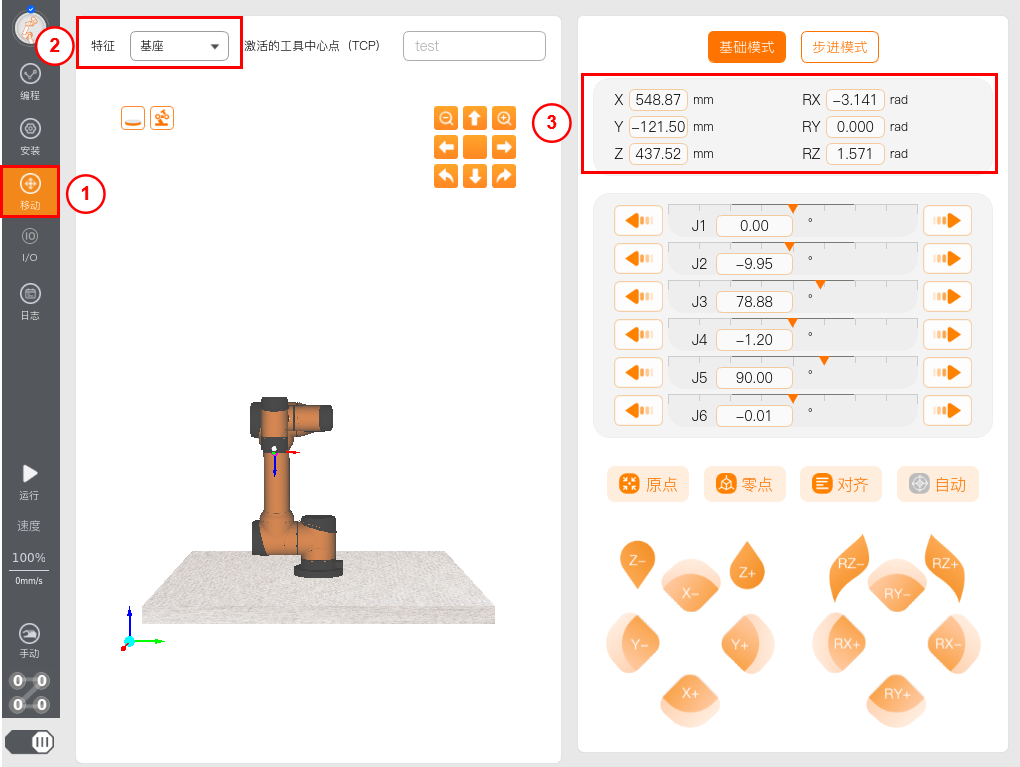
Sending Scripts via HTTP
HTTP Testing Tool
Use a POST request and enter the Control IP address in the request URL field, formatted as
{IP}:30003/aubo_script.Select the parameter Body, and choose the format raw.
Click Send to submit the HTTP script request. A successful response will return
Script received.
Note: The robot must be powered on and the brakes released before running the script.
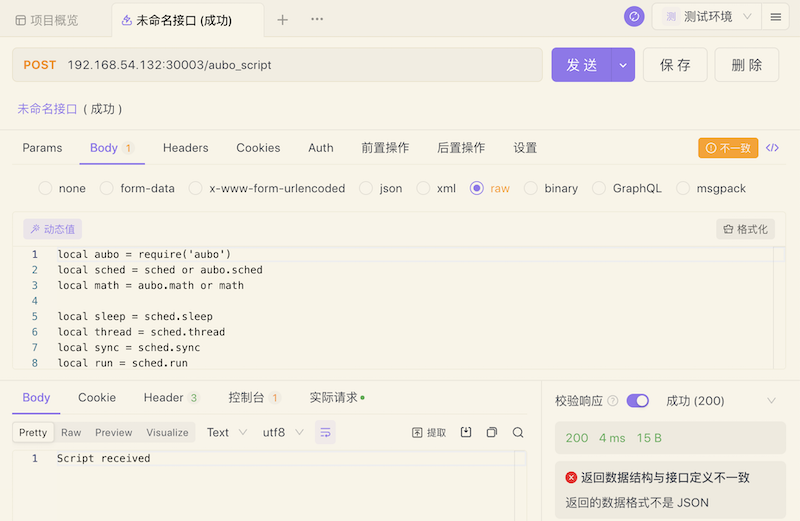
Shell Request HTTP
Use curl Request HTTP to send the script. Check if your Linux system can use the curl command.
- Use
--request POSTwith the Control IP address, formatted as{IP}:30003/aubo_script. - Use
--data-rawwith the script string.
curl --location --request POST '127.0.0.1:30003/aubo_script' \
--data-raw 'local aubo = require('\''aubo'\'')
local sched = sched or aubo.sched
local math = aubo.math or math

local sleep = sched.sleep
local thread = sched.thread
local sync = sched.sync
local run = sched.run
local kill = sched.kill
local halt = sched.halt
function p_3()
    _ENV = sched.select_robot(1)
    setCollisionStopType(0)
    setCollisionLevel(6)
    setHomePosition({0,-0.2617993877991494,1.74532925199433,0.4363323129985824,1.570796326794897,0}    )
    modbusDeleteAllSignals()
    setDigitalInputActionDefault()
    setDigitalOutputRunstateDefault()
    setStandardDigitalInputAction(0, StandardInputAction.PowerOn)
    setStandardDigitalInputAction(1, StandardInputAction.PauseProgram)
    setStandardDigitalInputAction(2, StandardInputAction.ResumeProgram)
    modbusAddSignal("192.168.1.1,502", 1, 1, 0, "MODBUS_0", 0)
    modbusAddSignal("192.168.1.1,502", 1, 2, 1, "MODBUS_1", 0)
    setPayload(0, {0,0,0}, {0,0,0}, {0,0,0,0,0,0,0,0,0})
    setTcpOffset({0,0,0,0,0,0})
    setPlanContext(sched.current_thread_id(), 1, "Initial variable")
    u57fau5ea7 = {0,0,0,0,0,0}
    u5de5u5177 = {0,0,0,0,0,0}
    Plane_0 = {0.768350098497211,-0.191,0.386240389635923,1.57079632679509,-0.729398907067939,1.37279501958681}
    Waypoint_0_p = {0.4088231104893066,-0.1323967385977438,0.4347702182194097,2.72087314652665,0.4388892171971361,1.558508144688528}
    Waypoint_0_q = {0.0640218,-0.0704569,1.31411,0.242477,1.13968,-0.114125}
    Waypoint_1_p = {0.4153092841363478,-0.1219412898255656,0.2555375392691158,3.052929290665242,0.09279123623776417,1.600158873255395}
    Waypoint_1_q = {0.01351444380551069,-0.2214086568455021,1.654302627486244,0.395411146553418,1.479791428899058,-0.02409079250042809}


    function str_cat(str1, str2)
        return tostring(str1) .. tostring(str2)
    end

    local function calculate_point_to_move_towards(feature, direction, position_distance)
        local posDir={direction[1], direction[2], direction[3]}
        if (math.norm(posDir) < 1e-6) then
            return getTargetTcpPose()
        end
        local direction_vector_normalized=math.normalize(posDir)
        local displacement_pose={direction_vector_normalized[1] * position_distance,direction_vector_normalized[2] * position_distance,direction_vector_normalized[3] * position_distance,0,0,0}

        local wanted_displacement_in_base_frame=poseSub(poseTrans(feature, displacement_pose), feature)
        return poseAdd(getTargetTcpPose(), wanted_displacement_in_base_frame)
    end
    setPlanContext(sched.current_thread_id(), 2, "Program")
    while true do
        setPlanContext(sched.current_thread_id(), 3, "Articulation")
        setPlanContext(sched.current_thread_id(), 4, "Waypoint_0")
        setTcpOffset({0,0,0,0,0,0})
        moveJoint(inverseKinematics(Waypoint_0_q, Waypoint_0_p), 1.39626, 1.0472, 0, 0)

        setPlanContext(sched.current_thread_id(), 5, "Waypoint_1")
        setTcpOffset({0,0,0,0,0,0})
        moveJoint(inverseKinematics(Waypoint_1_q, Waypoint_1_p), 1.39626, 1.0472, 0, 0)
        sched.cancel_point()
    end
end

local app = {
  PRIORITY = 1000, -- set the app priority, which determines app execution order
  VERSION = "0.1",
  VENDOR = "Aubo Robotics",
}

function app:start(api)
  --
  self.api = api
  print("start---")
  p_3()
end

function app:robot_error_handler(name, err)
  --
  print("An error hanppen to robot "..name)
end

-- return our app object
return app'
3. Based on the TCP Socket communication protocol
The port number for sending script strings or script files via TCP Socket is 30002.
The following explains how to send script strings and script files using a TCP debugging tool.
The script string used in the example is as follows:
--[[
    Function: Joint motion
    Description: Perform joint motion to pass through 3 waypoints sequentially.
]]
return function(api)
    local _ENV = require('aubo').sched.select_robot(1)
    local sched = require('aubo').sched
    sched.sleep(0)

    pi = 3.14159265358979323846

    -- Waypoints are represented by joint angles in radians.
    waypoint0_q = {0.0/180*pi, -15/180*pi, 100/180*pi, 25/180*pi, 90.0/180*pi, 0.0/180*pi}
    waypoint1_q = {35.92/180*pi, -11.28/180*pi, 59.96/180*pi, -18.76/180*pi, 90.0/180*pi, 35.92/180*pi}
    waypoint2_q = {41.04/180*pi, -7.65/180*pi, 98.80/180*pi, 16.44/180*pi, 90.0/180*pi, 11.64/180*pi}

    -- Set the robot arm's speed ratio.
    setSpeedFraction(0.75)

    -- Joint motion.
    moveJoint(waypoint0_q, 80/180*pi, 60/180*pi, 0, 0)

    moveJoint(waypoint1_q, 80/180*pi, 60/180*pi, 0, 0)

    moveJoint(waypoint2_q, 80/180*pi, 60/180*pi, 0, 0)
end
3.1 Sending Script Strings via TCP Debugging Tool
Below are the steps to send script strings using a TCP debugging tool:
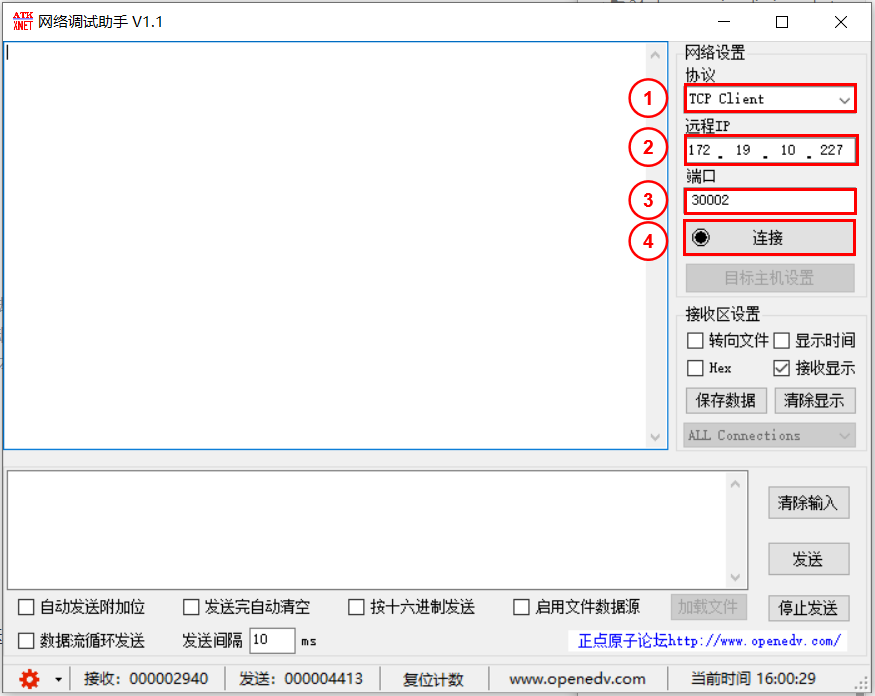
Select TCP Client, enter the robot's IP address and port number 30002, and then click Connect.
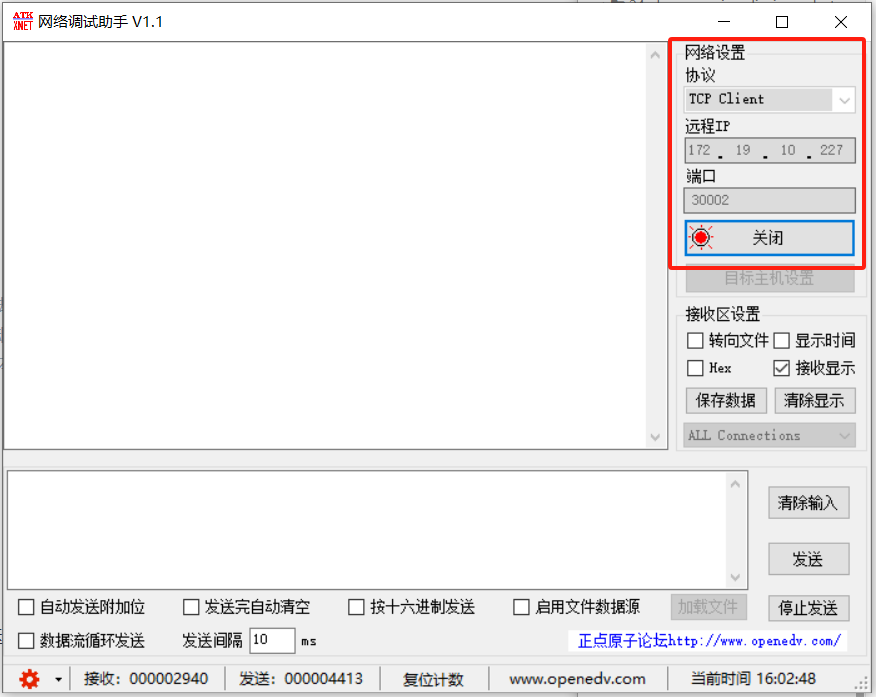
After a successful connection, the interface will look as shown below.
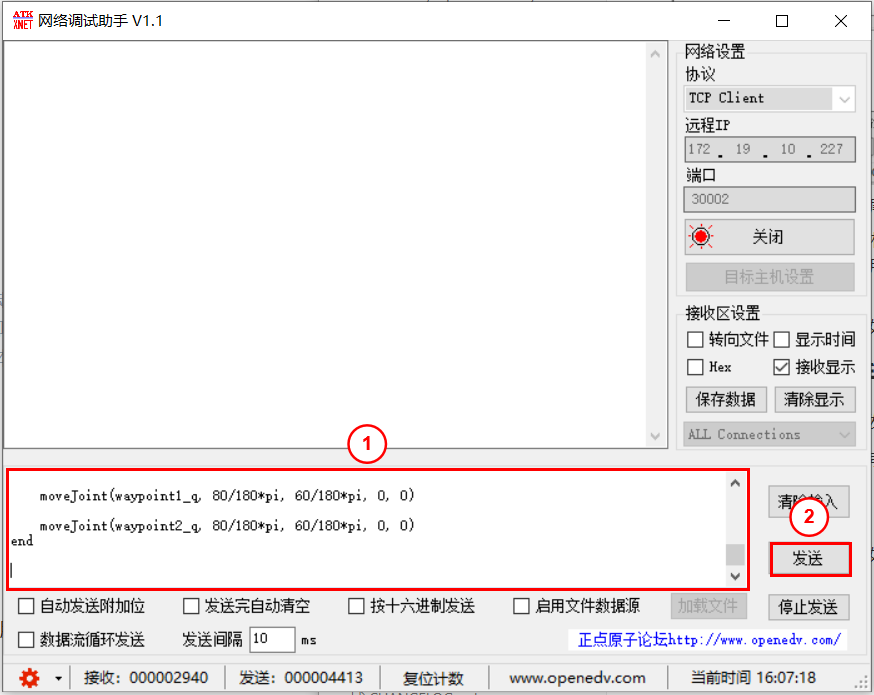
Enter the script string, press Enter twice at the end of the script, and click Send.
Note: Script strings sent to the robot controller via TCP Socket protocol must end with \r\n\r\n. \r\n represents a carriage return and newline. Therefore, after pasting the script into the TCP debugging tool, you need to press Enter at least twice at the end.
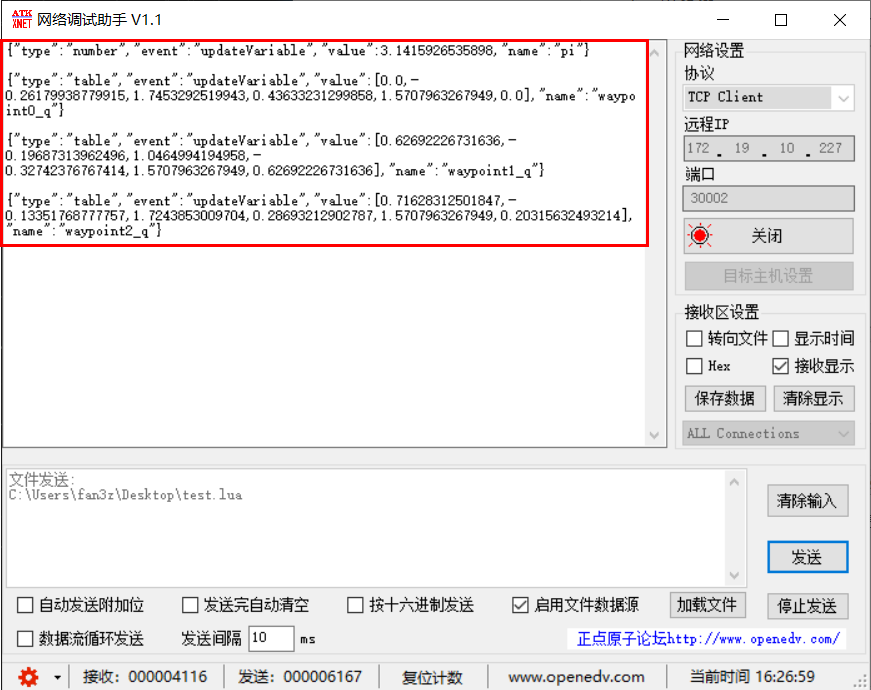
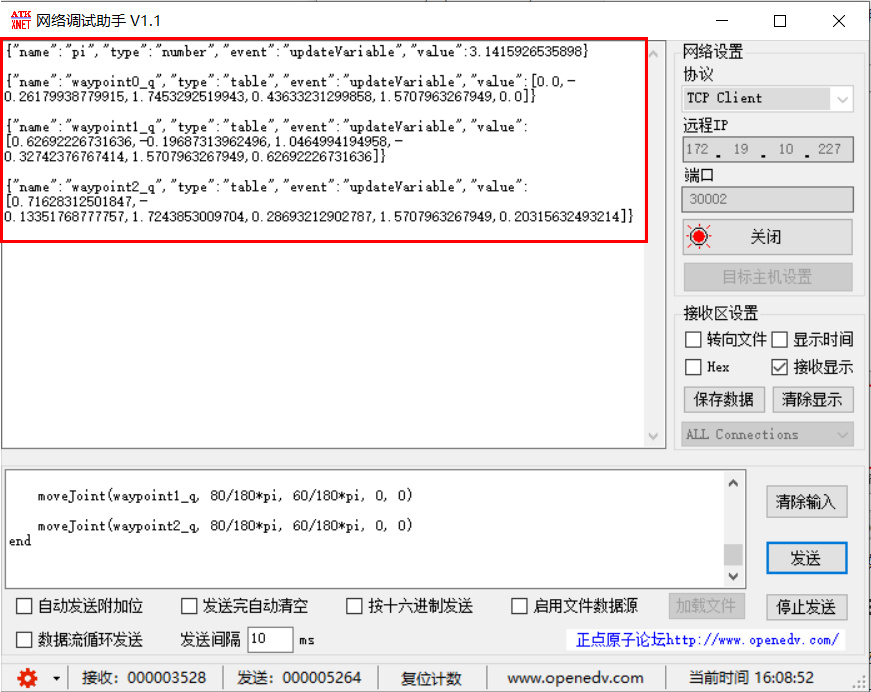
After the script runs successfully, the data reception information will appear as follows.
3.2 Sending Script Files via TCP Debugging Tool
Below are the steps to send script files using a TCP debugging tool:
Select TCP Client, enter the robot's IP address and port number 30002, and then click Connect.

After a successful connection, the interface will look as shown below.

Check Start File Data Source.
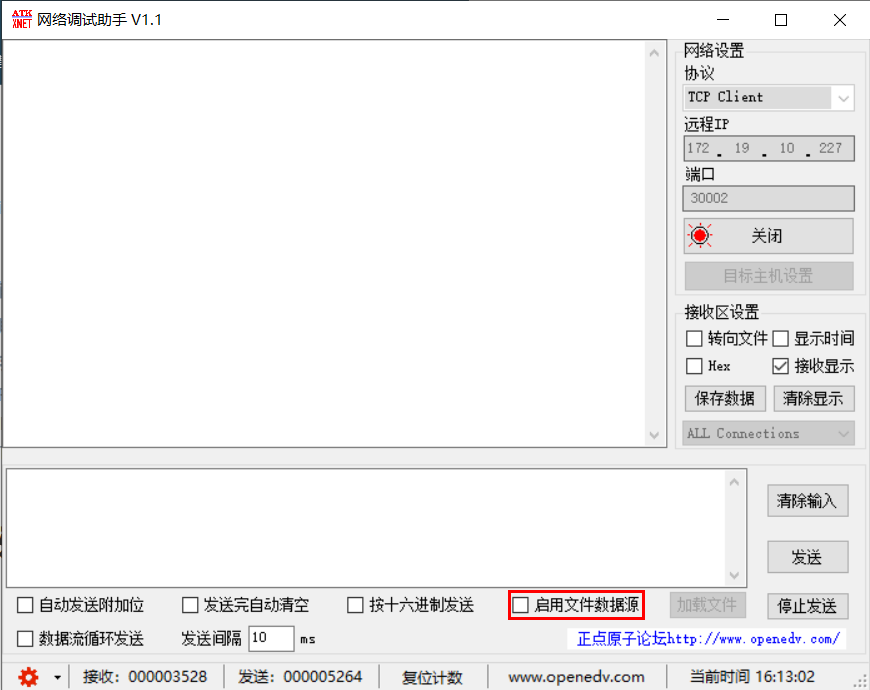
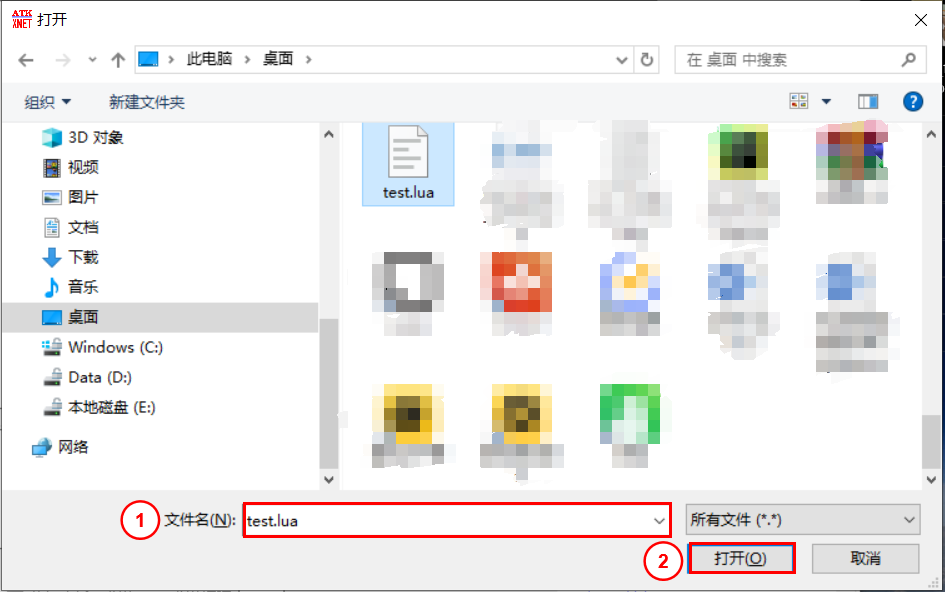
Open the script file.
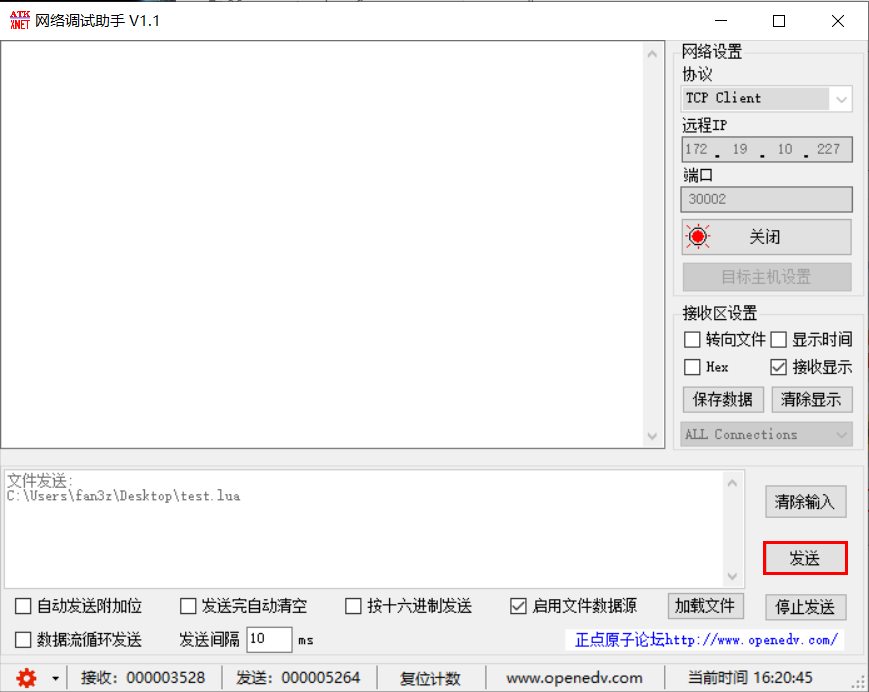
Click Send.
After the script runs successfully, the data reception information will appear as follows.
