servoJoint Interface User Guide
1. Use steps
To use the servoJoint interface, please strictly follow the steps below. Any problem in any of the following steps will make the servoJoint control inaccessible, and in this case, please contact relevant engineers for troubleshooting.
1.1 Checking the application environment
Use a network cable for connection to reduce network delay;
Please use the real-time system. If it is checked that the system is not of real-time type, please install the real-time kernel;
Open the terminal.
Run command:
bashuname -r #This command is for displaying the version number of the running kernel
If the end of the kernel version number contains
-rt(for example:4.14.195-rt94), it means that the kernel has been installed with a live patch; if not, it means that no live patch is installed on the current machine.
1.2 Move teaching test
After powering on and releasing the brake, operate in the move teaching interface of teach pendant and observe whether the robot arm moves normally without abnormal noise, jitter or other abnormalities;
1.3 Running program test
Create a new simple program, run this program and observe whether the robot arm moves normally without abnormal noise, jitter or other abnormalities;
1.4 Running servoj example test
Use the example provided in the SDK to test whether the robot arm can move normally under servoJoint control. During the test, mainly check whether there is jitter during the movement. If jitter occurs, or the robot stops motion automatically, please adjust the parameters and increase the t value as appropriate;
Note: For the sake of safety, please remove the obstacles around the robot arm before performing servoJoint control;
SDK examples are included in the SDK package, including C++ examples and Python examples;
Download SDK: https://download.aubo-robotics.cn/sdk/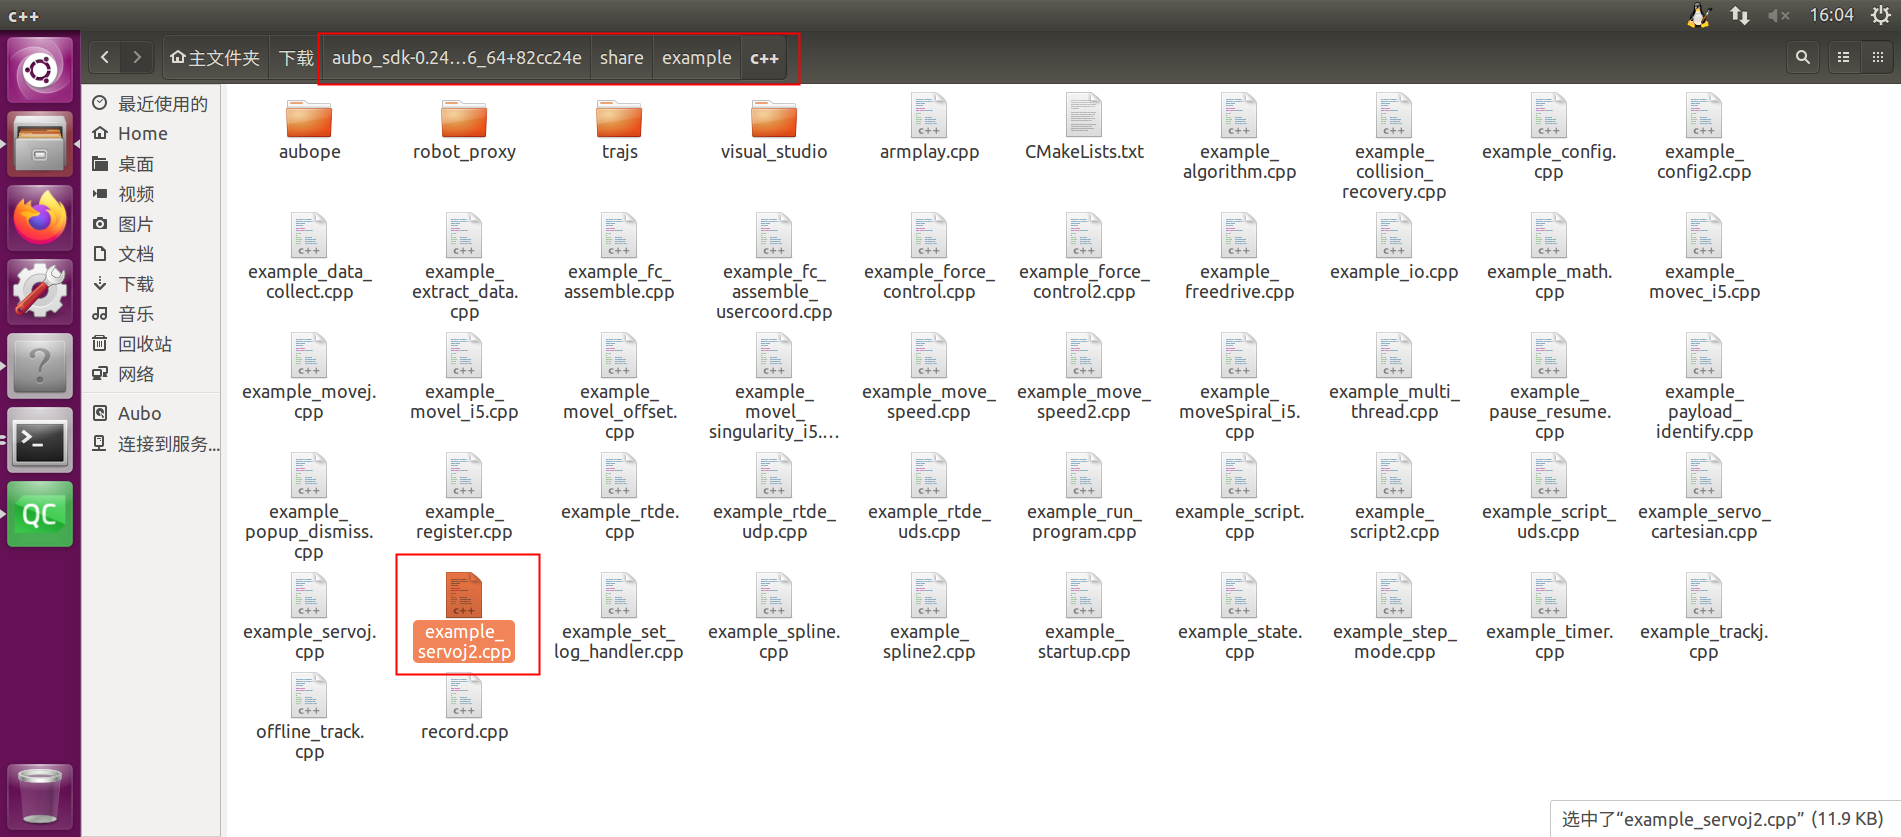
Note: The downloaded example may not be able to run directly. Therefore, please check the logic of the example and make necessary modifications, such as the path of the trajectory file and the method function called;
1.5 Integrating SDK example code logic
When no problem is found after the test as per the above steps, the servoJoint function can be integrated into the personal project according to the code logic of the example; the key logic is as follows:
Move to the first waypoint in the trajectory (i.e. the initial point of serovJoint control) using the moveJoint interface;
c++// Call interface: move the joint to the first waypoint in the trajectory, otherwise excessive overshoot may occur robot_interface->getMotionControl()->moveJoint(traj[0], 80 * (M_PI / 180), 60 * (M_PI / 180), 0, 0); // Blocking int ret = waitArrival(robot_interface); if (ret == 0) { Std::cout <<"The joint moves to the first waypoint in the trajectory file successfully"<< std::endl; } else { Std::cout << "The joint fails to move to the first waypoint in the trajectory file"<< std::endl; }Use the command
setServoMode(true)to enable servoJoint mode (executed only once at the start of control);c++// Call Interface: Enable servo mode cli->getRobotInterface(robot_name)->getMotionControl()->setServoMode(true); // Wait to enter servo mode int i = 0; while (!cli->getRobotInterface(robot_name) ->getMotionControl() ->isServoModeEnabled()) { if (i++ > 5) { //If the Servo mode enable fails, increase the judgment condition value appropriately std::cout <<"Servo mode enable failed!The current Servo mode is " << cli->getRobotInterface(robot_name) ->getMotionControl() ->isServoModeEnabled() << std::endl; return -1; } std::this_thread::sleep_for(std::chrono::milliseconds(5)); }Call the servoJoint interface to start motion control (it can be executed multiple times during the control process);
c++// Call interface: Joint servo motion cli->getRobotInterface(robot_name) ->getMotionControl() ->servoJoint(traj[i], 0.1, 0.2, 0.06, 0., 0.); // The function of sleep is to simulate the interval between calls to servoJoint, and this line can be deleted as the case may be std::this_thread::sleep_for(std::chrono::milliseconds(5));At the end of motion control, use the command
setServoMode(false)to disable servoJoint mode (executed only once at the end of control);c++// Call interface: Disable servo mode cli->getRobotInterface(robot_name)->getMotionControl()->setServoMode(false); // Wait for servo mode to end while (cli->getRobotInterface(robot_name) ->getMotionControl() ->isServoModeEnabled()) { if (i++ > 5) { std::cout <<"Servo mode disable failed!The current Servo mode is " << cli->getRobotInterface(robot_name) ->getMotionControl() ->isServoModeEnabled() << std::endl; return -1; } std::this_thread::sleep_for(std::chrono::milliseconds(5)); }
2. Common problems and solutions
2.1 Meaning of parameters of servoJoint interface
For description of ServoJoint interface, refer to: https://docs.aubo-robotics.cn/aubo_sdk_docs/
2.2 Excessive servoJoint-related logs
When too many servoJoint-related logs, including logs that require algorithm calculation, are found during the use of the servoJoint function, it is recommended to unselect servoJoint algorithm-related log through configuration to reduce the logs generated;
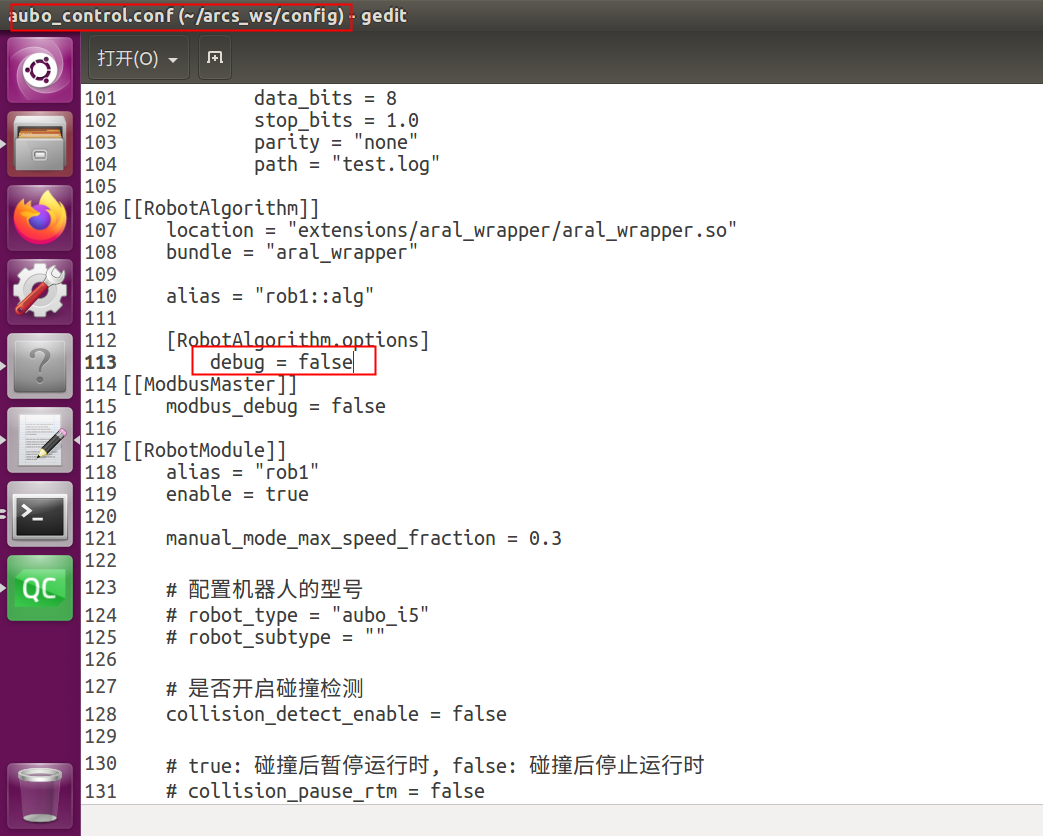
// The specific configuration is described as follows:
debug = false // disable algorithm-related log
Debug = true // enable algorithm-related log
Configure in ~/arcs_ws/conf/aubo_control.conf:
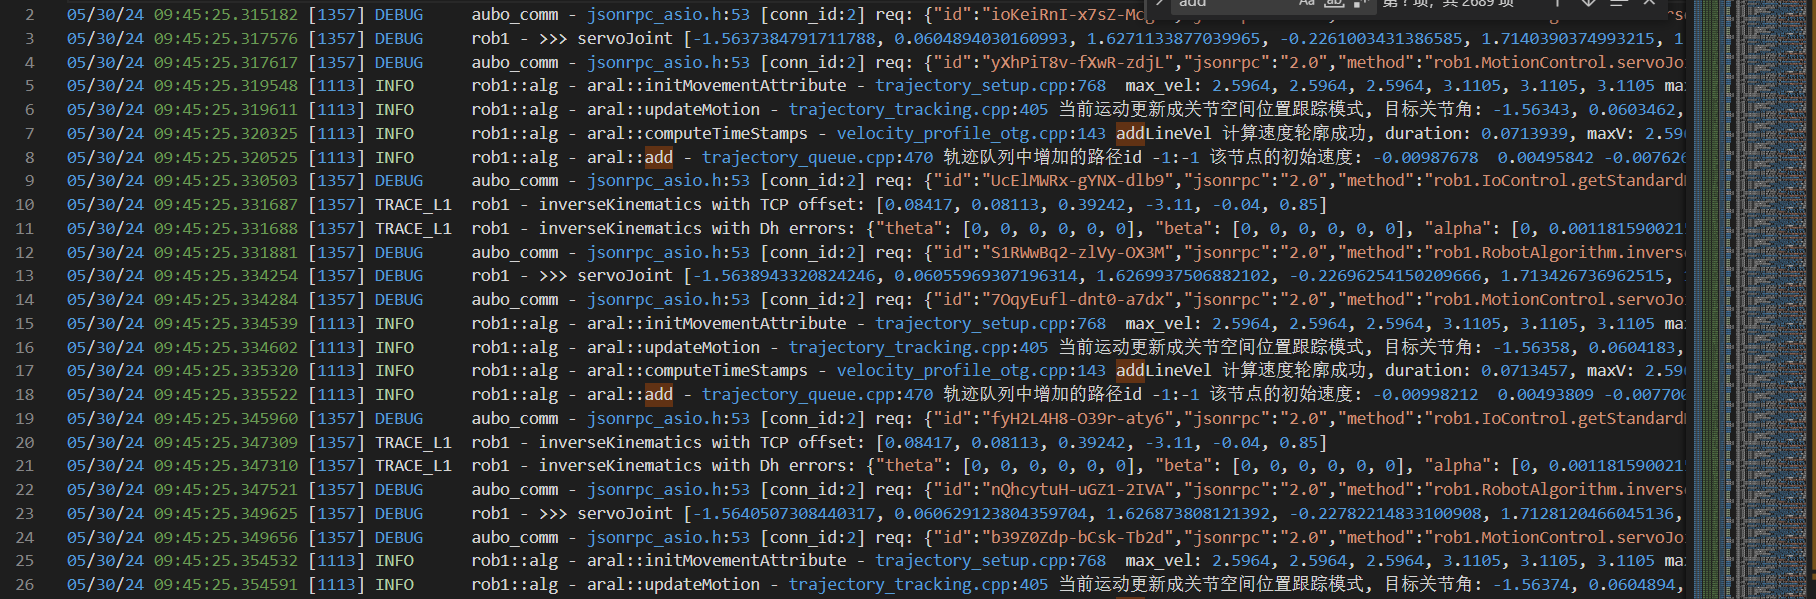
Effect:
Before configuration
After configuration

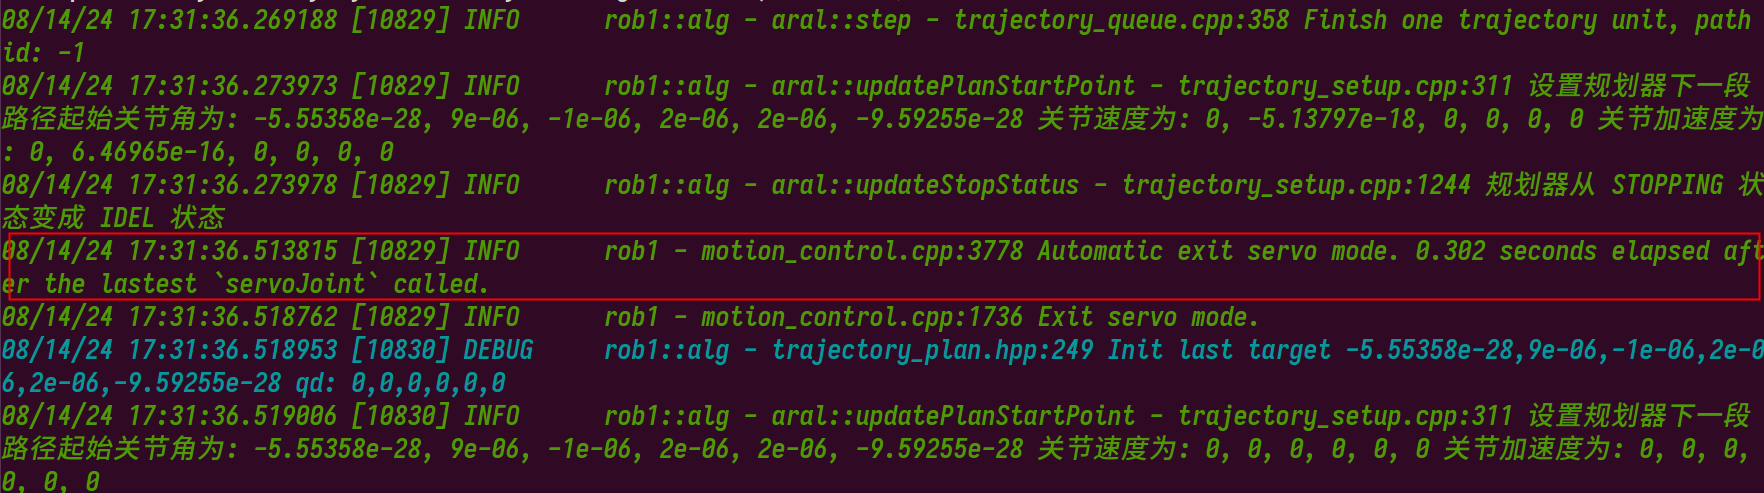
2.3 Automatic exit of servoJoint mode
The ServoJoint function is designed with a mechanism to automatically exit the servoJoint mode. After the servoJoint mode is exited, joint servo motion will stop, and the system can only resume operation by re-entering the servoJoint mode.
The servo mode will be automatically exited when:
- the interface stopJoint/stopLine/abort is called through SDK;
- the HandGuide mode is enabled;
- the servoJoint command is not received for a long time (5 times of t ); To use the ServoJ function after the servoJoint mode is exited, it is required to call the command "setServoMode(true)" via SDK to re-enable the servoJoint mode;
The logs recorded when the servoJoint mode is exited are as follows:
2.4 servoJoint motion failure
- Check the aubo_control.log to confirm if the servoJoint mode is automatically exited. In this case, it is allowed to increase the t value appropriately for testing;
- Check whether a window pops up on the teach pendant to report exceptions, such as collision, etc. In this case, solve the problem according to the prompt given in the pop-up window on the teach pendant;
2.5 How to collect diagnostic data of servoJoint control
If jitter or incorrect trajectory is found during servoJoint control of the robot arm, please collect diagnostic data via the following interfaces if necessary, which can be analyzed by yourself or relevant R&D personnel;
Reference code example:
// Call the startRecord interface to start recording diagnostic data (only executed once at the start of control). This statement can be placed after setServoMode(true)
robot_interface->getRobotManage()->startRecord("servoj_test.csv");
// Call the servoJoint interface to start motion control
for (size_t i = 1; i < traj.size(); i++) {
// Call interface: Joint servo motion
cli->getRobotInterface(robot_name)
->getMotionControl()
->servoJoint(traj[i], 0.1, 0.2, 0.06, 0, 0);
std::this_thread::sleep_for(std::chrono::milliseconds(5));
}
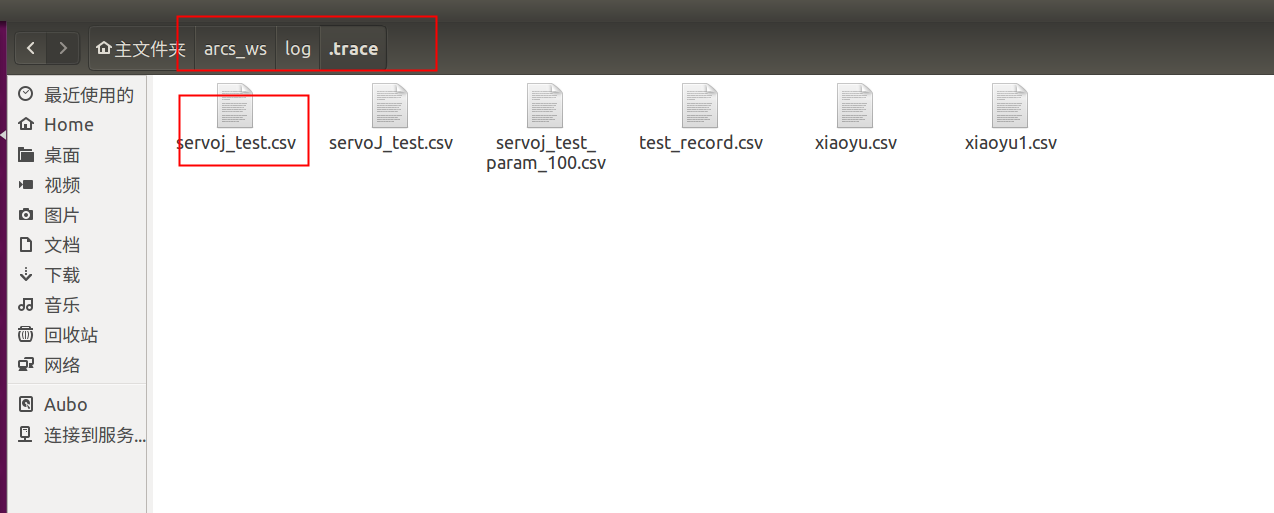
// Call the stopRecord interface to stop recording diagnostic data (only executed once at the end of control). This statement can be placed before setServoMode(false)
robot_interface->getRobotManage()->stopRecord();After the entire motion control process is completed, the diagnostic data will be stored in the ~/arcs_ws/log/.trace folder:
Note: The .trace folder is a hidden folder;