
AUBO-CB-MINI-S Controller User Manual
1 About This Manual
1.1 Version Information
| Item | Description |
|---|---|
| Manual name | AUBO-CB-MINI-S Controller User Manual |
| Manual version | v0.0.6 |
| Release date | 2026-09-22 |
| Applicable products | AUBO-CB-MINI-S controller |
This user manual is reviewed and revised periodically. Updates will be released with new versions. The content or information in this manual is subject to change without prior notice.
Before installing or using the product, read this manual thoroughly and keep it properly for future reference.
All images in this manual are for illustrative reference only. The actual product shall prevail.
1.2 Copyright and Disclaimer
This manual is proprietary to AUBO (Beijing) Intelligent Technology Co., Ltd. Without the written permission of AUBO (Beijing) Intelligent Technology Co., Ltd., it may not be photocopied, reproduced in whole or in part, or converted into any other format.
AUBO (Beijing) Intelligent Technology Co., Ltd. shall not be liable for any errors or omissions that may appear in this manual, or for incidental or consequential injury or damage arising from the use of this manual and the products described herein.
Copyright © 2015-2026 AUBO. All rights reserved.
1.3 Purpose of This Manual
This manual provides guidance for the installation, commissioning, pre-operation inspection, maintenance, repair, handling, storage, and disposal of the AUBO-CB-MINI-S controller.
This manual does not replace the system integrator's risk assessment, on-site safety design, operating instructions, or applicable laws, regulations, and safety standards of the country or region where the robot system is used.
1.4 Intended Use of the Controller
The AUBO-CB-MINI-S-48V controller can be used for general industrial equipment and general commercial equipment and is only allowed to be used under the specified environmental conditions. For specific information about the operating environment and operating conditions, please refer to the technical specifications table.
The AUBO-CB-MINI-S-48V controller has special safety rating characteristics; the use of sharp end effectors or tool connectors may be hazardous.
Prohibited uses include but are not limited to the following:
- Use in flammable and explosive hazardous environments.
- Use in devices for moving or transporting people or other animals.
- Use in medical equipment and other devices involving human life.
- Use in devices with significant social and public impact.
- Use in environments subject to vibration such as vehicles and ships.
- Use as climbing tools.
1.5 Target Audience
This manual is intended for the following qualified personnel:
- Installation personnel
- Commissioning and operating personnel
- Maintenance and repair personnel
- Safety management personnel
1.6 Operation Prerequisites
Personnel who read and use this manual must meet the following requirements:
- Have received relevant training provided by AUBO (or an AUBO-authorized distributor).
- Possess basic knowledge required for the installation and maintenance of mechanical, electrical, and automation equipment.
- Be familiar with on-site safety management requirements and have basic risk identification and safe operation awareness.
- Have read and understood the safety instructions in this manual and related documents.
1.7 Related Documents
When using this manual, it is recommended to also read the following documents:
1.8 More Information
For more information about products, services, training, or technical support, please visit https://www.aubo-robotics.cn.
2 Safety
2.1 Safety Instructions
This chapter introduces the basic safety principles to be followed when operating the controller or robot system. Integrators, users, and operators must read this chapter carefully and strictly observe the instructions marked with safety warning signs.
Due to the complexity and potential hazards of robot systems, this manual cannot list all possible hazardous scenarios. Users and integrators shall conduct risk assessment based on the actual application, end tools, peripheral equipment, working environment, and personnel activity range, and take appropriate risk reduction measures.
2.2 Safety Warning Signs
This manual uses the following safety warning signs to indicate important safety information. When you see the relevant signs, be sure to read and follow the corresponding instructions.
| Sign | Level | Description |
|---|---|---|
 | DANGER | Indicates a potentially hazardous situation which, if not avoided, could result in death or serious injury. |
 | WARNING | Indicates a potentially hazardous situation which, if not avoided, could result in personal injury or serious equipment damage. |
 | CAUTION | Indicates a potentially hazardous situation which, if not avoided, could result in minor personal injury or equipment damage. Matters marked with this symbol may, depending on the specific circumstances, sometimes have the potential for serious consequences. |
 | NOTICE | Indicates a situation which, if not avoided, could result in personal injury or equipment damage. Matters marked with this symbol may, depending on the specific circumstances, sometimes have the potential for serious consequences. |
2.3 General Safety Specifications
The following basic safety guidelines must always be observed when operating the controller and its related equipment. This section lists general safety requirements; safety instructions for specific scenarios are detailed in the relevant chapters of this manual.
Be sure to install the machine and all electrical equipment in accordance with the requirements and specifications in this manual.
Before using the machine for the first time and putting it into production, preliminary testing and inspection of the machine and its protection system are required.
Before starting the machine and system for the first time, it must be checked whether the machine and system are complete, whether operation is safe, and whether any damage is detected. During this inspection, compliance with the national or regional safety production regulations in force must be observed, and all safety functions must be tested.
The user must check and ensure that all safety parameters and user programs are correct and that all safety functions work properly. Personnel qualified to operate the robot are required to check each safety function. The robot may only be started after comprehensive and careful safety testing has been passed and the safety level has been reached.
Professional personnel are required to install and commission the machine in accordance with installation standards.
After the machine is installed and constructed, a comprehensive risk assessment must be carried out again and documented.
Safety parameters shall be set and changed by authorized personnel, and passwords or isolation measures shall be used to prevent unauthorized personnel from changing or setting safety parameters. After safety parameters are modified, the related safety functions need to be analyzed.
In the event of an accident or abnormal operation, the emergency stop switch can be used to stop the robot's motion.
The robot arm has a collision detection function. During operation after the robot is powered on, if the external force exceeds the normal force range set by the user's safety parameters, the robot stops automatically to prevent equipment damage or collision injuries to operators.
This function requires that the robot system operate within the normal operating range and use an AUBO series controller. If the user develops their own controller, the robot will not have the above function. The user shall bear the hazardous consequences arising therefrom.
Connecting different machines may increase hazards or create new hazards. Always carry out a comprehensive risk assessment of the entire installation. When different performance levels for safety and emergency stop are required, always select the highest performance level.
AUBO (Beijing) Intelligent Technology Co., Ltd. assumes no liability for damage to the machine or personal injury caused by improper operation of the machine.
Prohibited items:
| Sign | Description |
|---|---|
| 1. It is strictly prohibited to start the robot system before safety checks and risk assessment are completed. Before first startup, the system integrity check, testing of all safety functions, verification of safety parameter correctness, and review of risk assessment documents must be completed. 2. It is strictly prohibited to power on the controller without connecting the protective grounding wire (PE wire). Improper grounding may result in electric shock, equipment damage, or electromagnetic interference. 3. It is strictly prohibited to use the controller in humid environments or environments with conductive dust, which may result in injury or death. 4. It is strictly prohibited to frequently turn the power supply system on and off manually. The robot arm joint modules are equipped with brakes to maintain the robot pose during power-off. Do not frequently turn the power supply system on and off manually. It is recommended that the interval between power cycles be greater than 10s. 5. When the equipment is running, it is strictly prohibited to touch heated parts. Do not operate or touch the equipment while it is working or immediately after it has stopped. Turn off the power supply and wait for one hour for the equipment to cool down. 6. It is strictly prohibited to modify safety parameters or bypass safety functions without authorization. |
Operating specifications:
| Sign | Description |
|---|---|
| 1. Ensure that the controller and related equipment are securely installed. Improper installation may cause equipment to fall or abnormal operation. 2. Ensure that the robot system has sufficient workspace, without obstacles, sharp corners, or pinch points. Operators' head and face shall be outside the reachable range of the robot arm. 3. Do not connect safety devices to general I/O interfaces; only dedicated safety interfaces may be used. 4. Correctly configure installation parameters, including installation angle, TCP weight and offset, safety parameters, etc. 5. Do not continue using the controller or robot system if it is damaged. Stop it immediately and contact AUBO or an authorized service provider. 6. A safety assessment must be carried out after each installation to confirm that all safety functions operate properly. |
| 1. Check the insulation and protective measures before transporting the controller, and handle it carefully during transportation to avoid collisions. 2. Do not expose the controller to strong magnetic fields for a long time, as strong magnetic fields may cause equipment damage. 3. Do not modify the controller without authorization. Any unauthorized modification will void the warranty, and AUBO assumes no liability arising therefrom. |
2.4 Personnel Safety
When operating the robot system, personnel safety shall be given priority. Users and integrators shall at least take the following measures:
- Ensure that all relevant personnel have received training from AUBO official (or an AUBO-authorized distributor) and fully understand the safe and standard operating procedures. Training consultation: support@aubo-robotics.cn.
- During operation, tie up long hair, do not wear loose clothing, and do not wear jewelry. When the robot is stationary, it may be in a standby state and shall be regarded as continuously operating; do not approach it at will.
- In emergency situations such as a person being caught or trapped, the joint can be forced to move by pushing or pulling the robot arm forcefully. Manually moving the robot arm without power drive is limited to emergencies and may damage the robot arm joints.
- Personnel shall not place their head, face, neck, fingers, or other body parts in areas where they may be hit, pinched, or caught.
2.5 Responsibilities and Specifications
The controller is a component of a complete robot system and does not itself constitute a complete machine. Therefore, this manual does not cover the complete set of design, installation, and operation solutions for the complete robot, nor does it list all types of risk conditions that may affect the safety of peripheral equipment of the entire integrated system. The installation safety performance of the complete robot equipment depends on the design and construction method of the complete integration solution. The equipment integrator must carry out risk assessment throughout the design and installation of the entire integrated system in accordance with locally applicable laws and regulations, safety specifications, and industry standards.
None of the safety-related information contained in this manual shall be regarded as a guarantee by AUBO (Beijing) Intelligent Technology Co., Ltd. Even if operators strictly follow all safety guidelines in this manual, there is still a potential risk of personal injury or equipment damage.
AUBO (Beijing) Intelligent Technology Co., Ltd. continuously optimizes product performance and reliability and reserves the right to iterate and upgrade products without further notice. We have made every effort to ensure that the content of this manual is accurate and reliable, but we assume no liability for omissions or errors in the document.
2.5.1 Integrator Responsibilities
The integrator bears the following key responsibilities:
- Conduct a comprehensive risk assessment of the complete robot system.
- Ensure that the design, installation, and commissioning of the entire system meet safety requirements.
- Provide necessary training for users and relevant operators.
- Develop complete system operating procedures and emergency plans.
- Establish and maintain appropriate safety protection measures.
- Eliminate hazards or minimize all hazards to an acceptable level using appropriate methods during final installation.
- Inform the end user of the residual risks.
- Mark the integrator's information on the robot.
- Archive all relevant technical documents and risk assessment reports.
2.5.2 Reference Standards
Integrators may refer to the following international standards to implement the risk assessment process:
| Standard No. | Name | Description |
|---|---|---|
| ISO 12100:2010 | Safety of machinery — General principles for design — Risk assessment and risk reduction | Basic framework for risk assessment |
| ISO 10218-2:2025 | Robots and robotic devices — Safety requirements — Part 2: Industrial robot systems and robot applications | Safety requirements for industrial robot integration |
| RIA TR R15.306-2014 | Technical report for industrial robots and robot systems — Safety requirements, task-based risk assessment methodology | Guide to task-based risk assessment |
| ANSI B11.0-2010 | Safety of machinery — General requirements and risk assessment | American machinery safety standard |
For applicable standards and regulatory guidelines, please visit the AUBO official website www.aubo-robotics.cn or consult your local regulatory authority.
2.6 Hazard Identification
Risk assessment shall consider potential hazards during normal use, commissioning, maintenance, cleaning, abnormal recovery, and foreseeable misoperation. When using the collaborative robot arm without peripheral safety protection devices, the following potential hazards may be involved:
- Risk of puncture or cut caused by the use of sharp end effectors or tool connectors.
- Risk of exposure when handling toxic, corrosive, or other hazardous substances.
- Risk of operators' fingers or limbs being pinched by the robot arm joints or base.
- Risk of collision with personnel during the movement of the robot arm.
- Risk of objects falling due to improper fixing of the end tool.
- Hazards caused by impact between the robot payload and solid surfaces. The integrator must measure such hazards and their associated risk levels through risk assessment, and determine and implement corresponding measures to reduce the risk to an acceptable level. Please note that other significant hazards may also exist for specific robot equipment.
Combined with the inherent safety design of AUBO robots as well as the safety specifications and risk assessments developed by integrators and end users, the risks associated with collaborative operation of the robot arm can be reduced to a reasonably practicable level. This document is intended to communicate the residual risks existing before robot installation to integrators and end users. If, after risk assessment, the integrator determines that the corresponding application scenario has hazards that may cause unacceptable risk to operators, the integrator must take appropriate risk reduction measures to eliminate or minimize these hazards until the risk level reaches an acceptable standard. The robot shall not be put into use before the necessary risk reduction measures are completed.
If the robot adopts a non-collaborative deployment solution (such as carrying a hazardous tool), the risk assessment results may require the integrator to additionally install safety equipment (such as safety enabling devices) during program development to ensure the safety of personnel and equipment operation.
2.7 Emergency Handling
When recovering from an emergency state, all push-button emergency stop devices have a "lock" function. This "lock" must be released to end the emergency stop state of the equipment.
| Sign | Description |
|---|---|
| Recovering from the emergency stop state is a simple but very important step, which can only be performed after ensuring that the hazards of the machine system have been completely eliminated. |
3 Handling and Precautions
During packaging and transportation, packaging shall be carried out in accordance with packaging standards, and the required marks shall be applied to the outside of the packaging box.
During transportation, the equipment must be kept stable and secured in an appropriate position.
The controller shall be lifted using the handle. During handling, the moving parts shall be positioned with appropriate measures so that they do not move unexpectedly during handling and transportation and cause hazards.
When moving the AUBO-CB-MINI-S controller from the packaging material to the installation position, hold the equipment firmly and avoid collisions.
After fixing, power on the equipment and observe whether it operates normally.
Keep the original packaging after transportation. Store the packaging materials in a dry place for future repackaging and moving of the equipment.
| Sign | Description |
|---|---|
| 1. Ensure that your back or other body parts are not overly strained when lifting the equipment. 2. All regional and national guidelines shall be observed. AUBO (Beijing) Intelligent Technology Co., Ltd. is not responsible for damage incurred during equipment transportation. 3. Ensure that the installation instructions in the manual are strictly observed when installing the equipment. |
4 Maintenance, Repair, and Disposal
4.1 Maintenance and Repair
All maintenance and repair work must strictly comply with all safety specifications in this manual.
Equipment maintenance, calibration, and repair operations must be carried out in accordance with the latest version of the service manual, which is available on the official technical support website www.aubo-robotics.cn. All authorized distributors of AUBO (Beijing) Intelligent Technology Co., Ltd. can log in and access this website.
Equipment repair work may only be carried out by an authorized system integrator or AUBO factory personnel. If parts need to be returned to AUBO (Beijing) Intelligent Technology Co., Ltd., the procedures in the service manual must be strictly followed.
During the work, the safety level requirements corresponding to maintenance and repair must be met and the safety production regulations in force in the local area must be observed. After the work is completed, all safety functions must be tested one by one to confirm that they operate properly.
Maintenance and repair work is used to ensure the stable operation of the equipment or to restore it to normal operating conditions after a fault, and covers both fault diagnosis and physical repair.
When operating the controller or robot system, strictly follow the safety procedures and warnings below:
| Sign | Description |
|---|---|
| 1. Remove the main input cable from the back of the controller to ensure that it is completely de-energized. Necessary precautions shall be taken to prevent others from reconnecting the system energy during repair. After power-off, the system shall still be rechecked to ensure that it is de-energized. 2. Check the grounding connection before restarting the system. 3. Observe ESD (electrostatic discharge) regulations when disassembling the robot arm or controller. 4. Avoid disassembling the power supply system of the controller. After the controller is turned off, its power supply system can still retain high voltage for several hours. 5. Prevent water or dust from entering the robot arm or controller. |
| 1. Replace faulty parts with new parts of the same part number or corresponding parts approved by AUBO (Beijing) Intelligent Technology Co., Ltd. 2. Immediately reactivate all disabled safety measures after the work is completed. 3. Record all repair operations in writing and keep them in the technical documents related to the entire robot system. 4. The controller has no parts that can be repaired by the end user. If maintenance or repair service is required, please contact your dealer or AUBO (Beijing) Intelligent Technology Co., Ltd. |
4.2 Disposal
The AUBO-CB-MINI-S controller must be disposed of in accordance with applicable national laws and regulations and national standards.
5 Quality Assurance
5.1 Product Warranty
The AUBO-CB-MINI-S-48V controller enjoys a limited warranty period of 12 months.
If the new equipment and its components have defects caused by poor manufacturing or materials within 12 months after being put into use, AUBO (Beijing) Intelligent Technology Co., Ltd. shall provide the necessary spare parts for replacement or repair the relevant parts.
The ownership of the equipment or components that are replaced or returned to AUBO (Beijing) Intelligent Technology Co., Ltd. belongs to AUBO (Beijing) Intelligent Technology Co., Ltd.
If the product is no longer within the warranty period, AUBO (Beijing) Intelligent Technology Co., Ltd. reserves the right to charge the customer for replacement or repair.
Outside the warranty period, if the equipment shows defects, AUBO (Beijing) Intelligent Technology Co., Ltd. shall not be liable for any damage or loss arising therefrom, such as loss of production or damage to other production equipment.
5.2 Disclaimer
If equipment defects are caused by improper handling or failure to follow the relevant information described in the user manual, the "Product Warranty" shall become void.
Failures caused by the following circumstances are not covered by this warranty:
- Products purchased through channels not approved by AUBO.
- Failure to comply with industrial standards or to install, wire, or connect other control equipment as required by the user manual.
- Use beyond the specifications or standards stated for the product.
- Use of this product for purposes other than those specified.
- Use environment conditions beyond the product's rating.
- Use in a grinding environment or special use environment without product protection.
- Product damage caused by improper transportation.
- Failures, damage, or indirect damage caused by accidents or human factors.
- Failures, damage, or indirect damage caused by modification.
- Installation of non-genuine parts or accessories.
- Damage caused by modification, commissioning, or repair of original parts by third parties other than AUBO (Beijing) Intelligent Technology Co., Ltd. or its designated integrators.
- Failures, damage, or indirect damage caused by natural disasters or other force majeure.
- Failures other than the above circumstances that are not caused by the responsibility of AUBO (Beijing) Intelligent Technology Co., Ltd.
The following circumstances are not covered by the warranty:
- The product traceability number cannot be identified.
- The production date or warranty start date cannot be identified.
- Changes to software or internal data.
- The fault cannot be reproduced or identified by AUBO (Beijing) Intelligent Technology Co., Ltd.
- Use of this product in radioactive equipment, biological test equipment, or applications judged by AUBO (Beijing) Intelligent Technology Co., Ltd. to be hazardous.
- Appearance parts and wear parts.
According to the product warranty agreement, AUBO (Beijing) Intelligent Technology Co., Ltd. only makes warranty commitments for defects and deficiencies in products and parts sold to dealers.
Any other express or implied warranties or liabilities, including but not limited to any implied warranties of merchantability or fitness for a particular purpose, shall not be borne by AUBO (Beijing) Intelligent Technology Co., Ltd. In addition, AUBO (Beijing) Intelligent Technology Co., Ltd. shall not be liable for any form of indirect damage or consequences arising from the relevant products.
6 Controller Description
6.1 Introduction
The MINI controller is small in size, can be integrated, and can be customized. It integrates an industrial computer and a main control board, and does not carry a power supply or electrical control circuit itself; the power supply and control circuit used must be provided externally. Human-machine information interaction is completed using an external VGA monitor, USB, mouse, and keyboard. RS485 communication is used to exchange information with the customer's control end, which reduces wiring and makes integration easier for users. Before use, be sure to check whether the connections among the robot, the monitor, and the controller are reliable.
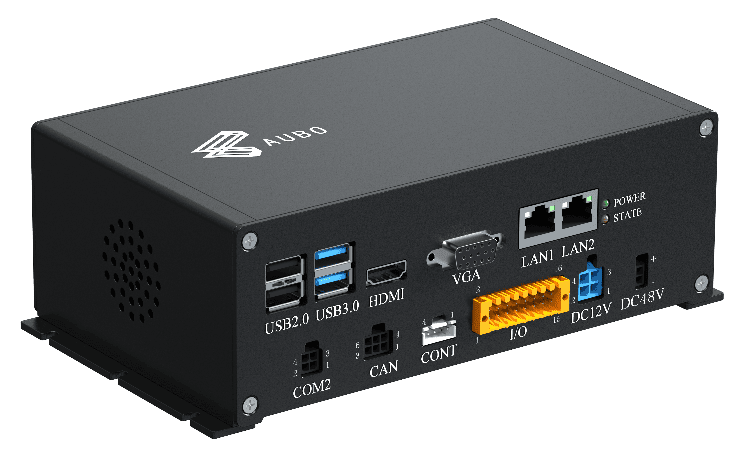
- DC 48V controller The DC controller uses DC48V (robot arm power) and DC12V (industrial computer and main control power). The appearance is shown in Figure 6-1:
6.2 Important Safety Instructions
| Sign | Description |
|---|---|
| 1. Ensure that the controller, teach pendant, and cables do not come into contact with liquids. A wet controller may cause injury or death. 2. The controller and teach pendant must not be placed in a dusty environment, or in a place where the humidity exceeds the IP rating of the equipment; if conductive dust exists on site, pay special attention to protection. 3. There is a hazardous voltage inside the enclosure. Non-professionals shall not open the cabinet while it is energized. 4. Do not directly touch the screws and other metal components inside the controller with your hands, and never remove wiring while it is energized. |
| 1. A safety assessment must be carried out after each robot installation, and the instructions in the safety chapter must be strictly observed. 2. The controller shall be placed horizontally on the ground. A clearance of 50mm shall be kept on each side of the controller to ensure ventilation and heat dissipation. 3. The teach pendant can be hung on the controller. Ensure that the cables do not trip personnel. 4. If non-AUBO original components (such as cables) are added to the robot, the user must ensure that such components do not interfere with or damage the safety functions of the equipment. 5. The software in the robot system only supports the upgrade and use of the default software. Installing other software such as the ROS system is prohibited. Checks before use: 1. Check whether the controller power cable is properly connected. 2. Check whether the controller and the robot are properly connected. 3. Check that the controller is firmly supported and that the whole machine is placed horizontally without shaking or offset. |
6.3 Controller Panel Introduction
The front panel of the 48V Mini controller is shown in Figure 6-2 below, and the detailed interface function description is given in Table 6-1: 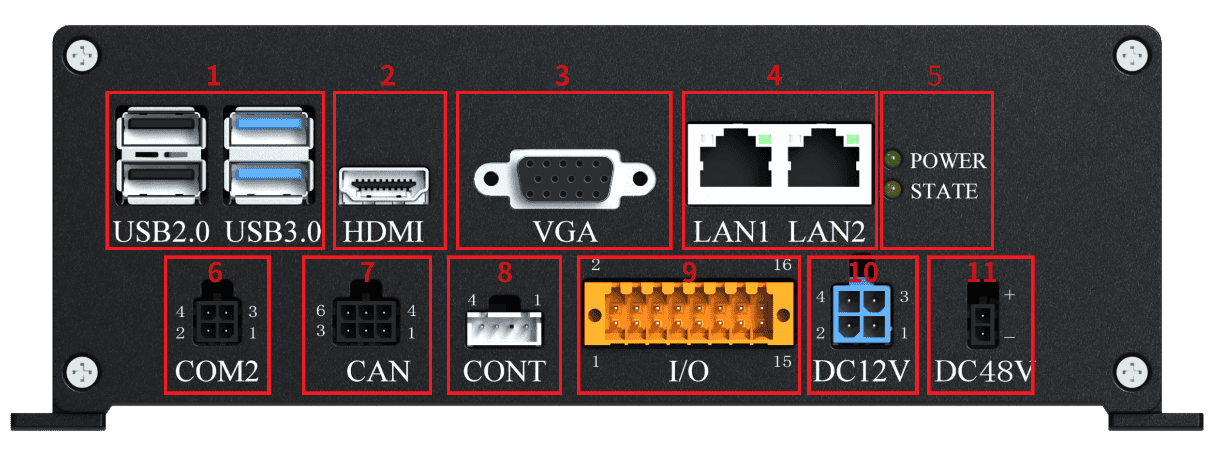
| No. | Name | Function |
|---|---|---|
| 1 | USB interface | Supports USB 2.0 and USB 3.0 interfaces |
| 2 | HDMI | Monitor interface, connects to a monitor with an HDMI interface |
| 3 | VGA | Monitor interface, connects to a monitor with a VGA interface |
| 4 | LAN1, LAN2 | Ethernet interfaces, which can be used for remote access and control |
| 5 | POWER/STATE | Power indicator light/status light |
| 6 | COM2 | RS485 interface of the main control board |
| 7 | CAN | Robot arm CAN communication interface |
| 8 | CONT | Robot arm 48V control interface |
| 9 | I/O | User I/O interface |
| 10 | DC12V | DC12V power input |
| 11 | DC48V | 48V power failure detection interface |
6.4 Installing the Robot System
- Unpack and take out the robot body, the controller, and related cables (monitor to be provided by the user).
- Install the robot body on a shock-proof solid surface.
- Place the controller and the monitor in appropriate positions.
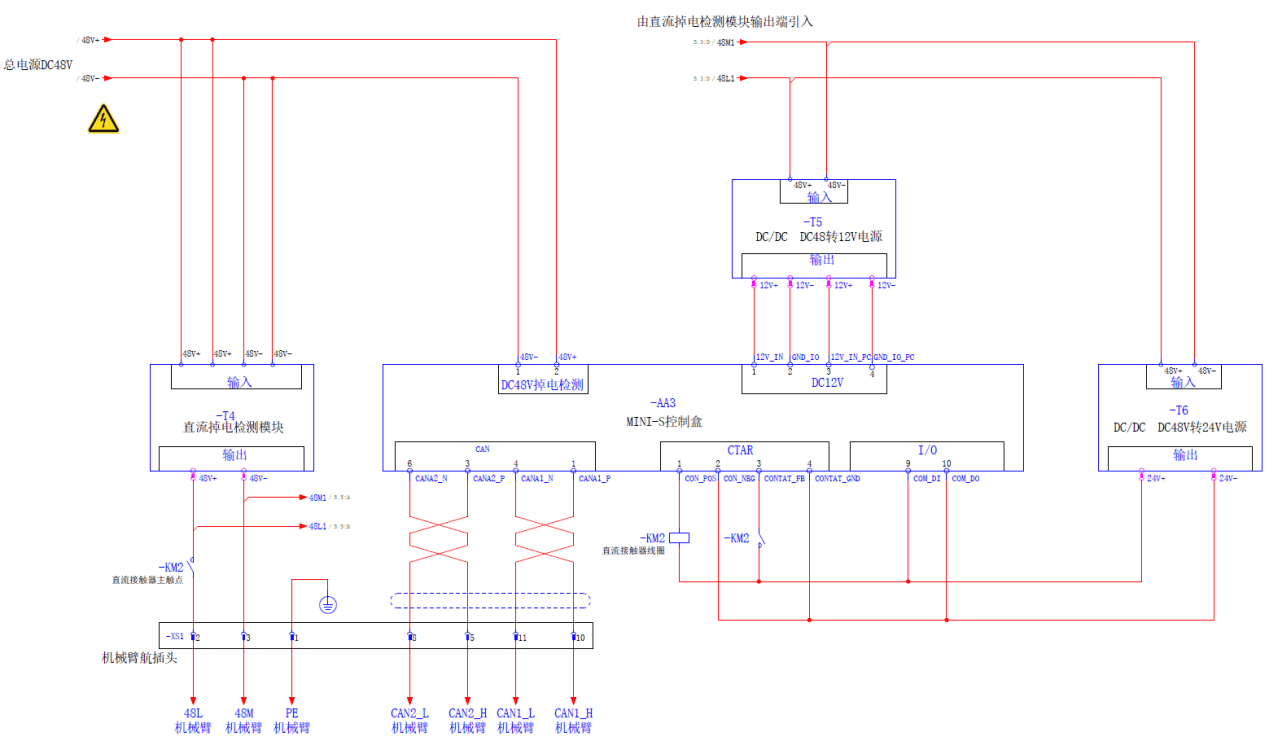
- Connect the cables to the corresponding robot body, controller, and DC48V DC power supply as shown in Figure 6-3 below.
- Confirm that the safety information for robot installation has been observed and the warning information has been avoided.
- Connect the external power supply, such as DC24V for I/O input/output.
| Sign | Description |
|---|---|
| 1. The controller harnesses are all designed with mistake-proofing; please connect them as shown in the diagram. 2. The I/O ports support NPN/PNP; the diagrams assume NPN by default. For details, please refer to Chapter 8.3. 3. I/O functions support customization; for details, please refer to the software user manual. |
7 Electrical Interfaces
7.1 Electrical Warnings and Cautions
The following warnings and cautions must be observed when designing and installing robot applications and the AUBO-CB-MINI-S-48V controller. These warnings and cautions must also be observed when performing maintenance work.
| Sign | Description |
|---|---|
| 1. Never connect safety signals to non-safety PLCs with an inappropriate safety level. Failure to comply with this warning may result in serious injury or even death due to the failure of a safety stop function. 2. The controller must be de-energized when wiring the controller electrical interfaces. 3. Ensure that all equipment that must be kept away from water is kept dry. If water enters the product, cut off the power supply and contact your supplier. 4. Use only the original cables of this robot. Do not use the robot in applications where those cables need to be bent. If longer cables or flexible cables are required, contact your supplier. 5. All GND connectors mentioned in this document are only suitable for power supply and signal transmission. For protective grounding (PE), use the screw connector marked with the grounding symbol in the controller. The grounding connector shall have a current rating of at least the highest current in the system. 6. Be careful when installing interface cables to the robot's I/O. 7. Interference signals higher than the levels specified in the IEC standards will cause abnormal behavior of the robot. Extremely high signal levels or excessive exposure will cause permanent damage to the robot. EMC problems usually occur during welding and are usually indicated by error messages in the log. AUBO (Beijing) Intelligent Technology Co., Ltd. is not responsible for any loss caused by EMC problems. 8. The length of the I/O cables used to connect the controller to other machinery and plant equipment shall not exceed 30 meters, unless extension testing shows that it is feasible. |
7.2 Controller Communication Interfaces
The AUBO robot controller provides a variety of electrical interfaces for connecting external devices, which users can use conveniently.
The upper panel of the controller provides an Ethernet interface, an RS485 interface, a USB interface, and some other electrical interfaces.
- Ethernet interface
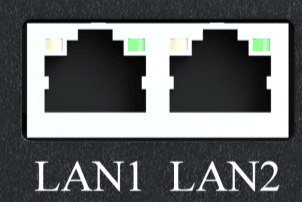
The Ethernet interface can be used for remote access and control.
- RS485 interface The RS485 interface is located on the side board of the controller. Modbus devices can be connected through the USB interface and the Modbus RTU interface.
The pin description of the Modbus RTU interface is shown in the figure below: 
| Pin No. | Function |
|---|---|
| 1 | RS485A |
| 2 | RS485B |
| 3 | RS485_GND |
| 4 | Reserved |
- USB interface The USB interface is located on the upper panel of the controller and can be used to connect devices, upgrade software, and export project files. It supports USB 2.0 and USB 3.0.
7.3 Controller I/O
There are 16 inputs/outputs in total, including 8 digital inputs and 6 digital outputs; the other 2 interfaces are the common terminals COM_DI and COM_DO respectively. The physical I/O is shown in Figure 7-3: 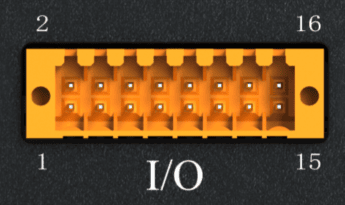
7.3.1 Safety Tips
| Sign | Description |
|---|---|
| 1. Do not connect safety signals to non-safety PLCs with an inappropriate safety level. 2. Be sure to separate safety interface signals from ordinary I/O interface signals. 3. Before using the robot, be sure to check the safety functions; the safety functions must be tested periodically. |
7.3.2 I/O Function Definition
| Input/Output | Pin No. | I/O Name | Interface Type | Function Definition |
|---|---|---|---|---|
| Input | PIN1 | DI01 | PNP/NPN | Configurable input I/O |
| PIN2 | DI00 | PNP/NPN | Configurable input I/O | |
| PIN3 | DI03 | PNP/NPN | Configurable input I/O | |
| PIN4 | DI02 | PNP/NPN | Configurable input I/O | |
| PIN5 | DI05 | PNP/NPN | Remote power on/off | |
| PIN6 | NC | - | Reserved | |
| PIN7 | DI0 | PNP/NPN | Emergency stop input | |
| PIN8 | DI1 | PNP/NPN | Emergency stop input | |
| PIN9 | COM_DI | - | Common input interface | |
| Output | PIN10 | COM_DO | - | Common output interface |
| PIN11 | DO00 | PNP/NPN | Configurable output I/O | |
| PIN12 | DO03 | PNP/NPN | Configurable output I/O | |
| PIN13 | DO01 | PNP/NPN | Configurable output I/O | |
| PIN14 | DO04 | PNP/NPN | Configurable output I/O | |
| PIN15 | DO02 | PNP/NPN | Configurable output I/O | |
| PIN16 | DO05 | PNP/NPN | Configurable output I/O |
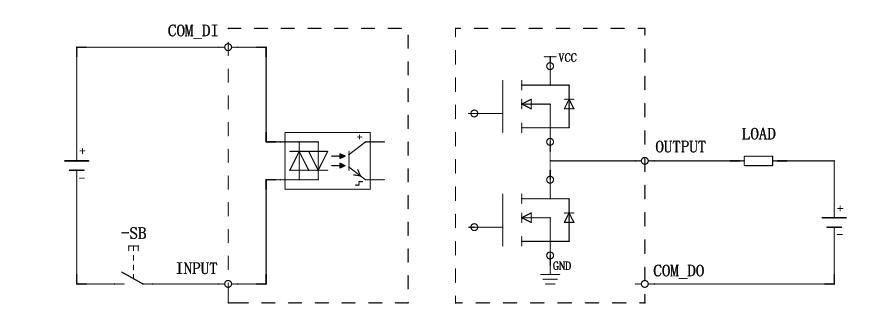
According to the I/O function definition, the I/O must be controlled and used through external DC24V. Both high-level and low-level electrical connections are supported. NPN and PNP are two common transistor structures, briefly described in this manual.
- NPN sinking type When the input and output interfaces of the controller use NPN transistors, "logic high" means the output is in the "on" state and the voltage is close to the ground voltage (such as 0V), and "logic low" means the output is in the "off" state with no voltage output. The COM_DI common input terminal and COM_DO common output terminal are connected as shown in Figure 7-4:
The I/O wiring is shown in Figure 7-5: 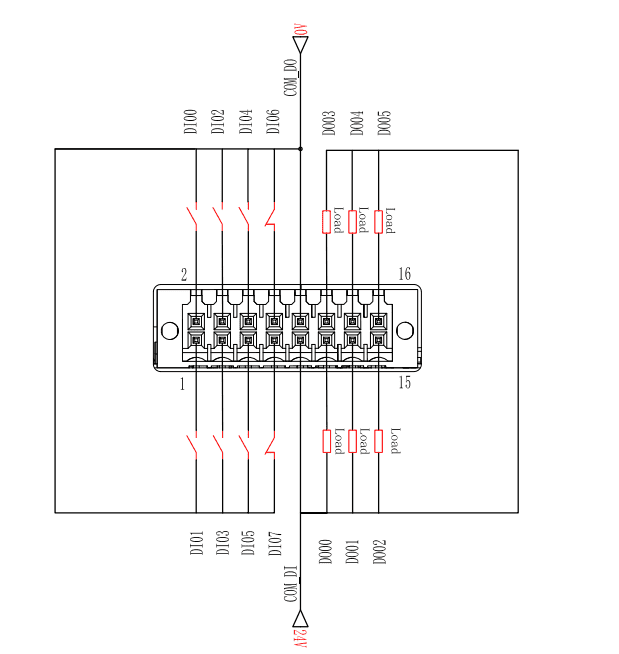
- PNP sourcing type When the input and output interfaces of the controller use PNP transistors, "logic high" means the output is in the "on" state and the voltage is close to the power supply voltage (such as 24V), and "logic low" means the output is in the "off" state with no voltage output. The COM_DI common input terminal and COM_DO common output terminal are connected as follows.
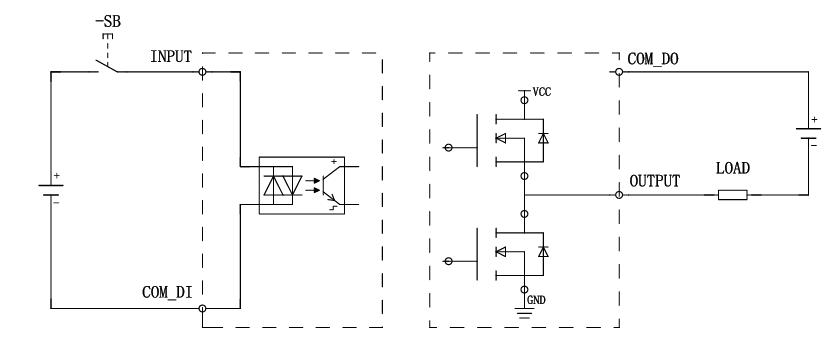
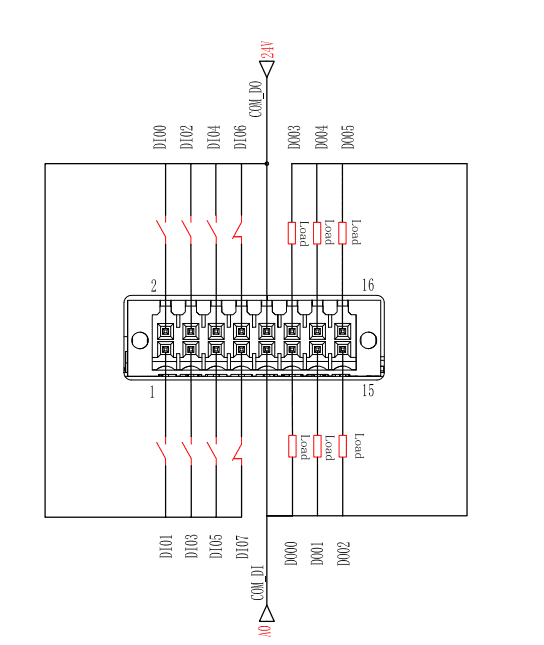
Note: DI03 and DI04 use self-locking buttons.
7.3.3 Configurable I/O Function Definition
All configurable I/O have dual-circuit safety channels (redundant design), which ensures that safety functions are not lost in the event of a single fault. During use, safety devices and equipment must be installed in accordance with the safety instructions and may only be used after a comprehensive risk assessment.
When a configurable I/O is configured as a safety I/O in the software, the interface is a safety I/O; interfaces not configured as safety I/O in the software can be used as general I/O. Safety I/O have higher priority than general I/O: when the same I/O is configured with both the safety I/O function and the general I/O function, only the safety I/O function is retained. For the specific functions and descriptions of safety I/O, please refer to the software user manual.
| Configurable I/O | Interface Type | Function |
|---|---|---|
| DI00, DI02 | PNP/NPN | Specific functions are set through the software interface |
| DI01, DI03 | PNP/NPN | |
| DO00, DO03 | PNP/NPN | Specific functions are set through the software interface |
| DO01, DO04 | PNP/NPN | |
| DO02, DO05 | PNP/NPN |
7.3.4 General I/O Function Definition
For the specific functions and descriptions of general I/O, please refer to the software user manual.
| General I/O | Interface Type | Function |
|---|---|---|
| DI00 | PNP/NPN | Specific functions are set through the software interface |
| DI01 | PNP/NPN | |
| DI02 | PNP/NPN | |
| DI03 | PNP/NPN | |
| DO00 | PNP/NPN | Specific functions are set through the software interface |
| DO01 | PNP/NPN | |
| DO02 | PNP/NPN | |
| DO03 | PNP/NPN | |
| DO04 | PNP/NPN | |
| DO05 | PNP/NPN |
7.3.5 Two Types of Safety Stop Inputs
- External emergency stop input: used only for emergency stop devices.
- External protective stop input: used for other safety protection devices. The functional differences are as follows:
| External emergency stop | External protective stop | |
|---|---|---|
| Robot stops moving | Yes | Yes |
| Program execution | Stop | Pause |
| Robot power | Off | On |
| Reset | Manual | Automatic or manual |
| Usage frequency | Infrequent | No more than once per operating cycle |
| Requires re-initialization | Yes | No |
| Stop category | Category 1 stop | Category 2 stop |
Note:
The stop type triggered by the external emergency stop input is a Category 1 stop. For a description of stop types, please refer to Appendix.
| Safety input function | Limit conditions | ||
|---|---|---|---|
| Detection time | Power-off time | Response time | |
| External emergency stop input | 100ms | 1200ms | 1300ms |
| External protective stop input | 100ms | —— | 1200ms |
7.3.6 Remote Power On/Off
When the system is in manual mode, taking NPN as an example (COM_DI connected to the DC24V positive pole):
Power on When the controller is powered normally, activate the remote power-on signal input, that is, apply a valid level to DI05 (pin No. PIN5); the system powers on after 1 second.
Power off After the system is powered on normally, activate the remote power-off signal input, that is, apply a valid level to DI05 (pin No. PIN5); the system shuts down after 3 seconds.
| Sign | Description |
|---|---|
| 1. Power on and power off share the same I/O input, that is, pin No. PIN5 (default definition). 2. For PNP-type level input/output power on/off, please refer to Chapter 8.3. |
7.3.7 Relay Wiring Instructions for the CONT Terminal
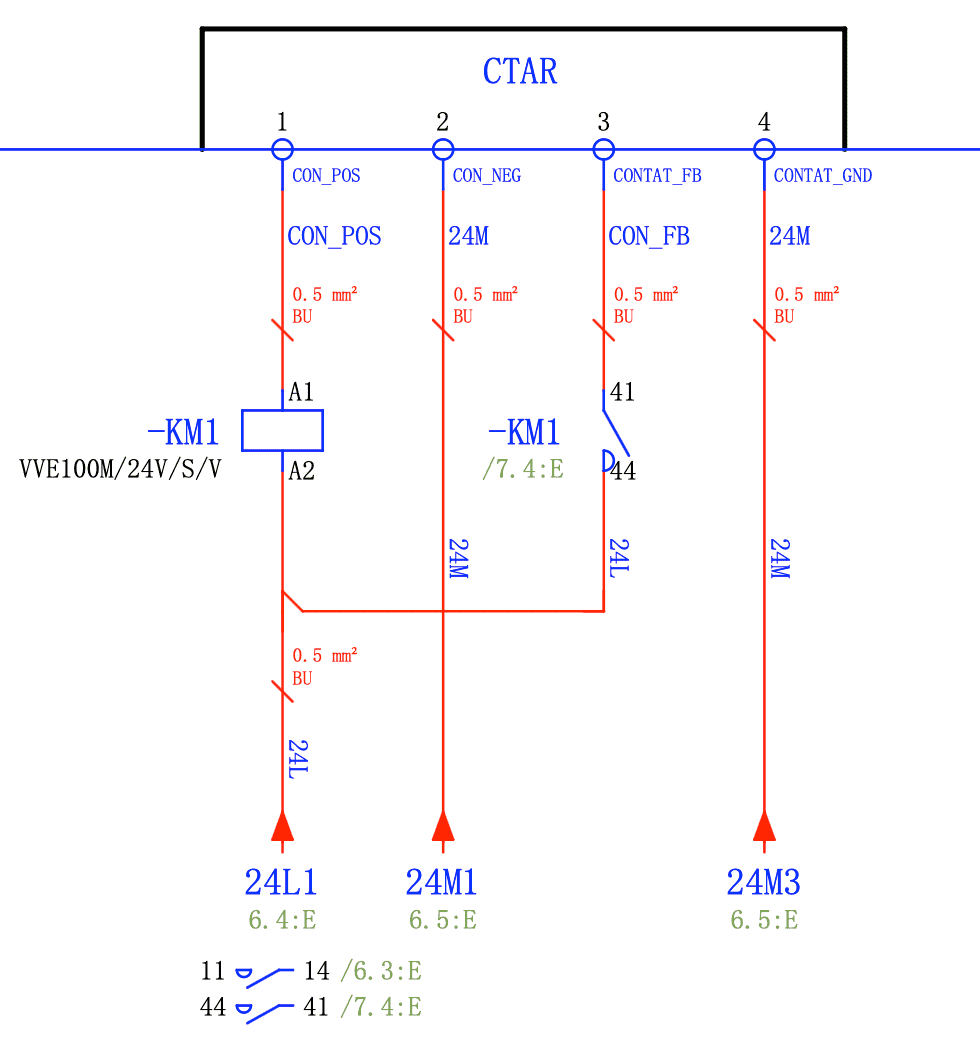
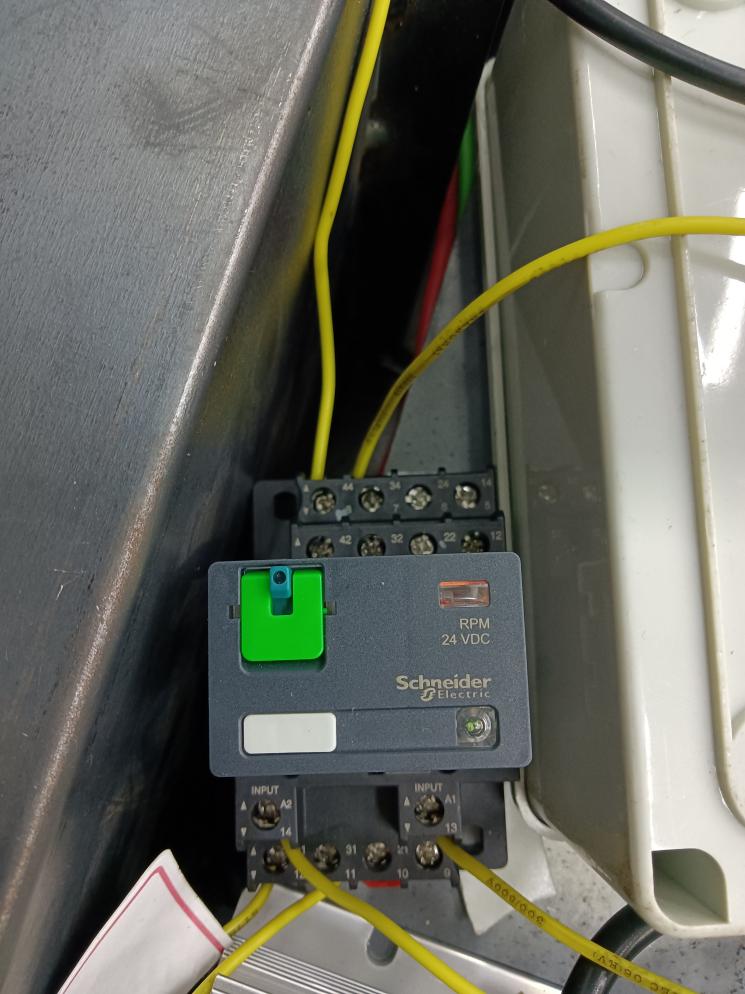
A relay must be connected to the CONT terminal of the MINI box. The specific wiring method and electrical parameter limits are as follows.
- Wiring definition:
- CON_POS (pin 1) connects to relay A1
- 24V+ connects to relay A2
- CON_FB (pin 3) connects to relay 41
- 24V+ connects to relay 44 (normally open contact)
- CON_NEG (pin 2) and CON_GND (pin 4) connect to 24V-
- Electrical parameter limits:
- Current between CON_POS (pin 1) and CON_NEG (pin 2) ≤480mA
- Relay coil voltage ≤30V
8 Appendix
8.1 Terminology
Category 0 stop: Uncontrolled stop, in which the power is cut off immediately, the brakes of each joint are engaged without deceleration control, and the robot may deviate from the programmed path. It is only applicable to extreme situations such as exceeding safety-rated limits or failures in the safety-rated part of the control system. For the definition of stop categories and the requirement to immediately cut off power, please refer to IEC 60204-1:2016 (9.2.2 Stop categories); for the design requirements of the emergency stop function, please refer to EN ISO 13850:2015.
Category 1 stop: Controlled stop with power removed after stopping, in which the robot stops along the programmed path and the power is cut off after the stop is completed, balancing safety and path stability. For the definition of stop categories and the requirement to cut off power after stopping, please refer to IEC 60204-1:2016 (9.2.2 Stop categories); for the design requirements of the emergency stop function, please refer to EN ISO 13850:2015.
Category 2 stop: Controlled stop with power maintained, in which the robot keeps powered after stopping, the safety-rated control system maintains the stop position, and operation can be resumed quickly. For the definition of stop categories and the requirement to continuously maintain power, please refer to IEC 60204-1:2016 (9.2.2 Stop categories). Category 2 stop shall not be used as an emergency stop, so EN ISO 13850:2015 does not apply.
8.2 Technical Specifications
| Controller model | AUBO-CB-MINI-S-48V | ||
|---|---|---|---|
| IP rating | IP20 | ||
| Controller dimensions (L*H*W) | 186mm * 65mm * 115mm | ||
| Controller weight | 1kg | ||
| Power supply | DC12V supply | ||
| I/O ports | Digital input | 8 | |
| Digital output | 6 | ||
| Analog input | None | ||
| Analog output | None | ||
| RS485 | 1 (UT-890A recommended) | ||
| I/O power supply | External DC24V | ||
| Power failure detection | AC220V or DC48V | ||
| Communication protocols | Ethernet, ModBus-RTU/TCP, Profinet (optional gateway) | ||
| Interfaces and openness | SDK (supports C/C++/C#/Lua/Python development), supports ROS, API | ||
| Operating temperature | 0 °C ~ 50 °C | ||
| Transportation and storage temperature | -20 °C ~ 60 °C | ||
| Humidity | 90% relative humidity (non-condensing) | ||
| Connecting cables | Robot arm connecting cable, external harness 3m | ||
8.3 Revision History
| Version/Date | Description |
|---|---|
| v0.0.4/20260203 | Released trial version v0.0.4. 1. [7.3.7] Added 7.3.7 Relay wiring instructions for the CONT terminal. |
| v0.0.5/20260720 | 1. Released trial version v0.0.5. 2. Unified the manual structure, safety instructions, chapter naming, and warning signs. |
| v0.0.6/20260922 | 1. Released trial version v0.0.6. 2. Added the description of stop types in the appendix. |