
AUBO-iS Standard Version Robot Arm User Manual
1 About this Manual
1.1 Version Information
| Item | Content |
|---|---|
| Manual name | AUBO-iS Standard Version Robot Arm User Manual |
| Manual version | v1.0.0 |
| Release date | 2026-11-16 |
| Applicable products | AUBO-iS3 robot arm, AUBO-iS7 robot arm, AUBO-iS10 robot arm, AUBO-iS16 robot arm, AUBO-iS20 robot arm, AUBO-iS20L robot arm, AUBO-iS25 robot arm, AUBO-iS35 robot arm |
| Applicable controllers | AUBO-iS Standard Version robot arms (except AUBO-iS35) can be used with AUBO-CB-iS and AUBO-CB-iS(CE) controllers. AUBO-iS35 is only compatible with the AUBO-CB-iS-H controller. |
The User Manual will be regularly checked and corrected, and the updates will be incorporated in the new version. The information in this manual is subject to change without notice.
Please read this manual thoroughly before installing and using the product, and keep it properly for future reference.
All pictures in this manual are for illustration only. The actual product received shall prevail.
1.2 Copyright and Disclaimer
This manual is the exclusive property of AUBO (Beijing) Intelligent Technology Co., Ltd. and may not be copied, reproduced in whole or in part, or converted into any other form for use without the written permission of AUBO (Beijing) Intelligent Technology Co., Ltd.
AUBO (Beijing) Intelligent Technology Co., Ltd. shall not be liable for any errors or omissions in this manual, or for any accidental or consequential injuries arising from the use of this manual and the products described herein.
Copyright © 2015-2026 AUBO All rights reserved.
1.3 Purpose of the Manual
This manual is intended to guide the installation, commissioning, pre-operation inspection, maintenance, repair, handling, storage and disposal of AUBO-iS Standard Version robot arms.
This manual is not a substitute for the system integrator's risk assessment, on-site safety design, work instructions, or the laws, regulations and safety standards applicable in the relevant country/region.
1.4 Intended Readers
This manual is intended for the following professionals:
- Robot arm installation personnel
- Commissioning and operation personnel
- Maintenance and repair personnel
- Safety management personnel
1.5 Preconditions for Operation
Readers of this manual should meet the following requirements:
- Have received the relevant training provided by AUBO or an AUBO-authorized distributor;
- Have basic knowledge required for the installation and maintenance of mechanical, electrical and automation equipment;
- Be familiar with on-site safety management requirements and have basic risk identification and safe operation awareness;
- Have read and understood the safety instructions in this manual and the related documents.
1.6 Related Documents
It is recommended to read the following documents together with this manual:
1.7 Where to Get More Information
For more information about products, services, training or technical support, please visit https://www.aubo-robotics.cn.
2 Safety
2.1 Safety Instructions
This chapter describes the basic safety principles to be followed when operating the robot arm or robot system. Integrators, users and operators must read this chapter carefully and strictly follow the instructions marked with safety warning signs.
Because robot systems are complex and potentially hazardous, this manual cannot list every possible hazardous scenario. Users and integrators should perform a risk assessment based on the actual application, end tools, peripheral equipment, working environment and personnel activity range, and take appropriate risk reduction measures.
2.2 Safety Warning Signs
The following safety warning signs are used in this manual to indicate important safety information. Whenever you see these signs, be sure to read and follow the corresponding instructions.
| Sign | Level | Description |
|---|---|---|
 | DANGER | Indicates a hazardous situation which, if not avoided, will result in death or serious injury. |
 | WARNING | Indicates a hazardous situation which, if not avoided, could result in personal injury or serious equipment damage. |
 | CAUTION | Indicates a hazardous situation which, if not avoided, could result in minor personal injury or equipment damage. Depending on the specific situation, matters marked with this sign may sometimes lead to major consequences. |
 | NOTICE | Indicates a situation which, if not avoided, could result in personal injury or equipment damage. Depending on the specific situation, matters marked with this sign may sometimes lead to major consequences. |
2.3 General Safety Rules
The following basic safety guidelines must always be observed when operating the robot arm and its related equipment. This section lists general safety requirements; safety instructions for specific scenarios are described in detail in the relevant chapters of this manual.
Be sure to install the machine and all electrical equipment in accordance with the requirements and specifications in this manual.
Before using the machine for the first time and putting it into production, preliminary testing and inspection of the machine and its protective systems are required.
Before starting the machine and system for the first time, check whether the machine and system are complete, whether operation is safe, and whether any damage is detected. This inspection shall verify compliance with the national or regional regulations on safe production in force, and all safety functions must be tested.
Users must check and ensure that all safety parameters and user programs are correct and that all safety functions work properly. Personnel qualified to operate the robot are required to check each safety function. The robot may be started only after comprehensive and careful safety testing has been completed and the required safety level has been reached.
Professional personnel are required to install and commission the machine in accordance with the installation standards.
After the machine has been installed and set up, a comprehensive risk assessment shall be carried out again and documented.
Safety parameters shall be set and changed by authorized personnel only. Passwords or isolation measures shall be used to prevent unauthorized persons from changing or setting safety parameters. After safety parameters are modified, the related safety functions shall be analyzed.
In the event of an accident or abnormal operation, the emergency stop switch can be used to stop the robot's motion.
The robot arm is equipped with a collision detection function. When the external force on the powered robot exceeds the normal force range set by the user, the robot stops automatically to prevent injury to the robot or operators due to collision. This function is specially designed for AUBO-iS Standard Version robot arms to ensure the safety of human-machine collaboration, but it requires that the robot system operate within its normal working range and that an AUBO series controller be used. If users develop their own controller, the robot will not have the above functions, and the user shall bear the hazardous consequences arising therefrom.
Connecting different machines may increase hazards or create new hazards. Always perform a comprehensive risk assessment of the entire installation. When different safety and emergency stop performance levels are required, always choose the highest performance level.
AUBO (Beijing) Intelligent Technology Co., Ltd. assumes no liability for machine damage or personal injury caused by improper operation of the machine.
Prohibitions:
| Sign | Description |
|---|---|
| 1. It is strictly prohibited to start the robot arm before safety checks and risk assessment are completed. The following checks must be completed before the first startup: - System integrity check (mechanical installation, electrical connection, grounding protection) - Testing of all safety functions - Verification of the correctness of safety parameters - Review of risk assessment documents 2. It is strictly prohibited to power on the robot arm without connecting the protective earth (PE) conductor. Poor grounding may cause electric shock, equipment damage or electromagnetic interference. 3. It is strictly prohibited to use the controller in humid environments or environments with conductive dust, which may cause casualties. 4. It is strictly prohibited to switch the power supply on and off frequently. Brakes are installed in the joint modules of the robot arm to maintain the robot posture when power is off. Do not switch the power supply on and off frequently; it is recommended that the interval between power-on and power-off be greater than 10 s. 5. It is strictly prohibited to touch the surfaces of joints and motors while the robot arm is running. Do not operate or touch the robot while it is working or has just stopped. Cut off the power and wait one hour before the robot cools down. 6. It is strictly prohibited to modify safety parameters or bypass safety functions without authorization. |
Operating Rules:
| Sign | Description |
|---|---|
| 1. Ensure that the robot arm and end tool are securely installed. Insecure installation may cause the equipment to fall off or reduce operating accuracy. 2. Ensure that the robot arm has sufficient working space, free of obstacles, sharp corners or pinch points. The operator's head and face shall be outside the reachable range of the robot arm. 3. Do not connect safety devices to general-purpose I/O interfaces; only dedicated safety-type interfaces may be used. 4. Configure the installation parameters correctly, including the mounting angle, TCP weight and offset, and safety parameters. 5. If the robot arm is damaged, do not continue to use it. Stop the robot immediately and contact AUBO or an authorized service provider. 6. Heavy-payload (≥20 kg) robot arms must not be handled manually; compliant dedicated lifting equipment must be used. 7. A safety assessment must be carried out after each installation to confirm that all safety functions are normal. |
| 1. Check the insulation condition and protective measures before transporting the robot arm. Handle it carefully during transportation to avoid collisions. 2. Do not expose the robot arm to strong magnetic fields for a long time; strong magnetic fields may damage the equipment. 3. Do not modify the robot arm without authorization. Any unauthorized modification will void the warranty, and AUBO assumes no liability arising therefrom. |
2.4 Personnel Safety
Personnel safety shall be given priority when operating the robot system. Users and integrators shall take at least the following measures:
- Ensure that all relevant personnel have received training from AUBO officially (or from an AUBO-authorized distributor) and fully understand safe and standardized operating procedures. Training consultation: support@aubo-robotics.cn.
- Tie back hair, do not wear loose clothing, and do not wear jewelry during operation. The robot may be in a ready-to-start state when it is stationary and shall be regarded as continuously running; do not approach it at will.
- In an emergency such as a person being pinched or trapped, the joints can be forced to move by pushing or pulling the robot arm forcefully. Manually moving the robot arm without power drive is limited to emergencies and may damage the robot arm joints.
- Personnel must not place their head, face, neck, fingers or other body parts in areas where they may be hit, pinched or entangled.
2.5 Responsibilities and Specifications
The robot arm is a component of a complete robot system and does not in itself constitute a complete machine. Therefore, this manual does not cover the full design, installation and operation scheme of a complete robot, nor does it list all risk conditions that may affect the safety of peripheral equipment of the integrated system. The installation safety performance of complete robot equipment depends on the design and construction method of the overall integration scheme. Equipment integrators must carry out risk assessment throughout the design and installation of the entire integrated system in accordance with applicable local laws, regulations, safety specifications and industry standards.
None of the safety information contained in this manual shall be regarded as a guarantee by AUBO (Beijing) Intelligent Technology Co., Ltd. Even if operators strictly follow all safety instructions in this manual, there is still a potential risk of personal injury or equipment damage.
AUBO (Beijing) Intelligent Technology Co., Ltd. continuously improves product performance and reliability and reserves the right to upgrade products iteratively; product updates will not be notified separately. We have made every effort to ensure that the content of this manual is accurate and reliable, but we do not assume liability for any omissions or errors in the document.
2.5.1 Integrator Responsibilities
The integrator bears the following key responsibilities:
- Perform a comprehensive risk assessment of the complete robot system
- Ensure that the design, installation and commissioning of the entire system meet safety requirements
- Provide necessary training to users and relevant operators
- Develop complete system operating procedures and emergency plans
- Establish and maintain appropriate safety protection measures
- Eliminate hazards or minimize all hazards to an acceptable level using appropriate methods during final installation
- Inform the end user of the residual risks
- Mark the integrator's information on the robot
- Archive all relevant technical documents and risk assessment reports
2.5.2 Reference Standards
Integrators may refer to the following international standards when carrying out the risk assessment process:
| Standard No. | Name | Description |
|---|---|---|
| ISO 12100:2010 | Safety of machinery — General principles for design — Risk assessment and risk reduction | Basic framework for risk assessment |
| ISO 10218-2:2025 | Robotics — Safety requirements — Part 2: Industrial robot systems and robot applications | Safety requirements for industrial robot integration |
| RIA TR R15.306-2014 | Technical report for industrial robots and robot systems — Safety requirements, task-based risk assessment methodology | Guidelines for task-based risk assessment |
| ANSI B11.0-2010 | Safety of machinery — General requirements and risk assessment | US machinery safety standard |
For applicable standards and regulatory guidelines, please visit the AUBO official website at www.aubo-robotics.cn or consult your local regulatory authority.
2.6 Hazard Identification
The risk assessment shall consider potential hazards during normal use, commissioning, maintenance, cleaning, abnormal recovery and foreseeable misuse. When peripheral safety protection devices are not used, using a collaborative robot arm may involve the following potential hazards:
- Risk of puncture or cut caused by sharp end effectors or tool connectors.
- Risk of exposure when handling toxic, corrosive or other hazardous substances.
- Risk of an operator's fingers or limbs being pinched by the robot arm joints or base.
- Risk of collision with personnel during robot arm motion.
- Risk of objects falling due to improper fixation of the end tool.
- Hazards caused by impact between the robot payload and a solid surface.
The integrator must assess such hazards and their associated risk levels through risk assessment, and determine and implement corresponding measures to reduce risks to an acceptable level. Please note that other significant hazards may also exist in specific robot installations.
Combined with the inherent safety design of AUBO robots and the safety specifications and risk assessments developed by integrators and end users, the risks associated with collaborative operation of the robot arm can be reduced to a reasonably practicable level. This document is intended to communicate the residual risks existing before robot installation to integrators and end users. If, after risk assessment, the integrator determines that the corresponding application scenario has hazards that may cause unacceptable risks to operators, the integrator must take appropriate risk reduction measures to eliminate or minimize these hazards until the risk level reaches an acceptable standard. Operation is prohibited before the necessary risk reduction measures are completed.
If the robot is deployed in a non-collaborative mode (for example, equipped with hazardous operating tools), the risk assessment results may require the integrator to add safety devices (such as safety start-up devices) during program development to ensure the safety of personnel and equipment operation.
2.7 Emergency Handling
2.7.1 Emergency Stop Device
Pressing the emergency stop button will immediately stop all motion of the robot arm. The robot arm body is not equipped with a push-button emergency stop device, but the controller, wired teach pendant, control handle and other devices are equipped with push-button emergency stop devices. For details, please refer to the user manual of the applicable controller or accessory.
| Sign | Description |
|---|---|
| 1. Emergency stop cannot be used as a routine risk reduction measure and shall be regarded as a secondary protective means. 2. If multiple emergency stop buttons need to be connected, they must be included in the risk assessment of the robot application. 3. If the end tool constitutes a potential threat, it must be integrated into the emergency stop circuit of the system. Failure to comply with this warning may result in death, serious personal injury or major property damage. 4. Before resetting the emergency stop, it must be confirmed that the hazard has been completely eliminated. |
| The stop type triggered by pressing the [Emergency Stop] button is stop category 1. For a description of stop types, please refer to section 8.1 Terminology in the Appendix. |
2.7.2 Emergency Joint Movement
In an emergency, the robot arm joints can be moved in the following way:
- Forced dragging: Push or pull the robot arm joints forcefully to force them to move.
| Sign | Description |
|---|---|
| Forced manual movement of the robot arm is limited to emergencies and may damage the robot arm joints. |
2.7.3 Excessive Force Safety Protection of the Robot Arm
The robot arm is equipped with an excessive force safety protection function. When the robot arm is powered and stationary, if an operator or other object accidentally touches the robot arm and the collision force exceeds the safety threshold, the robot arm will move passively in the direction of the collision force. This function can reduce the injury to personnel, other objects and the robot arm when an operator or other objects collide with the robot arm.
| Sign | Description |
|---|---|
| This function can reduce collision injuries. A risk assessment is required when it is used for other purposes. |
2.7.4 Collision Protection
The robot arm is equipped with a collision protection function. During operation, if an operator or other object accidentally touches the robot arm and the collision force exceeds the safety threshold, the robot arm will enter the stop category 2 state and the drag teaching mode at the same time. At this point, you can drag the robot arm to a relatively safe position and then operate the teach pendant to make the robot arm continue to run. This function can reduce the injury to personnel, other objects and the robot arm when an operator or other objects collide with the robot arm; at the same time, it saves the time of restarting the program and improves work efficiency. The safety threshold of the collision force can be changed by setting the collision level.
3 Robot Arm Description
3.1 About the iS Standard Version
AUBO-iS Standard Version robot arms are intelligent, lightweight, 6-degree-of-freedom modular collaborative robots launched by AUBO (Beijing) Intelligent Technology Co., Ltd. They are divided into eight models and include various options to achieve payloads from 3 kg to 35 kg and a working radius from 0.625 m to 2.10 m.
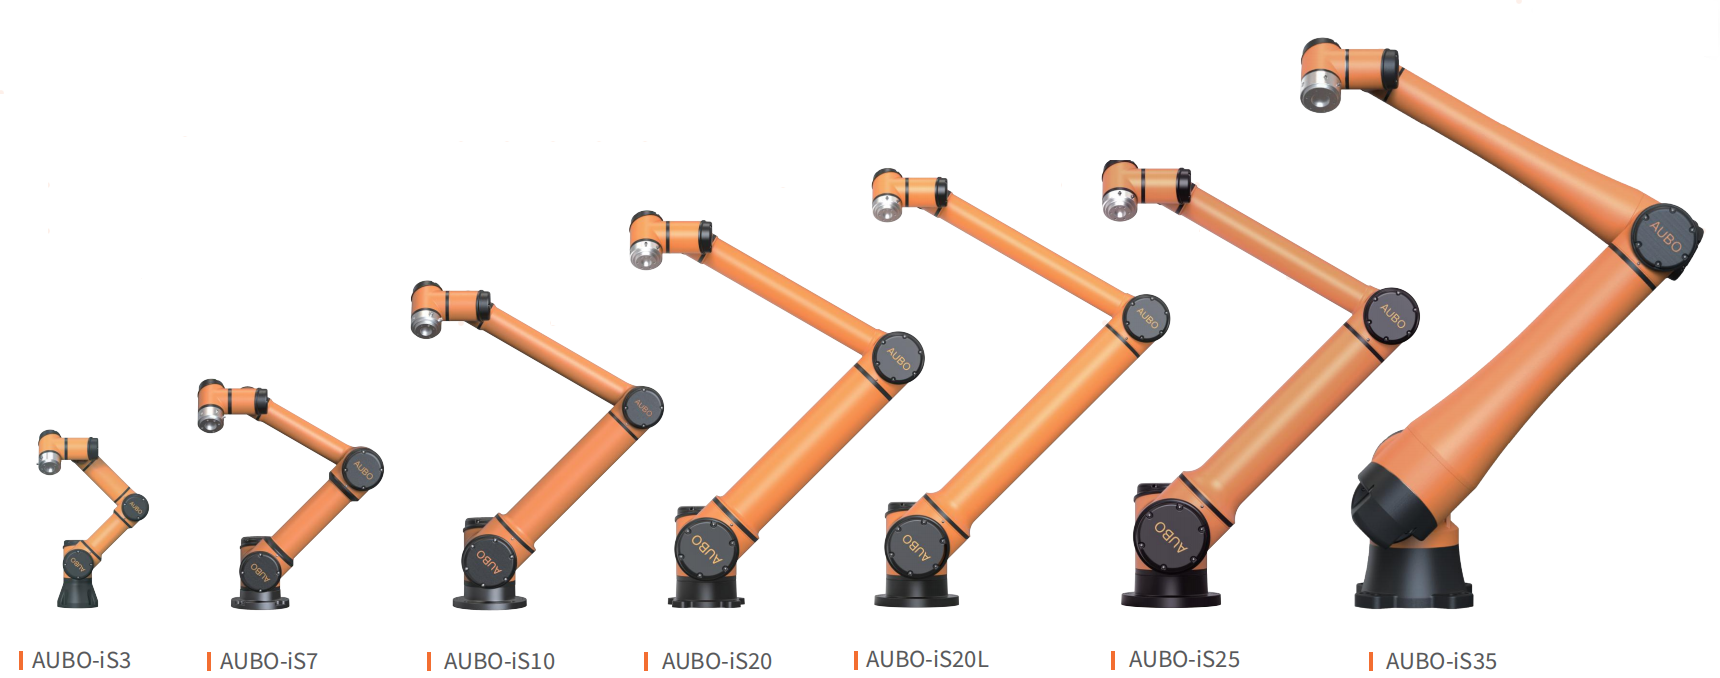
| Sign | Description |
|---|---|
| AUBO-iS Standard Version robot arms (except AUBO-iS35) can be used with AUBO-CB-iS and AUBO-CB-iS(CE) controllers. AUBO-iS35 is only compatible with the AUBO-CB-iS-H controller. |
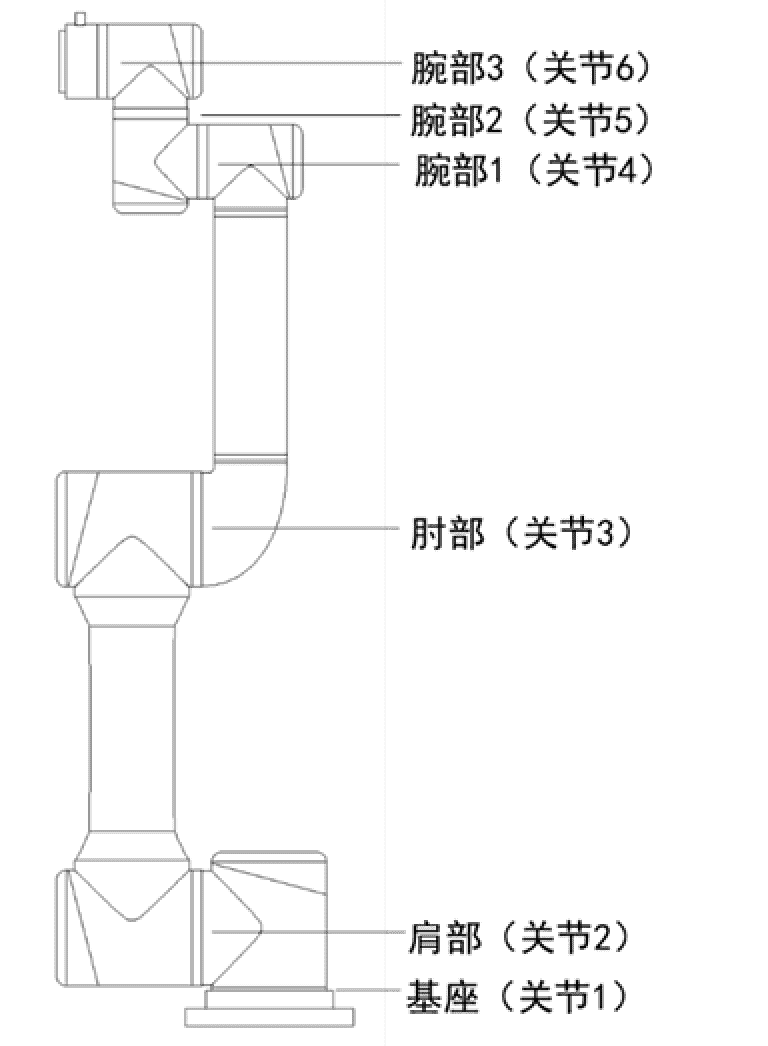
AUBO-iS Standard Version robot arms imitate the human arm and have 6 rotary joints, each representing one degree of freedom. As shown in Figure 3-2, the robot arm joints include the base (joint 1), shoulder (joint 2), elbow (joint 3), wrist 1 (joint 4), wrist 2 (joint 5) and wrist 3 (joint 6).
- The base is used to connect the robot arm body to the base pedestal, and the tool end is used to connect the robot arm to the tool (the tool end is the end of wrist 3).
- The shoulder and elbow, as well as the elbow and wrist, are connected by arm tubes.
- Through the teach software interface or drag teaching, users can control the rotation of each joint to move the robot end tool to different poses.
3.2 Technical Specifications
3.2.1 AUBO-iS3
| Robot arm model | AUBO-iS3 |
|---|---|
| Degrees of freedom | 6 rotary joints |
| Weight | 16 kg |
| Payload | 3 kg |
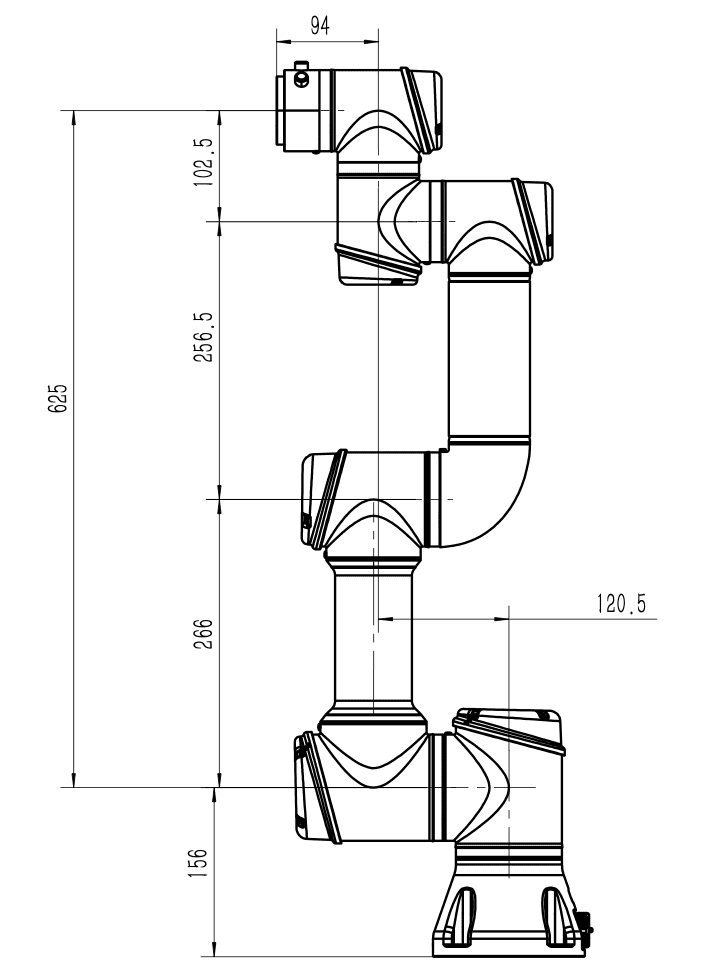
| Maximum working radius | 625 mm |
| Joint range | joint1/joint2/joint4/joint5/joint6: -360° ~ +360° joint3: -156° ~ +156° |
| Maximum joint speed | joint1/joint2/joint3/joint4/joint5/joint6: 237°/s |
| Tool speed | ≤ 2.5 m/s |
| Repeatability | ± 0.02 mm |
| Operating ambient temperature range | 0 ~ 50°C |
| Operating ambient humidity | 90% relative humidity (non-condensing) |
| IP rating | IP67 |
| Average power | Approx. 150 W when running a typical program |
| Peak power | 1000 W |
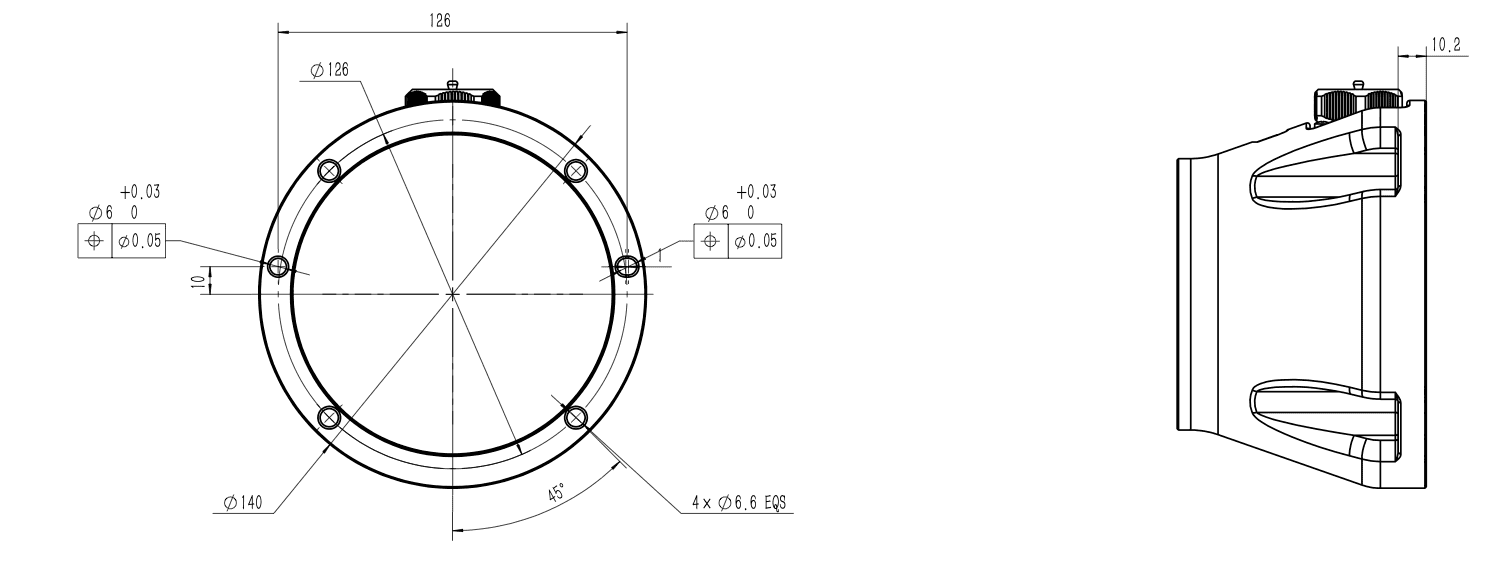
| Mounting surface diameter | ⌀140 mm |
| General certification mark / organization | CE |
3.2.2 AUBO-iS7
| Robot arm model | AUBO-iS7 |
|---|---|
| Degrees of freedom | 6 rotary joints |
| Weight | 21.5 kg |
| Payload | 7 kg |
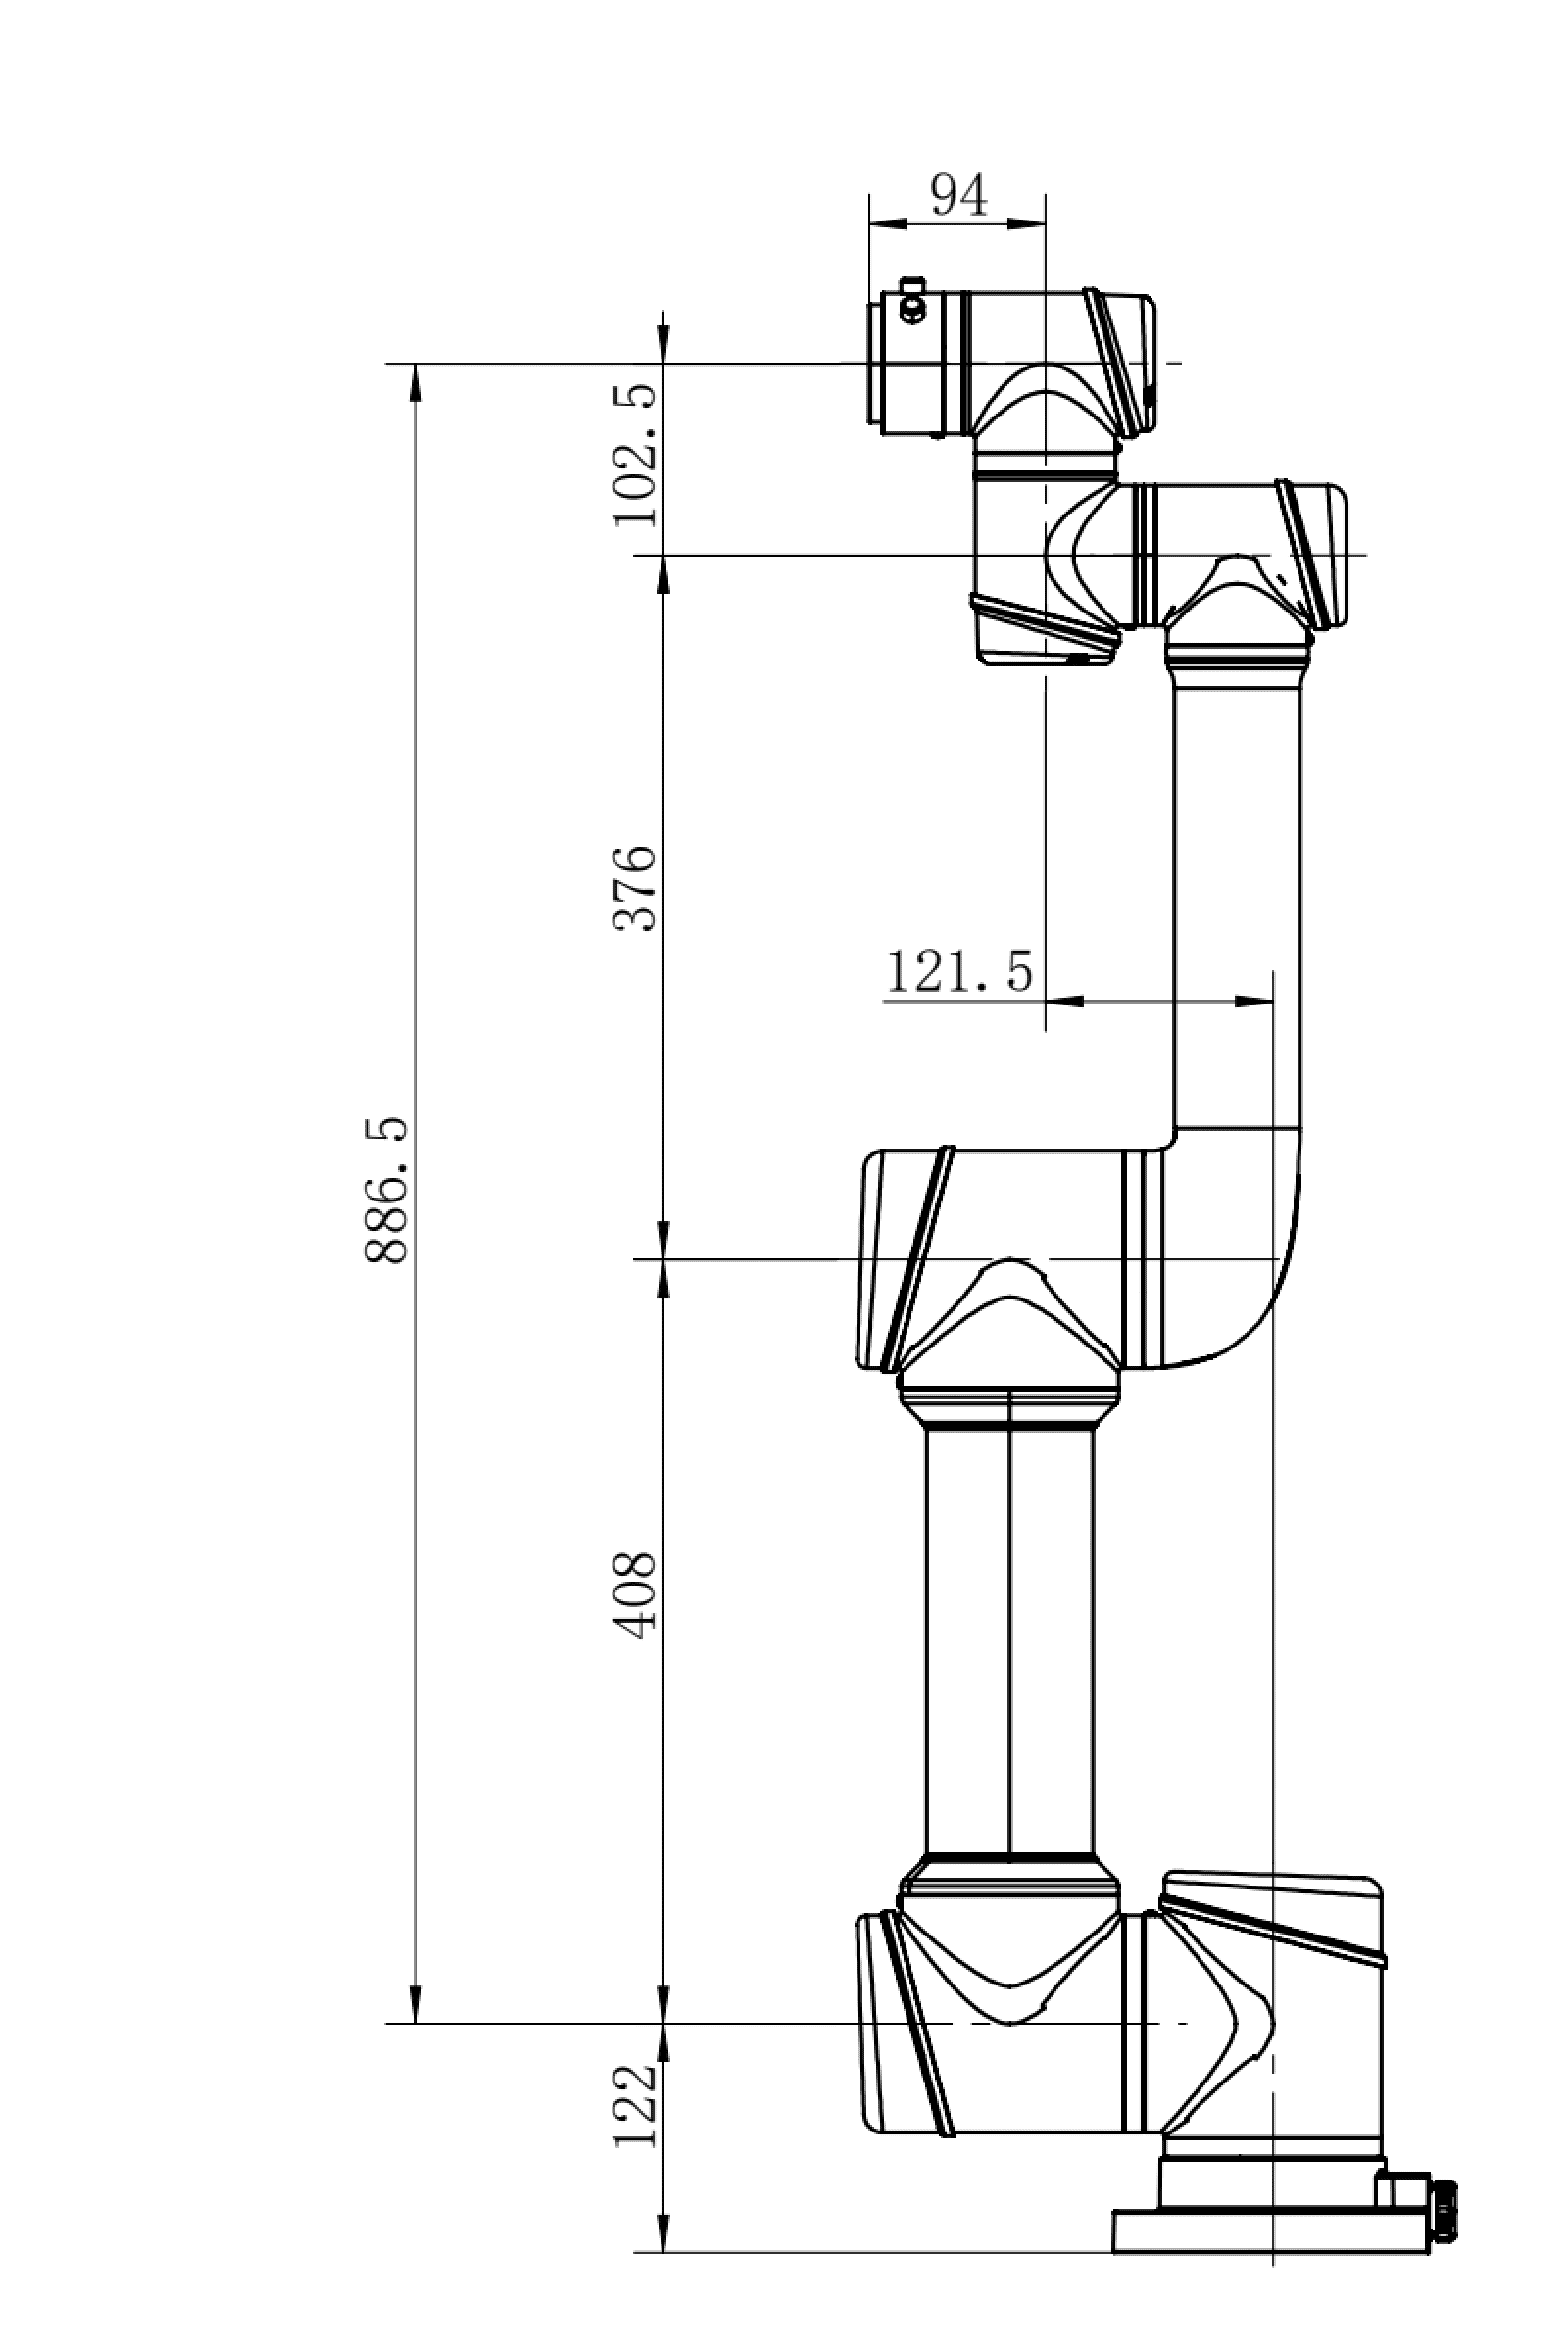
| Maximum working radius | 886.5 mm |
| Joint range | joint1/joint2/joint4/joint5/joint6: -360° ~ +360° joint3: -162° ~ +162° |
| Maximum joint speed | joint1/joint2/joint3: 223°/s joint4/joint5/joint6: 237°/s |
| Tool speed | ≤ 3.6 m/s |
| Repeatability | ± 0.02 mm |
| Operating ambient temperature range | 0 ~ 50°C |
| Operating ambient humidity | 90% relative humidity (non-condensing) |
| IP rating | IP67 |
| Average power | Approx. 200 W when running a typical program |
| Peak power | 2000 W |
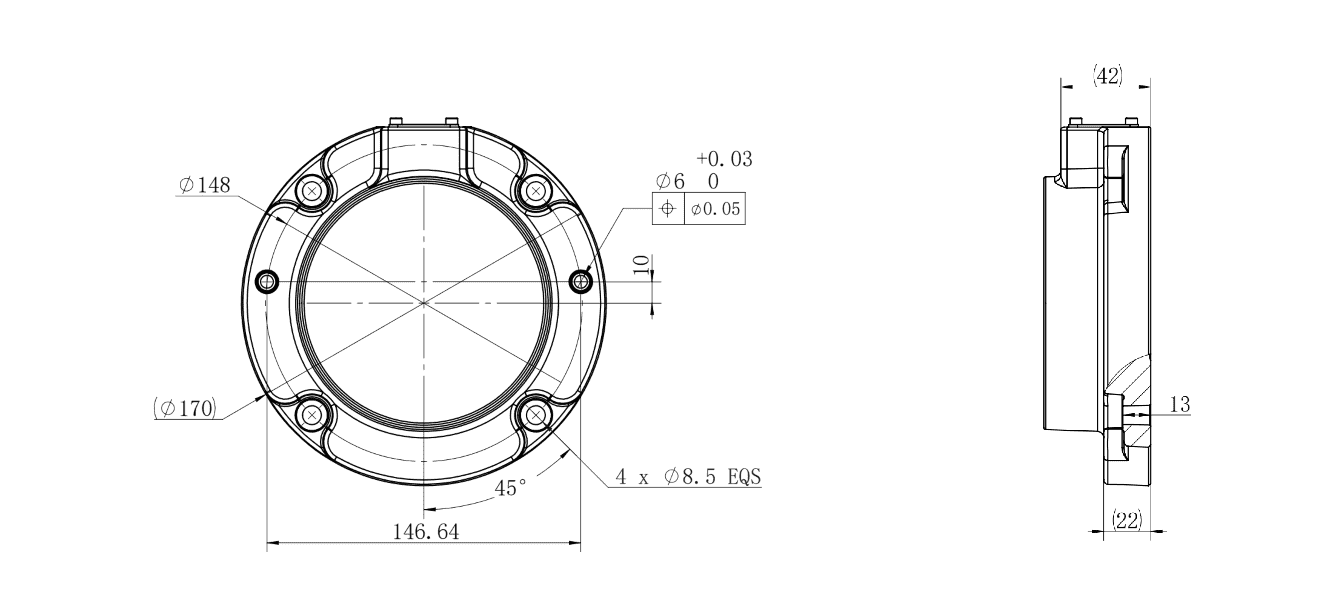
| Mounting surface diameter | ⌀170 mm |
| General certification mark / organization | CE, CR, REACH |
3.2.3 AUBO-iS10
| Robot arm model | AUBO-iS10 |
|---|---|
| Degrees of freedom | 6 rotary joints |
| Weight | 36 kg |
| Payload | 12 kg |
| Maximum working radius | 1300 mm |
| Joint range | joint1/joint2/joint4/joint5/joint6: -360° ~ +360° joint3: -165° ~ +165° |
| Maximum joint speed | joint1/joint2: 200°/s joint3: 237°/s joint4/joint5/joint6: 237°/s |
| Tool speed | ≤ 4.5 m/s |
| Repeatability | ± 0.03 mm |
| Operating ambient temperature range | 0 ~ 50°C |
| Operating ambient humidity | 90% relative humidity (non-condensing) |
| IP rating | IP67 |
| Average power | Approx. 500 W when running a typical program |
| Peak power | 2000 W |
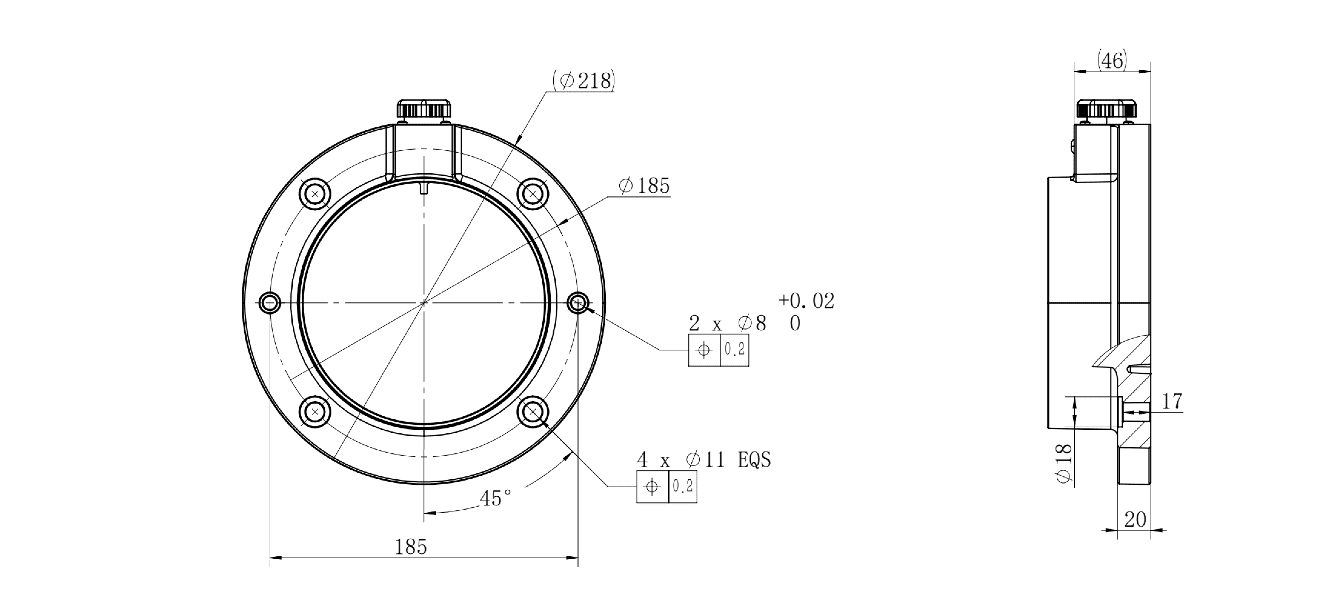
| Mounting surface diameter | ⌀218 mm |
| General certification mark / organization | CE, CR, REACH |
3.2.4 AUBO-iS16
| Robot arm model | AUBO-iS16 |
|---|---|
| Degrees of freedom | 6 rotary joints |
| Weight | 64 kg |
| Payload | 16 kg |
| Maximum working radius | 1900 mm |
| Joint range | joint1/joint2/joint4/joint5/joint6: -360° ~ +360° joint3: -165° ~ +165° |
| Maximum joint speed | joint1/joint2: 180°/s joint3/joint4/joint5/joint6: 237°/s |
| Tool speed | ≤ 5.9 m/s |
| Repeatability | ± 0.05 mm |
| Operating ambient temperature range | 0 ~ 50°C |
| Operating ambient humidity | 90% relative humidity (non-condensing) |
| IP rating | IP54 (IP67 customizable) |
| Average power | Approx. 1000 W when running a typical program |
| Peak power | 3000 W |
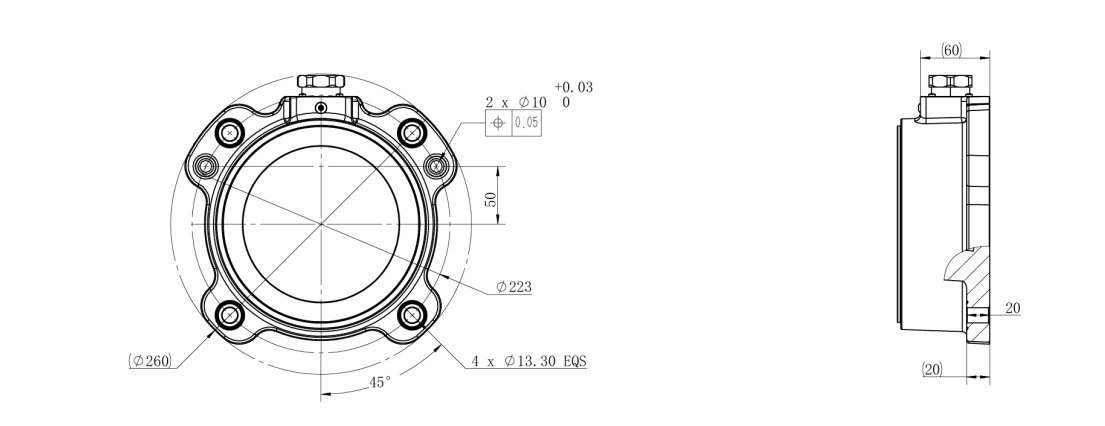
| Mounting surface diameter | ⌀260 mm |
| General certification mark / organization | CE, CR, REACH |
3.2.5 AUBO-iS20
| Robot arm model | AUBO-iS20 |
|---|---|
| Degrees of freedom | 6 rotary joints |
| Weight | 64 kg |
| Payload | 20 kg |
| Maximum working radius | 1647 mm |
| Joint range | joint1/joint2/joint4/joint5/joint6: -360° ~ +360° joint3: -165° ~ +165° |
| Maximum joint speed | joint1/joint2: 130°/s joint3: 237°/s joint4/joint5/joint6: 237°/s |
| Tool speed | ≤ 3.7 m/s |
| Repeatability | ± 0.05 mm |
| Operating ambient temperature range | 0 ~ 50°C |
| Operating ambient humidity | 90% relative humidity (non-condensing) |
| IP rating | IP54 (IP67 customizable) |
| Average power | Approx. 1000 W when running a typical program |
| Peak power | 3000 W |
| Mounting surface diameter | ⌀260 mm |
| General certification mark / organization | CE, CR, REACH |
3.2.6 AUBO-iS20L
| Robot arm model | AUBO-iS20L |
|---|---|
| Degrees of freedom | 6 rotary joints |
| Weight | 72 kg |
| Payload | 20 kg |
| Maximum working radius | 2000 mm |
| Joint range | joint1/joint2/joint4/joint5/joint6: -360° ~ +360° joint3: -165° ~ +165° |
| Maximum joint speed | joint1/joint2: 110°/s joint3: 237°/s joint4/joint5/joint6: 237°/s |
| Tool speed | ≤ 3.8 m/s |
| Repeatability | ± 0.05 mm |
| Operating ambient temperature range | 0 ~ 50°C |
| Operating ambient humidity | 90% relative humidity (non-condensing) |
| IP rating | IP54 (IP67 customizable) |
| Average power | Approx. 1000 W when running a typical program |
| Peak power | 3000 W |
| Mounting surface diameter | ⌀282 mm |
| General certification mark / organization | CE, CR, REACH |
3.2.7 AUBO-iS25
| Robot arm model | AUBO-iS25 |
|---|---|
| Degrees of freedom | 6 rotary joints |
| Weight | 75.6 kg |
| Payload | 25 kg |
| Maximum working radius | 1700 mm |
| Joint range | joint1/joint2/joint4/joint5/joint6: -360° ~ +360° joint3: -165° ~ +165° |
| Maximum joint speed | joint1/joint2: 110°/s joint3: 237°/s joint4/joint5/joint6: 237°/s |
| Tool speed | ≤ 3.2 m/s |
| Repeatability | ± 0.05 mm |
| Operating ambient temperature range | 0 ~ 50°C |
| Operating ambient humidity | 90% relative humidity (non-condensing) |
| IP rating | IP54 (IP67 customizable) |
| Average power | Approx. 1000 W when running a typical program |
| Peak power | 3000 W |
| Mounting surface diameter | ⌀282 mm |
| General certification mark / organization | CE, CR, REACH |
3.2.8 AUBO-iS35
| Robot arm model | AUBO-iS35 |
|---|---|
| Degrees of freedom | 6 rotary joints |
| Weight | 172 kg |
| Payload | 35 kg |
| Maximum working radius | 2100 mm |
| Joint range | joint1/joint2/joint4/joint5/joint6: -360° ~ +360° joint3: -165° ~ +165° |
| Maximum joint speed | joint1/joint2: 113°/s joint3: 123°/s joint4/joint5/joint6: 237°/s |
| Tool speed | ≤ 4.0 m/s |
| Repeatability | ± 0.05 mm |
| Operating temperature | The robot can operate within the temperature range of 0 ~ 50°C |
| Humidity | 90% relative humidity (non-condensing) |
| IP rating | IP54 (IP67 customizable) |
| Average power | Approx. 2000 W when running a typical program |
| Peak power | 6000 W |
| Mounting surface diameter | ⌀423 mm |
| General certification mark / organization | CE, CR, REACH |
3.3 Performance Parameters
3.3.1 Load Curve
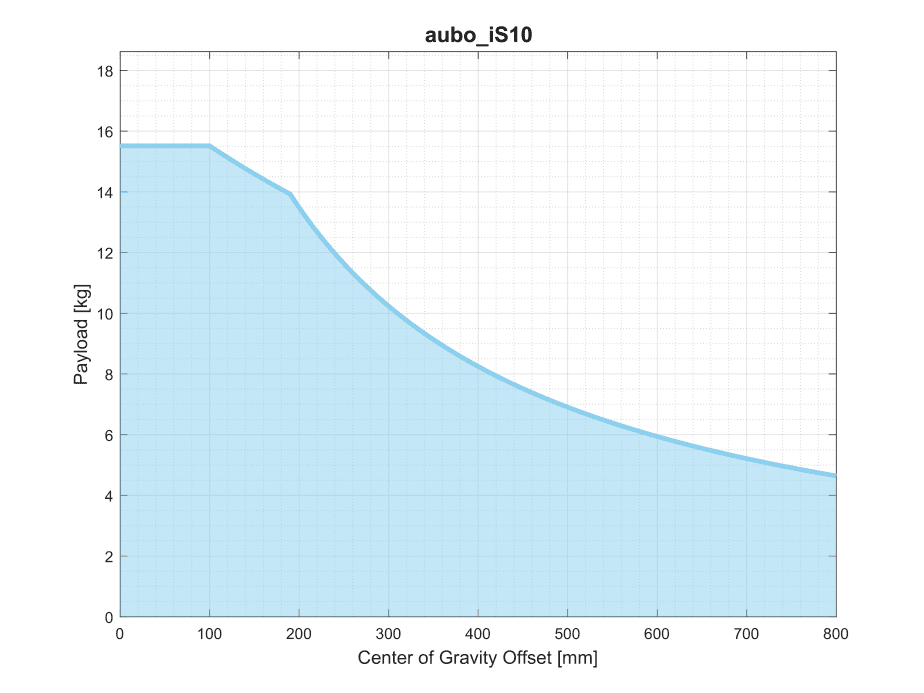
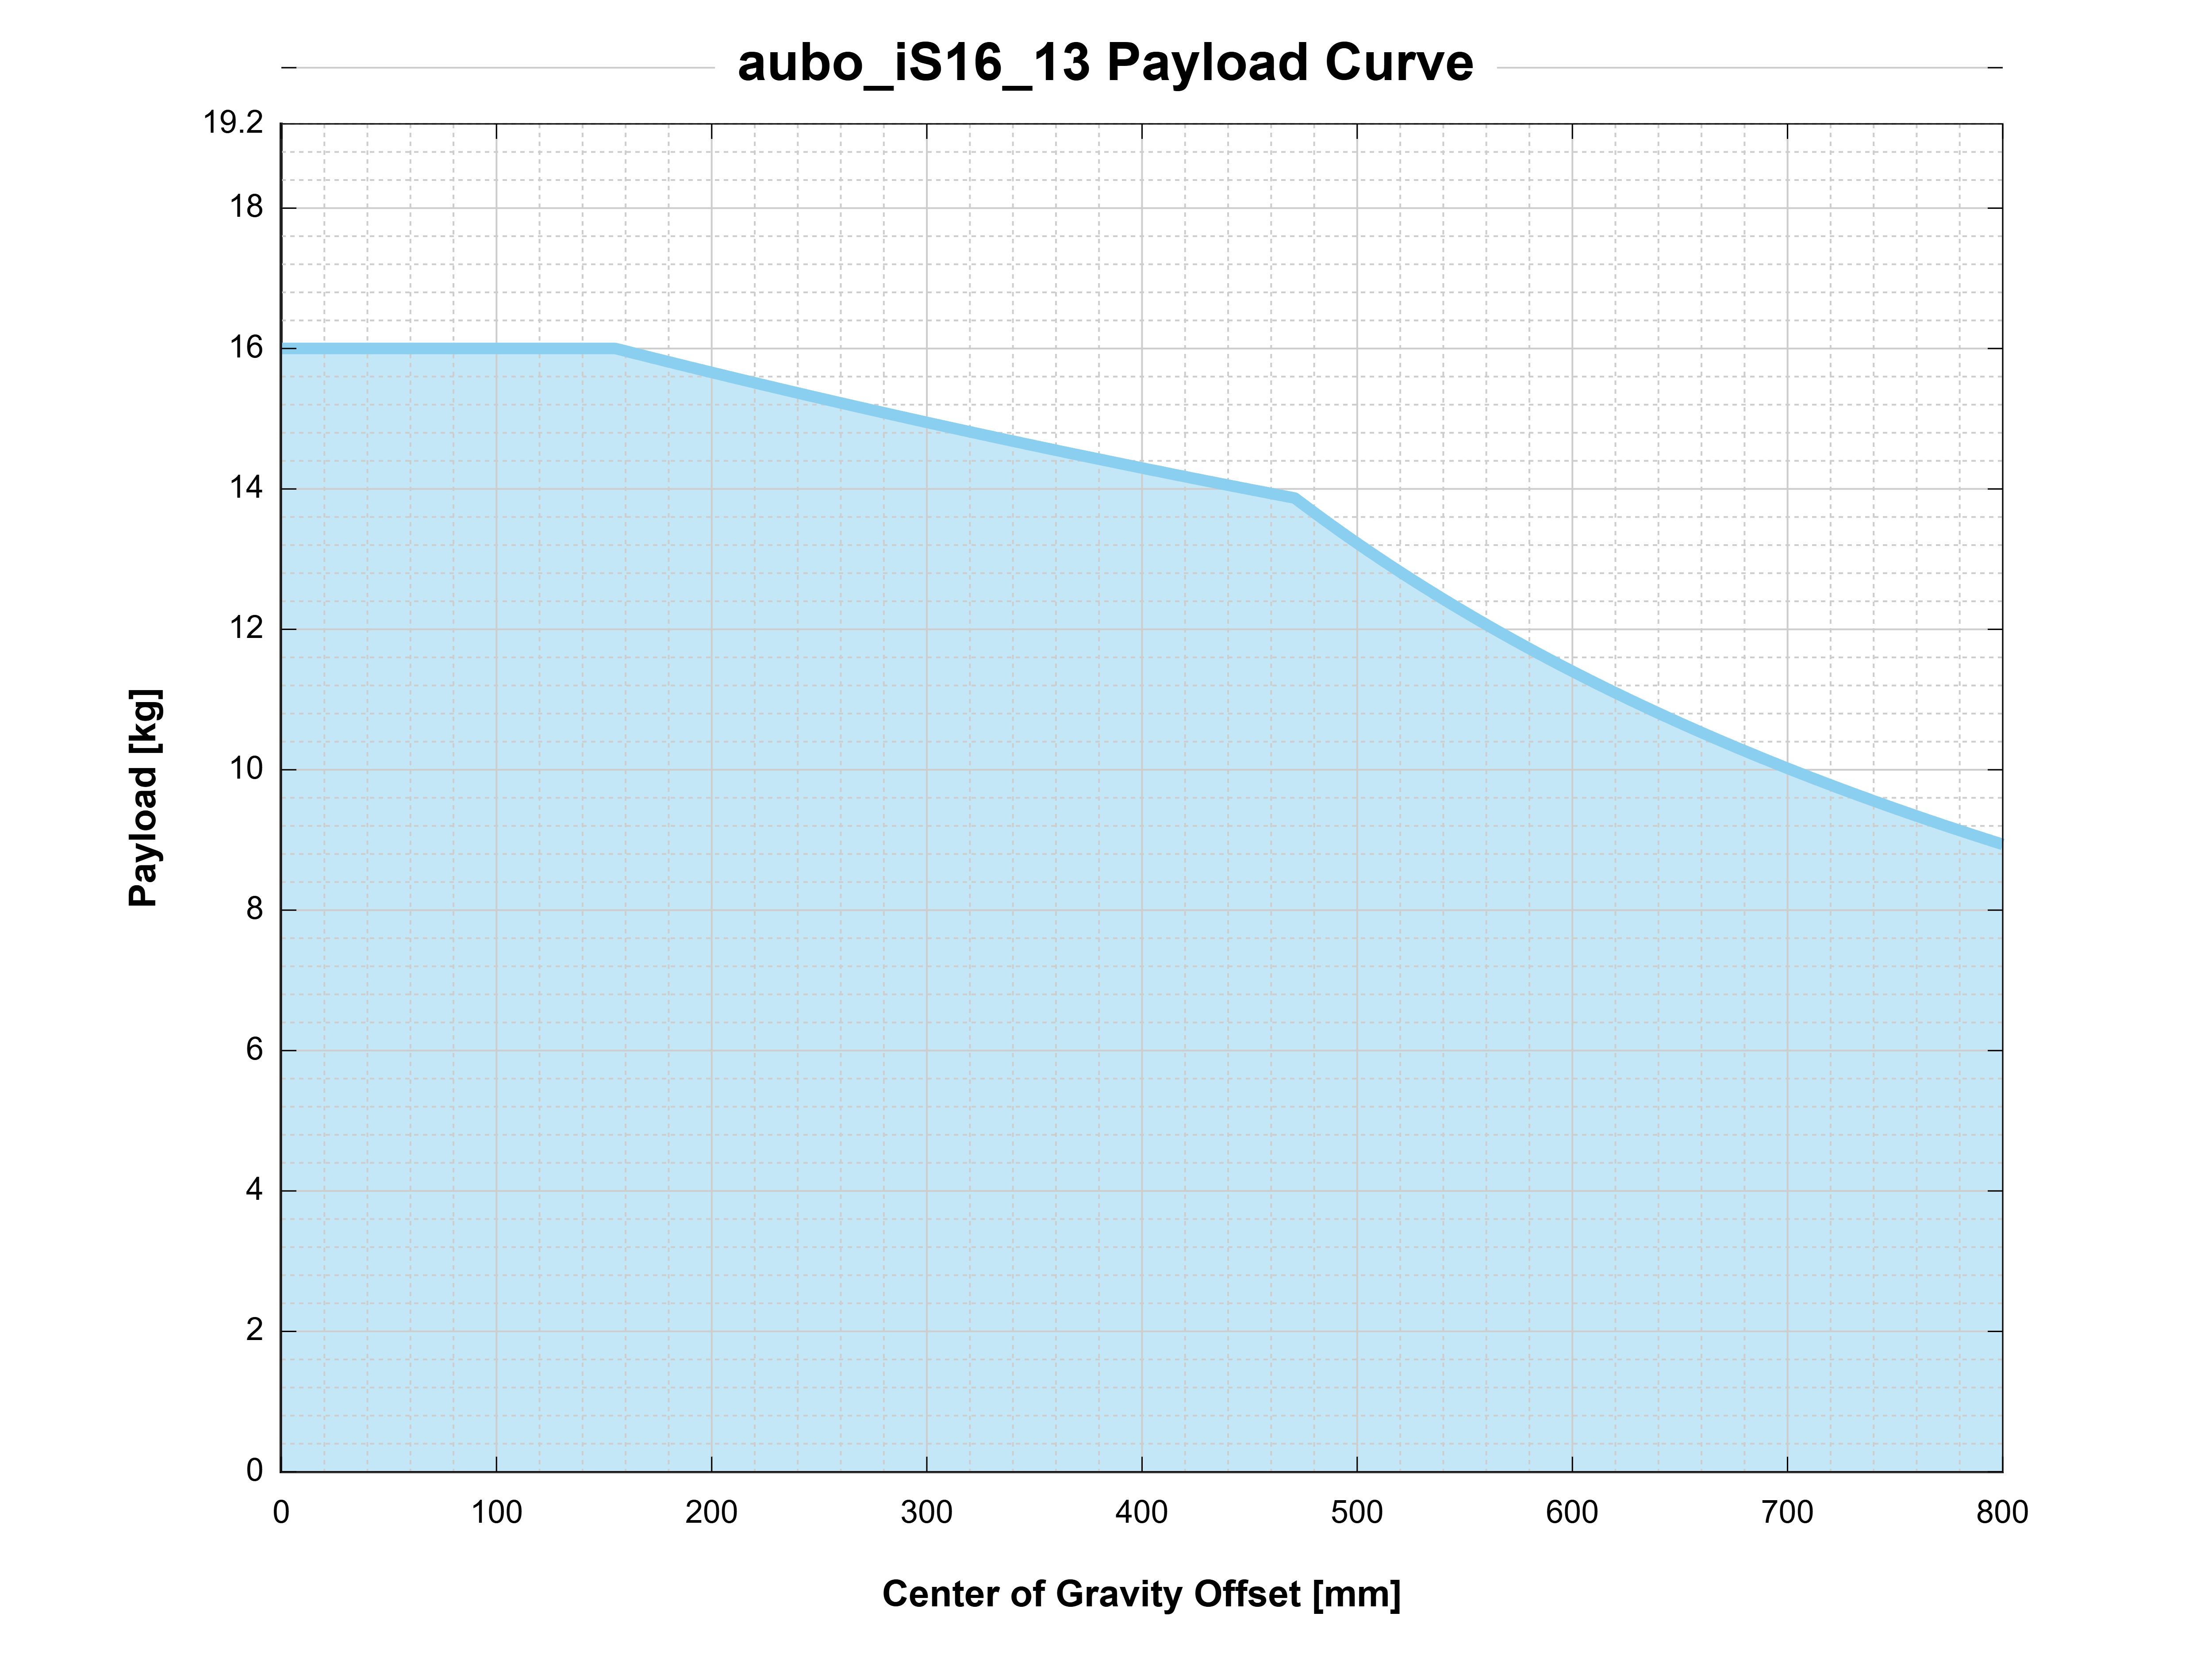
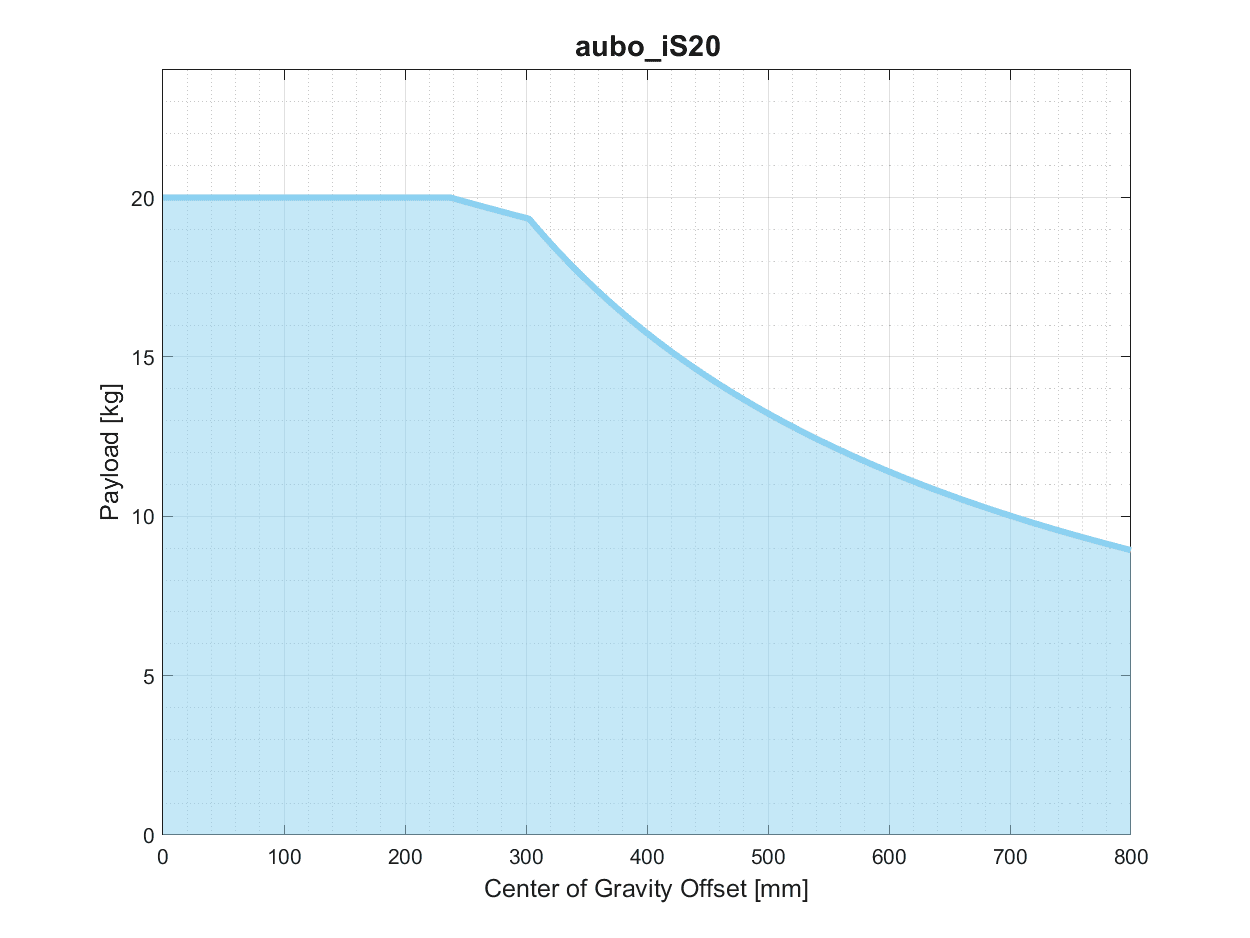
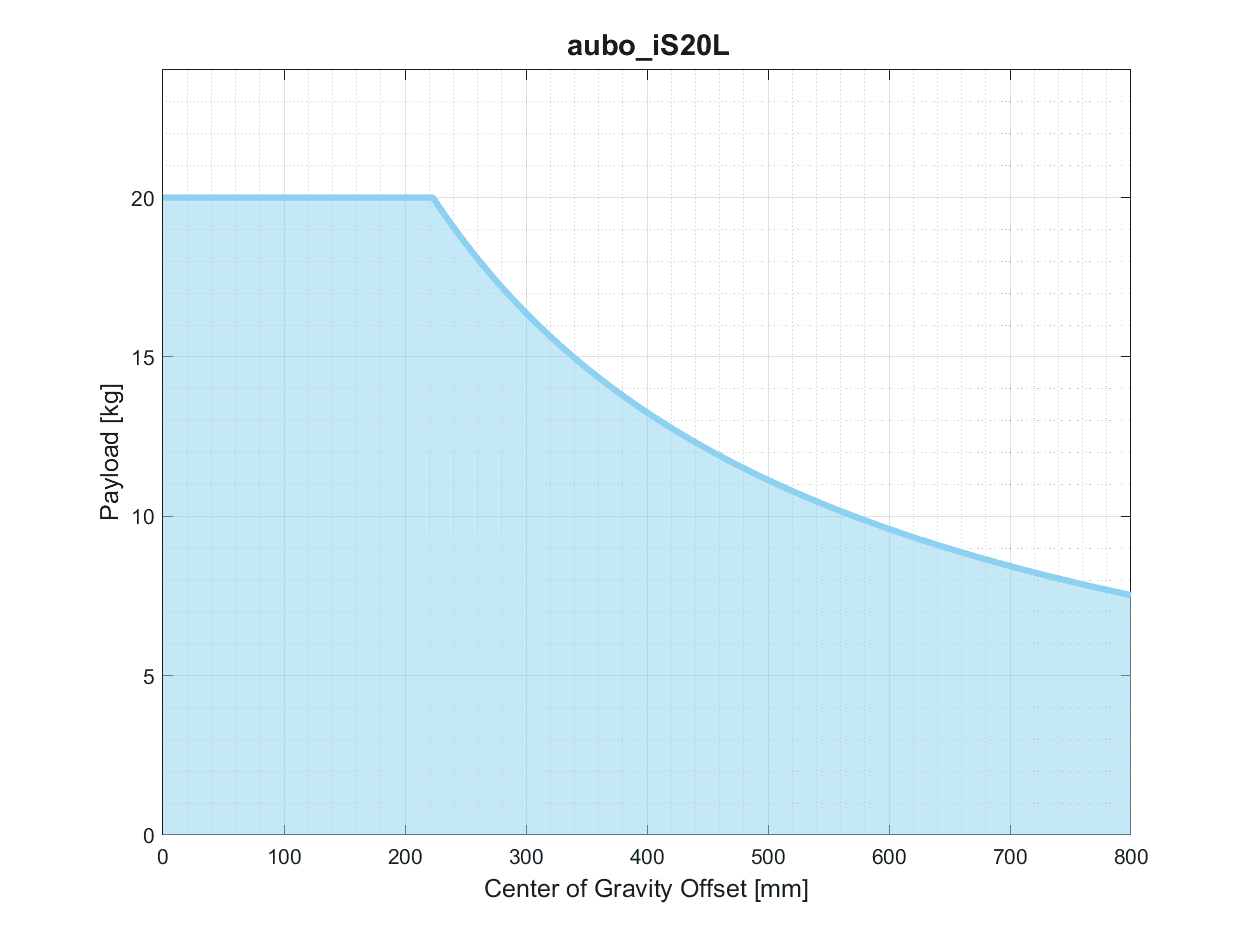
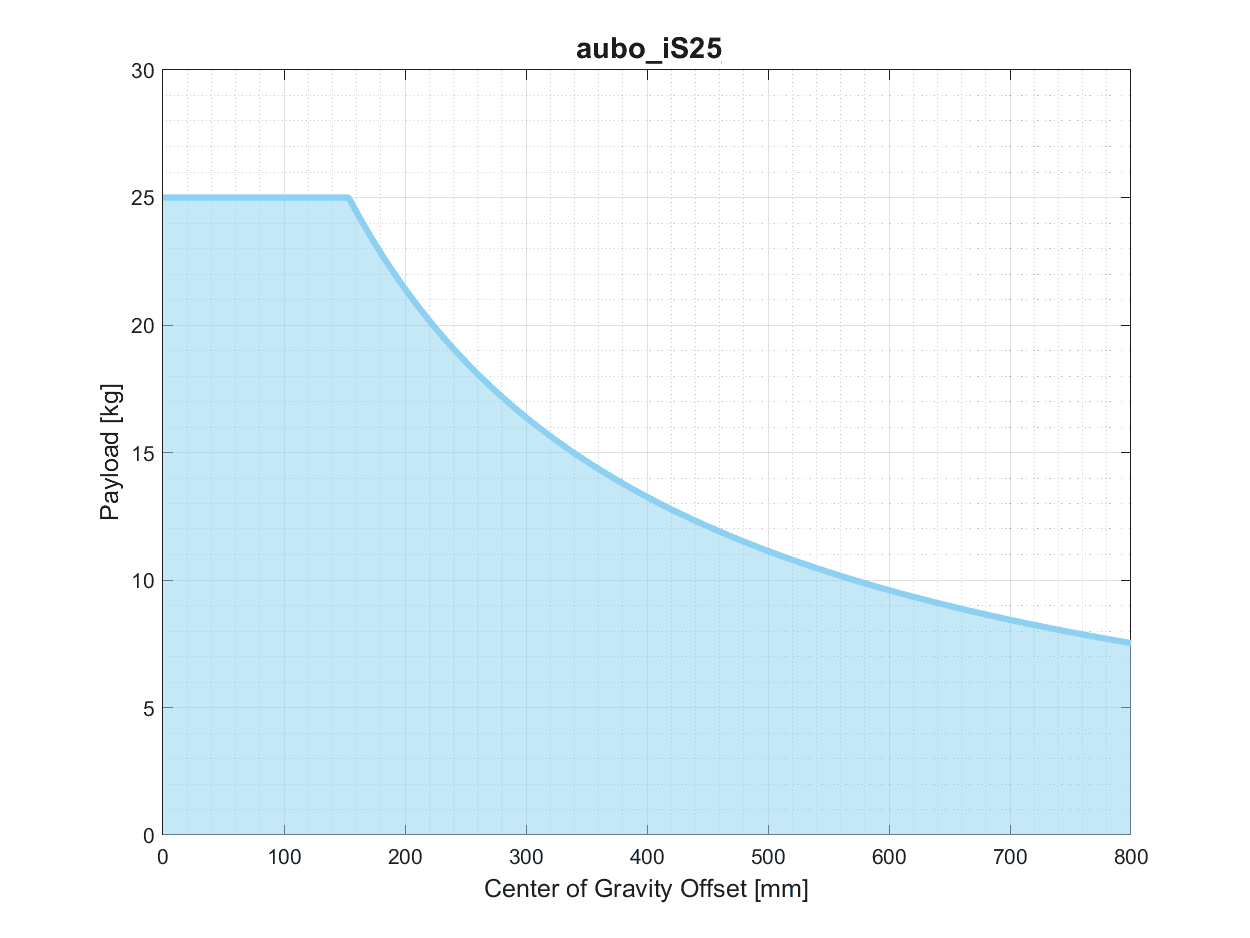
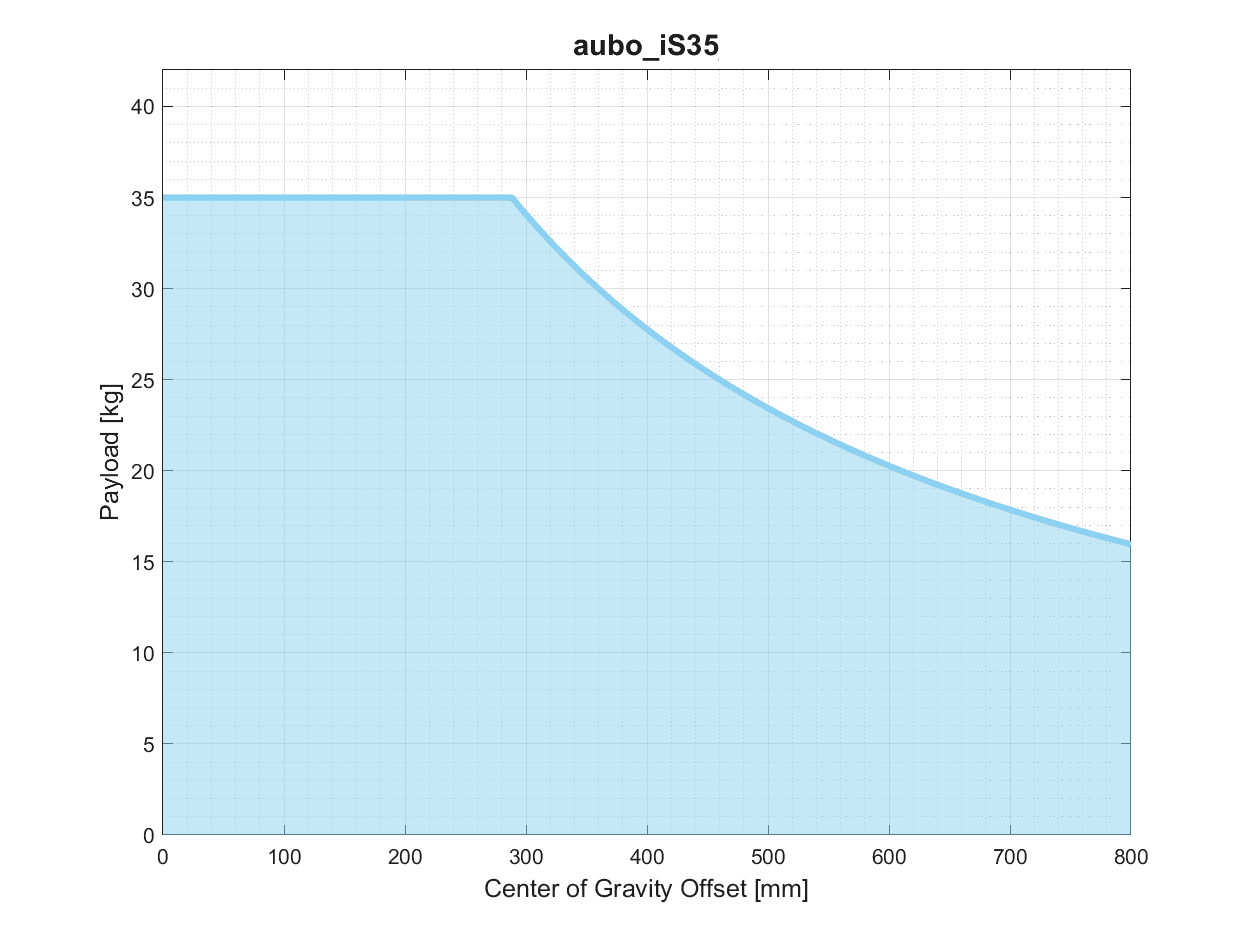
The following are the load offset curves of the robot arm wrist. In the ordinate, payload indicates the payload, and in the abscissa, Center of Gravity Offset indicates the distance between the center of the tool flange and the tool center.
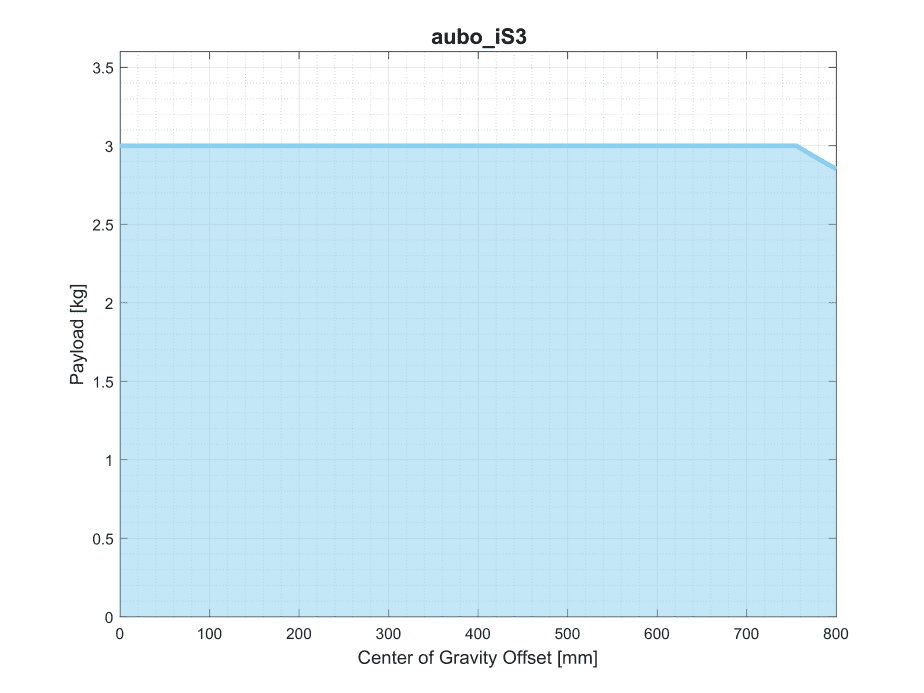
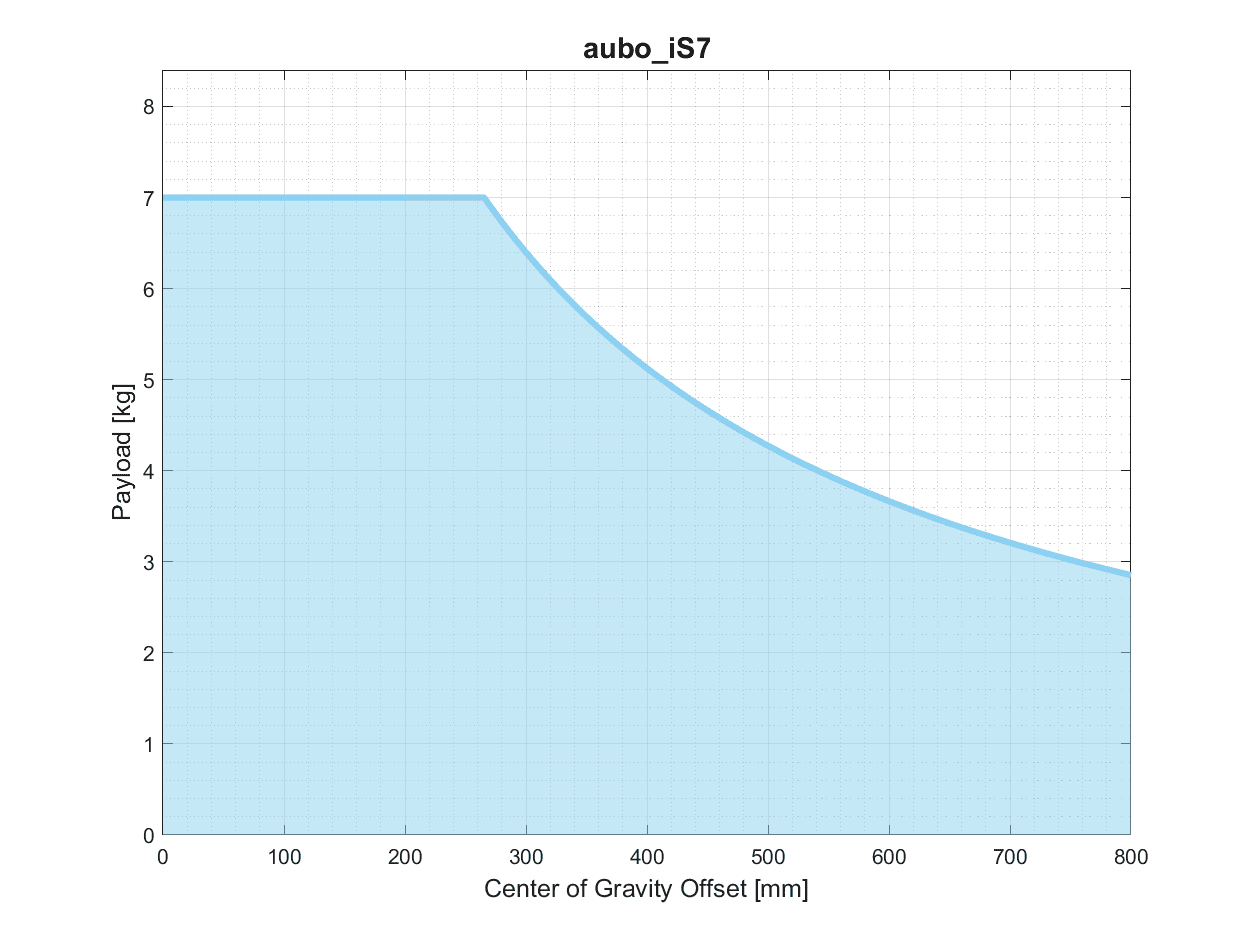
| Sign | Description |
|---|---|
| 1. Load conditions shall be within the range shown in the chart. 2. The load shown in the figure is the maximum payload capacity of this robot arm model. Under no circumstances shall the maximum weight shown in the figure be exceeded. 3. Exceeding the allowable value may damage internal components of the machine. |
3.4 Robot Arm Workspace
3.4.1 Mechanical Dimensions
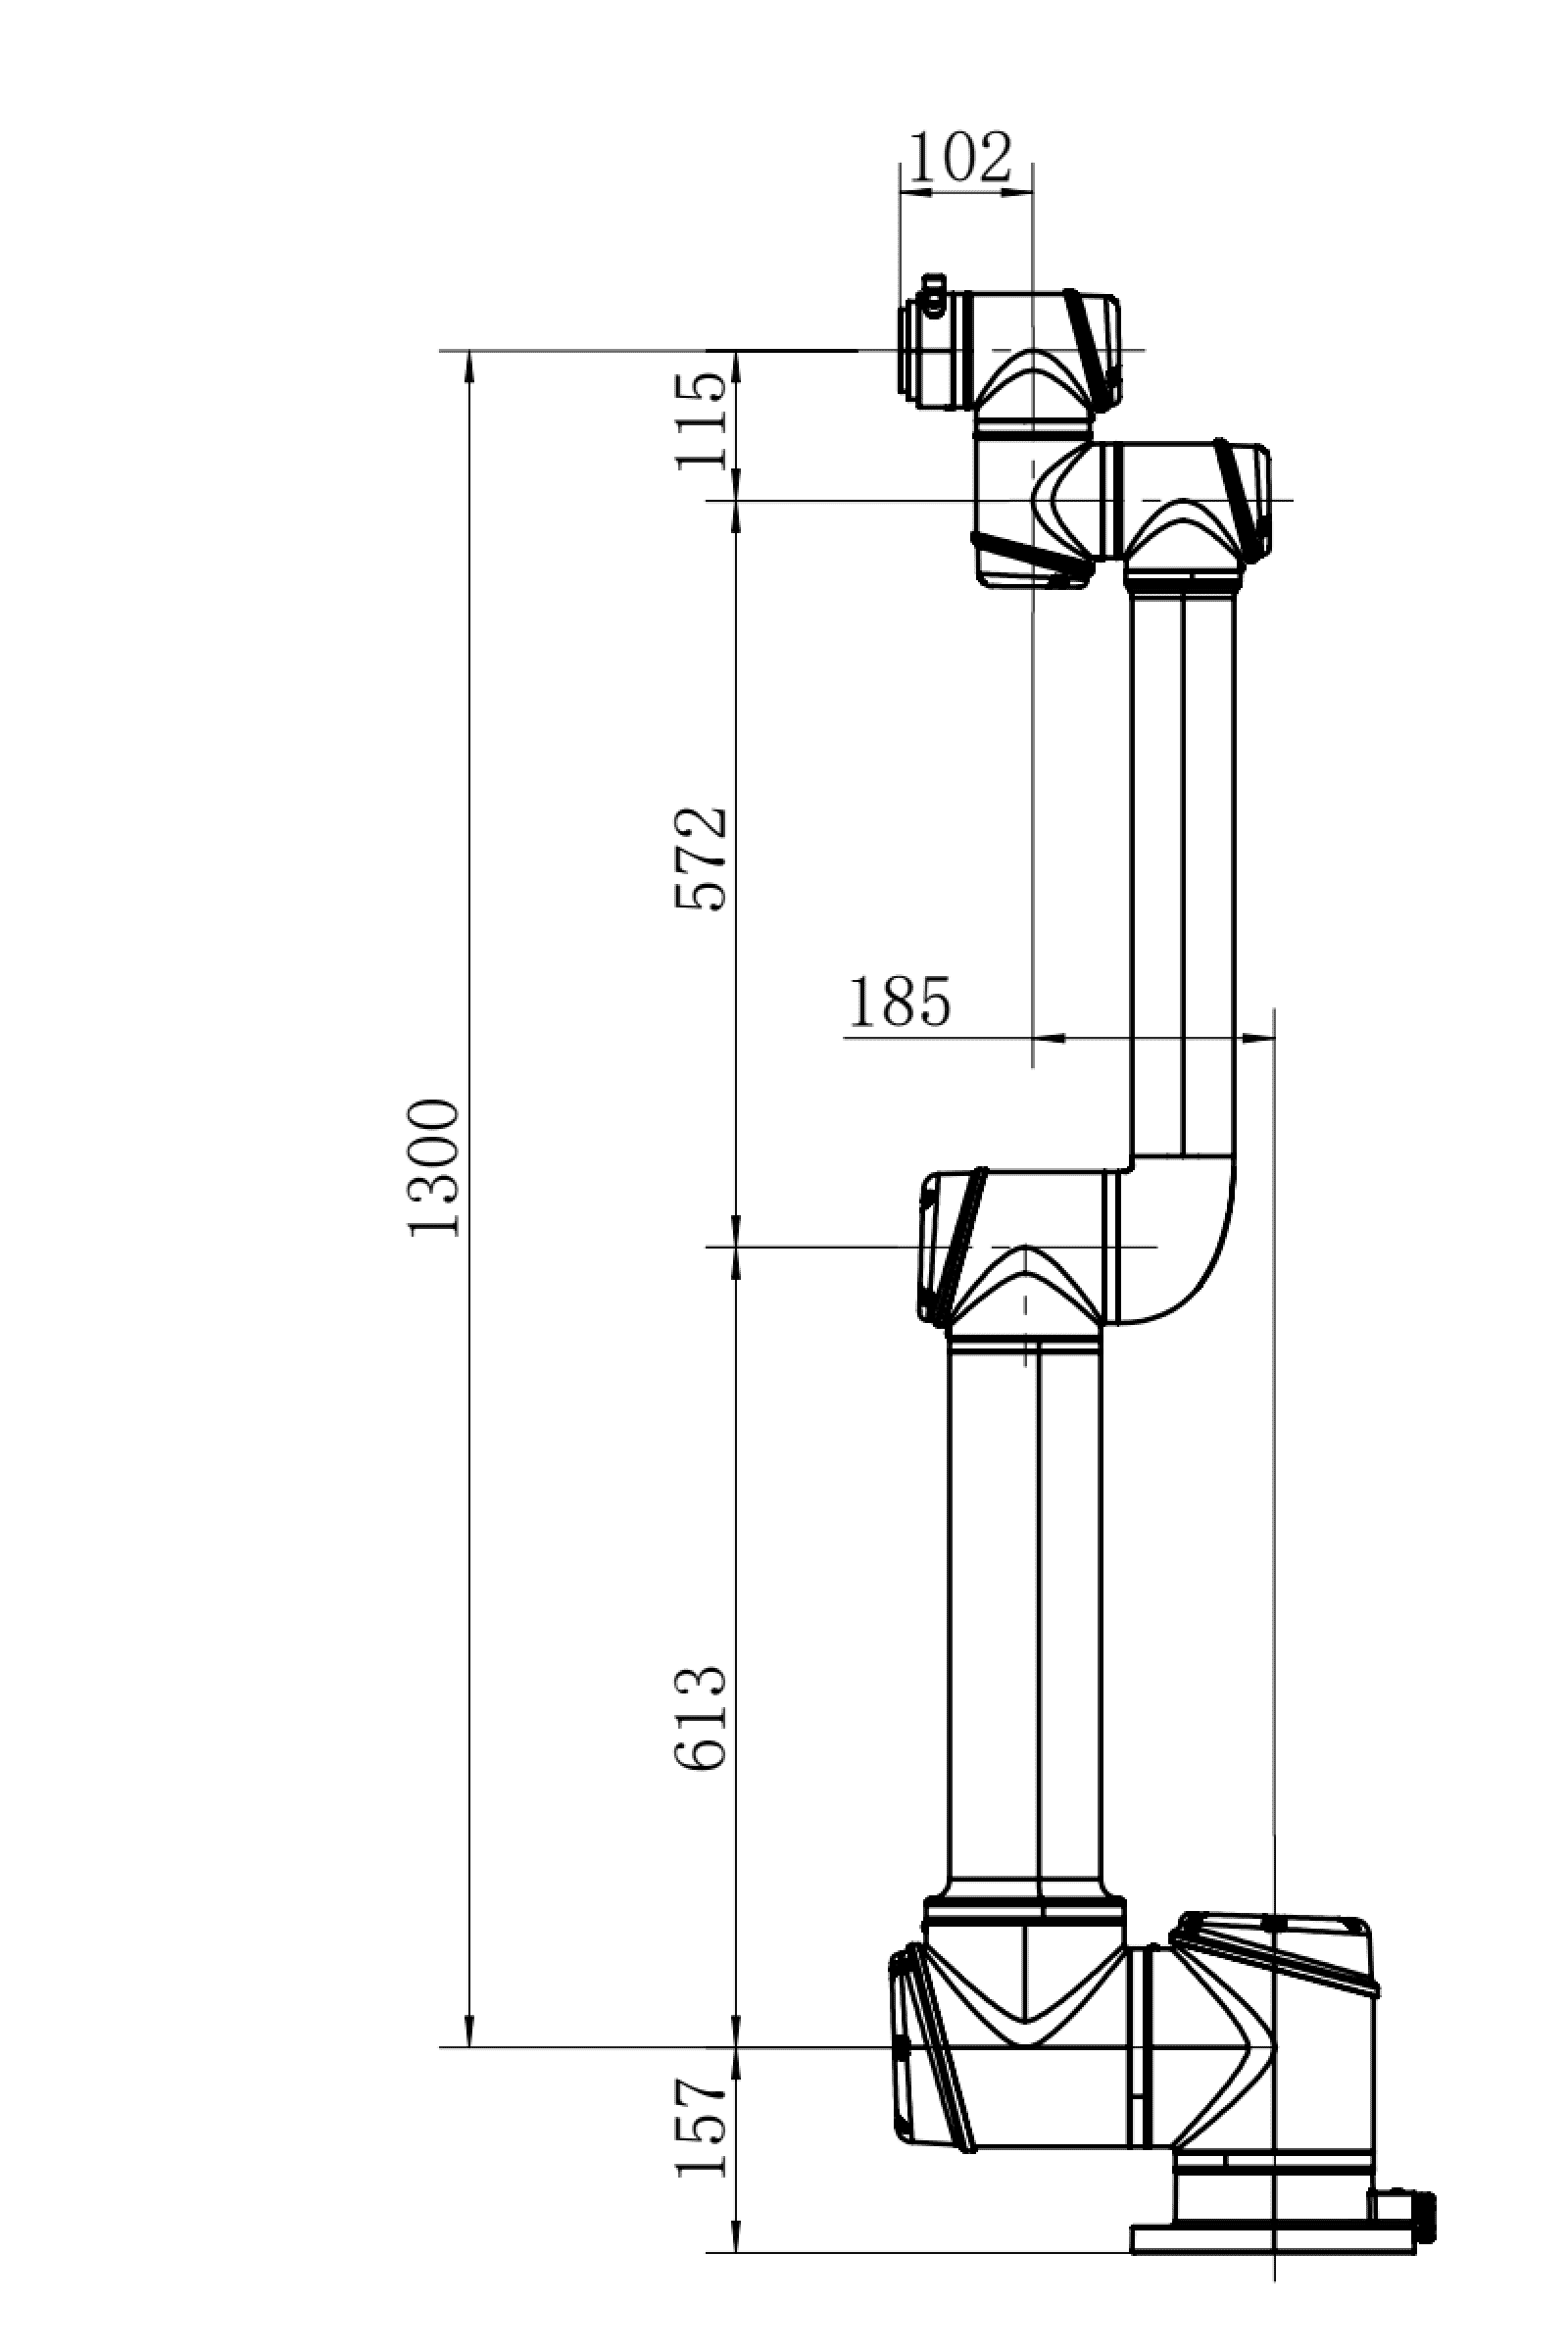
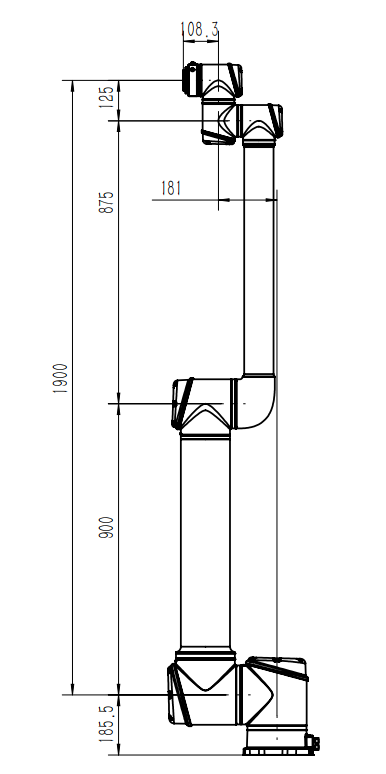
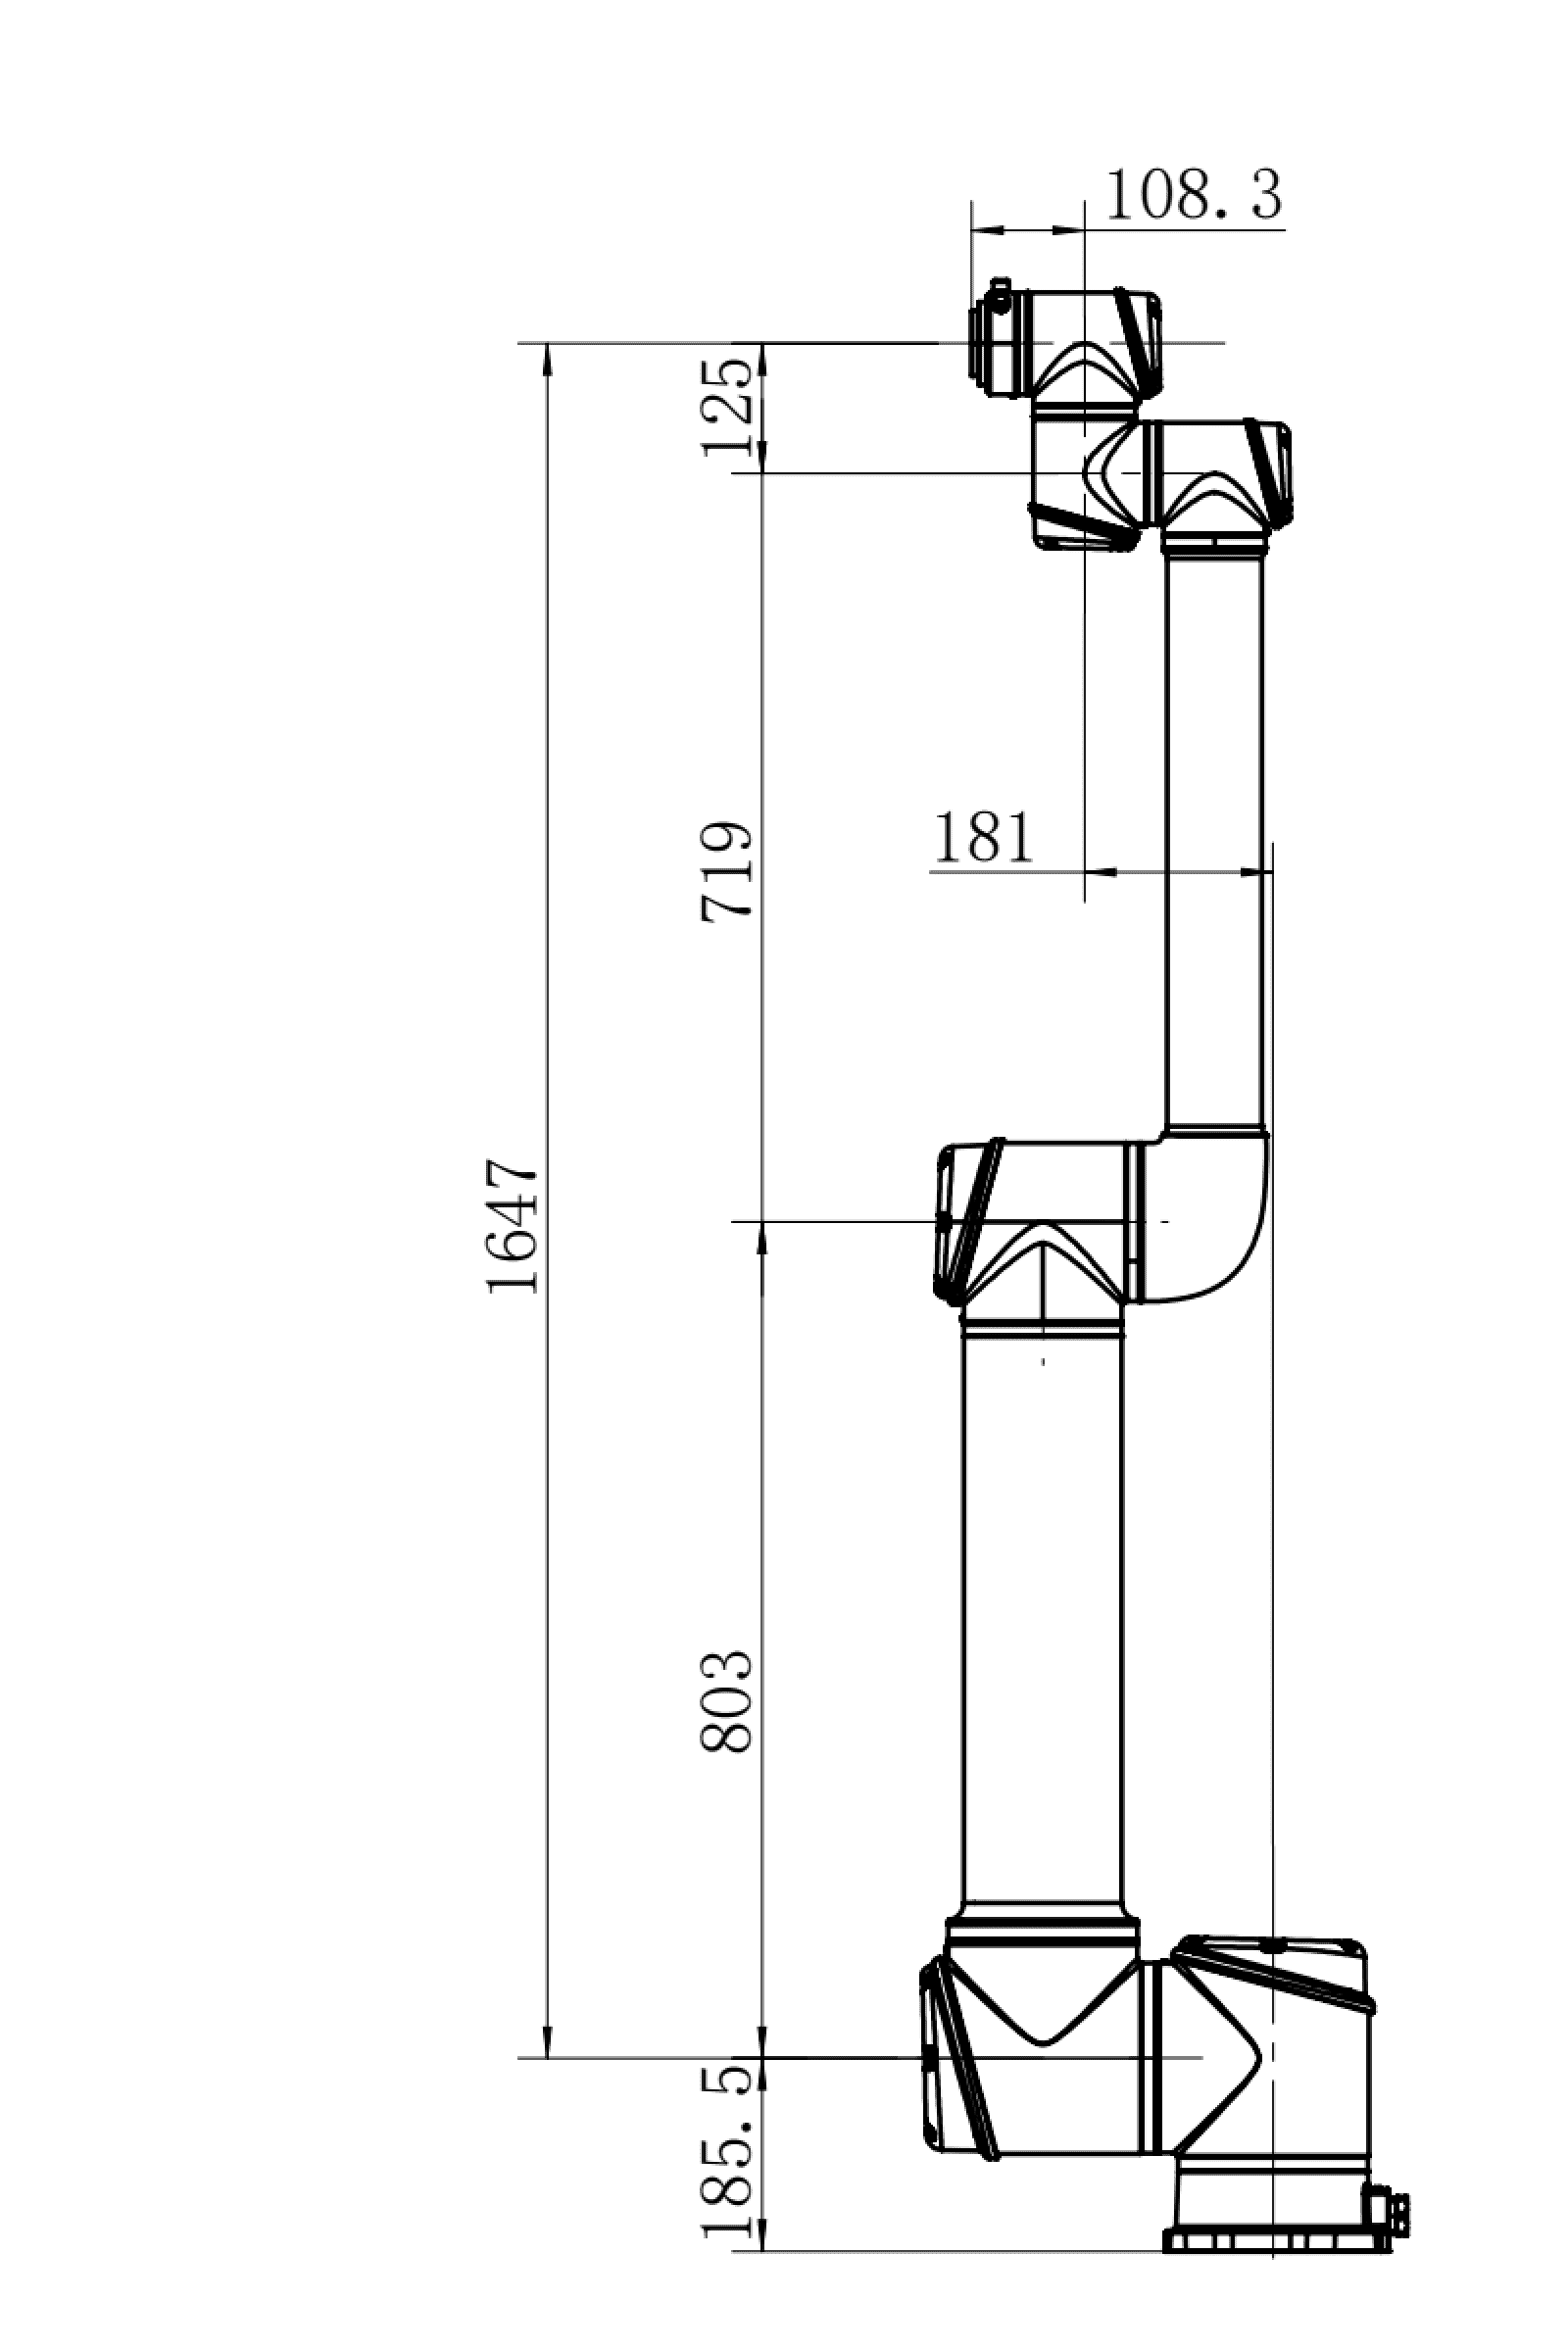
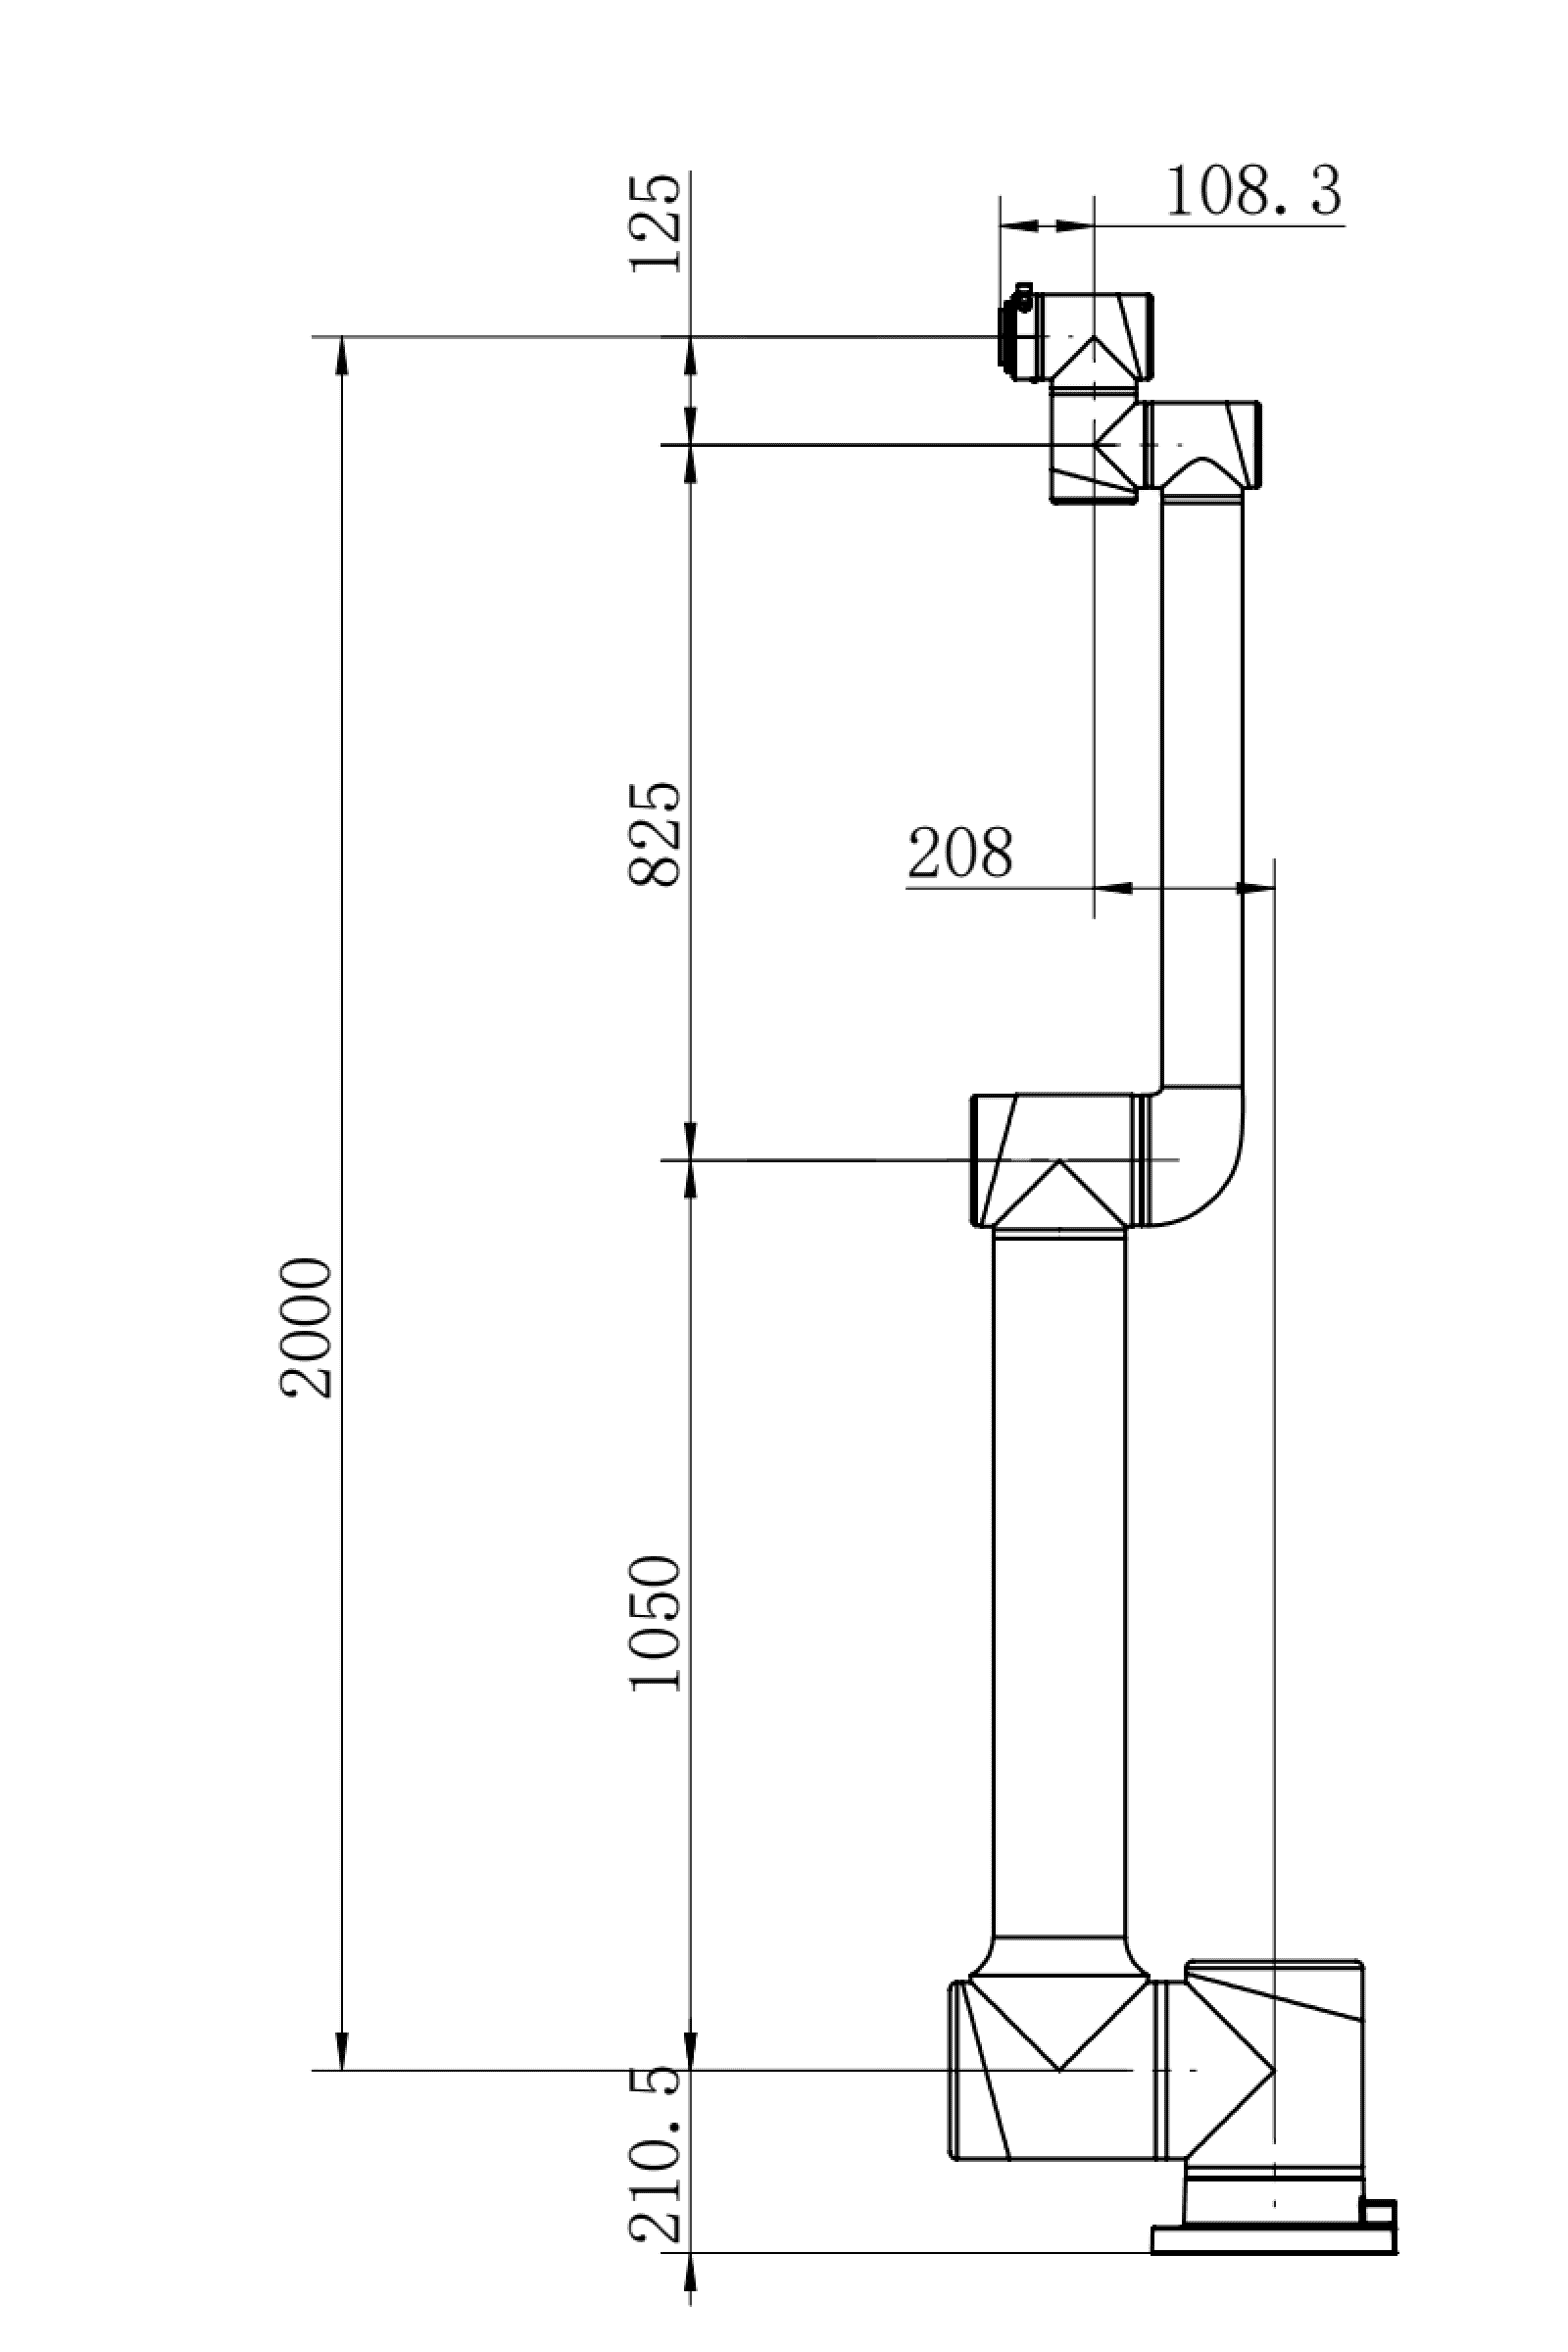
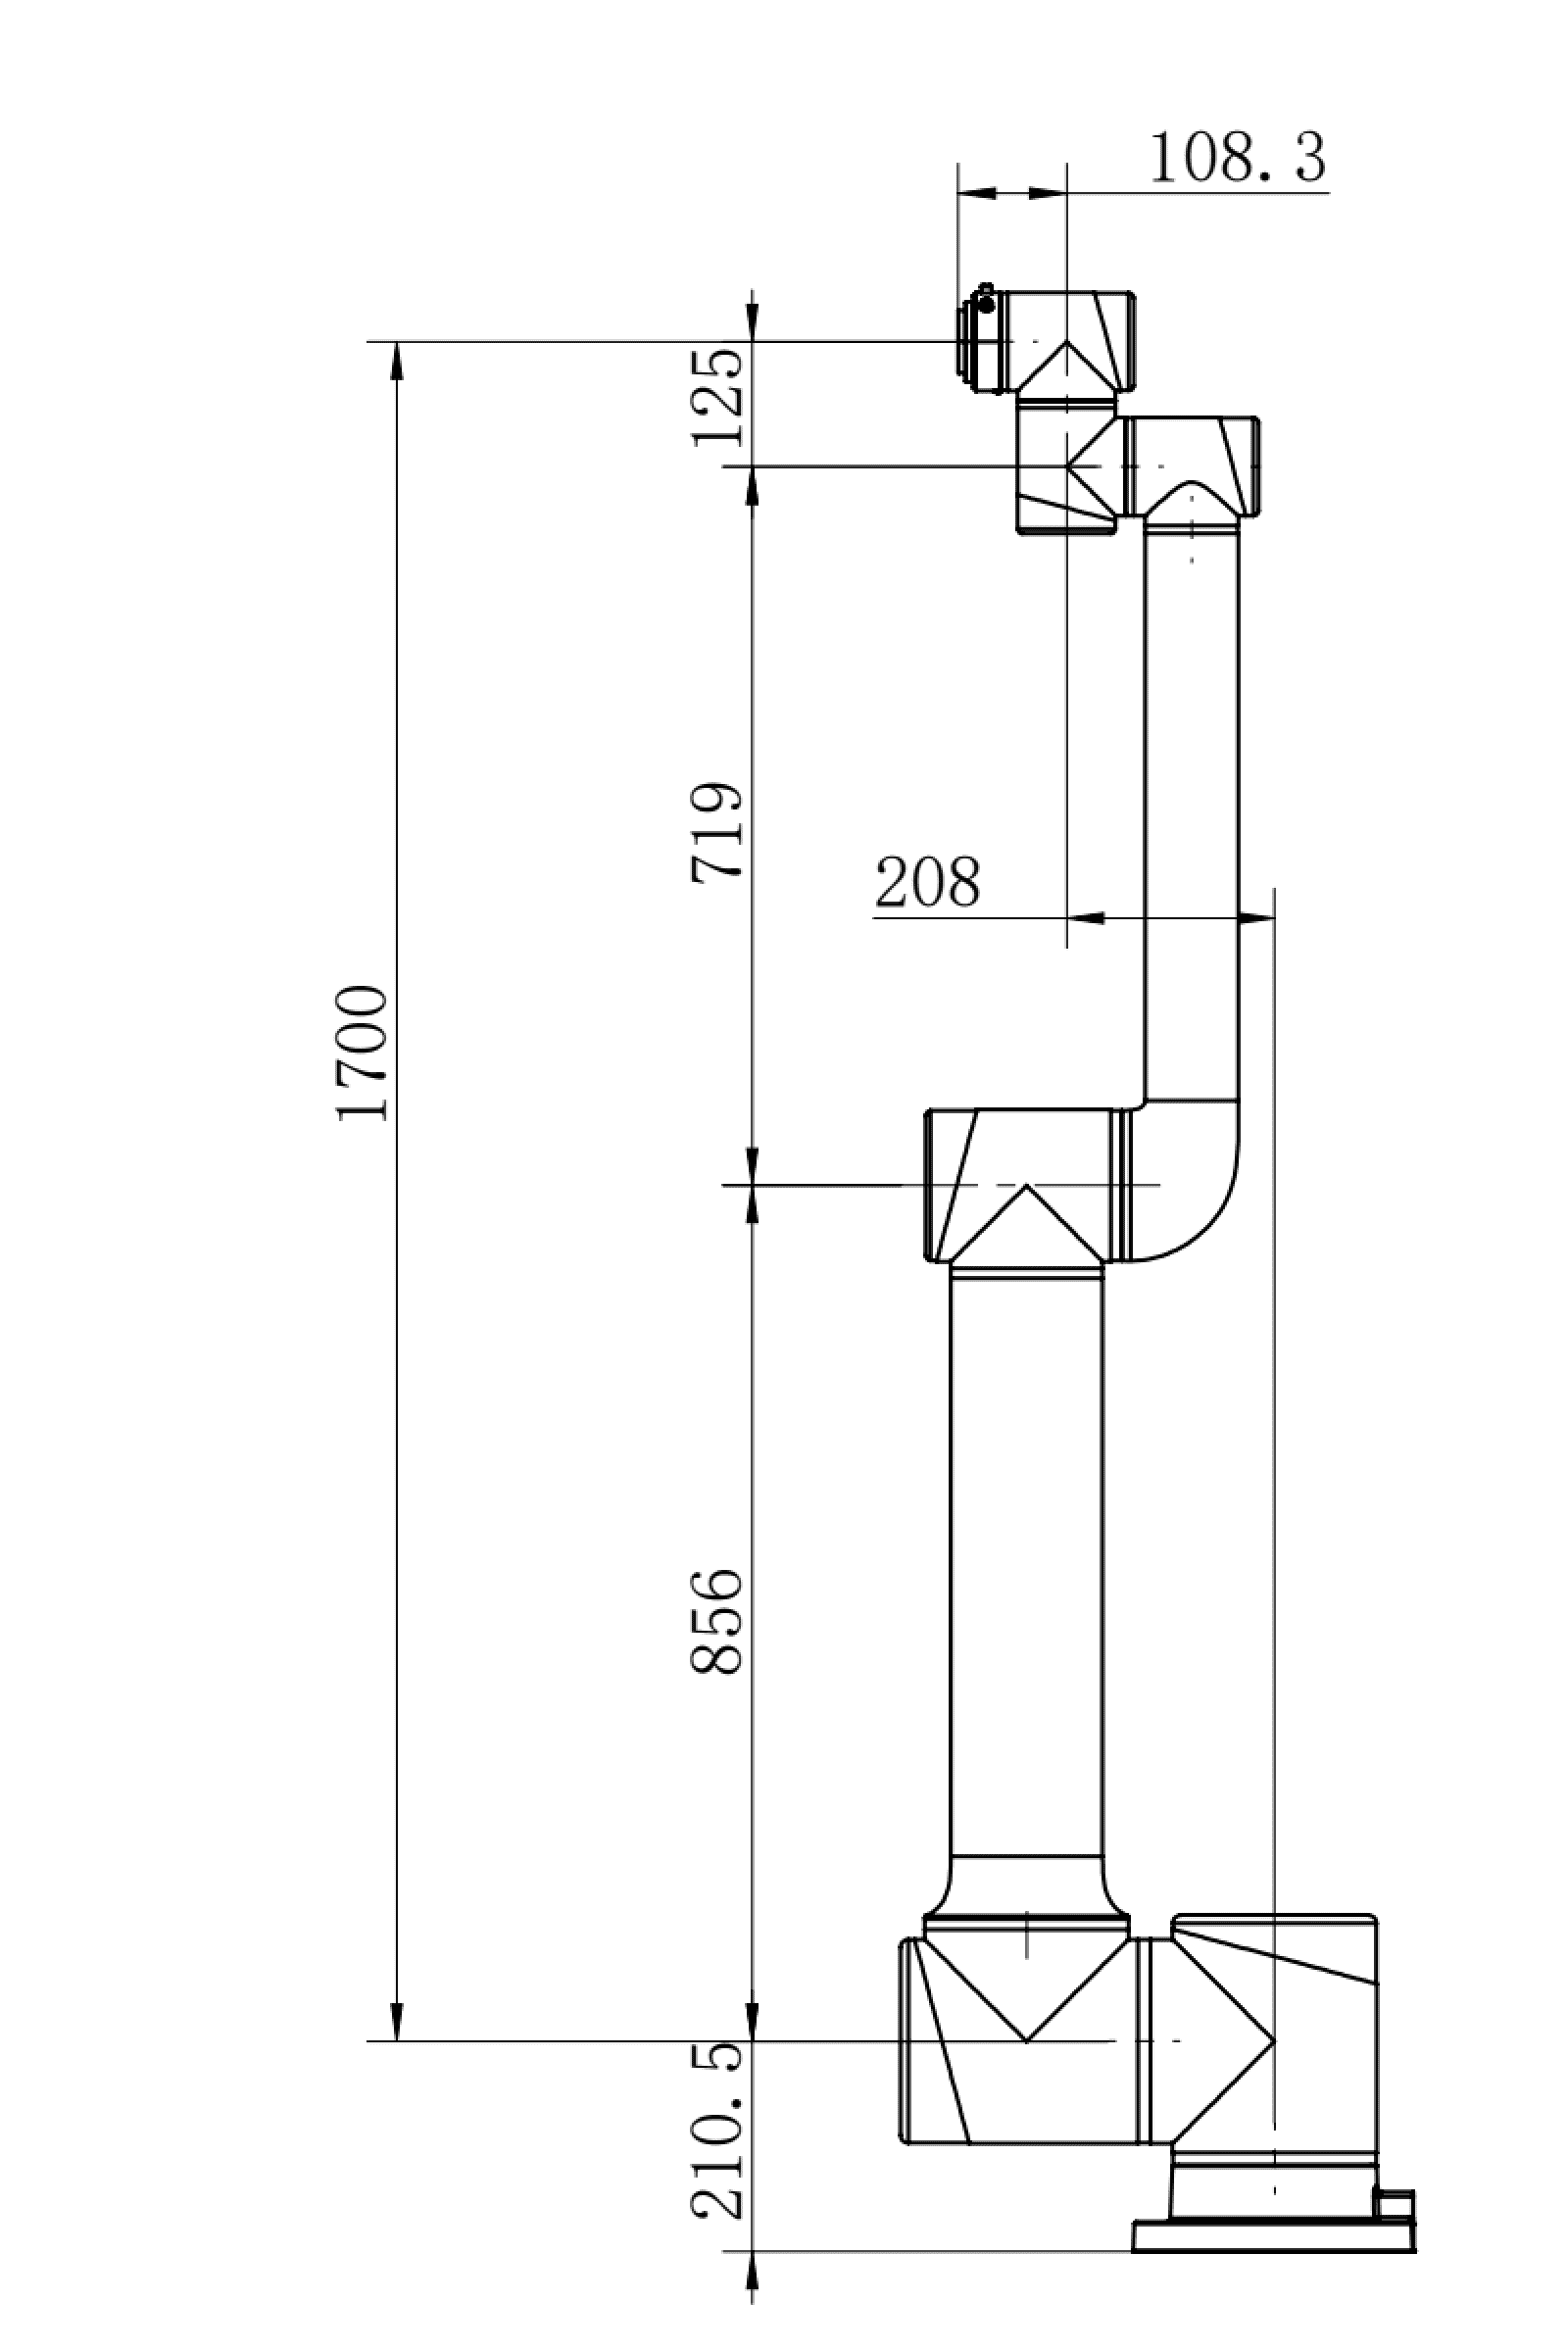
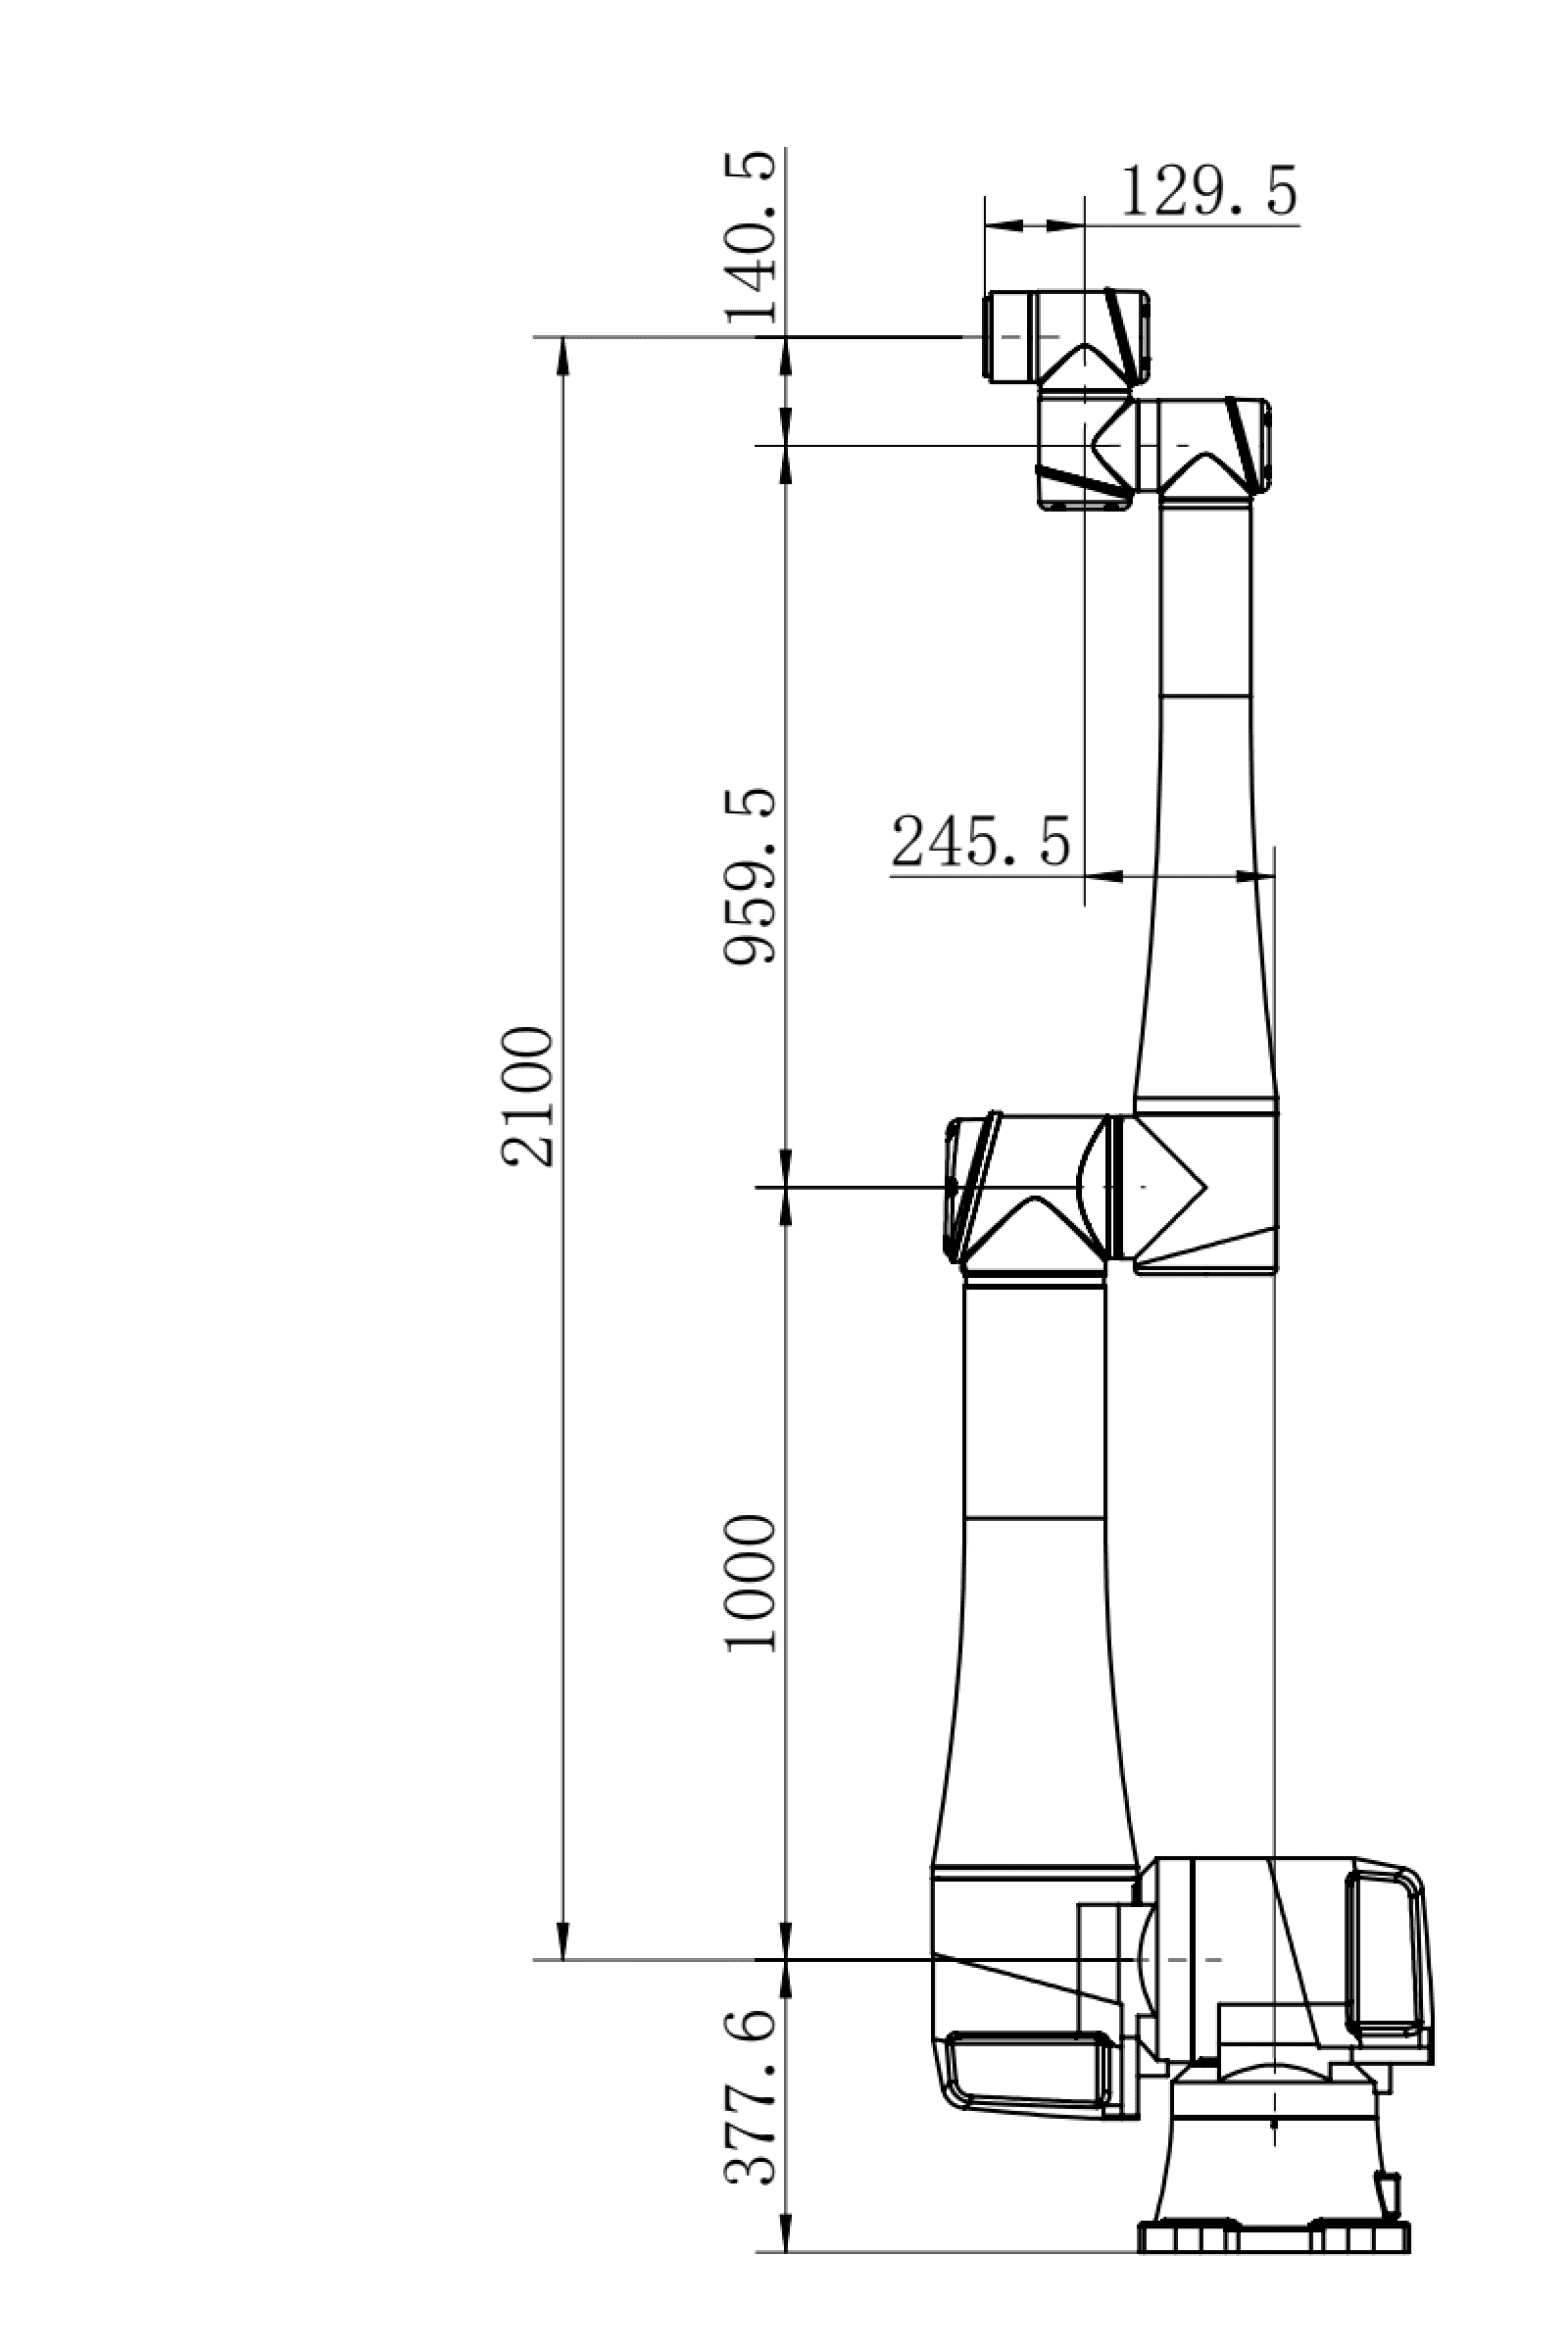
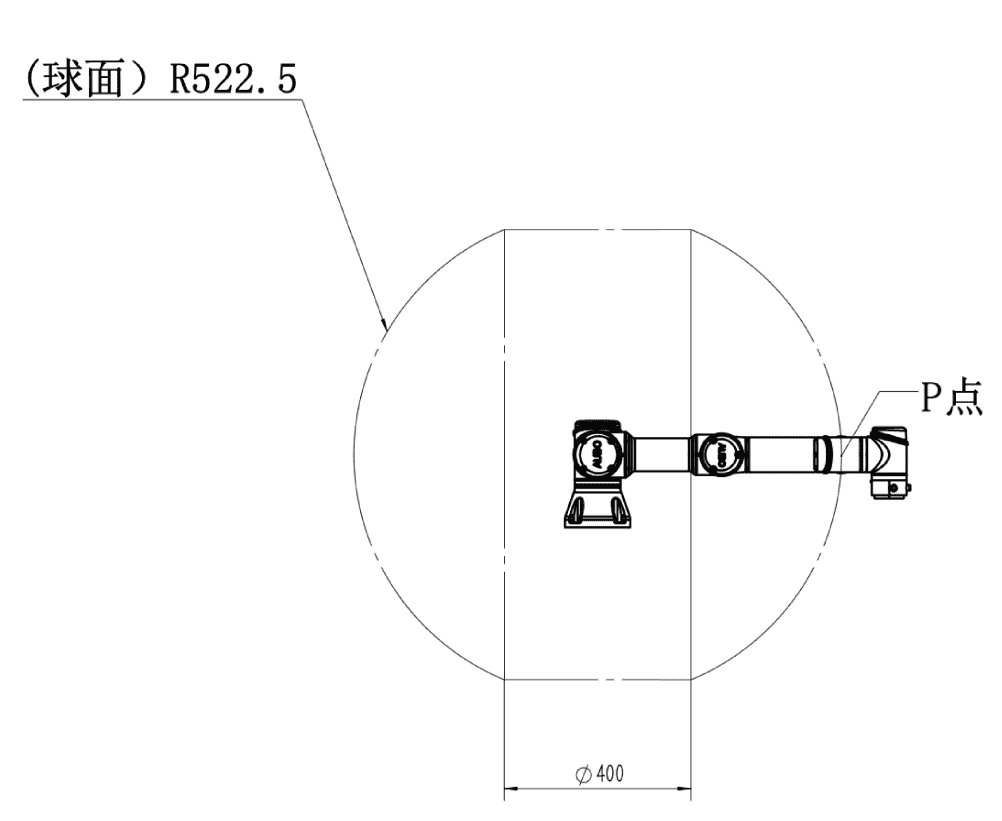
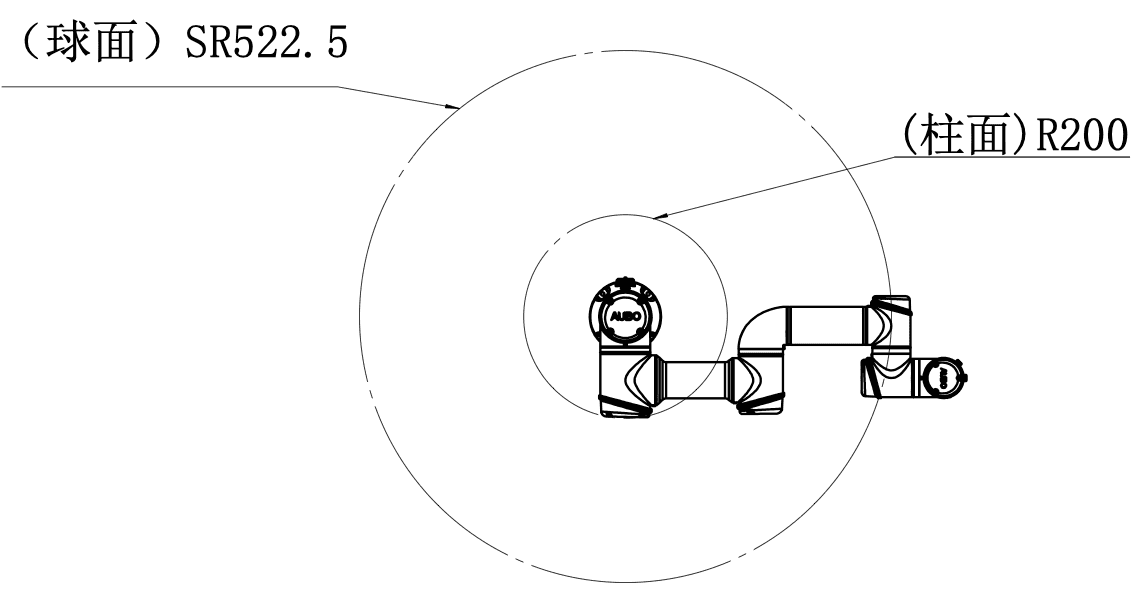
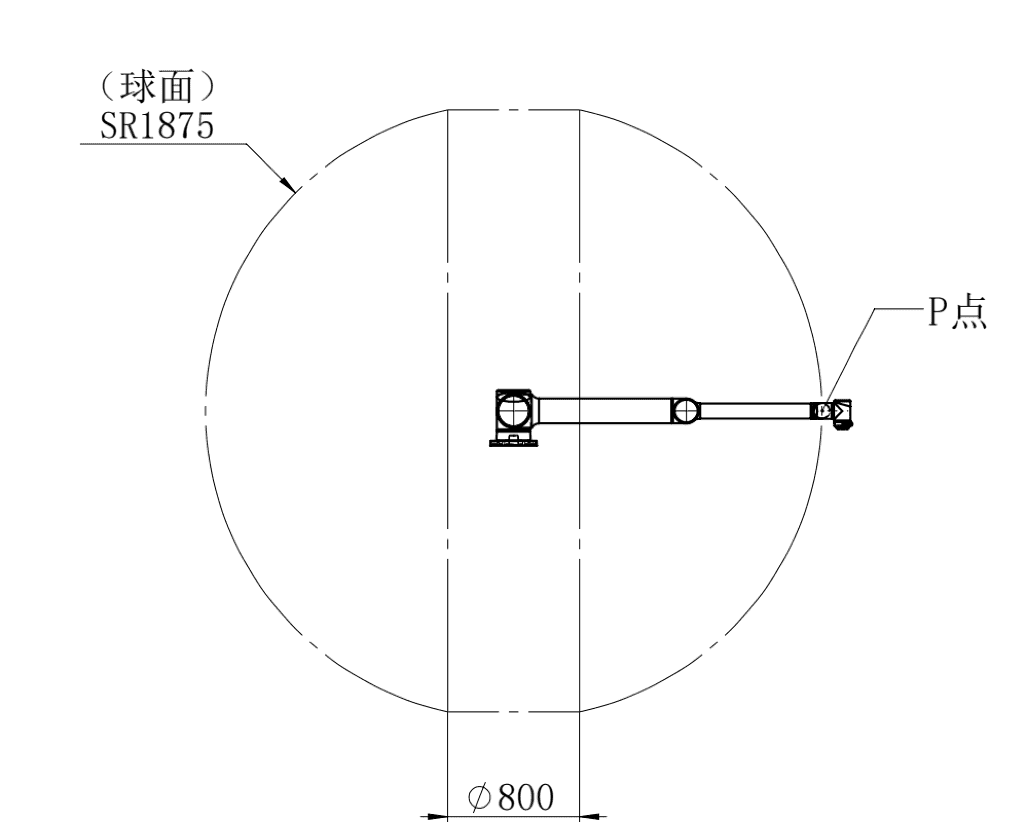
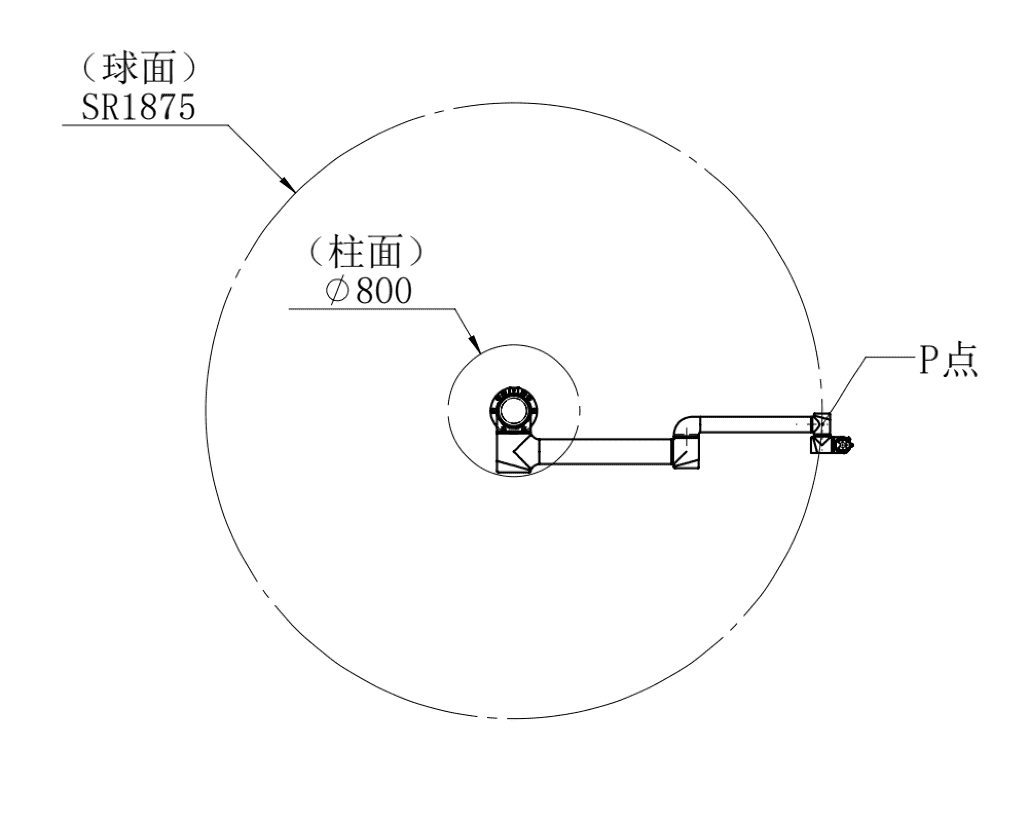
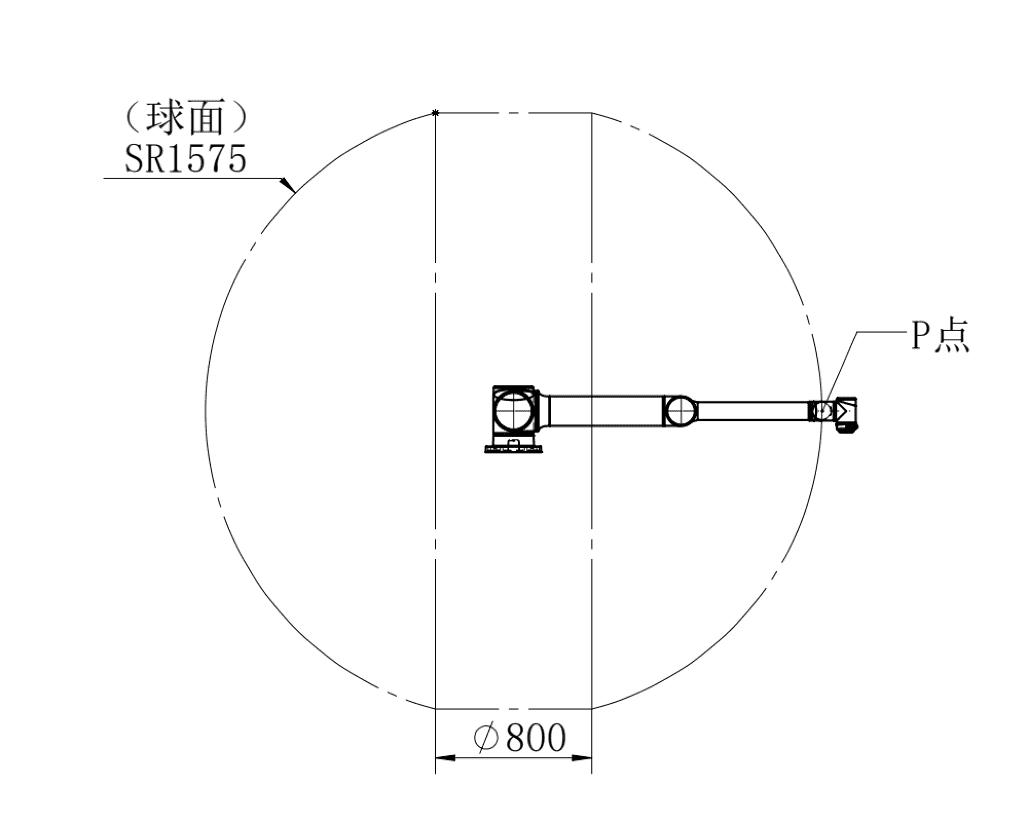
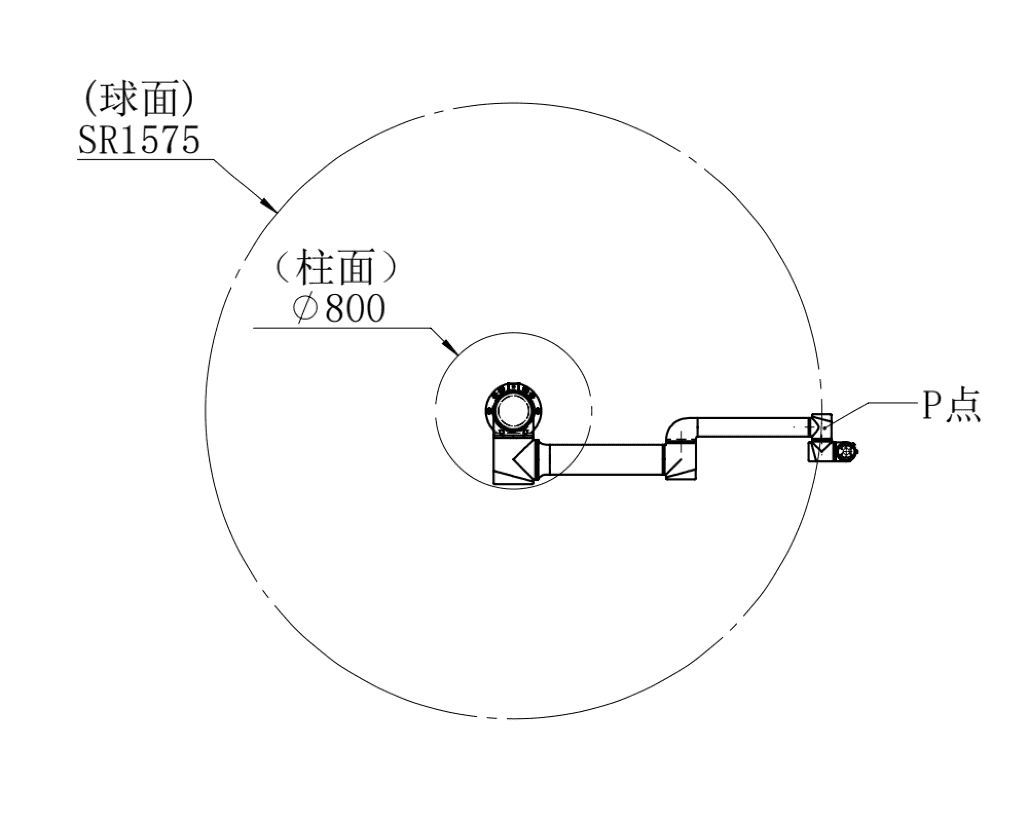
3.4.2 P-point Motion Range of the Body
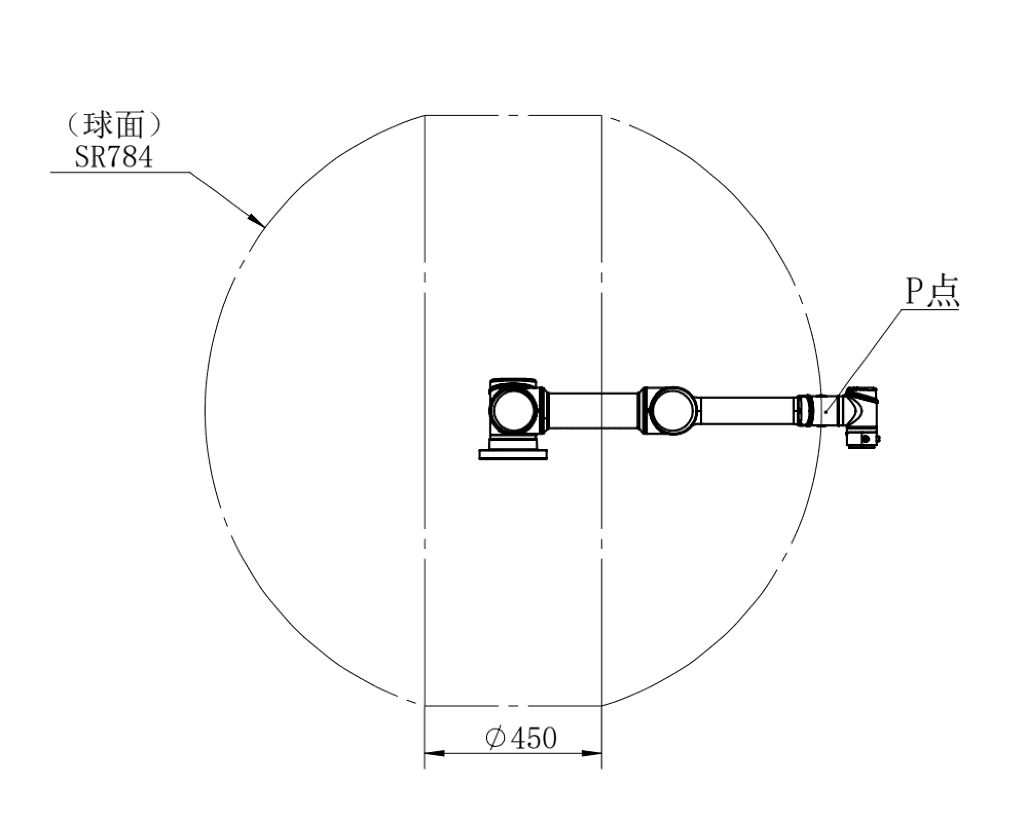
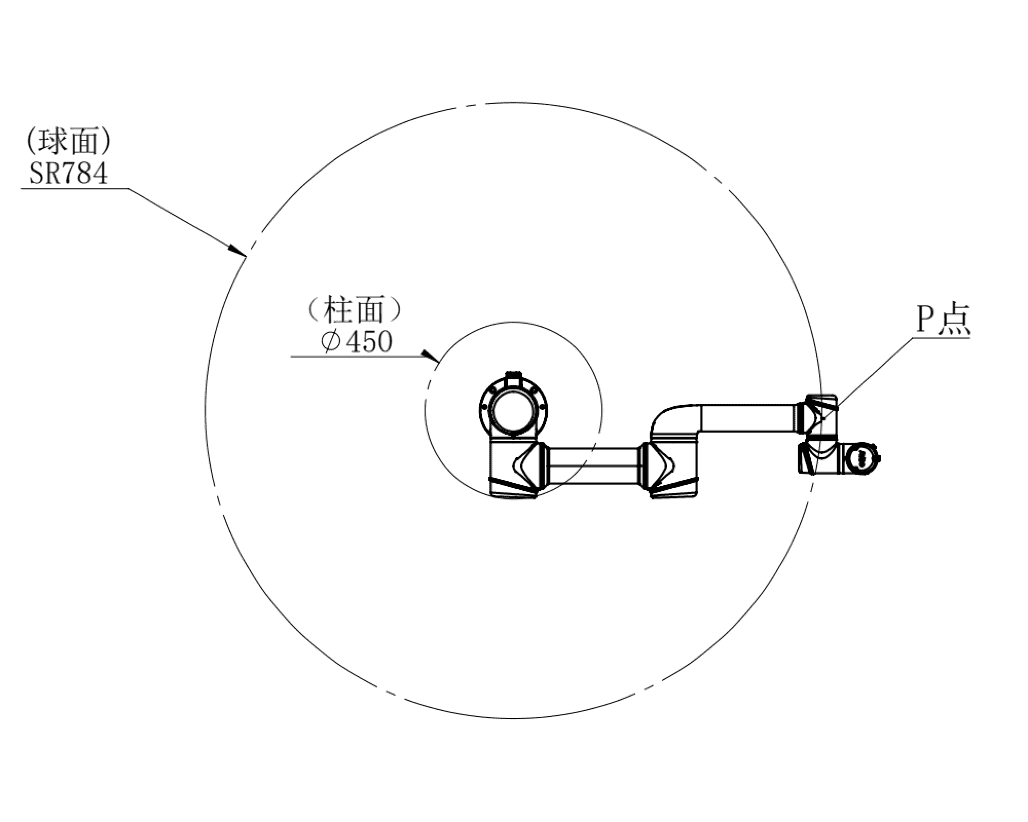
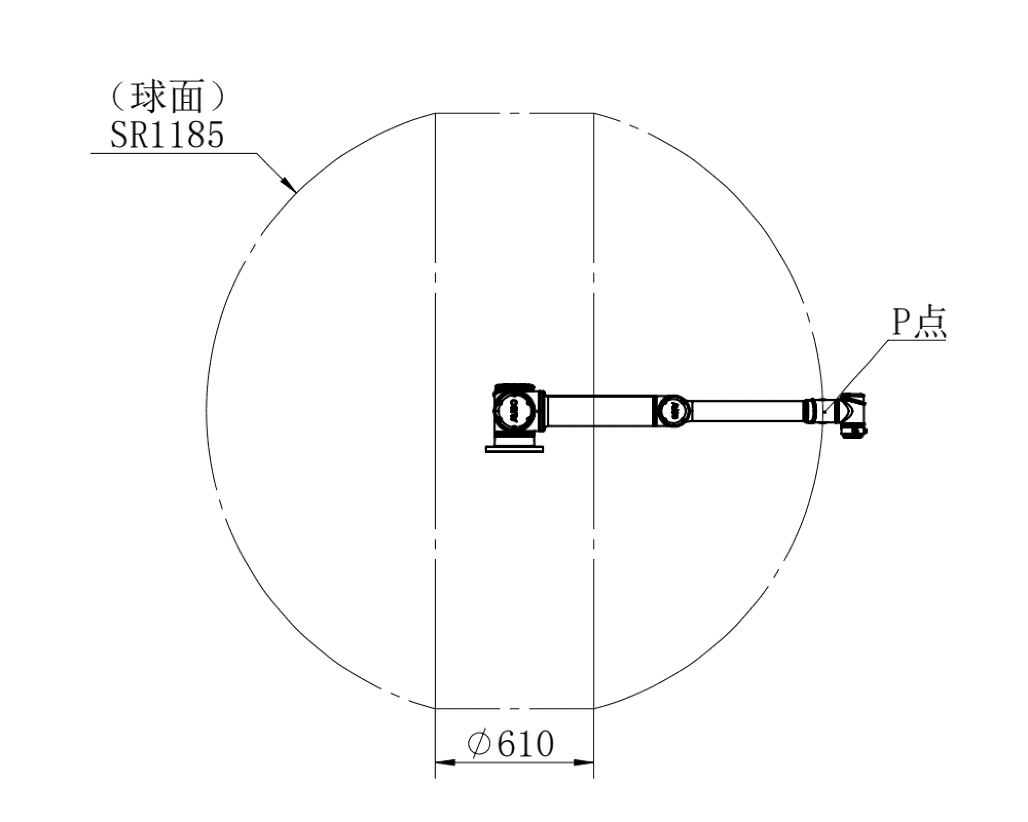
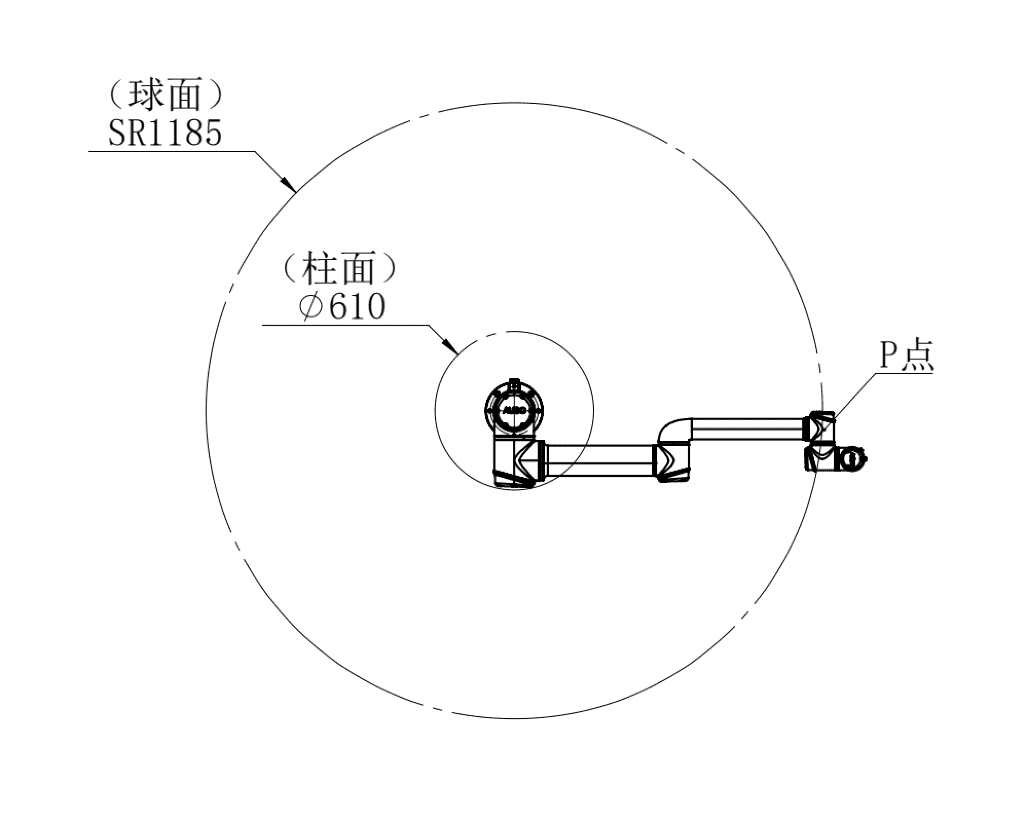
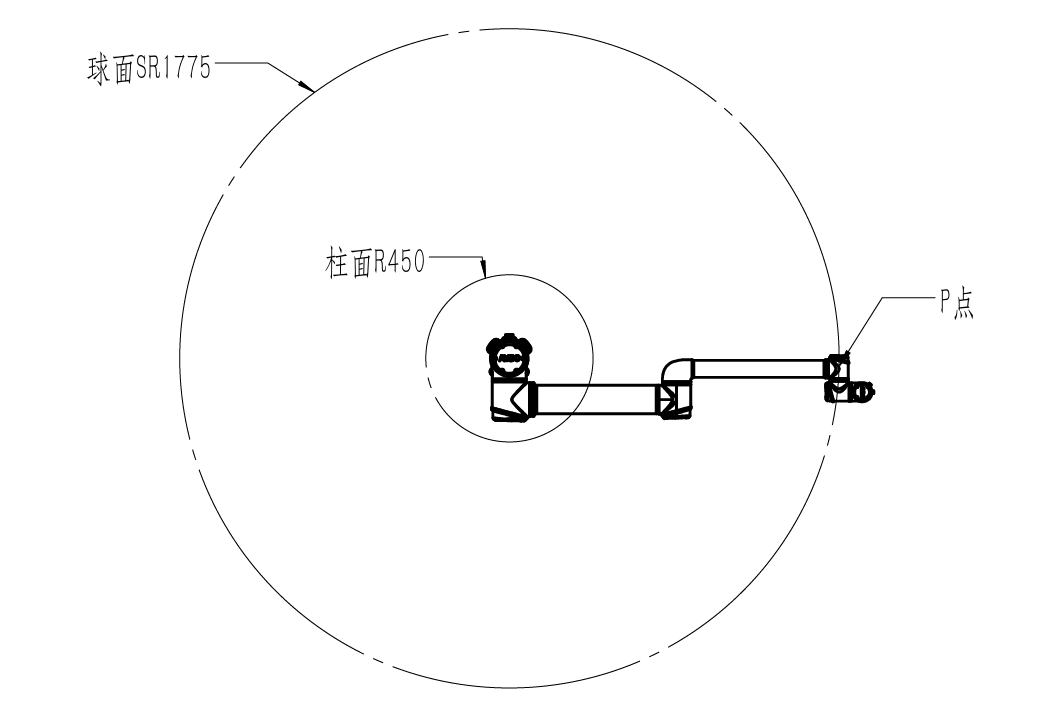
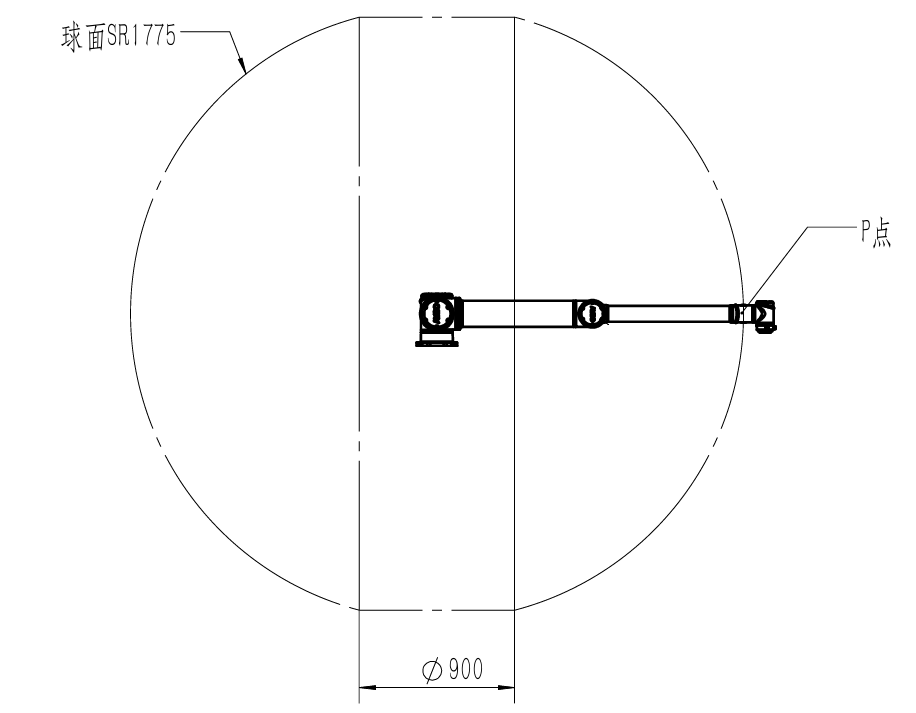
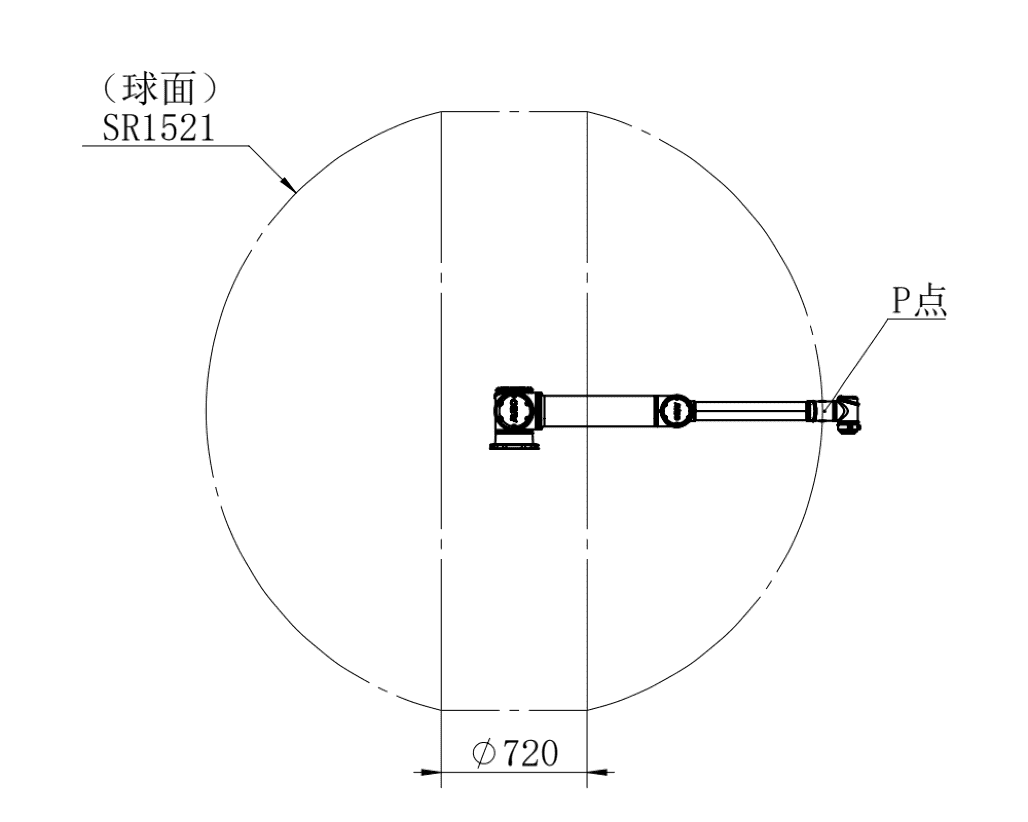
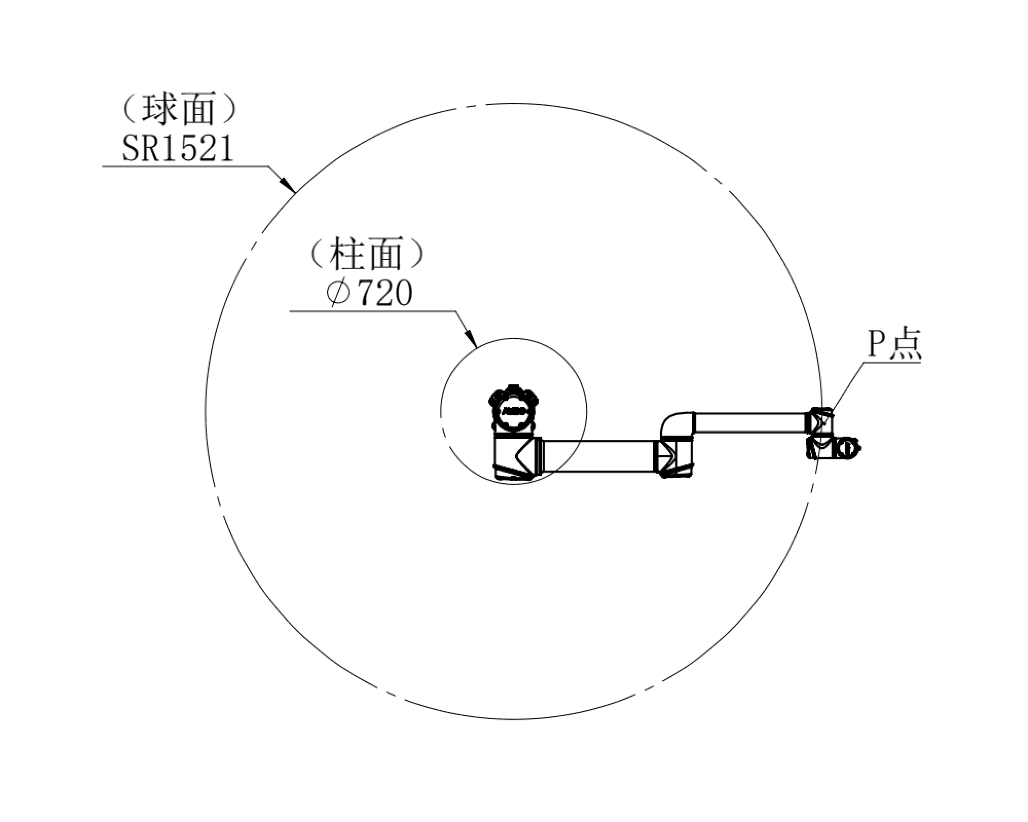
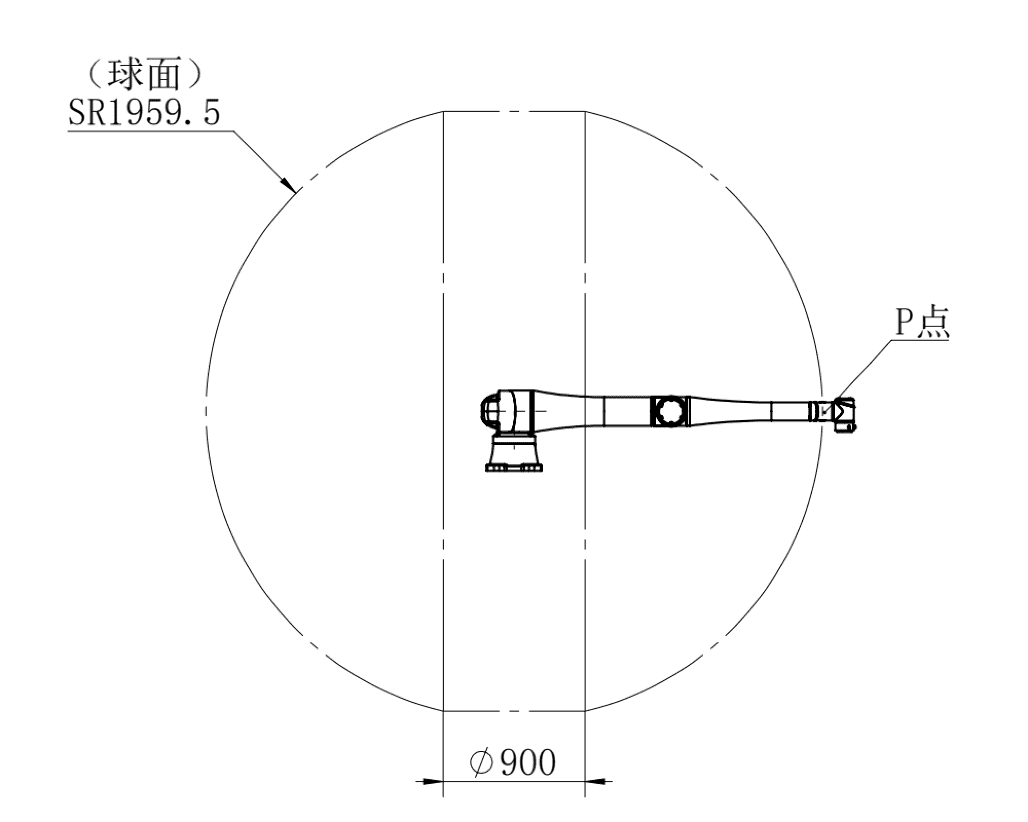
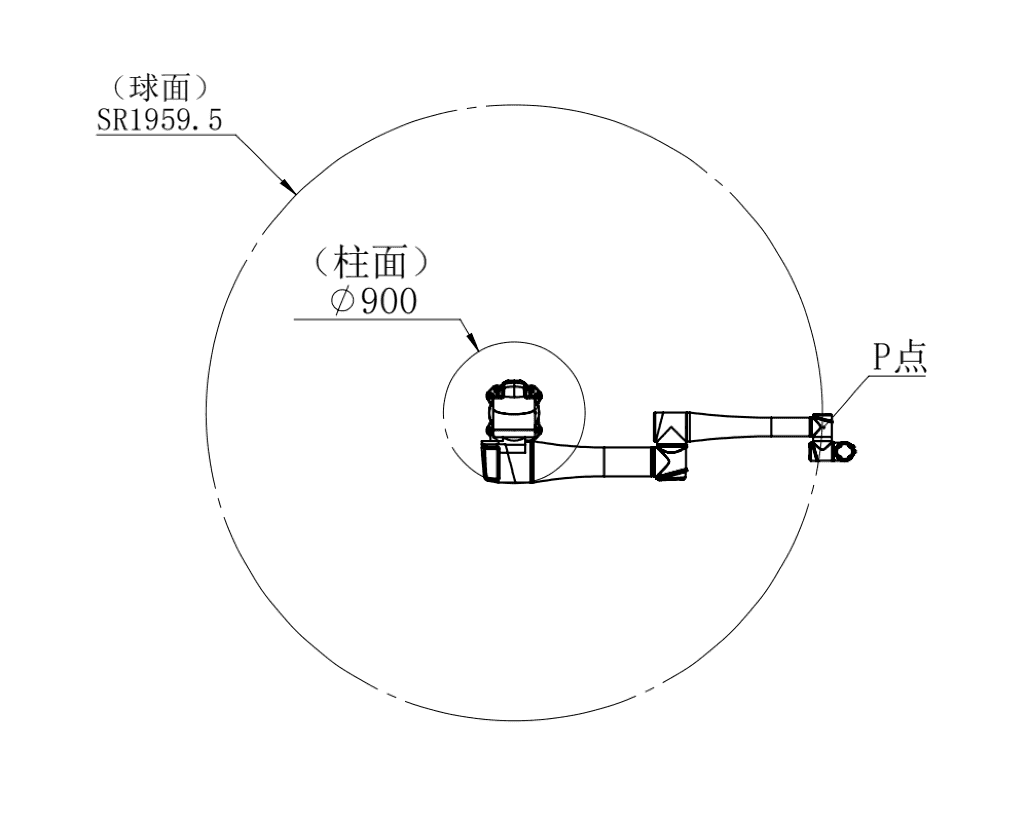
3.4.3 End Flange Mechanical Dimensions
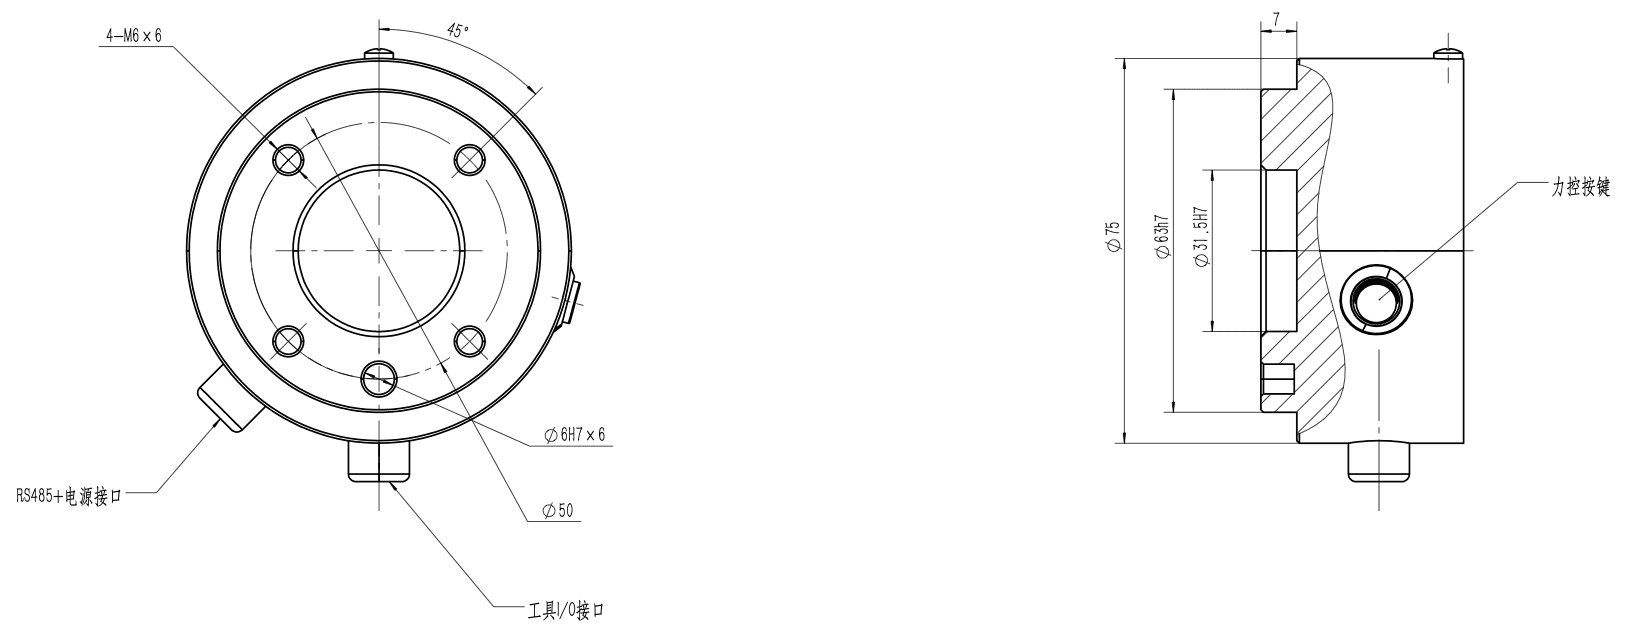
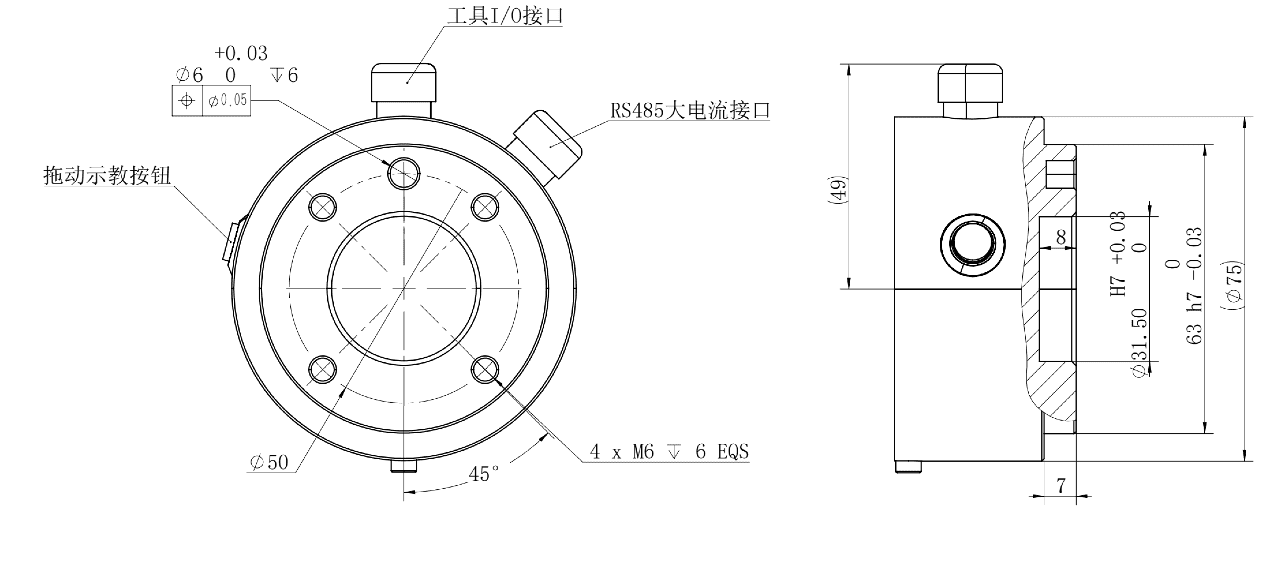
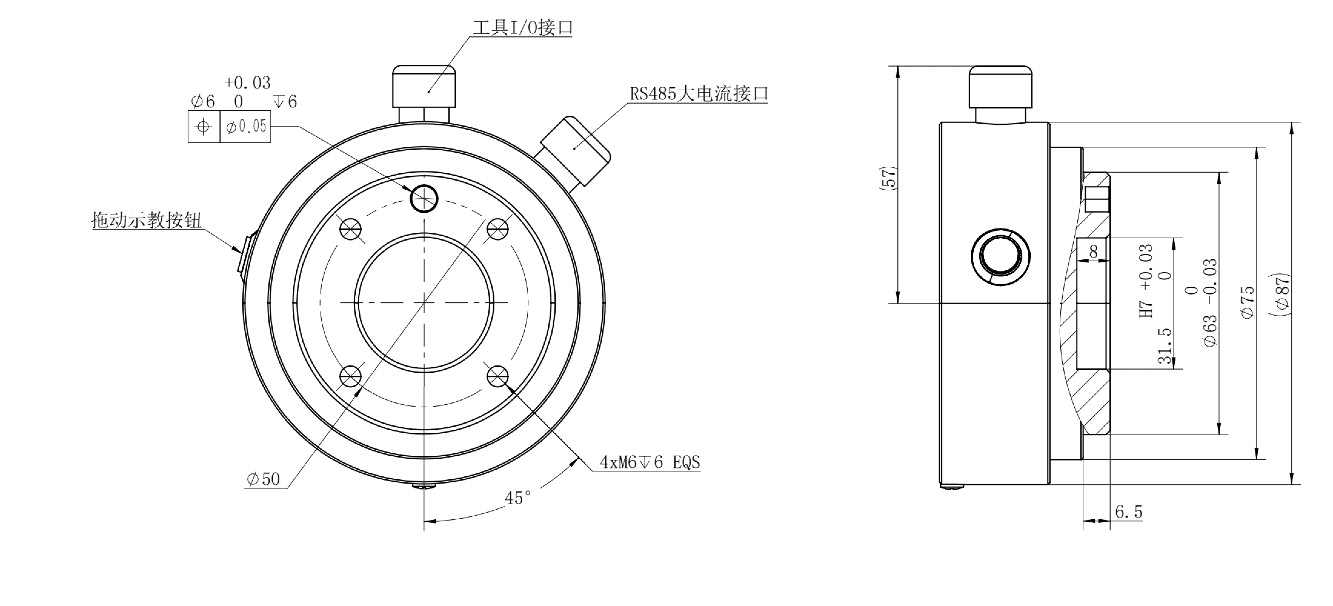
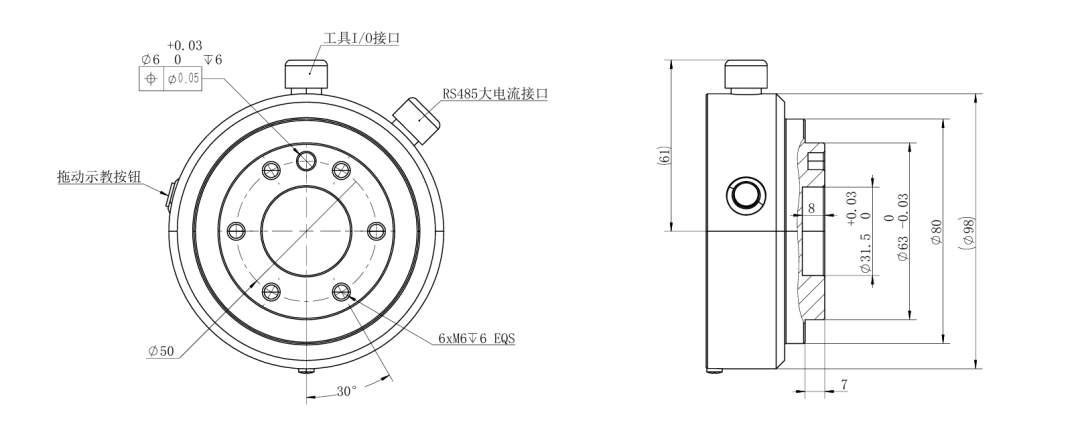
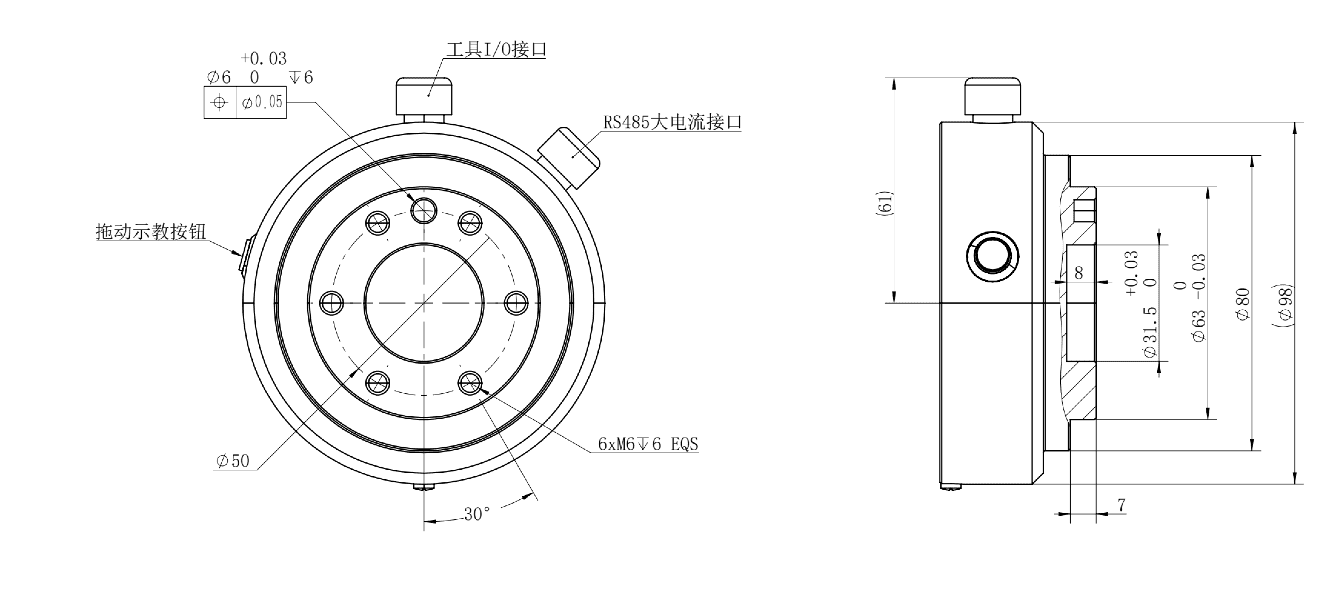
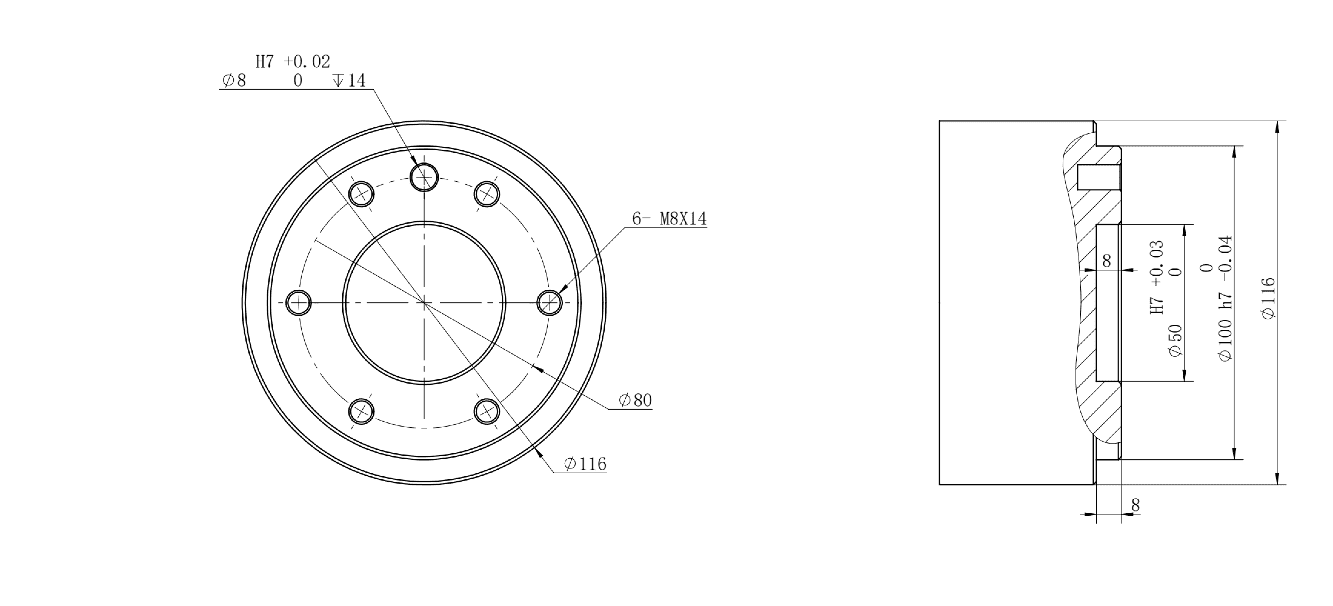
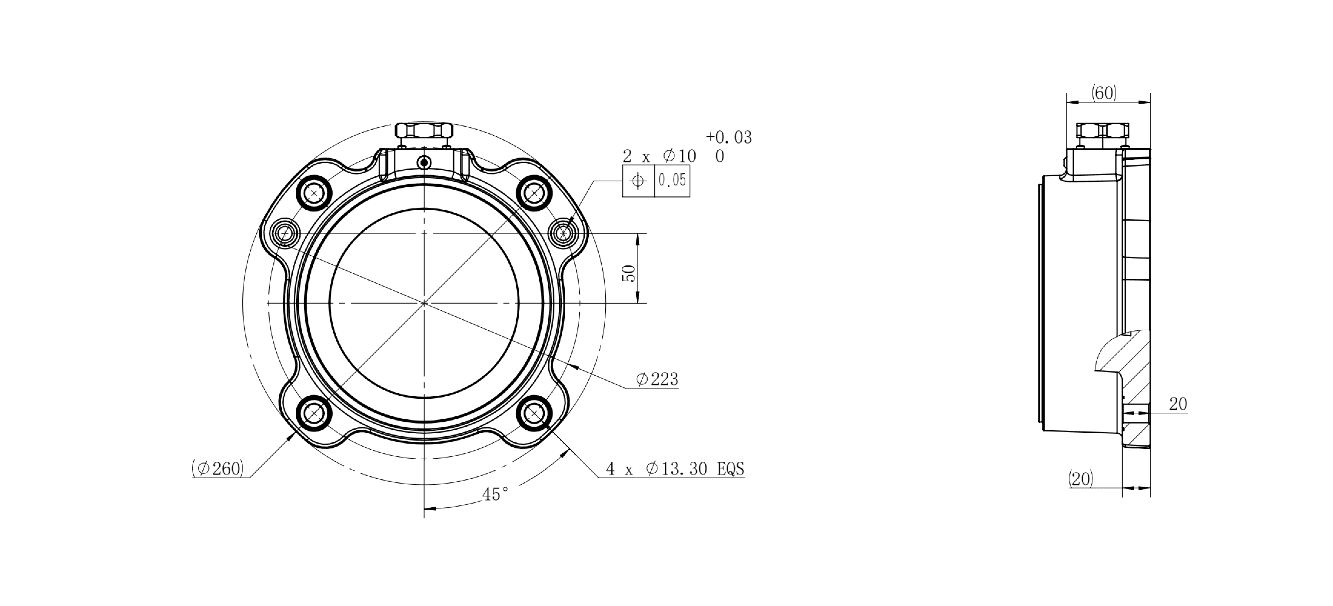
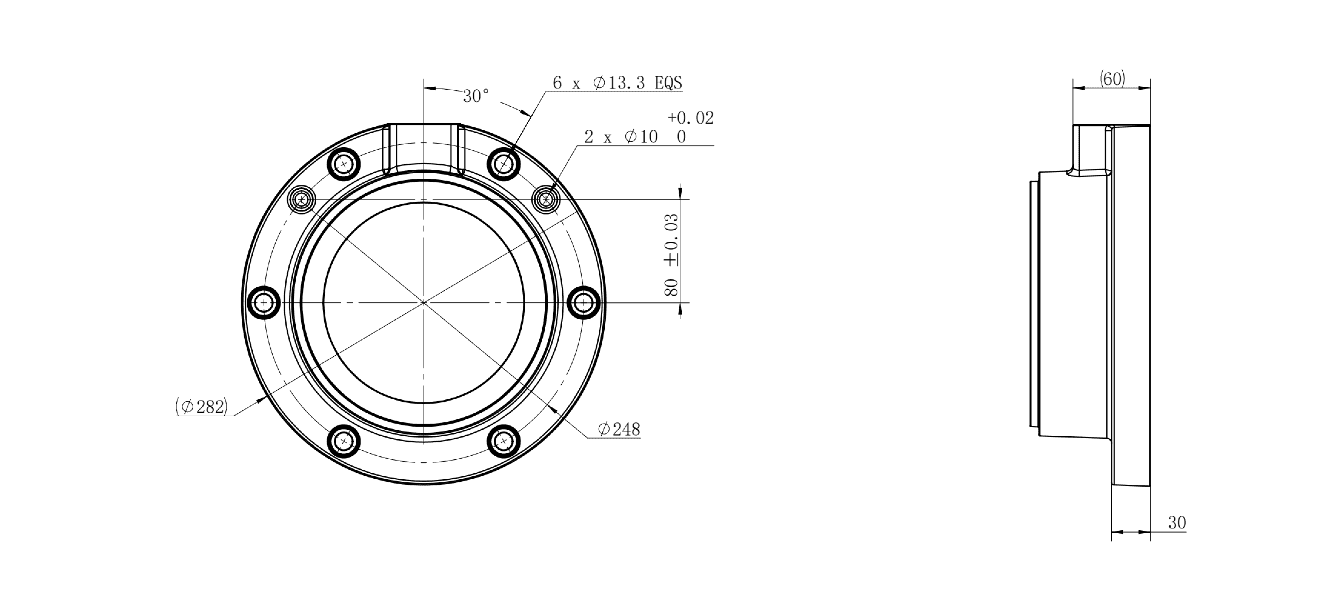
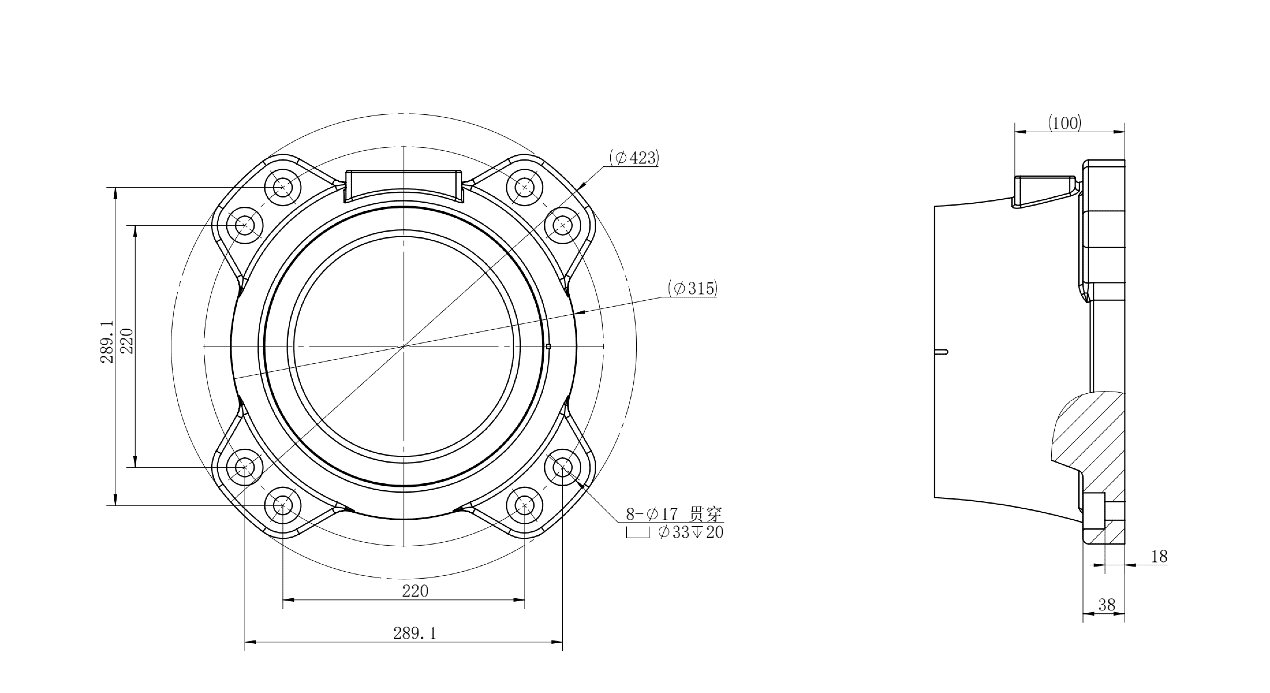
The end flanges used by different models of AUBO-iS Standard Version robot arms are slightly different. The end flange has several threaded holes and one locating hole.
3.4.4 Base Top View
4 Installation and Commissioning
4.1 Important Safety Instructions
4.1.1 Environmental Conditions
The robot arm shall be installed in an environment that meets the following conditions:
- Free of corrosive gases or liquids
- Free of oil mist
- Free of smoke
- Free of dust or metal powder
- Free of mechanical impact and vibration
- Free of electromagnetic noise
- Free of radioactive materials
- Low humidity
- Free of flammable materials
- Ambient temperature: 0°C ~ 50°C
- Avoid direct sunlight (avoid outdoor use)
4.1.2 Safety Requirements
The installation foundation shall meet the following mechanical load-bearing requirements:
- Load-bearing capacity: Install the robot on a solid surface that is sufficient to withstand at least 10 times the full torsional force of the base joint and at least 5 times the weight of the robot arm.
- Stability: The mounting surface shall be free of vibration and shall not become loose after installation.
Instructions for installing additional devices:
If non-AUBO original accessories (cables, etc.) are added to the robot, the user must ensure that such accessories do not interfere with or damage the safety functions of the equipment.
Controller safety instructions:
- The controller shall be placed horizontally on the floor.
- A clearance of ≥ 50 mm shall be reserved on each side of the controller to ensure ventilation and heat dissipation.
- The teach pendant can be hung on the controller to ensure that cables do not trip personnel.
| Sign | Description |
|---|---|
| 1. A wet controller may cause casualties. 2. Pay close attention to environments with conductive dust. |
4.2 Installation Precautions for Heavy-Payload Robot Arms
For robot arms with a rated payload of 20 kg or above, uncontrolled motion may cause irreversible serious injury or even death. The following safety requirements must be strictly observed during installation.
4.2.1 Preparations Before Installation
- Before installation, complete the risk assessment of the robot arm installation scenario and identify potential hazards in hoisting, fixing and electrical connection (such as mechanical crushing, falling objects and electric shock).
- All personnel involved in the installation must have proven, through targeted training or experience, their safety competence in handling heavy-payload servo systems.
- For heavy-payload robots, it is recommended to provide means to limit their motion space (mechanical stops, electromechanical devices or certified safety software).
- It is recommended to install safety protection devices such as safety fences or safety light curtains. The height of the safety fence shall be higher than 2000 mm (not less than 1400 mm at minimum), and the ground clearance shall not exceed 180 mm; the fasteners of the protective panels must be "drop-proof bolts" to ensure that the protective panels can be reliably restored after maintenance. The minimum safety distance S of the safety light curtain must be determined by the formula
, taking into account the personnel approach speed (K), the stopping time of the robot arm (T) and the intrusion distance (C).
4.2.2 Safety Specifications for Handling and Hoisting
- Robot arms with a rated payload of 20 kg or above must not be handled manually. Manual handling involves major safety risks such as personal injury, falling objects and equipment damage. Such robot arms must be handled and hoisted with compliant dedicated equipment, and the whole process shall comply with safety specifications.
- The influence of the end effector on the center of gravity must be considered during hoisting, and the end effector shall be removed first if necessary.
- Hoisting operations shall be directed by dedicated personnel, and unauthorized persons are prohibited from entering the working radius during hoisting. Hoisting personnel must possess the corresponding safety qualifications.
4.2.3 Foundation Engineering Requirements
Robot arms with a rated payload of 20 kg or above have huge dynamic inertia, and the installation floor must undergo professional structural calculation. To meet the foundation stability requirements of ISO 10218-2:2025, the following technical standards are recommended:
- Material strength: The robot installation foundation shall adopt reinforced concrete with a strength grade of not less than C30 (approximately 4000 psi in international standards), so as to ensure that the anchor bolts do not loosen under the huge overturning torque generated by an emergency stop of the robot.
- Installation accuracy: The flatness tolerance of the mounting surface shall be
to prevent internal stress in the base casting during fastening.
Equipotential bonding: The robot arm body shall adopt equipotential bonding, with a grounding resistance of ≤ 4Ω. The grounding terminal shall be firmly connected without looseness, and the specification of the grounding cable shall match the power requirements of the robot arm.
4.3 Installing the Robot Arm
The installation of the robot arm includes the following main steps:
- Determine the workspace: Plan a safe working area according to the motion range of the robot arm.
- Install the robot arm body: Fix the robot arm to the base or workbench.
- Install the end tool: Mount the end effector onto the robot arm flange.
- Connect the controller: Complete the electrical connection according to the controller manual.
- Power-on commissioning: Complete the initial configuration through the teach software after power-on.
After each installation, a safety assessment must be carried out, and the relevant requirements of the safety chapter of this manual must be strictly followed.
4.3.1 Base (Optional)
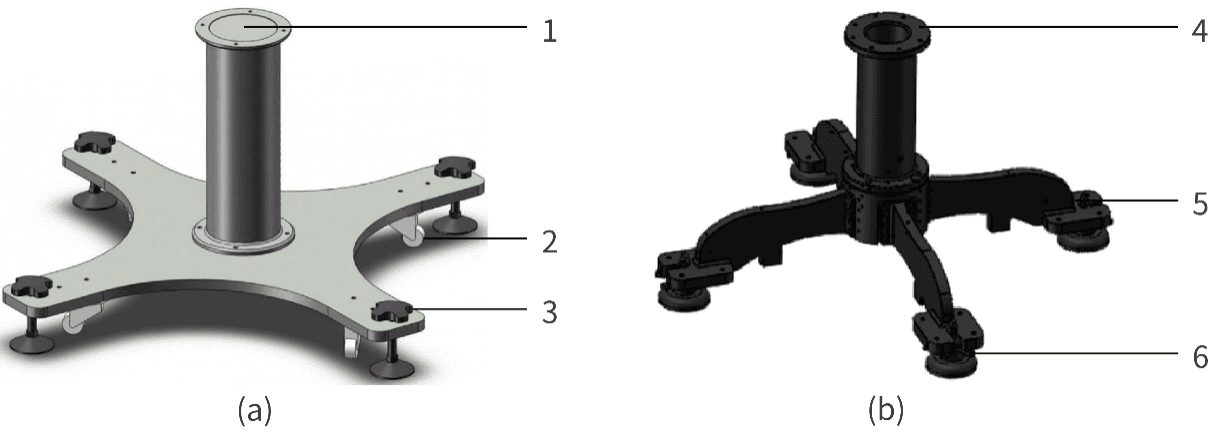
The AUBO robot base is an optional component used to support and fix the robot arm. Figure 4-1 shows the schematic diagram of the base structure. The actual equipment shall prevail.
AUBO provides two specifications of bases. Their appearance, applicable payloads and structural descriptions are as follows:
| Base type | Appearance color | Applicable payload | Structural description |
|---|---|---|---|
| Light-payload base | Silver | Maximum support of 5 kg payload | Equipped with 4 anchor bolts and 4 casters for easy fixing and moving. To fix the robot arm, rotate the upper part of the anchor bolts to lower them; to move the robot arm, use a wrench to rotate the lower nuts of the anchor bolts and lift the anchor bolts so that the casters are released from the ground. |
| Heavy-payload base | Black | Normally used for 7 kg and 10 kg payloads, up to 20 kg payload | Equipped with 4 anchor bolts, specially designed for stable installation. To fix the robot arm, rotate the star knobs to adjust the height of the anchor bolts and tighten the nuts with an adjustable wrench. |
When selecting and using the base, be sure to comply with the following requirements:
| Sign | Description |
|---|---|
| 1. Select a base matching the payload capacity of the robot arm: the silver light-payload base supports a maximum payload of 5 kg; the black heavy-payload base is normally used for 7 kg and 10 kg payloads, up to 20 kg payload. 2. The bottom of the base is not fixed to the ground and is only suitable for simple commissioning scenarios. It must not be operated at full payload and full speed, otherwise there is a risk of tipping over. |
4.3.2 Installing the Robot Arm
AUBO-iS Standard Version robot arms feature 360° mounting position and orientation self-adaptation, and support floor mounting, hoisting, wall mounting and various other installation methods, as shown in Figure 4-2. After the robot arm is installed, the teach software will automatically identify and adjust the working parameters of the robot arm after power-on.
For installation on a base, it is recommended to use 4 bolts for fixing and to pre-install locating pins in 2 slightly smaller holes to improve installation accuracy. For mechanical dimensions, please refer to 3.4.4 Base Top View.
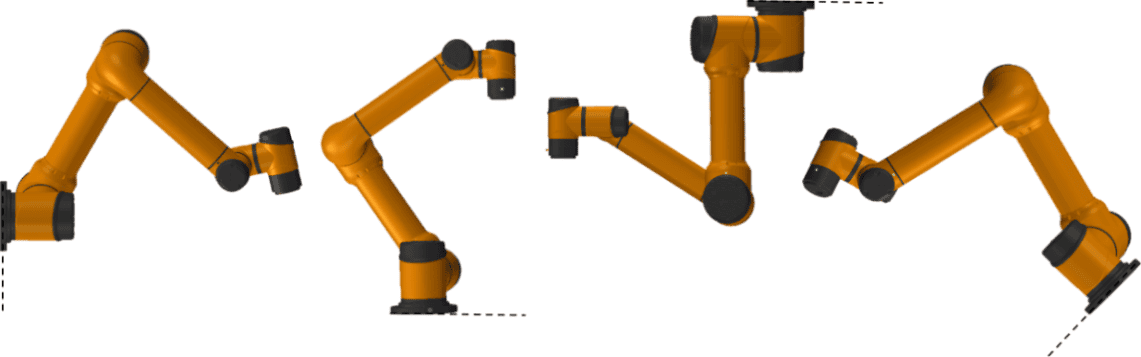
| Sign | Description |
|---|---|
| 1. Ensure that the robot arm is correctly and safely installed in place. 2. The robot arm shall not be installed in water or a humid environment unless it is declared to have IP67 protection. Otherwise, the robot arm may be damaged if it is immersed in water for a period of time. 3. Risk of tipping over: if the robot arm is not safely placed on a solid surface, the robot arm may tip over and cause injury. |
| 1. When installed on a base, the contact surface between the robot and the base shall be in close contact. 2. It is recommended to use a base contact surface with strong heat dissipation performance, such as all-aluminum material. When the working environment exceeds 35°C, it is strongly recommended to use materials with strong heat dissipation performance. |
4.3.3 Installing the End Tool
The end tool flange has several threaded holes and one locating hole, which facilitates the installation of tools such as grippers onto the robot arm end. For mechanical dimensions of the tool flange, please refer to 3.4.3 End Flange Mechanical Dimensions.
| Sign | Description |
|---|---|
| 1. Ensure that the tool is correctly and safely installed in place. 2. Ensure the safety architecture of the tool so that parts will not accidentally fall and cause risks. |
4.3.4 Grounding Protection
The power input terminal of the robot arm controller must be connected to a qualified ground conductor (PE conductor) to ensure good electrical connection between the enclosure and the earth. It is strictly prohibited to power on the robot arm without connecting the protective earth (PE) conductor.
- Grounding technical requirements:
- Cable specification: The protective earth (PE) conductor must be a copper-core cable with a cross-sectional area ≥ 2.5 mm². The insulation layer shall be intact, and the terminals shall be firmly crimped with professional crimping tools; twisted connections are strictly prohibited.
- Grounding resistance: After the grounding work is completed, the grounding resistance must be measured between the PE terminal of the robot arm and the earth with a grounding resistance tester; ≤ 4Ω is qualified.
- Record keeping: Grounding test records must be kept on file as important proof of safety compliance.
- Safety inspection and maintenance:
- Daily inspection: Operators shall periodically check the connection status of the PE conductor to ensure that there is no looseness, breakage or corrosion.
- Maintenance requirements: After equipment maintenance, relocation or reinstallation, the grounding resistance must be re-tested to ensure that the grounding system remains effective.
- Training requirements: All operators must receive grounding safety training and understand the risks of missing grounding and the correct grounding methods.
| Sign | Description |
|---|---|
| 1. It is strictly prohibited to power on the robot arm without connecting the protective earth (PE) conductor. Missing or poor grounding may cause electric shock accidents, abnormal electromagnetic interference or permanent damage to the equipment. 2. When the robot arm is not connected to the PE conductor, the enclosure may carry an induced voltage of 15 V ~ 105 V, which may cause numbness, stinging and other discomfort when touched by operators, and may lead to panic and misoperation, resulting in secondary injuries such as collision with the robot arm or accidental triggering of the emergency stop. |
4.3.5 Cable Connection
After the robot arm is installed, the controller must be correctly connected before the robot arm can be powered on normally. For cable connection methods, please refer to the controller user manual.
4.4 Arm-Side Interfaces and Buttons
4.4.1 Introduction
To meet the diversified requirements of end tools, AUBO-iS Standard Version robot arms are designed with an 8-pin connector (hereinafter referred to as the "tool I/O interface"), a 4-pin connector (hereinafter referred to as the "tool RS485 interface") and a drag teaching button at the wrist. The tool RS485 interface is optional.
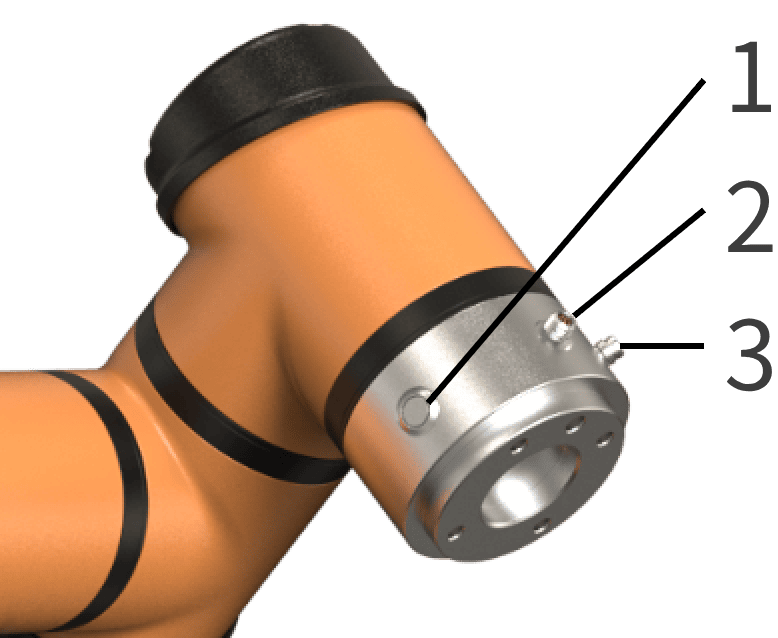
4.4.2 Tool I/O Interface
The tool I/O interface integrates power supply and signal transmission functions and supports the connection and control of end execution devices such as grippers and sensors. It uses industrial-grade cables and is internally equipped with 8 functional wires (as shown in Figure 4-4 and Table 4-1). The power supply voltage, the mode of the digital I/O interfaces and the functions of the I/O interfaces can all be configured in the teach software. For configuration methods and functions, please refer to the AuboStudio User Manual.
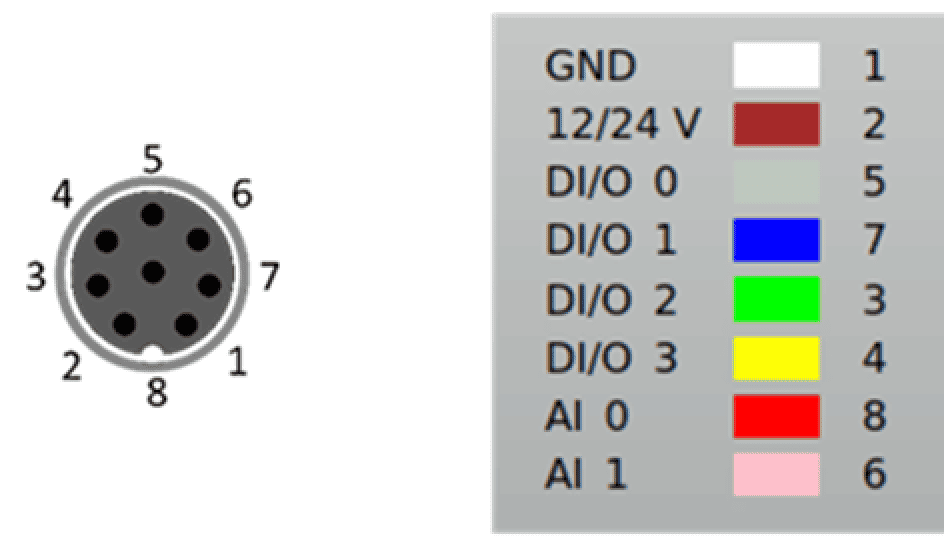
| Color | Signal | Pin | Color | Signal | Pin |
|---|---|---|---|---|---|
| White | GND | 1 | Green | DI/O 2 | 3 |
| Brown | 12/24V | 2 | Yellow | DI/O 3 | 4 |
| Grey | DI/O 0 | 5 | Red | AI 0 | 8 |
| Blue | DI/O 1 | 7 | Pink | AI 1 | 6 |
The digital I/O interfaces of the tool I/O interface adopt the NPN switching scheme:
- Digital input mode: when activated, the connector drives to GND; when disabled, it is in an open-circuit state.
- Digital output mode: equipped with a weak pull-down resistor to ensure signal stability and reliability.
For detailed electrical parameters of the tool I/O interface, please refer to Table 4-2 to Table 4-4. The electrical error is within ±10%.
| Parameter | Min. | Typ. | Max. | Unit |
|---|---|---|---|---|
| Power supply voltage in 24V mode | 23 | 24 | 25 | V |
| Power supply voltage in 12V mode | 11.5 | 12 | 12.5 | V |
| Power supply current in both modes | - | 0.35 | 1.0 | A |
| Parameter | Min. | Typ. | Max. | Unit |
|---|---|---|---|---|
| Input voltage range | 0 | - | 10 | V |
| Voltage resolution | - | 2.5 | - | mV |
| I/O type | Parameter | Min. | Typ. | Max. | Unit |
|---|---|---|---|---|---|
| Digital input interface | Input voltage | -0.5 | - | Vout+2 | V |
| Logic low voltage | 0 | 1.5 | 2 | V | |
| Logic high voltage | Vout-4 | Vout | Vout+2 | V | |
| Input resistance | - | 4.3 | - | kΩ | |
| Digital output interface | Voltage in open circuit | Same as the current power supply | |||
| Voltage at 1A input current | 0.35 | 0.4 | 0.85 | A | |
| Input current | 0.35 | 0.4 | 0.5 | A | |
| Current through GND | 0.35 | 0.4 | 0.5 | A | |
| Analog input interface | AI0 | 0 | - | +10 | V |
| AI1 | 0 | - | +10 | V | |
| Sign | Description |
|---|---|
| When connecting tools and grippers, ensure that interrupting the power supply will not cause any danger, such as a workpiece falling off the tool. |
4.4.3 Tool RS485 Interface (Optional)
The tool RS485 interface provides fieldbus communication capability and supports direct communication and data exchange with a variety of devices. It uses the standard RS485 communication protocol and industrial cables, and contains 4 functional wires (as shown in Figure 4-5 and Table 4-5). Its power supply voltage is configured in the same way as that of the tool I/O interface. For configuration methods and functions, please refer to the AuboStudio User Manual; for related electrical parameters, please refer to Table 4-2.
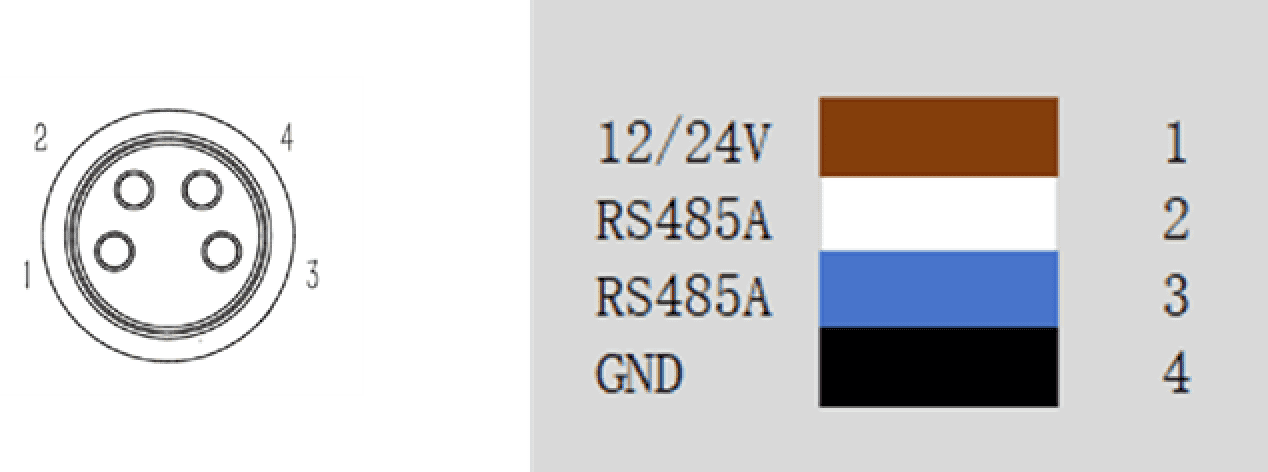
| Color | Signal | Pin |
|---|---|---|
| Brown | 12/24V | 1 |
| White | RS485A | 2 |
| Blue | RS485B | 3 |
| Black | GND | 4 |
4.4.4 Drag Teaching Button
The drag teaching button is a human-machine interaction component provided by AUBO-iS Standard Version robot arms. Press and hold the button and the robot arm enters the drag teaching mode, allowing users to easily move the robot arm; release the button and the robot arm maintains the current pose and exits the drag teaching mode. This function can be used together with the "trajectory recording" function. For details, please refer to the AuboStudio User Manual.
5 Handling and Transportation Precautions
When hoisting the robot, the moving parts shall be positioned with appropriate measures to prevent unexpected movement during hoisting and transportation that may cause hazards. Packaging and transportation shall be carried out in accordance with packaging standards, and the required marks shall be applied to the outside of the packaging box.
During transportation, the robot must be kept stable and fixed in an appropriate position.
The controller shall be lifted by its handle.
When moving the robot from the packaging material to the installation position, hold the robot until all bolts of the robot base are fully tightened.
After fixing, power on the robot and use the drag teaching function to adjust the robot posture to an appropriate position.
Keep the original packaging after transportation. Store the packaging material in a dry place for future repackaging and moving of the robot.
| Sign | Description |
|---|---|
| 1. Ensure that your back or other body parts are not excessively strained when lifting the equipment. 2. All regional and national guidelines shall be observed. AUBO (Beijing) Intelligent Technology Co., Ltd. is not responsible for damage caused during equipment transportation. 3. Ensure that the installation instructions in the manual are strictly followed when installing the robot. |
6 Maintenance, Repair and Disposal
6.1 Maintenance and Repair
All safety specifications in this manual must be strictly observed when carrying out various maintenance and inspection operations.
Equipment maintenance, calibration and repair operations shall be carried out in accordance with the latest version of the service manual, which is available on the official technical support website www.aubo-robotics.cn. All authorized distributors of AUBO (Beijing) Intelligent Technology Co., Ltd. can log in and access this website.
Equipment repair shall only be carried out by authorized system integrators or AUBO original factory personnel. If parts need to be returned to AUBO (Beijing) Intelligent Technology Co., Ltd., the relevant procedures in the service manual must be strictly followed.
The operations shall meet the safety level requirements corresponding to maintenance and inspection and comply with the local safety production regulations in force. After the operations are completed, all safety functions must be tested item by item to confirm that they operate normally.
Maintenance and inspection work is used to ensure the stable operation of the equipment or to restore normal working conditions after a fault occurs, covering both fault diagnosis and physical repair.
When operating the robot arm body or controller, strictly implement the following safety procedures and warning requirements:
| Sign | Description |
|---|---|
| 1. Remove the main input cable from the back of the controller to ensure that it is completely de-energized. Necessary precautions shall be taken to prevent others from reconnecting the system energy during repair. After power-off, re-check the system to ensure that it is de-energized. 2. Check the grounding connection before restarting the system. 3. Observe ESD (electrostatic discharge) regulations when disassembling the robot arm or controller. 4. Avoid disassembling the power supply system of the controller. After the controller is turned off, its power supply system may retain high voltage for several hours. 5. Avoid water or dust entering the robot arm or controller. |
| 1. Replace faulty parts with new parts of the same part number or corresponding parts approved by AUBO (Beijing) Intelligent Technology Co., Ltd. 2. Immediately reactivate all disabled safety measures after the work is completed. 3. Record all repair operations in writing and keep them in the technical documents related to the entire robot system. 4. The controller has no parts that can be repaired by the end user. If maintenance or repair service is required, please contact your distributor or AUBO (Beijing) Intelligent Technology Co., Ltd. |
6.2 Disposal
AUBO robots must be disposed of in accordance with applicable national laws and regulations and national standards.
7 Quality Assurance
7.1 Product Warranty
AUBO-iS Standard Version robot arms enjoy a limited warranty period of 36 months.
If defects caused by poor manufacturing or materials occur within 36 months after the new equipment and its components are put into use, AUBO (Beijing) Intelligent Technology Co., Ltd. shall provide the necessary spare parts for replacement or repair of the relevant parts.
The ownership of the equipment or components replaced or returned to AUBO (Beijing) Intelligent Technology Co., Ltd. shall belong to AUBO (Beijing) Intelligent Technology Co., Ltd.
If the product is no longer within the warranty period, AUBO (Beijing) Intelligent Technology Co., Ltd. reserves the right to charge the customer for replacement or repair.
Outside the warranty period, if the equipment exhibits defects, AUBO (Beijing) Intelligent Technology Co., Ltd. assumes no liability for any damage or loss arising therefrom, such as production loss or damage to other production equipment.
7.2 Disclaimer
If equipment defects are caused by improper handling or failure to follow the relevant information described in the user manual, the "Product Warranty" shall become void.
Failures caused by the following conditions are not covered by this warranty:
- Products purchased through channels not approved by AUBO.
- Failure to meet industrial standards or failure to install, wire and connect other control equipment as required by the user manual.
- Use beyond the specifications or standards stated for the product.
- Use of this product for purposes other than those specified.
- Use in environmental conditions beyond the nominal values of the product.
- Use in a grinding environment or special use environment without product protection.
- Product damage caused by improper transportation.
- Accidents, faults, damage or indirect damage caused by human factors.
- Faults, damage or indirect damage caused by modification.
- Installation of non-original genuine parts and accessories.
- Damage caused by modification, commissioning or repair of original parts by third parties other than AUBO (Beijing) Intelligent Technology Co., Ltd. or its designated integrators.
- Faults, damage or indirect damage caused by natural disasters and other force majeure events.
- In addition to the above conditions, faults not caused by the responsibility of AUBO (Beijing) Intelligent Technology Co., Ltd.
The following conditions are not covered by the warranty:
- The product traceability number cannot be identified.
- The production date or warranty start date cannot be identified.
- Changes to software or internal data.
- The fault cannot be reproduced or the fault cannot be identified by AUBO (Beijing) Intelligent Technology Co., Ltd.
- Use of this product in radioactive equipment, biological test equipment or uses judged by AUBO (Beijing) Intelligent Technology Co., Ltd. to be hazardous.
- Appearance parts and wearing parts.
According to the product warranty agreement, AUBO (Beijing) Intelligent Technology Co., Ltd. only provides warranty commitments for defects and deficiencies in products and parts sold to distributors.
AUBO (Beijing) Intelligent Technology Co., Ltd. assumes no warranty liability for any other express or implied warranties or liabilities, including but not limited to any implied warranty of merchantability or fitness for a particular purpose. In addition, AUBO (Beijing) Intelligent Technology Co., Ltd. assumes no liability for any form of indirect damage or consequences arising from the relevant products.
8 Appendix
8.1 Terminology
Stop category 0: Uncontrolled stop. Power is cut off immediately, the brakes of all joints engage without deceleration control, and the robot may deviate from the programmed path. It is only applicable to extreme situations such as exceeding the safety-rated limits or failure of the safety-rated part of the control system. For the definition of stop categories and the requirements for immediate power cutoff, please refer to IEC 60204-1:2016 (9.2.2 Stop categories); for the design requirements of the emergency stop function, please refer to EN ISO 13850:2015.
Stop category 1: Controlled stop with power cutoff after stopping. The robot stops along the programmed path, and the power supply is cut off after the stop is completed, balancing safety and path stability. For the definition of stop categories and the requirements for power cutoff after stopping, please refer to IEC 60204-1:2016 (9.2.2 Stop categories); for the design requirements of the emergency stop function, please refer to EN ISO 13850:2015.
Stop category 2: Controlled stop with continuous power supply. The robot remains powered after stopping, and the safety-rated control system maintains the stop position, allowing quick resumption of operation. For the definition of stop categories and the requirements for maintaining power, please refer to IEC 60204-1:2016 (9.2.2 Stop categories). Stop category 2 shall not be used as an emergency stop, so EN ISO 13850:2015 does not apply.
Integrator: The integrator is the organization that designs the final installation of the robot. The integrator is responsible for the final risk assessment and must ensure that the final installation complies with local laws and regulations.
Risk assessment: Risk assessment is the entire process of identifying all risks and reducing risks to an appropriate level. The risk assessment shall be recorded and archived. For details, please refer to ISO 12100.
Performance level: Performance level (PL) is a discrete level used to describe the ability of each safety-related part of the control system to perform a safety function under predictable conditions. PLd is the second highest confidence classification, meaning that the safety function is quite reliable. For more information, please refer to EN ISO 13849-1:2008.
8.2 Revision History
| Version | Date | Revision content |
|---|---|---|
| v1.0.0 | 2026-11-16 | 1. Release of the v1.0.0 official version. |
8.3 Technical Specifications Summary
| Parameter | AUBO-iS3 | AUBO-iS7 | AUBO-iS10 | AUBO-iS16 | AUBO-iS20 | AUBO-iS20L | AUBO-iS25 | AUBO-iS35 |
|---|---|---|---|---|---|---|---|---|
| Degrees of freedom | 6 rotary joints | 6 rotary joints | 6 rotary joints | 6 rotary joints | 6 rotary joints | 6 rotary joints | 6 rotary joints | 6 rotary joints |
| Weight | 16 kg | 21.5 kg | 36 kg | 64 kg | 64 kg | 72 kg | 75.6 kg | 172 kg |
| Payload | 3 kg | 7 kg | 12 kg | 16 kg | 20 kg | 20 kg | 25 kg | 35 kg |
| Max. working radius | 625 mm | 886.5 mm | 1300 mm | 1900 mm | 1647 mm | 2000 mm | 1700 mm | 2100 mm |
| Joint range | joint1/joint2/joint4/joint5/joint6: -360° ~ +360° joint3: -156° ~ +156° | joint1/joint2/joint4/joint5/joint6: -360° ~ +360° joint3: -162° ~ +162° | joint1/joint2/joint4/joint5/joint6: -360° ~ +360° joint3: -165° ~ +165° | joint1/joint2/joint4/joint5/joint6: -360° ~ +360° joint3: -165° ~ +165° | joint1/joint2/joint4/joint5/joint6: -360° ~ +360° joint3: -165° ~ +165° | joint1/joint2/joint4/joint5/joint6: -360° ~ +360° joint3: -165° ~ +165° | joint1/joint2/joint4/joint5/joint6: -360° ~ +360° joint3: -165° ~ +165° | joint1/joint2/joint4/joint5/joint6: -360° ~ +360° joint3: -165° ~ +165° |
| Max. joint speed | joint1/joint2/joint3/joint4/joint5/joint6: 237°/s | joint1/joint2/joint3: 223°/s joint4/joint5/joint6: 237°/s | joint1/joint2: 200°/s joint3: 237°/s joint4/joint5/joint6: 237°/s | joint1/joint2: 180°/s joint3/joint4/joint5/joint6: 237°/s | joint1/joint2: 130°/s joint3: 237°/s joint4/joint5/joint6: 237°/s | joint1/joint2: 110°/s joint3: 237°/s joint4/joint5/joint6: 237°/s | joint1/joint2: 110°/s joint3: 237°/s joint4/joint5/joint6: 237°/s | joint1/joint2: 113°/s joint3: 123°/s joint4/joint5/joint6: 237°/s |
| Tool speed | ≤ 2.5 m/s | ≤ 3.6 m/s | ≤ 4.5 m/s | ≤ 5.9 m/s | ≤ 3.7 m/s | ≤ 3.8 m/s | ≤ 3.2 m/s | ≤ 4.0 m/s |
| Repeatability | ± 0.02 mm | ± 0.02 mm | ± 0.03 mm | ± 0.05 mm | ± 0.05 mm | ± 0.05 mm | ± 0.05 mm | ± 0.05 mm |
| Operating ambient temperature range | 0 ~ 50°C | 0 ~ 50°C | 0 ~ 50°C | 0 ~ 50°C | 0 ~ 50°C | 0 ~ 50°C | 0 ~ 50°C | The robot can operate within the temperature range of 0 ~ 50°C |
| Operating ambient humidity | 90% relative humidity (non-condensing) | 90% relative humidity (non-condensing) | 90% relative humidity (non-condensing) | 90% relative humidity (non-condensing) | 90% relative humidity (non-condensing) | 90% relative humidity (non-condensing) | 90% relative humidity (non-condensing) | 90% relative humidity (non-condensing) |
| IP rating | IP67 | IP67 | IP67 | IP54 (IP67 customizable) | IP54 (IP67 customizable) | IP54 (IP67 customizable) | IP54 (IP67 customizable) | IP54 (IP67 customizable) |
| Average power | Approx. 150 W when running a typical program | Approx. 200 W when running a typical program | Approx. 500 W when running a typical program | Approx. 1000 W when running a typical program | Approx. 1000 W when running a typical program | Approx. 1000 W when running a typical program | Approx. 1000 W when running a typical program | Approx. 2000 W when running a typical program |
| Peak power | 1000 W | 2000 W | 2000 W | 3000 W | 3000 W | 3000 W | 3000 W | 6000 W |
| Mounting surface diameter | ⌀140 mm | ⌀170 mm | ⌀218 mm | ⌀260 mm | ⌀260 mm | ⌀282 mm | ⌀282 mm | ⌀423 mm |
| General certification mark / organization | CE | CE, CR, REACH | CE, CR, REACH | CE, CR, REACH | CE, CR, REACH | CE, CR, REACH | CE, CR, REACH | CE, CR, REACH |