Power-On/Off and Connection
Power-on
Tip
Please stand outside the reach (work radius) of the robot arm.
AUBO-CB-M controller, AUBO-CB-iS controller
Once the robot arm and controller have been installed and wired, and the external power supply has been activated, please turn the switch above the controller power supply interface to "I"/"ON". Then, wait for the POWER indicator light and STANDBY indicator light to light up. Finally, press and hold the Power button in the upper right corner of the teach pendant to enter the system.
AUBO-CB-C controller
Method 1: Power on via the ON/OFF STATE button of the controller
- After completing the installation and wiring of the robot arm and controller and turning on the external power supply, turn the switch above the controller power supply interface to "I/ON";
- Press and hold the ON/OFF STATE button of the controller until the ON/OFF STATE button light flashes, indicating that the controller is started.
Method 2: Power on via the Power button on the control handle
- After completing the installation and wiring of the robot arm and controller and turning on the external power supply, turn the switch above the controller power supply interface to "I/ON";
- Press and hold the Power button on the control handle until the power indicator light on the control handle flashes, indicating that the controller is started.
AUBO-CB-S control box
Method 1: Power on via the POWER button of the controller
- After completing the installation and wiring of the robot arm and controller and turning on the external power supply, press and hold the POWER button of the controller until the POWER button light strip flashes, indicating that the controller is started.
Method 2: Power on via the Power button on the control handle
- After completing the installation and wiring of the robot arm and controller and turning on the external power supply, press and hold the Power button on the control handle until the power indicator light on the control handle flashes, indicating that the controller is started.
AUBO-CB-MINI-S-48V control box
After completing the installation and wiring of the robot arm, controller and external switch and turning on the external power supply, turn on the external switch, and wait for the POWER/STATE indicator light to light up, indicating that the controller is started.
Wireless connection
Tip
Controller models that support wireless connectivity include AUBO-CB-C, AUBO-CB-S, and AUBO-CB-MINI-S-48V.
Search on the tablet and connect to the robot's WiFi. The default WiFi name is "(AAAA-CCCC-YYYY-)XXXX", and the default password is "12345678". Here, AAAA is a fixed brand name; CCCC is the controller model; YYYY is the production year, month and batch; and XXXX is the last 4 digits of the controller's serial number.
After connection via Wi-Fi, open the AuboStudio APP, select the entry in the [IP List] (or enter the controller's IP address) to connect the controller.
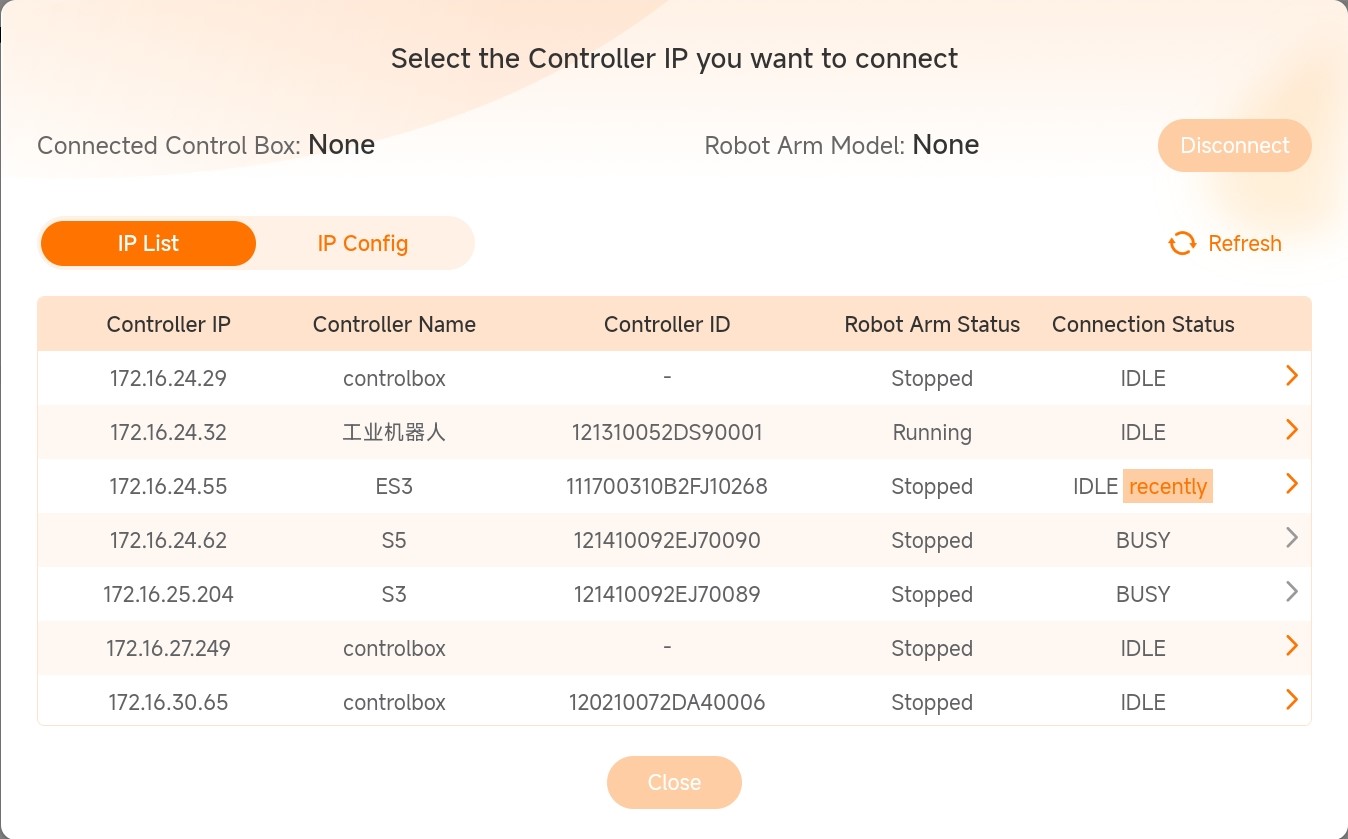
Upon successful connection, the software interface will refresh and enter the [Home] page. Click the [Disconnect] button at the top to disconnect the currently connected robot.
After the software is successfully connected, users can modify the Wi-Fi name and password. For settings of the built-in Wi-Fi, refer to "System Settings - Wi-Fi".
Robot power-on/off
Click the [Power On] button on the [Home] page.
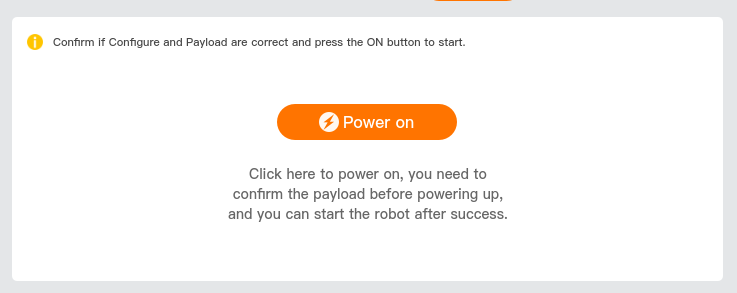
Select the payload mode and click [Continue]. Payload has two preset modes:
- Payload: this is the default mode, and in this mode, the payload is fixed to 0 kg.
- Custom load: Enter the value of payload. The value shall not exceed 1.2 times the robot's rated load.

The system begins initialization, and the robot will perform the following:
- Robot power-on.
- Load the robot drive.
- Activate the robot, and then the robot enters active state.
After successful system initialization, click the [Start] button, then the robot will release the brakes and enter operable state.
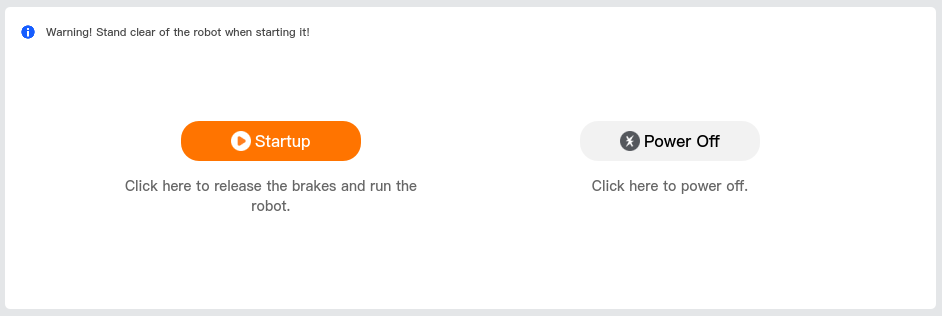
Click [Power Off] to power off the robot.

Power-off
Normal power-off
Recommended power-off method:
- Click "Home > Shutdown" in the AuboStudio teach pendant software to shut down the system.
- Power off remotely.
- Press and hold the [Power] button of the wired teach pendant for 3 seconds.
- Press and hold the [Power] button on the control handle for 2 seconds.
Forced power-off
Danger
Please avoid using forced power-off.
In the event of a forced power-off, please save any ongoing tasks and files before powering-off, if possible. And perform necessary system checks and maintenance afterwards.
Forced shutdown method:
- In any state, press and hold the [Power] button of the teach pendant for 10 seconds.
- In any state, press and hold the [Power] button on the control handle for 10 seconds.
- Disconnect the power supply directly.
Danger
- Methods 1 and 2 are only available for system shutdown under abnormal conditions.
- Avoid directly cutting off the power supply to shut down the device, as this may cause serious system damage.