
How to Install the ARCS System
Please perform the operations in this tutorial under the guidance of technical support. Unauthorized operations may cause damage to the system or hardware, which may result in loss of warranty eligibility.
1. Creating a USB Boot Drive
Taking Windows 10 Home Chinese Edition as an example
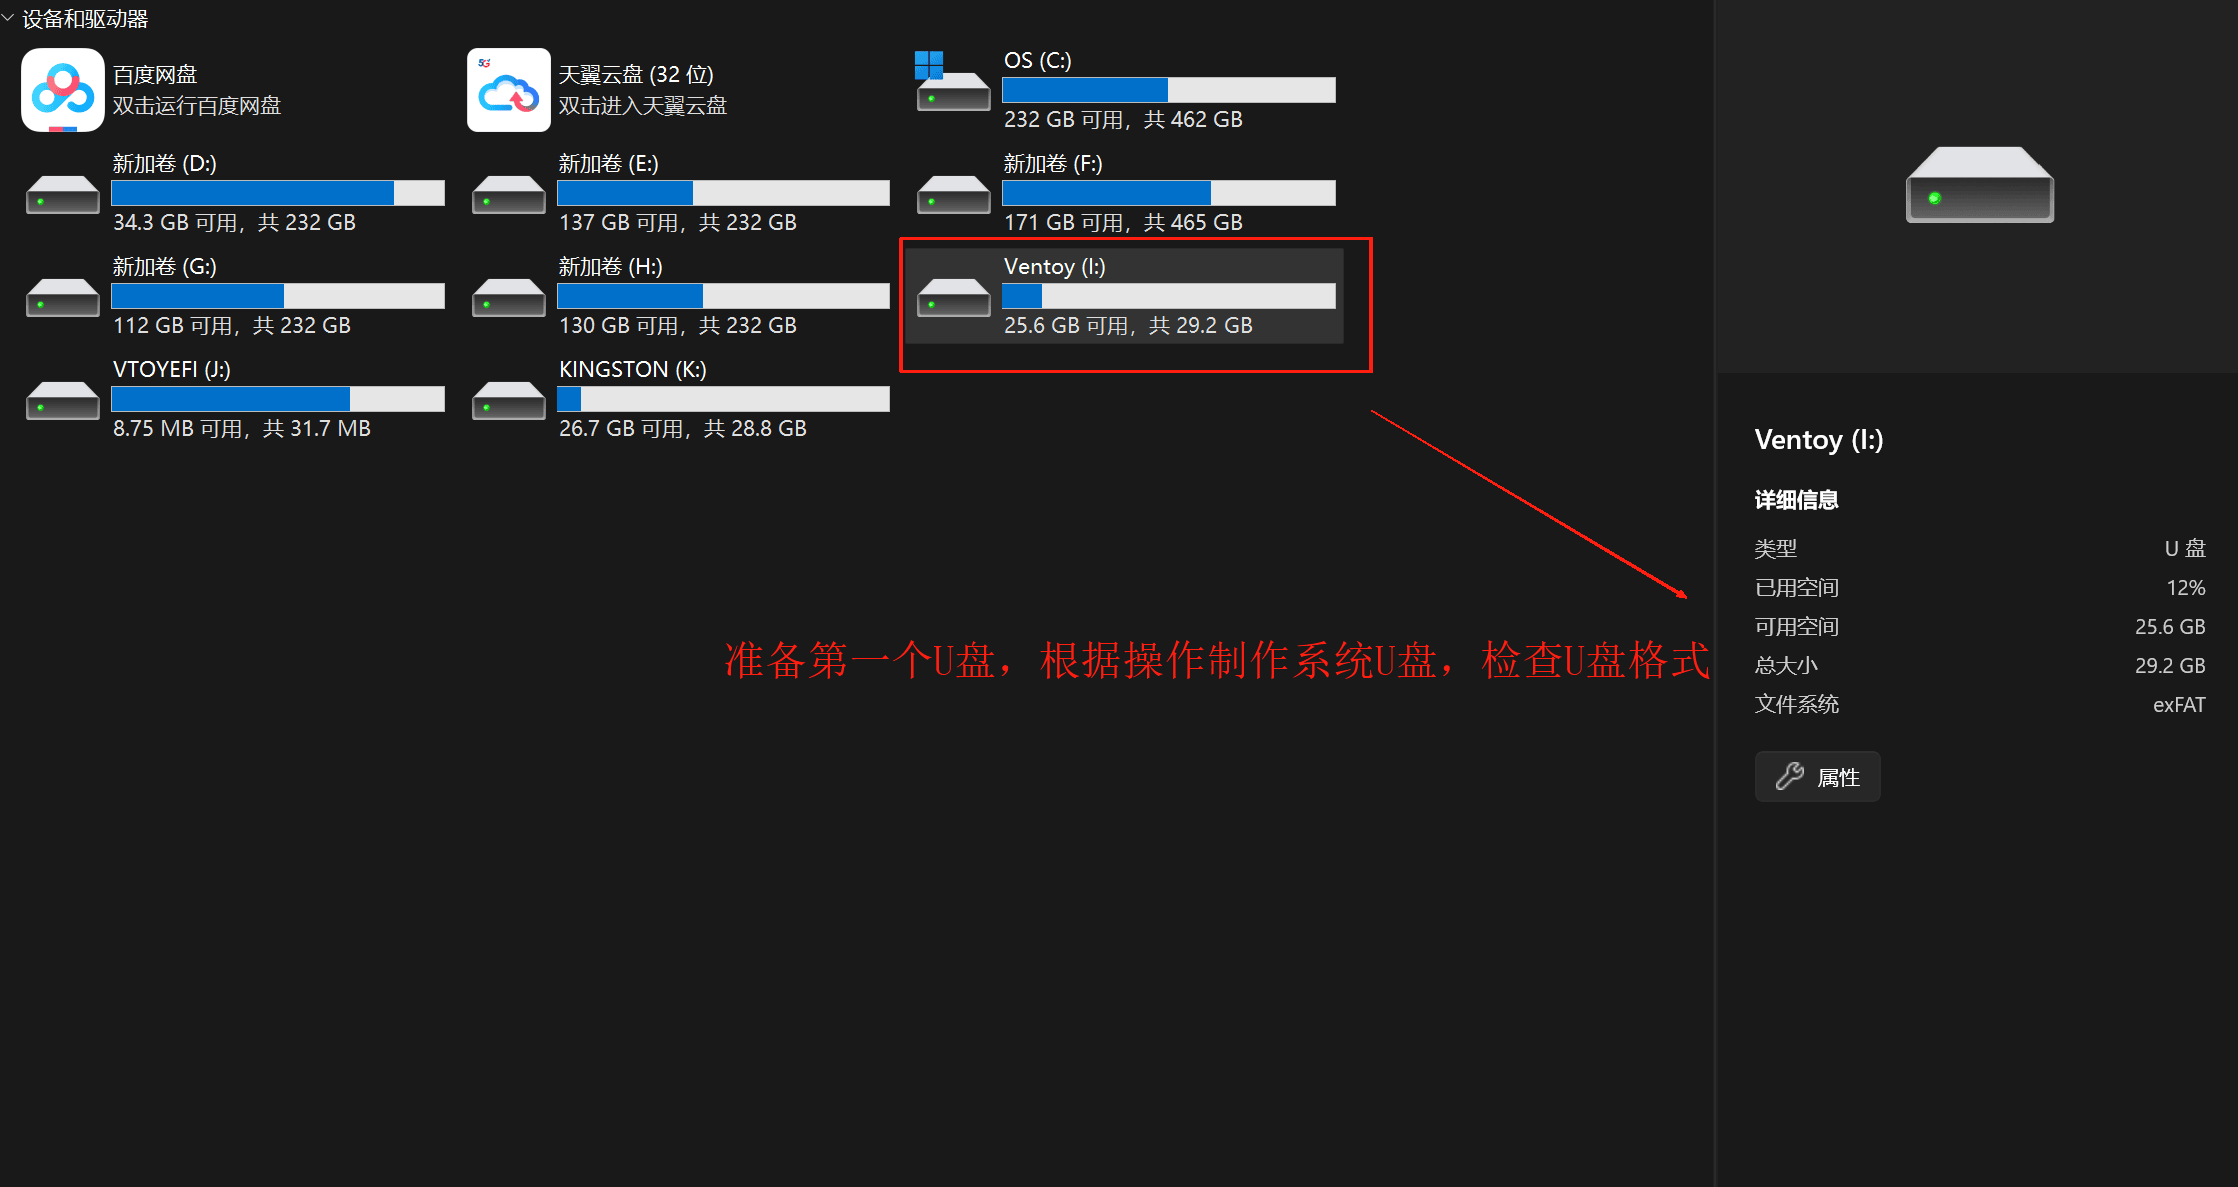
1. Prepare an empty USB drive
Prepare the first empty USB drive of 8 GB or more, used to create the system drive (after creation, the USB drive format is exFAT) and to store the ISO image file.
2. Download Ventoy
Ventoy is easy to use and supports Windows and Linux; here we use the Windows version as an example.
Download address: https://aubocdn.aubo-robotics.cn/build_system/ventoy-1.0.73-windows.zip
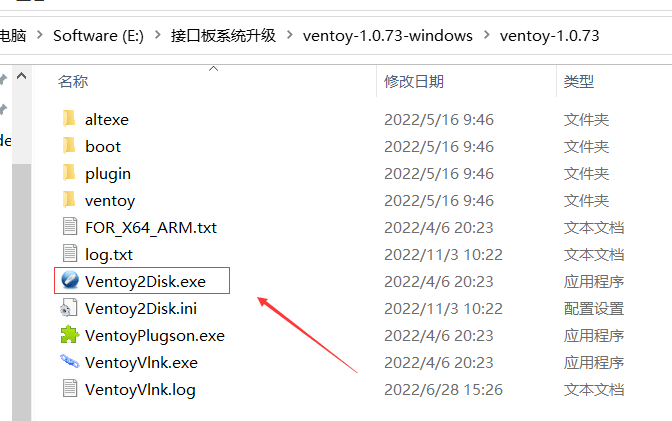
Insert the USB drive. Taking the ventoy-1.0.73-windows.zip version as an example, after extracting it, run the Ventoy2Disk.exe executable and select your USB drive device, as shown below:
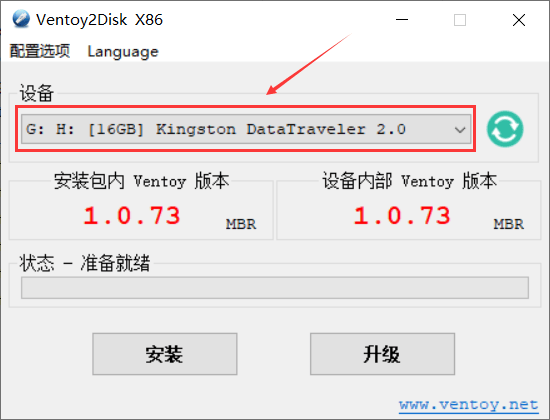
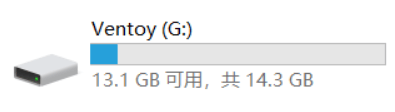
Click Install to start the Ventoy installation. Note that during installation the USB drive will be formatted and all data on it will be lost, so remember to back up the files on the USB drive first, and do not select the wrong USB drive.
3. Download the xubuntu image
xubuntu 16.04 download address: https://aubocdn.aubo-robotics.cn/build_system/iso/xubuntu-16.04.3-rt94-amd64.iso
xubuntu 22.04 5.15.137 kernel version download address: https://aubocdn.aubo-robotics.cn/build_system/iso/xubuntu-22.04.3-rt71-amd64.iso
xubuntu 22.04 6.1.158 kernel version download address: https://aubocdn.aubo-robotics.cn/build_system/iso/xubuntu-22.04.3-rt58-amd64.iso
Copy the ISO image file into the USB drive. It can be copied to the root directory of the USB drive or to a specified directory. Note that the ISO file name must not contain Chinese characters, the directory must not contain Chinese characters either, and do not place the ISO file in a directory that is too deep. The USB boot drive is now complete.

2. Installing the Operating System
Installing xubuntu-16.04.3
1. Shut down the teach pendant, and plug the prepared USB boot drive into the control cabinet
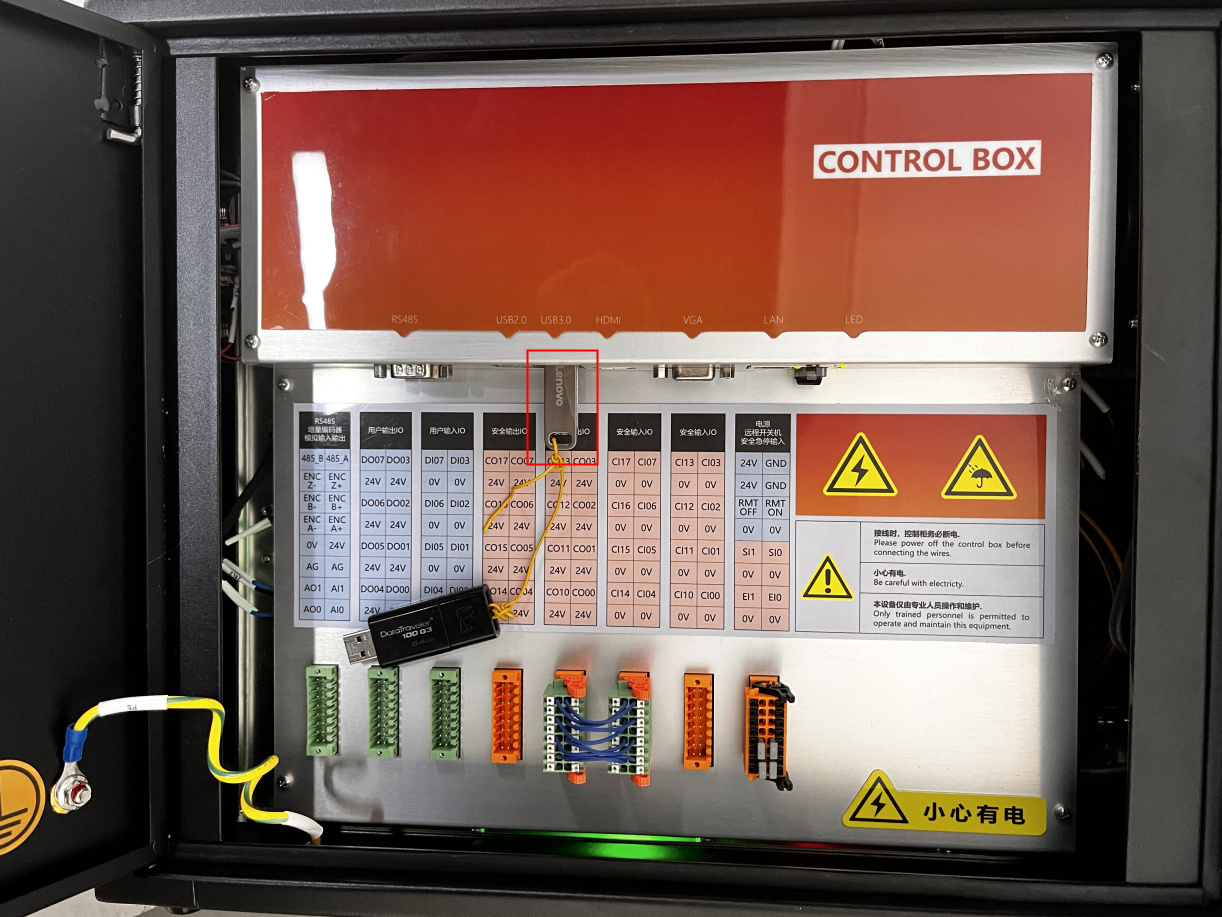
2. Plug in the keyboard and start the teach pendant. When the following pattern appears on the teach pendant
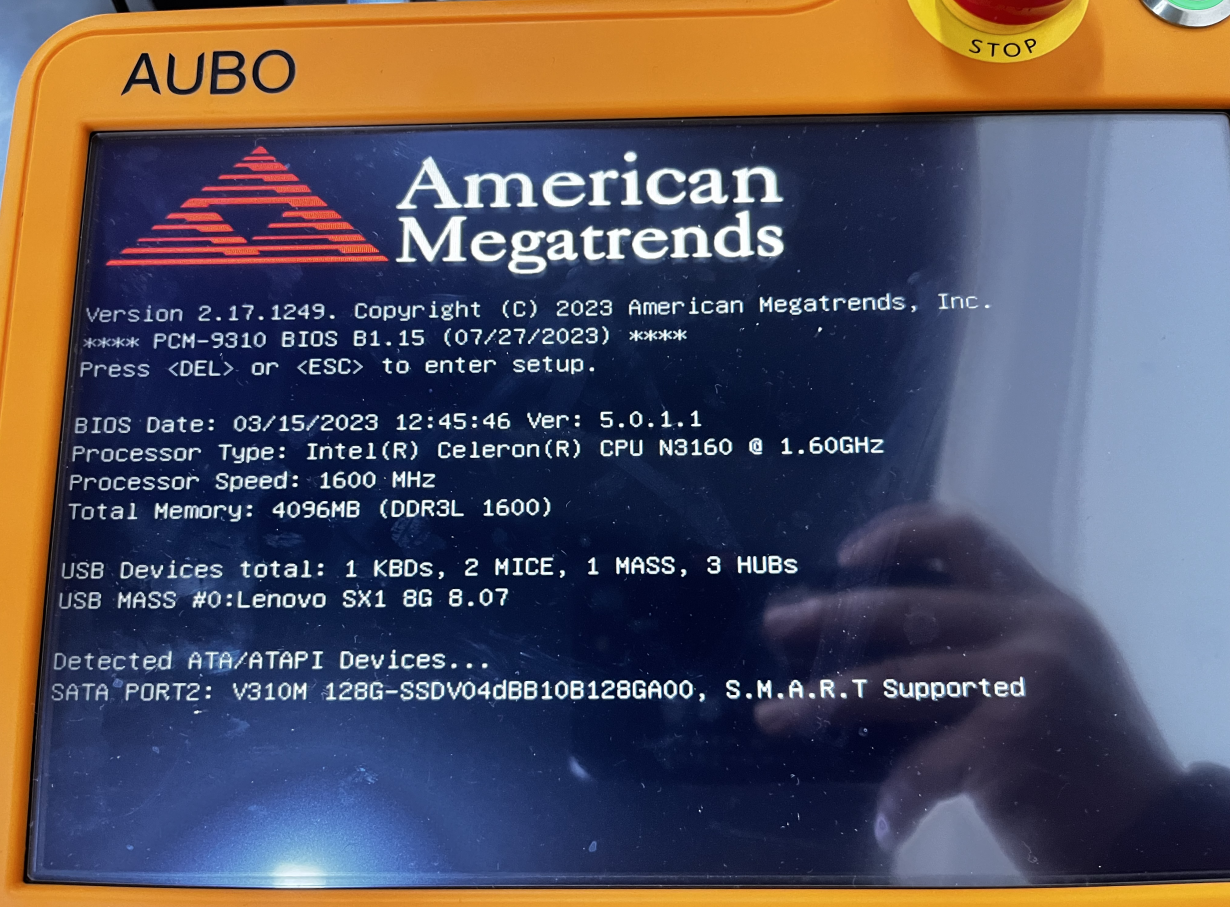
immediately press the Delete key on the keyboard repeatedly until you enter the BIOS (different devices enter the BIOS in different ways).
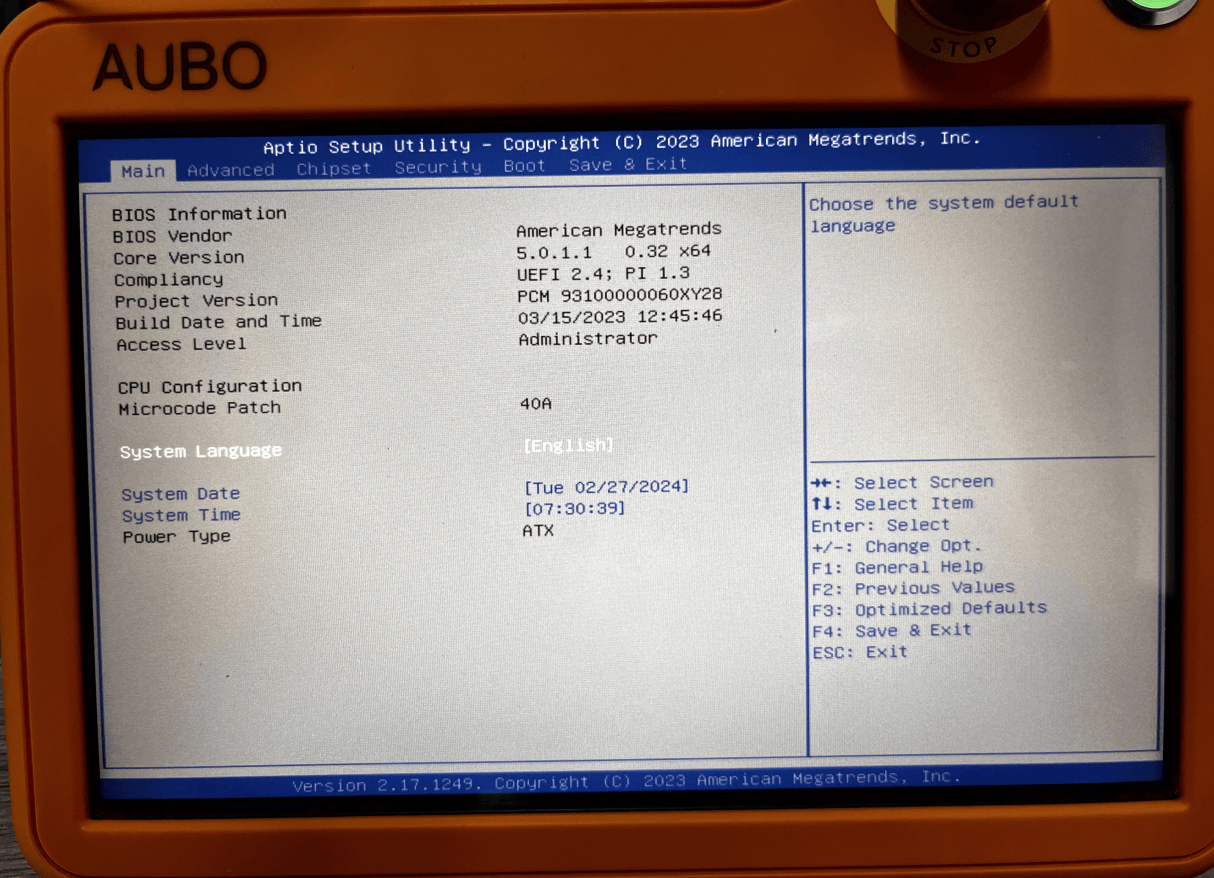
Switch to the Boot page, select Hard Drive BBS Priorities, and press Enter.
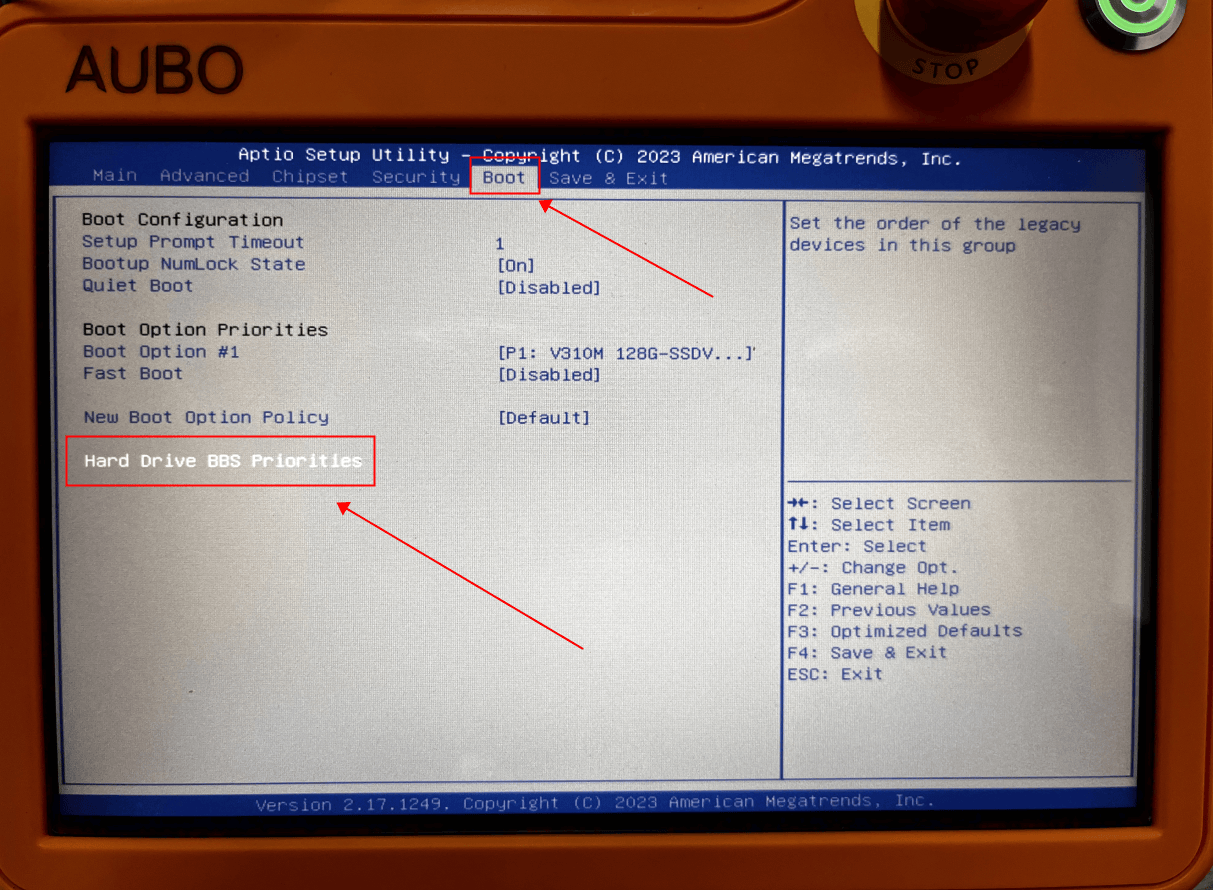
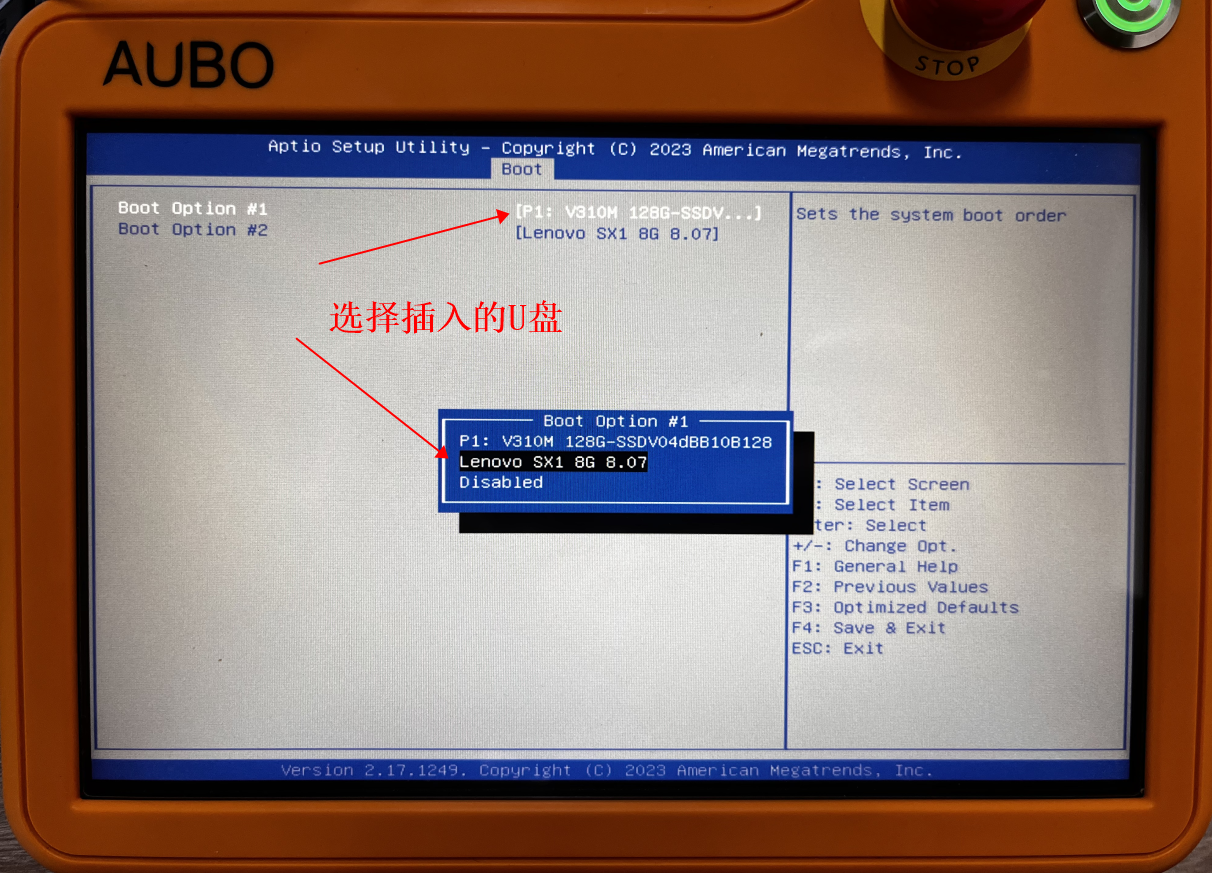
Select the boot item Boot Option #1 and switch it to the name of the inserted USB drive (here, taking my inserted USB drive Lenovo as an example), then press Enter.
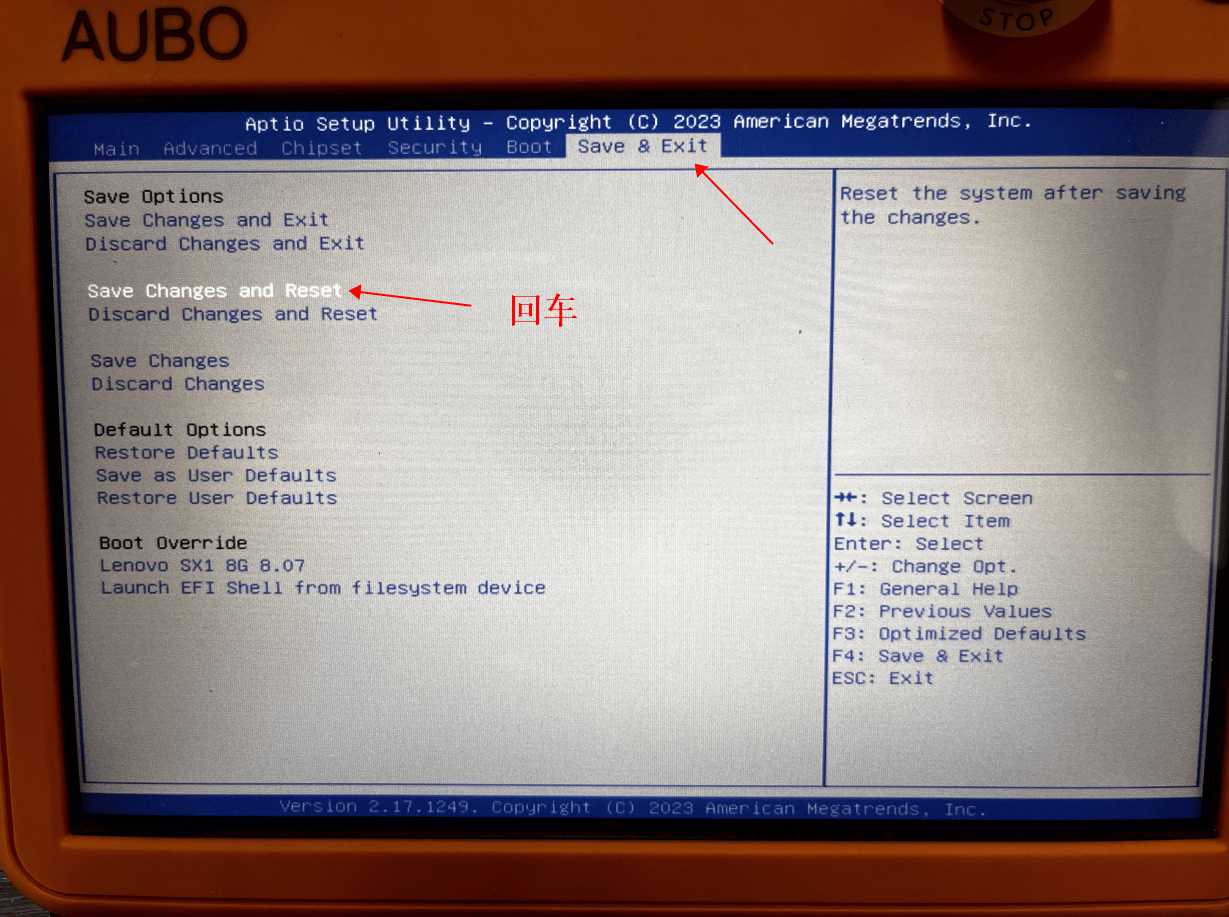
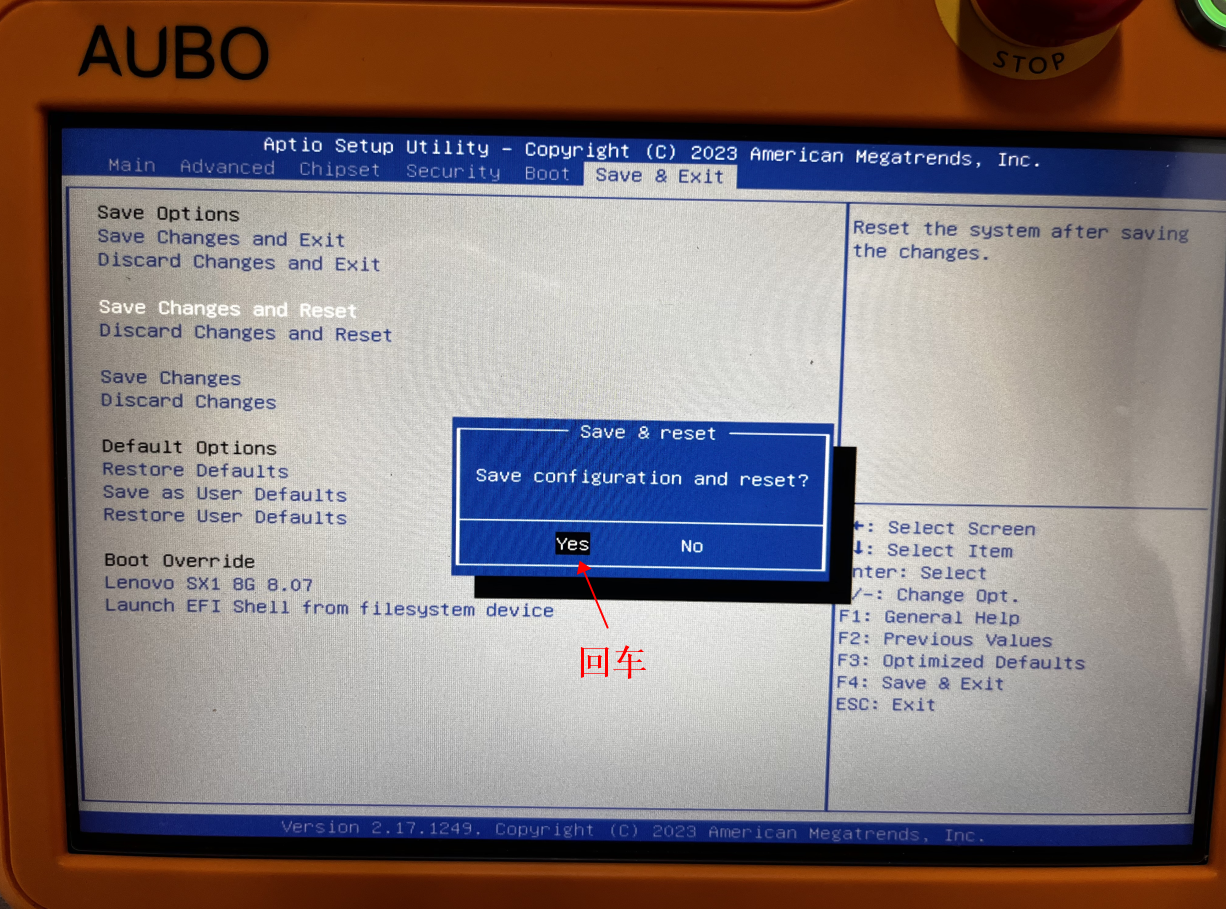
After completing the settings, switch to Save & Exit, select Save Changes and Reset, press Enter, and then select Yes; the teach pendant shuts down.
3. Install xubuntu
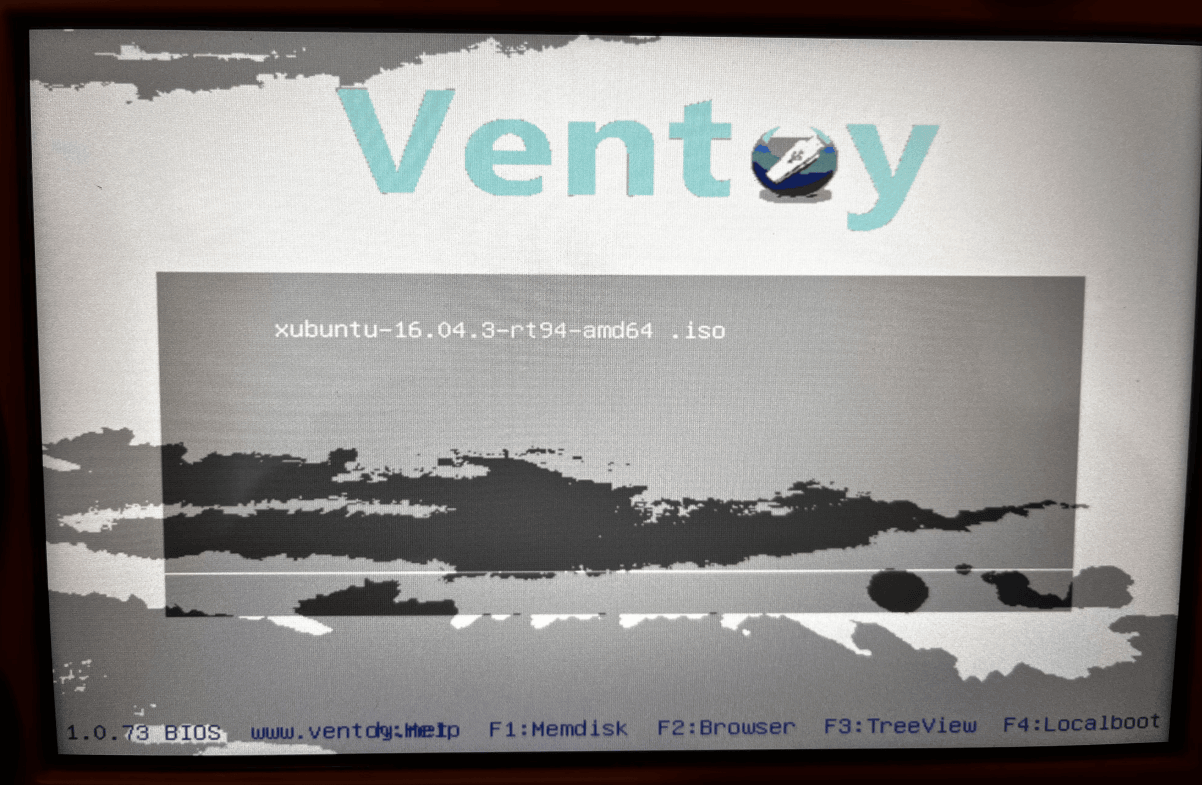
Start the teach pendant again, select xubuntu-16.04.3-rt94-amd64.iso, and press Enter to install the xubuntu system.
The installation process is as follows:
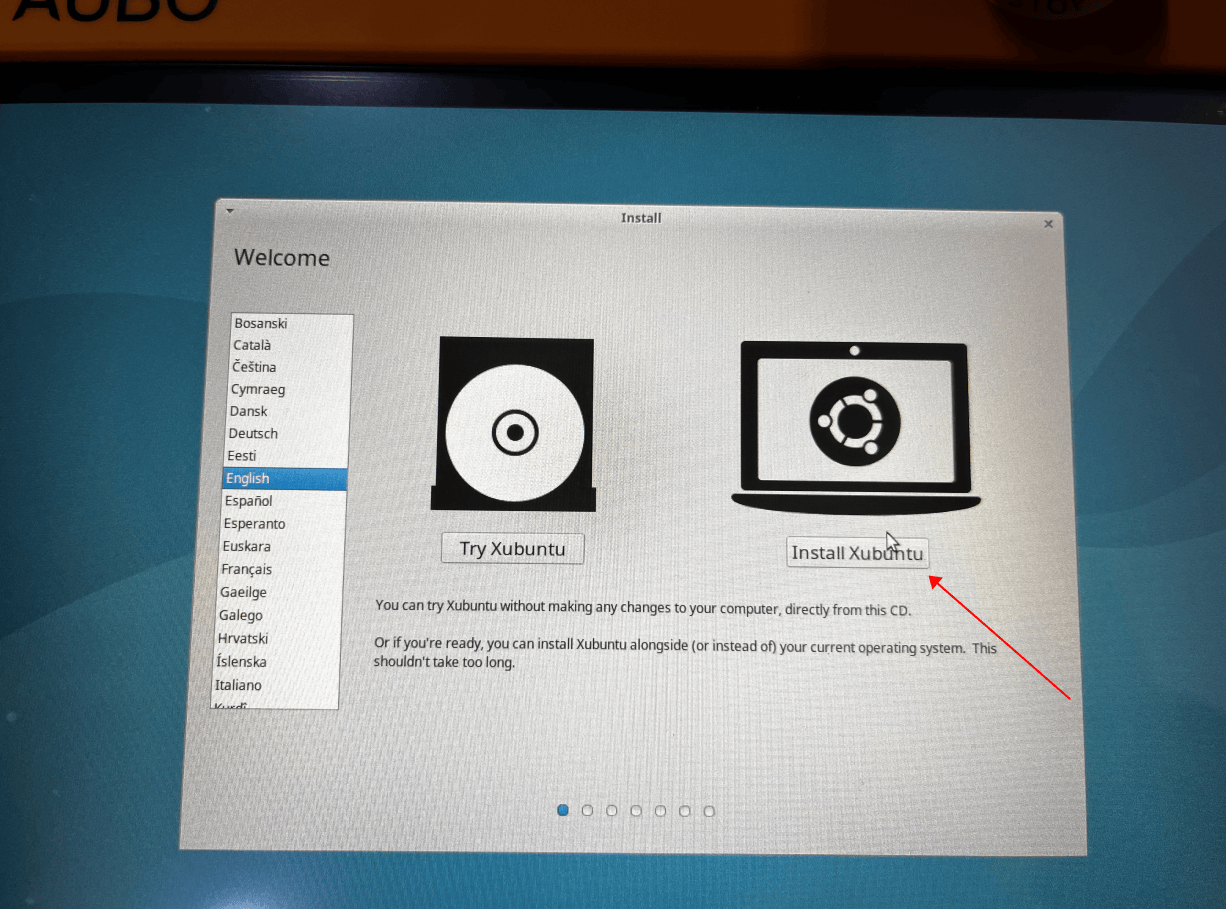
Select Install Xubuntu
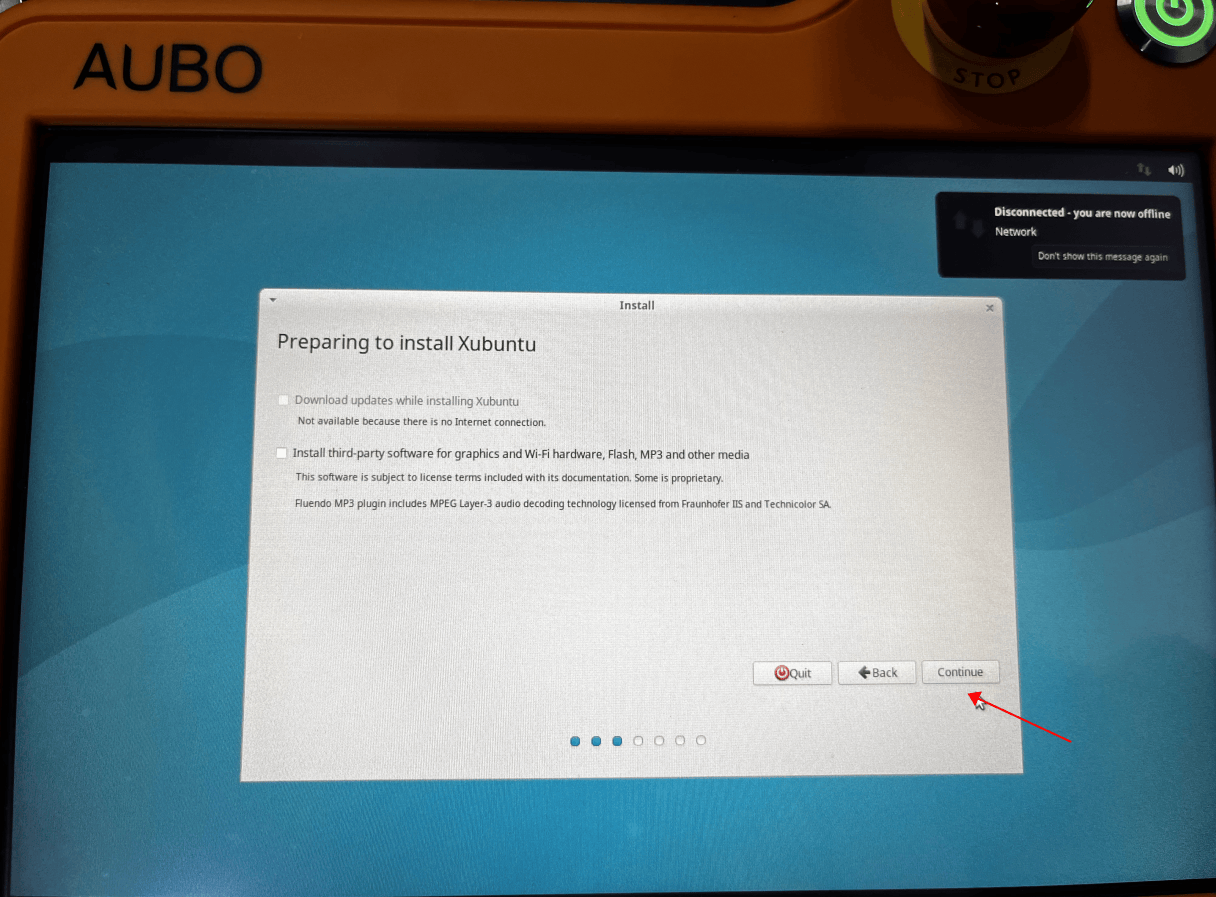
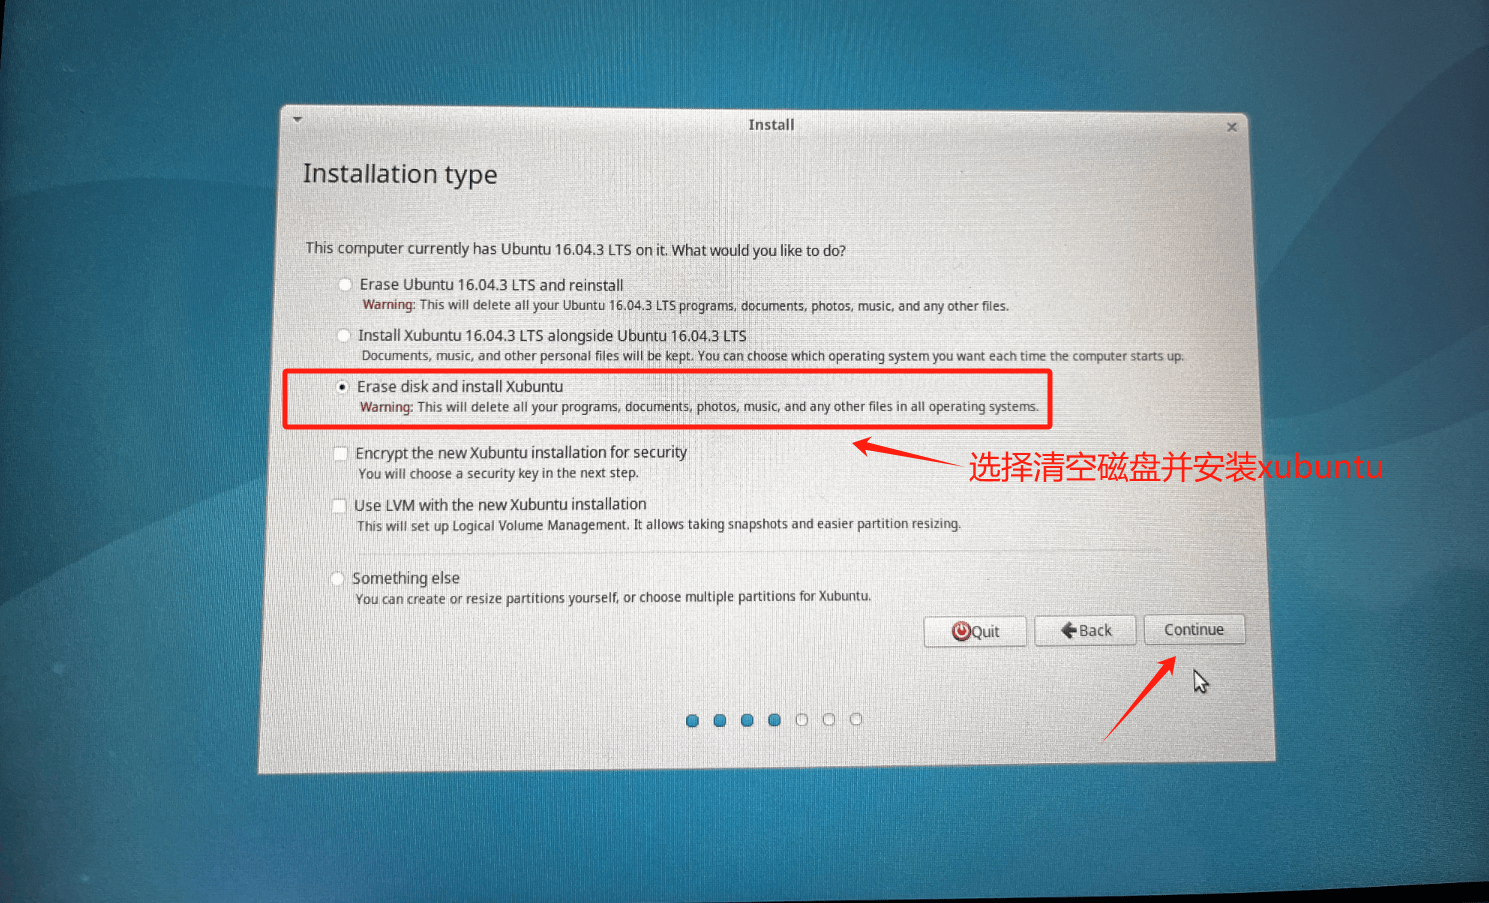
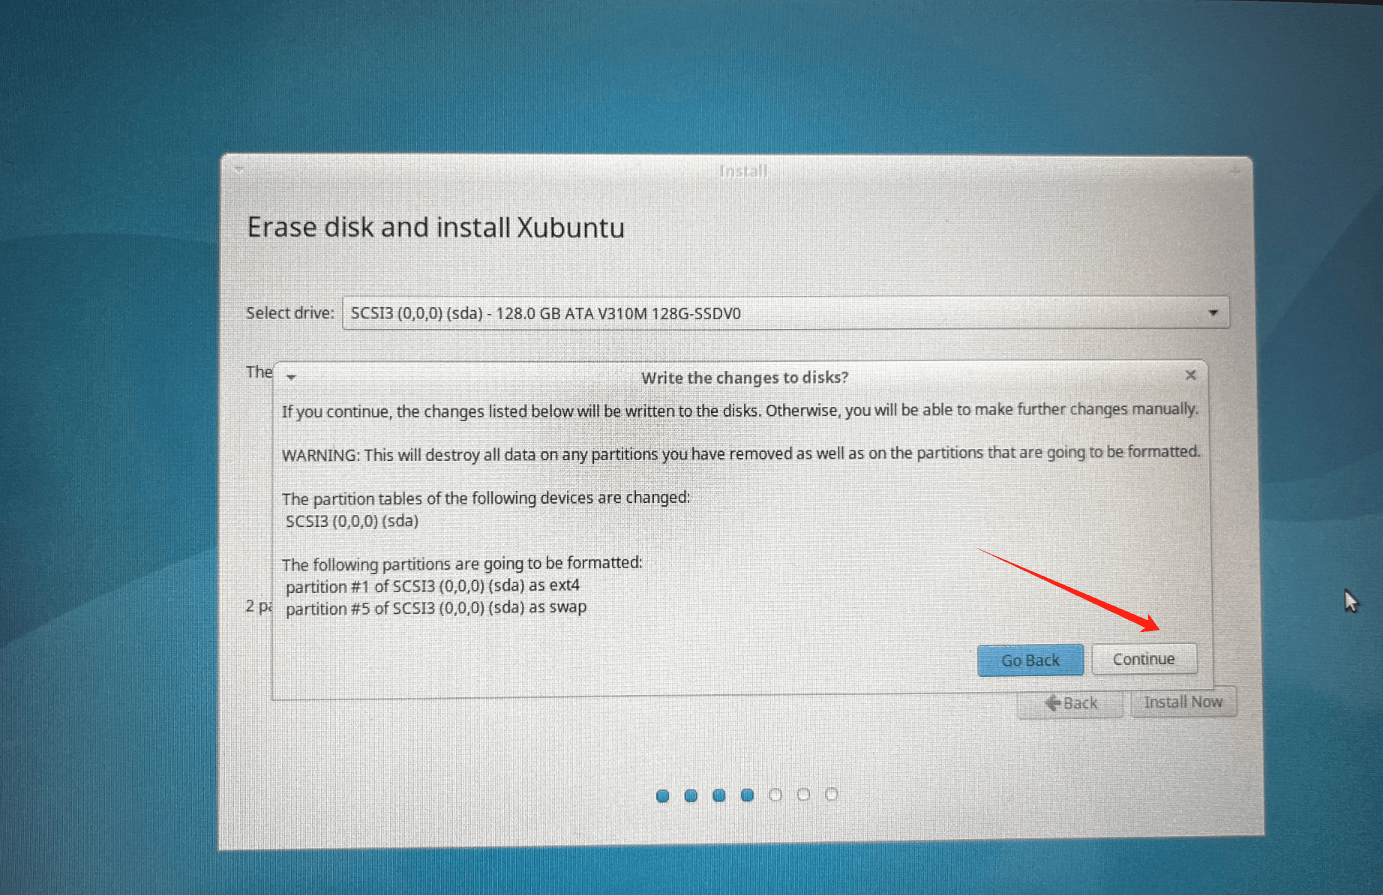
Select to erase the disk space to install xubuntu.
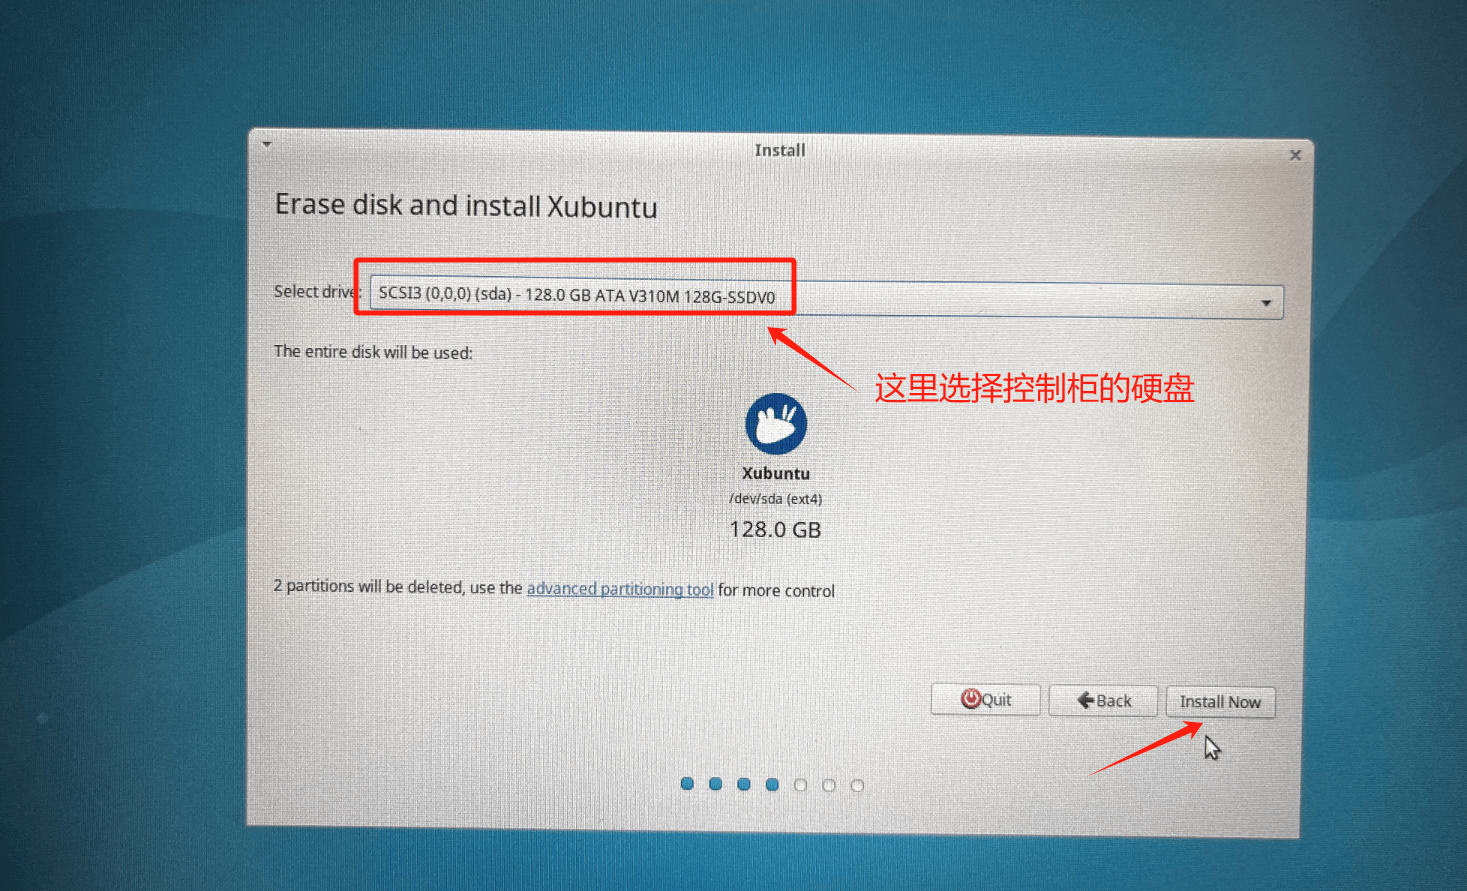
Note: Here select to install the system on the control cabinet hard drive, not on the inserted USB drive.
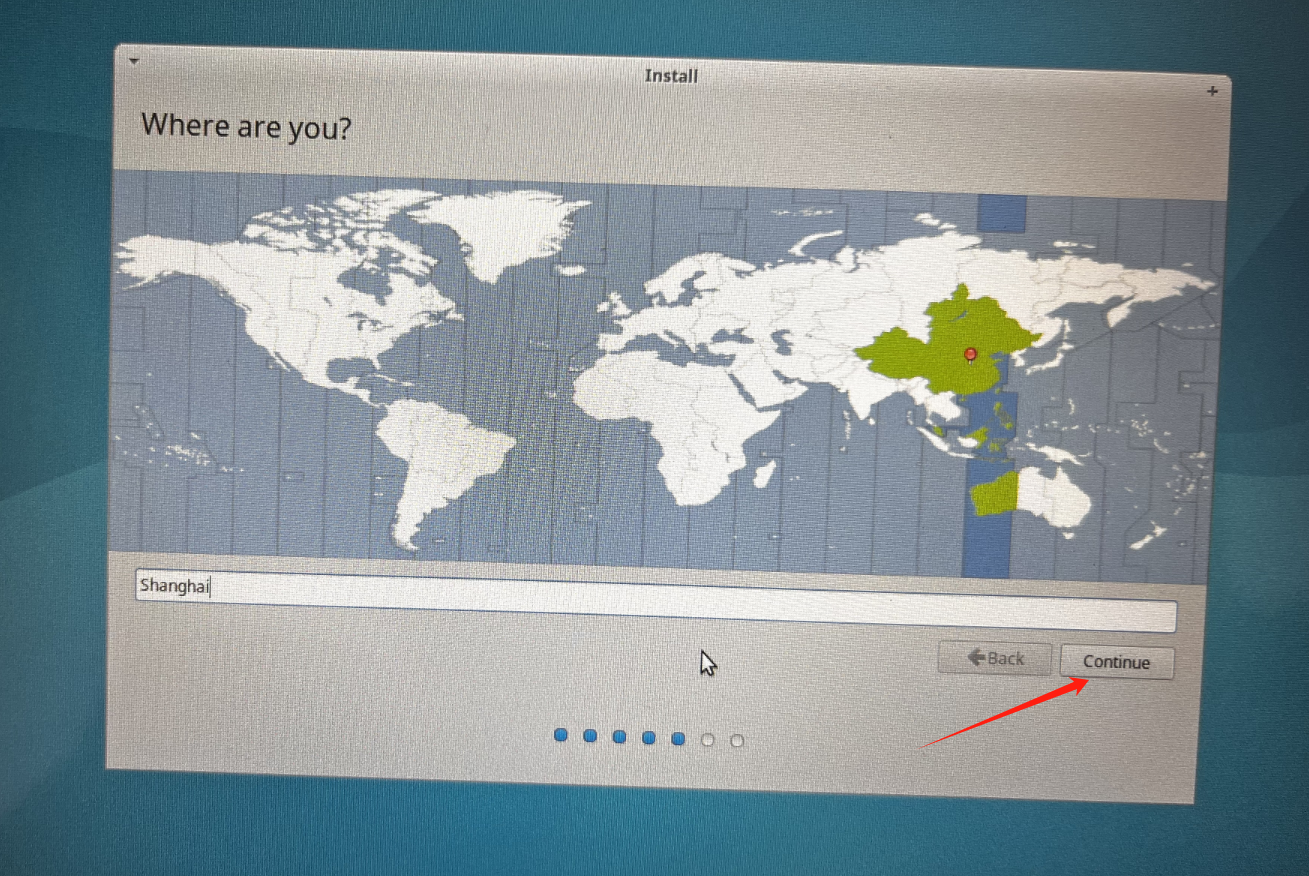
Select the region and click Continue.
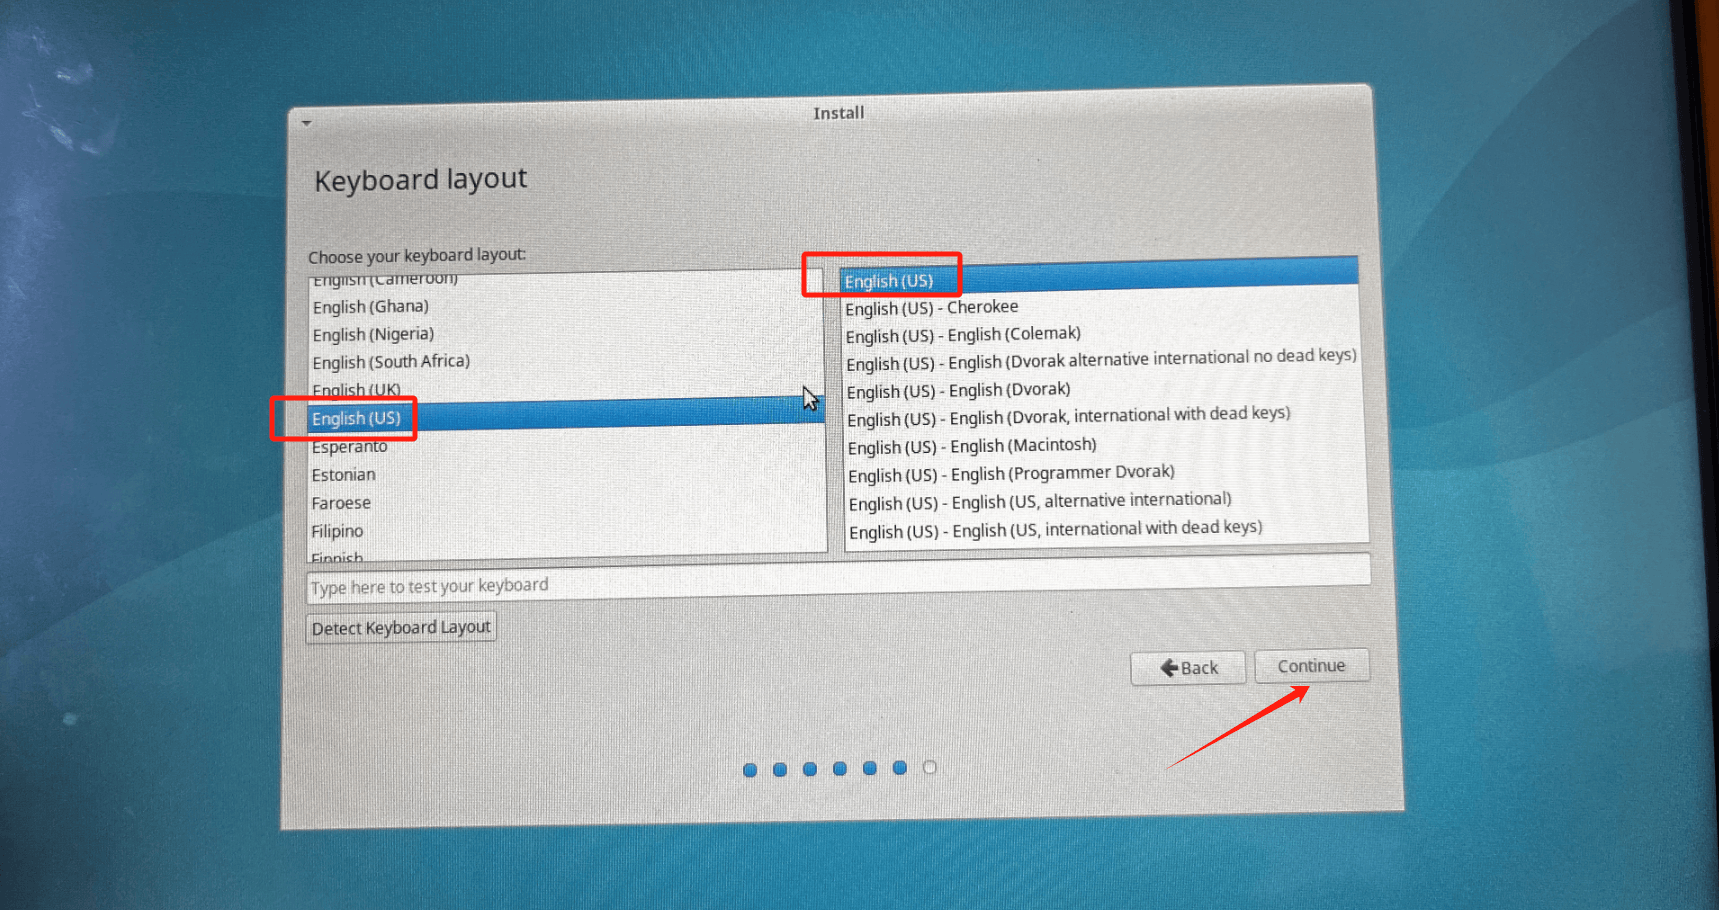
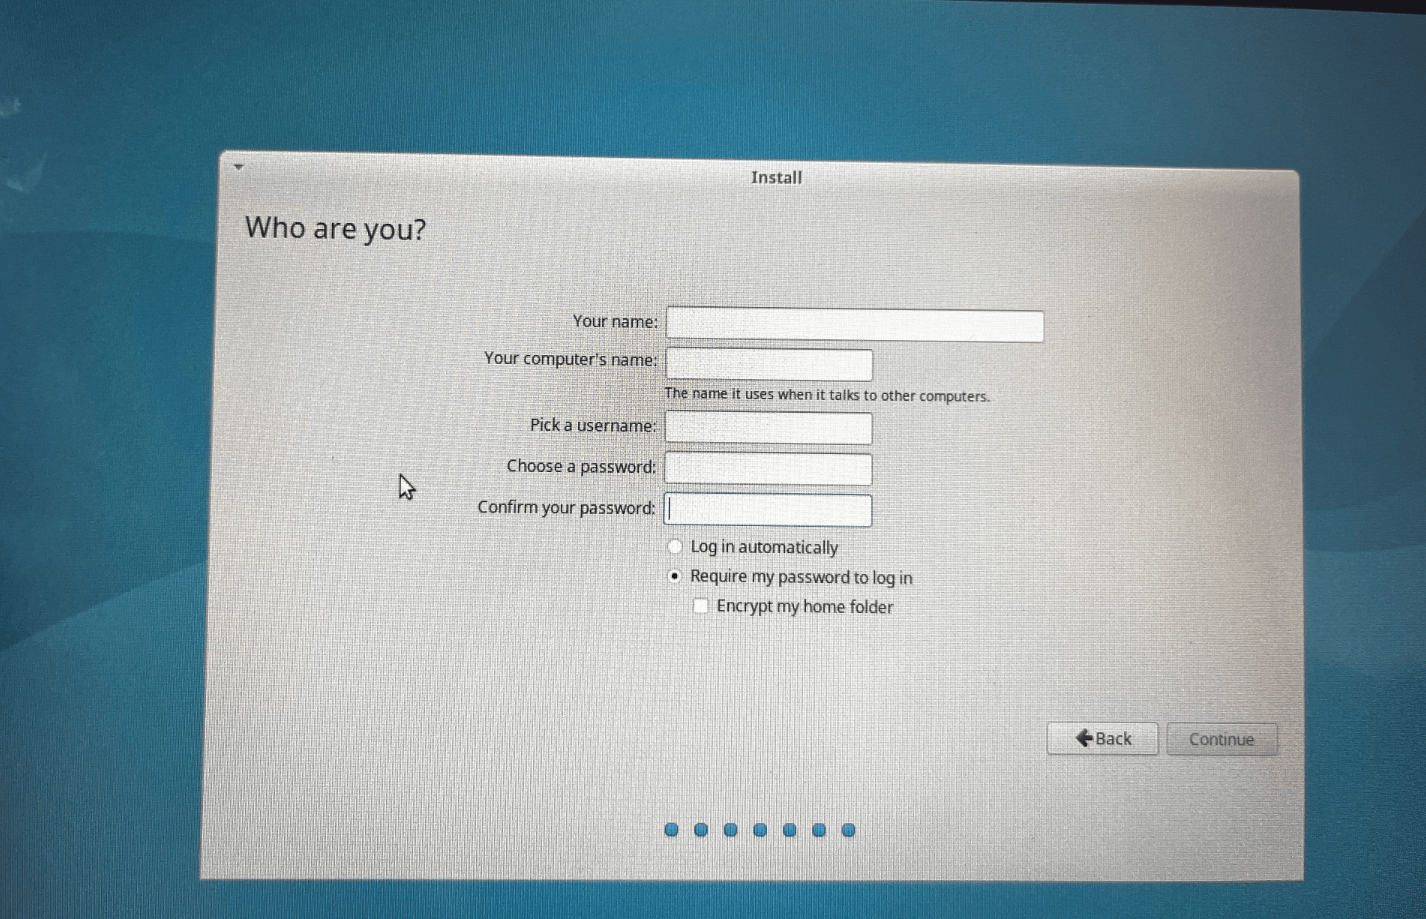
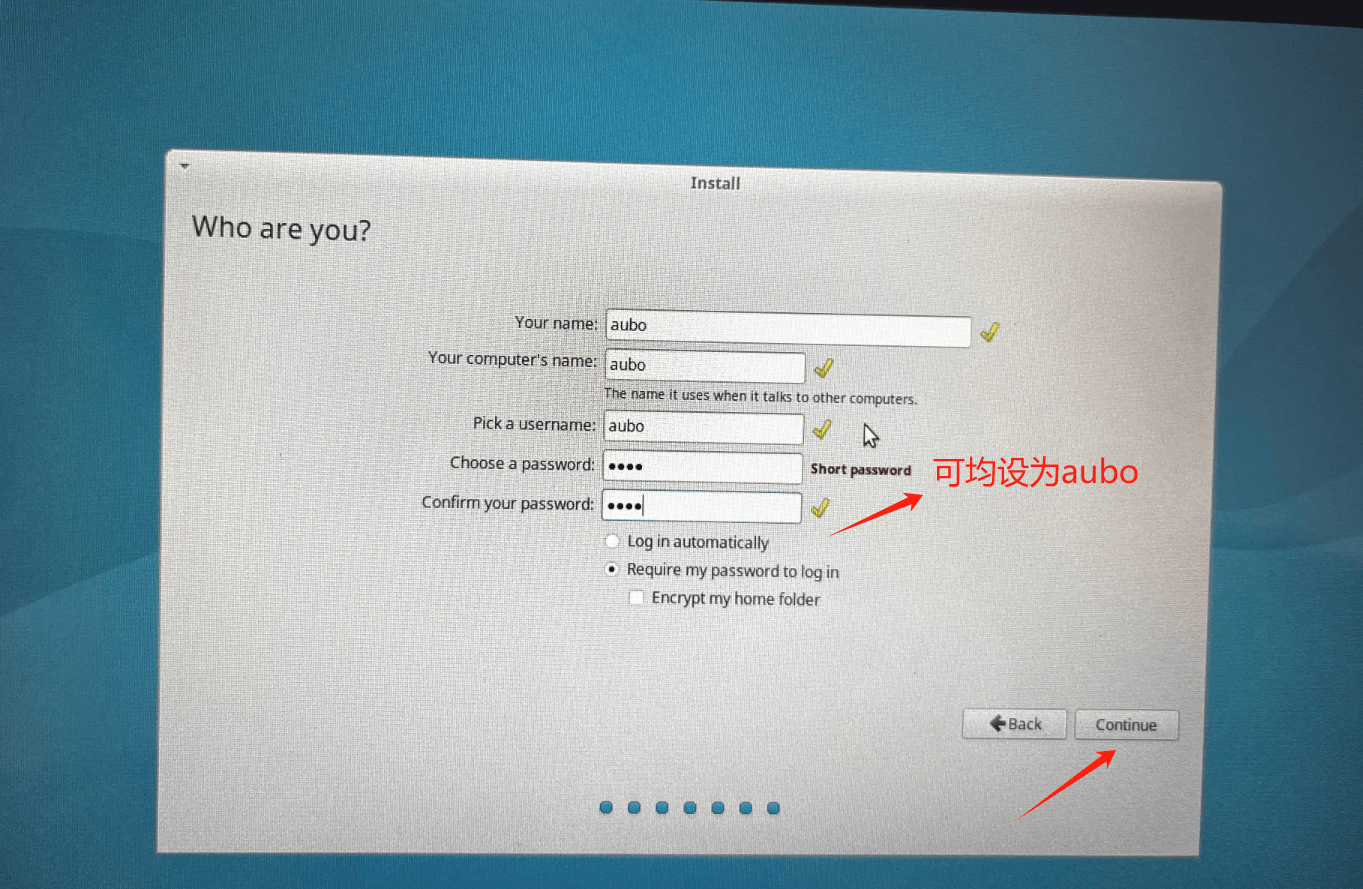
Your name, Your computer's name, Pick a username, Choose a password, and Confirm your password can all be set to aubo. After setting them, click Continue.
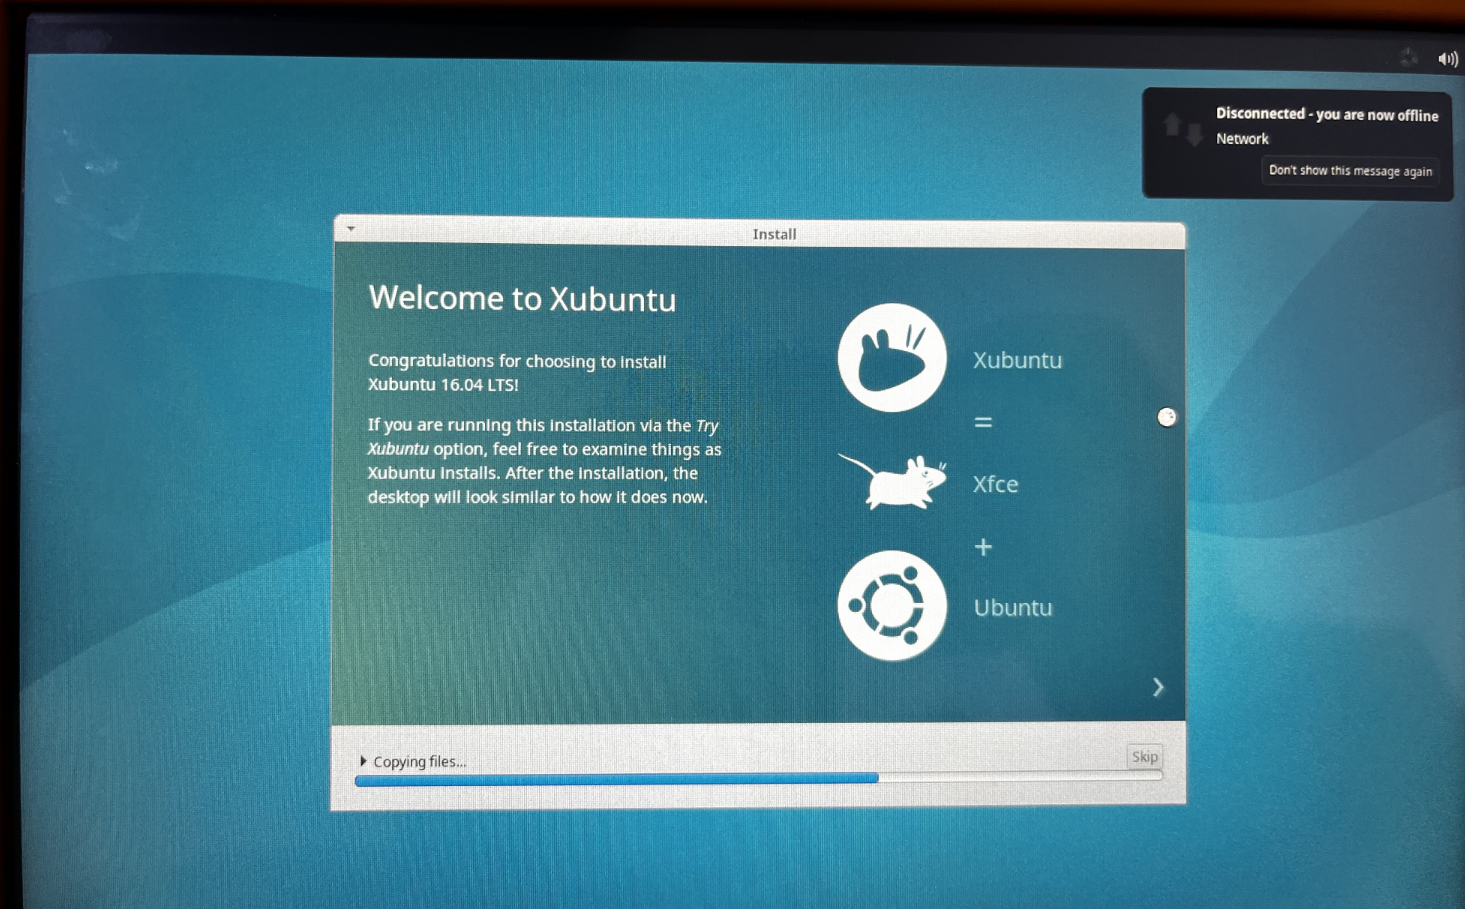
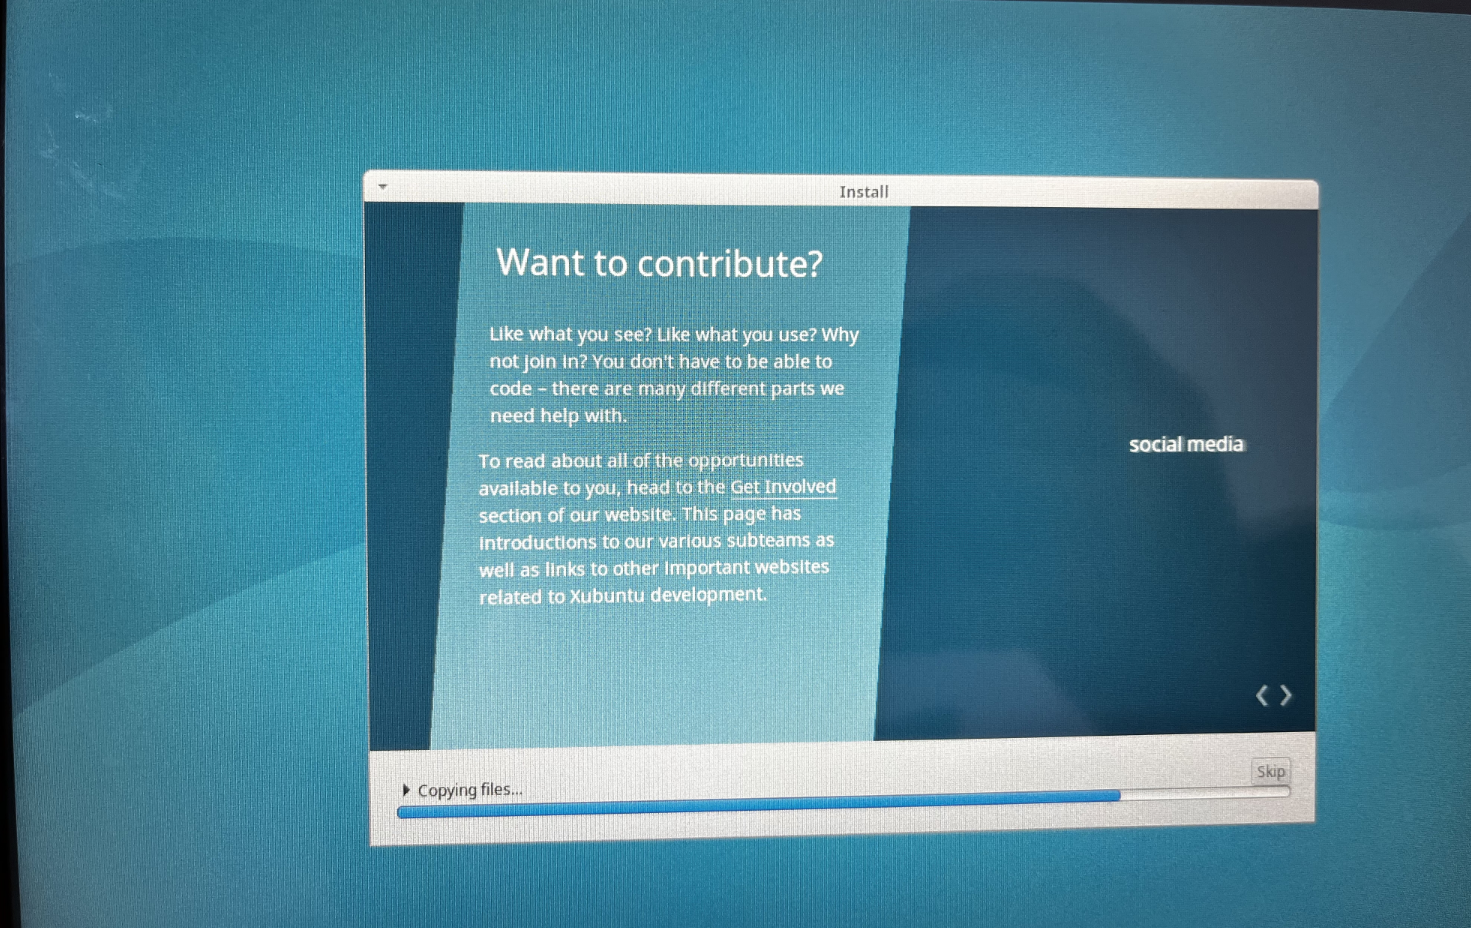
Wait for the xubuntu system installation to complete. If the screen turns off, tap the screen lightly.
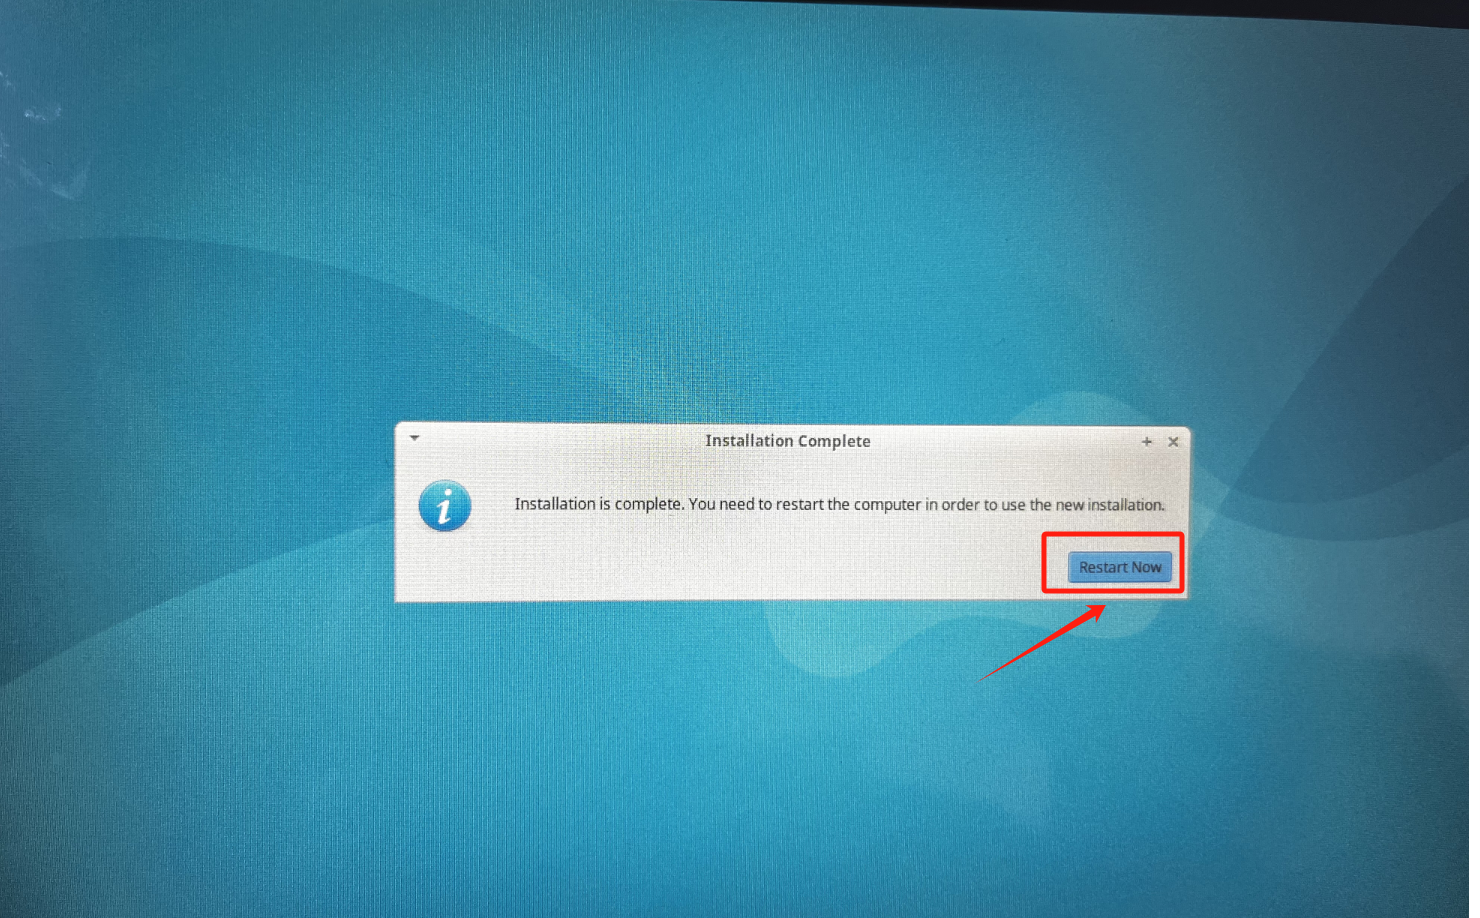
When the following image appears, click Restart Now; the teach pendant shuts down. Immediately unplug the USB drive from the control cabinet.
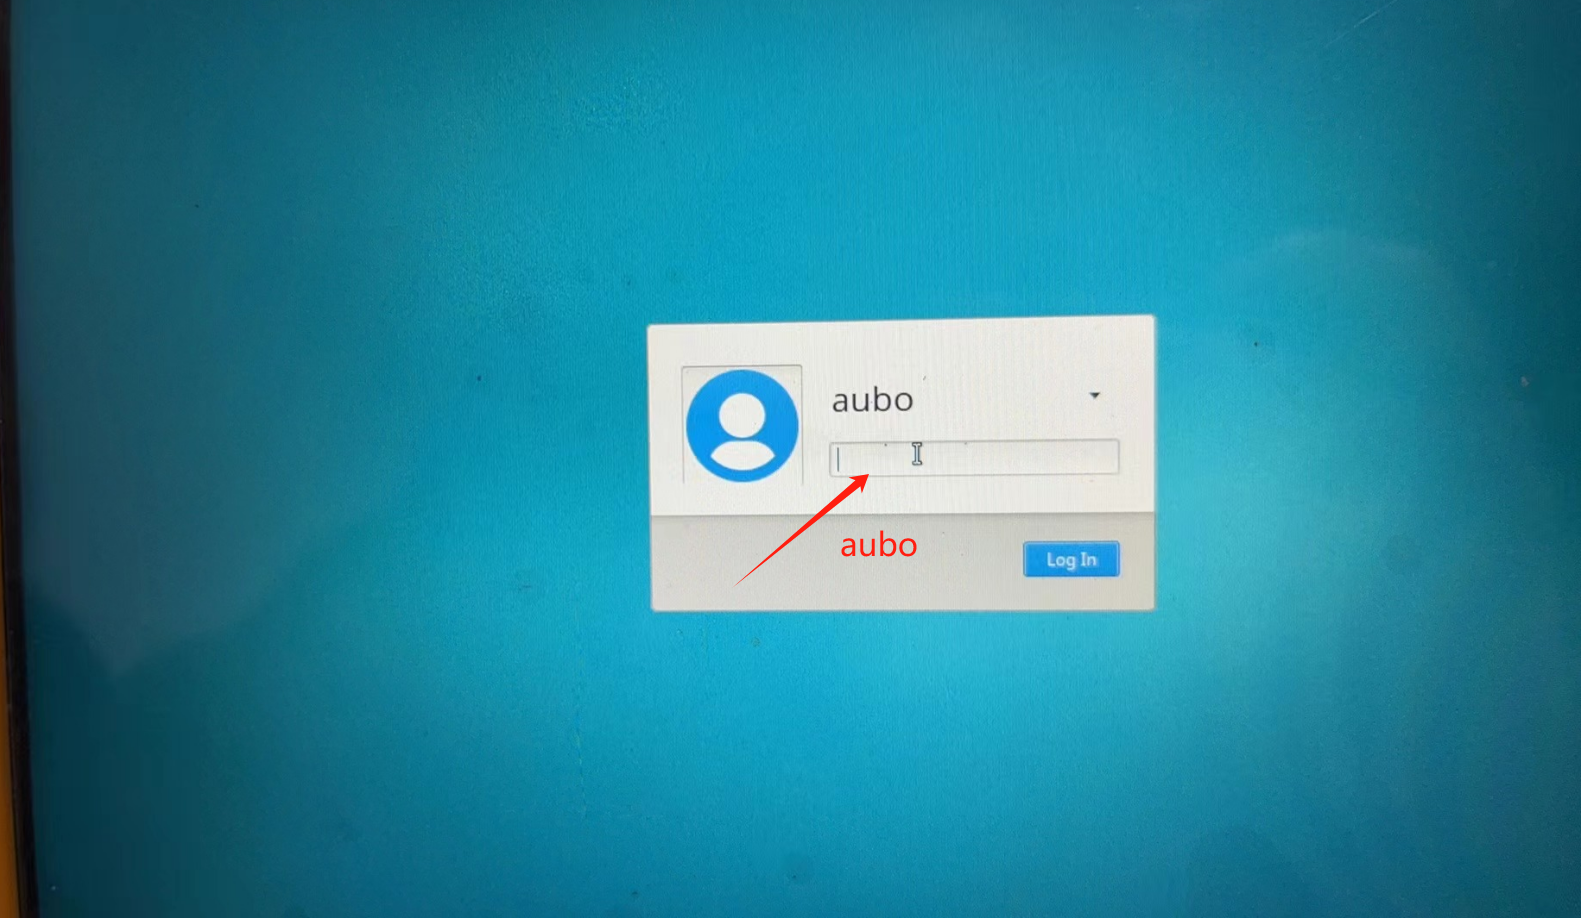
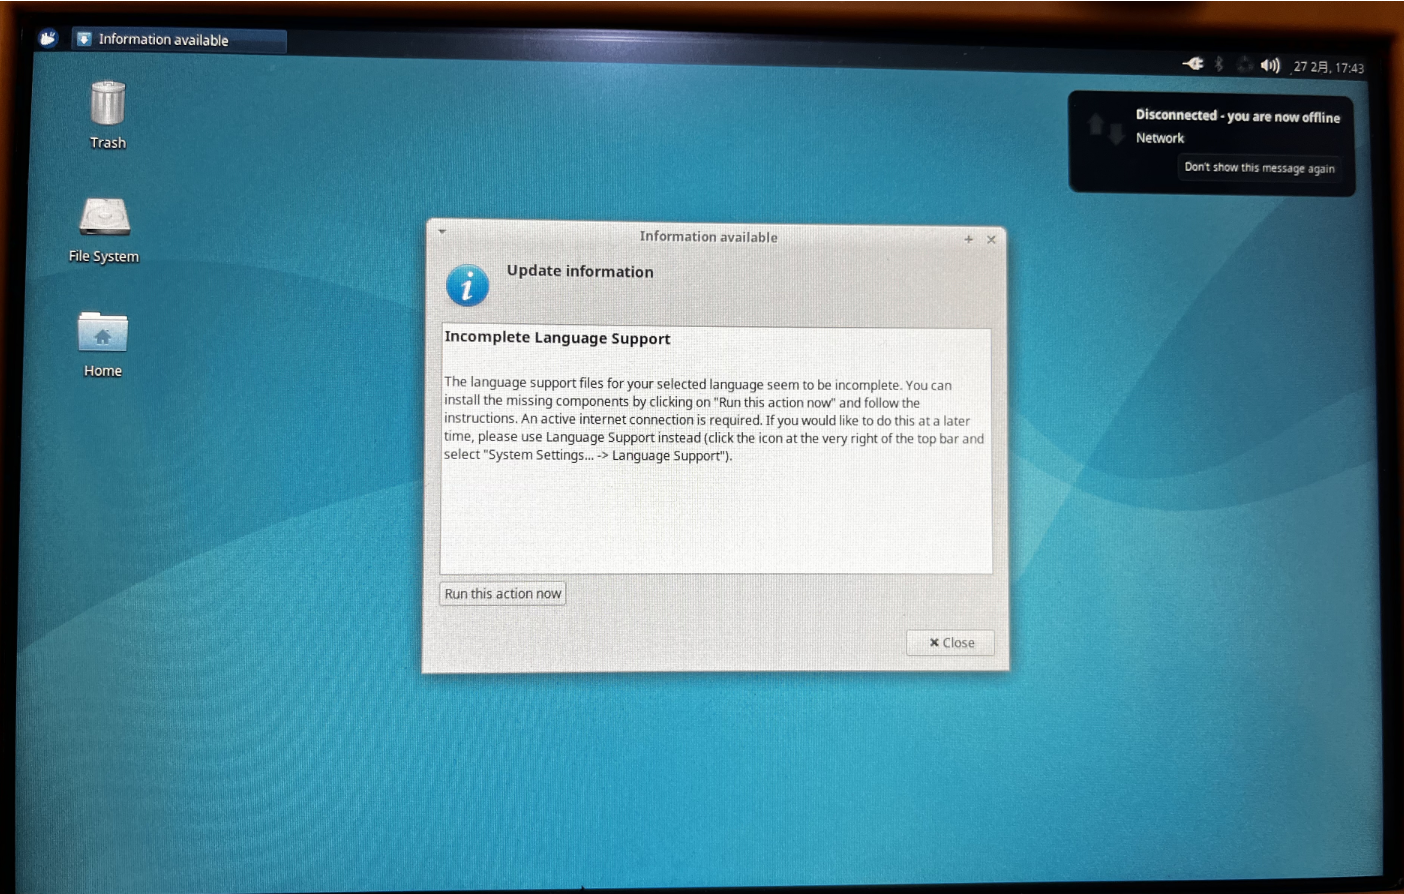
Start the teach pendant again and enter the login password aubo to enter the xubuntu interface and complete the xubuntu installation.
Installing xubuntu-22.04.3
1. Shut down the teach pendant, and plug the prepared USB boot drive into the control cabinet
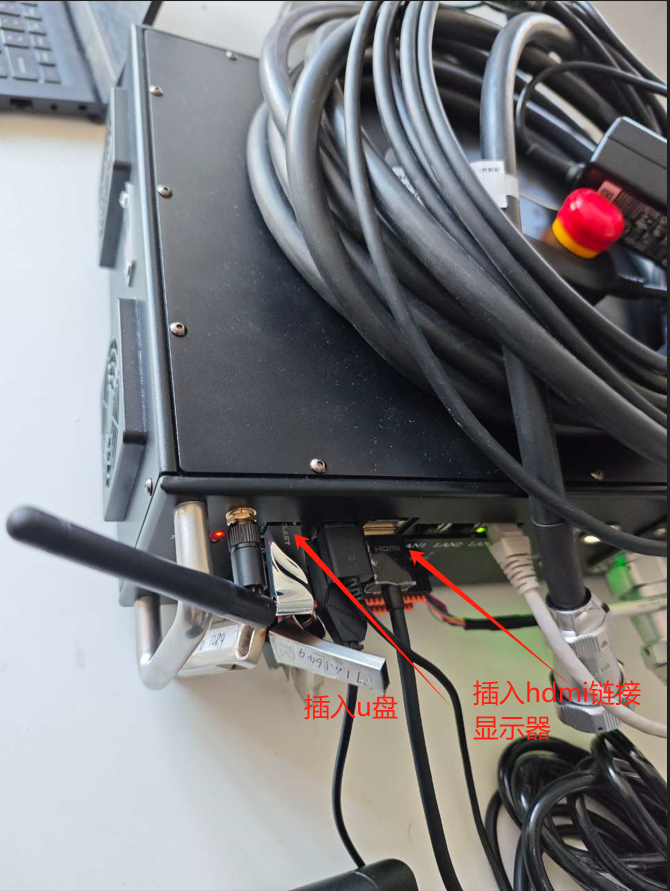
2. Plug in the keyboard and connect the monitor. When the following pattern appears on the monitor
immediately press the Delete key on the keyboard repeatedly until you enter the BIOS (different devices enter the BIOS in different ways).
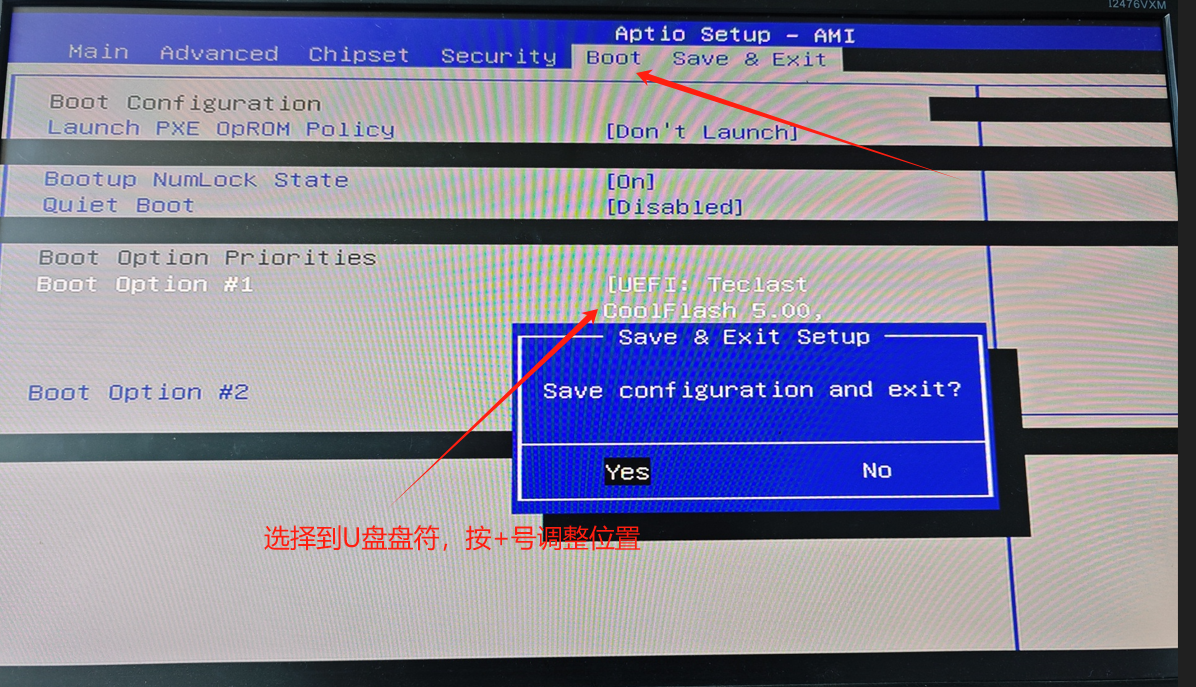
Switch to the Boot page, move to the position of the inserted USB drive name within Boot Option, and press the + key to adjust the boot position so that it is above the system drive. Press F4 on the keyboard and select yes to save and exit.
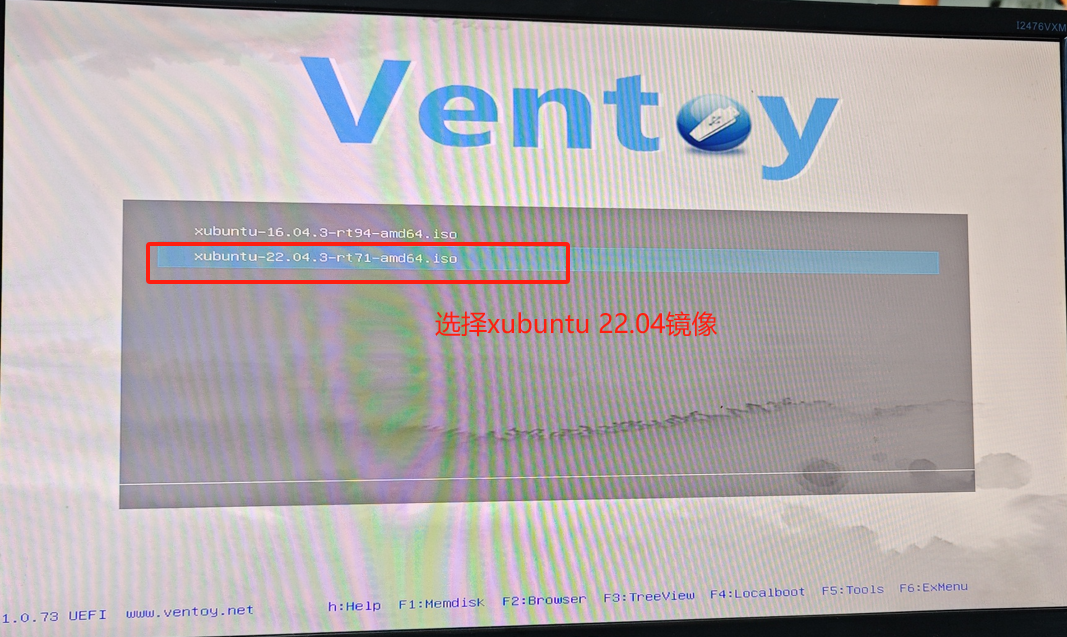
3. Install xubuntu
Start the teach pendant again, select xubuntu-22.04.3-rt71-amd64.iso, and press Enter to install the xubuntu system.
The installation process is as follows:
Select Install Xubuntu
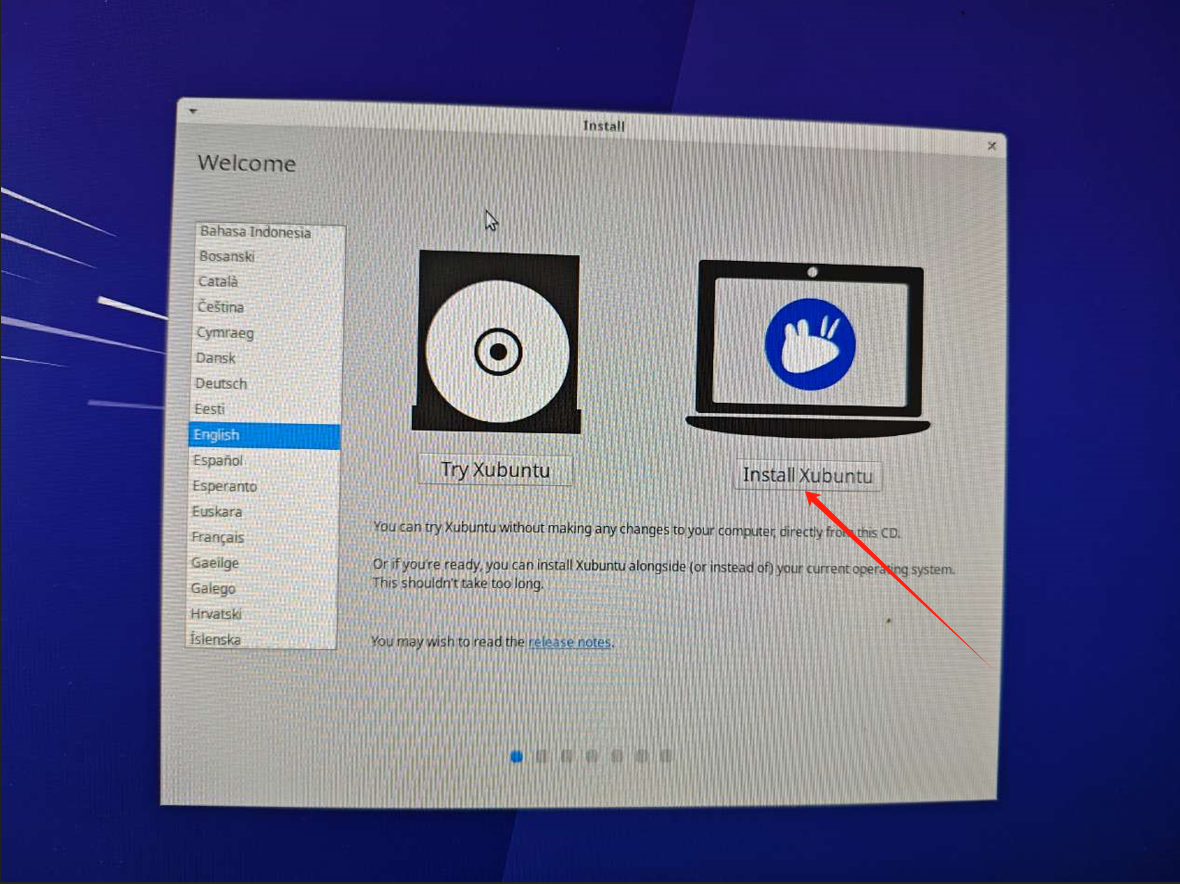
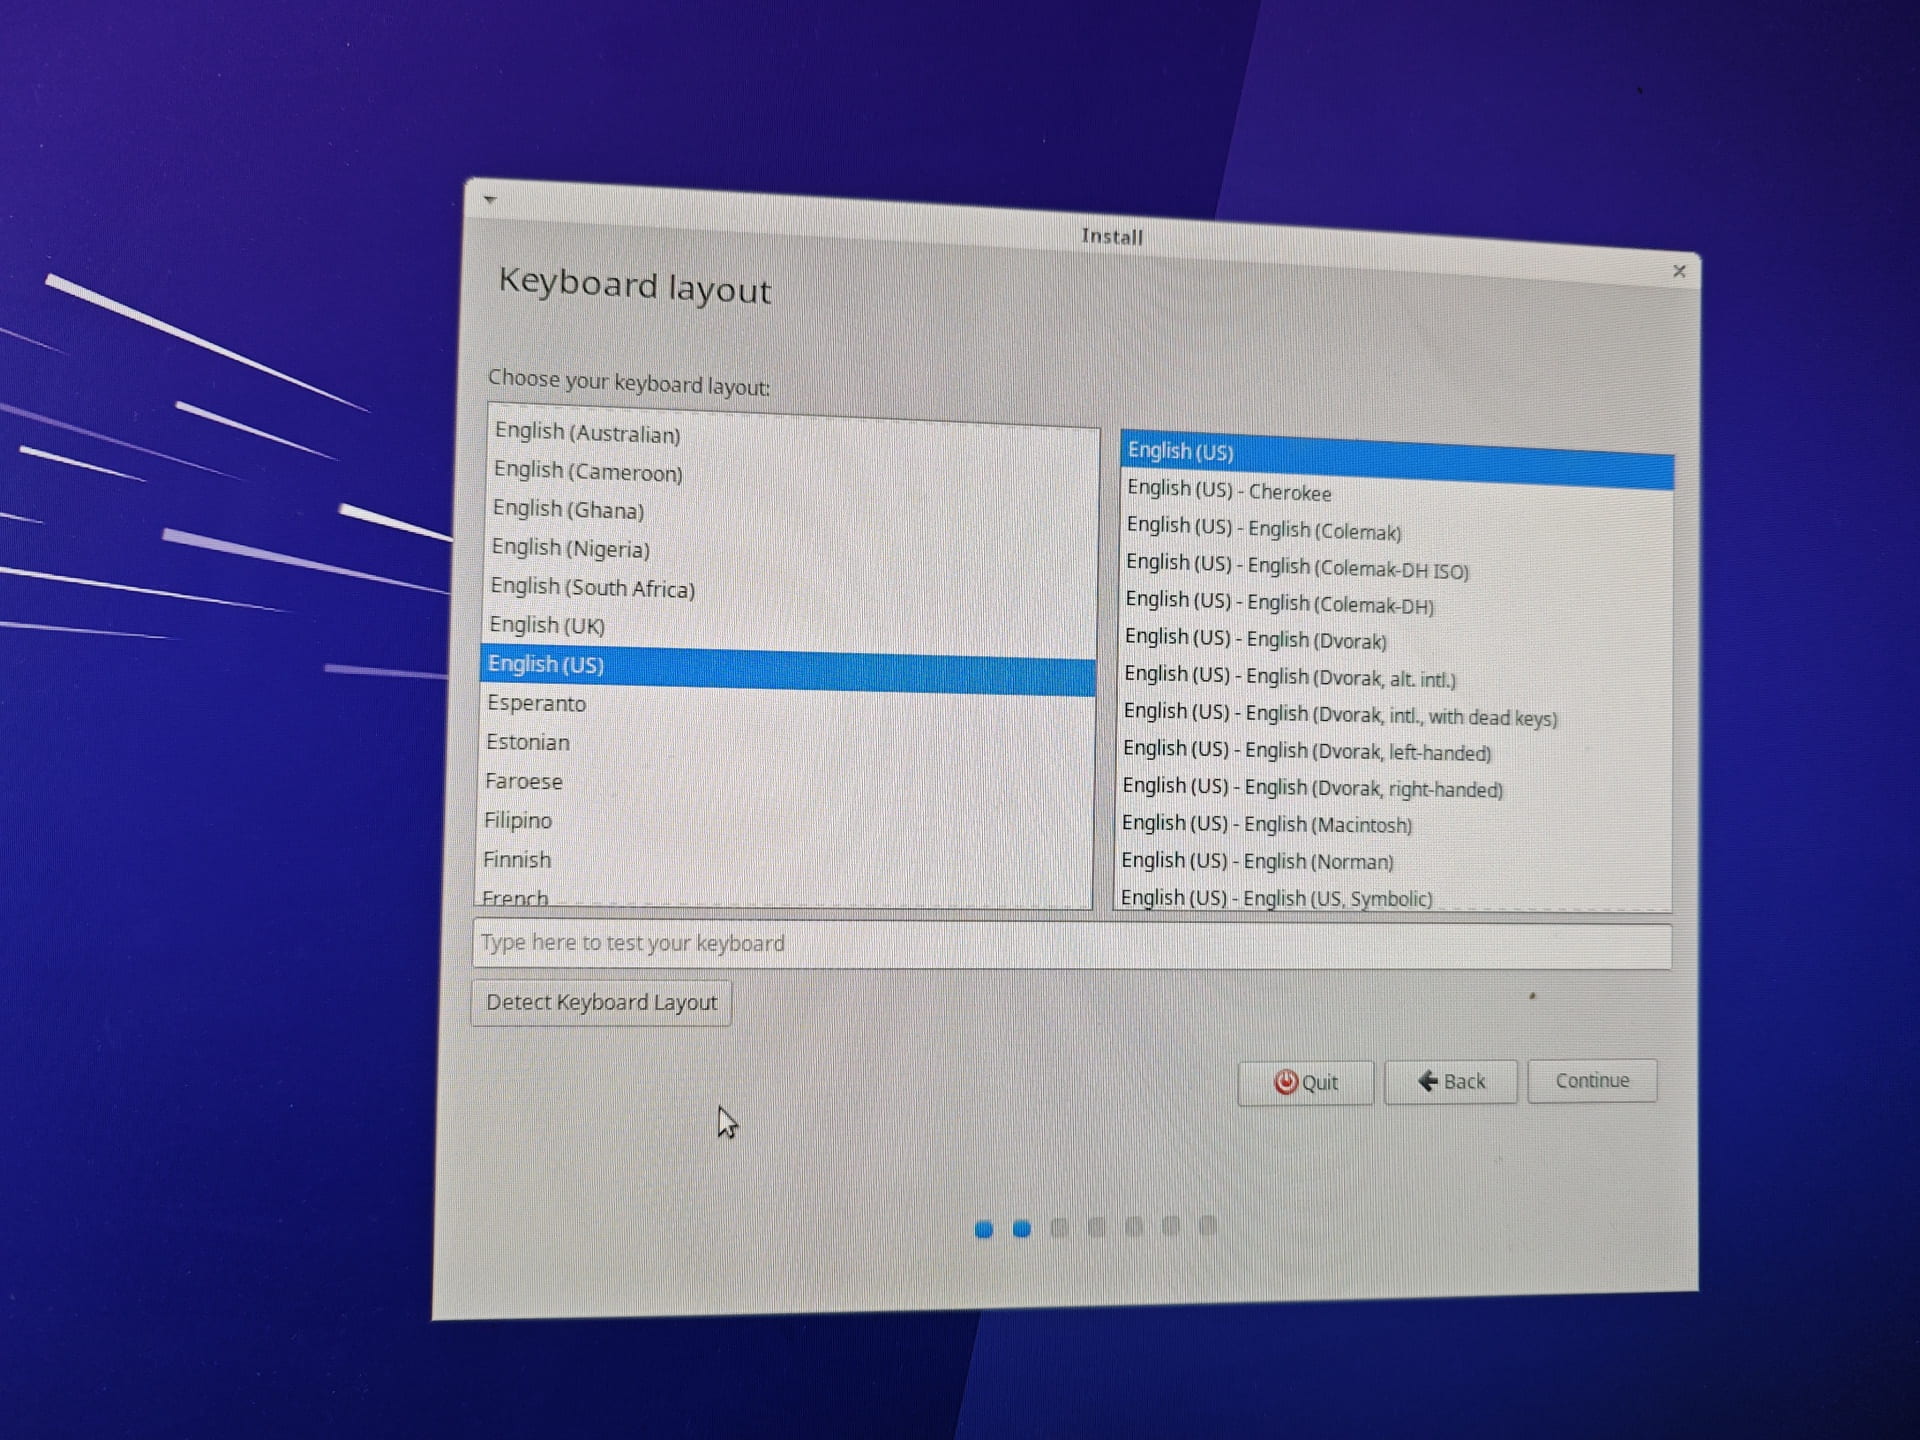
Select the English language and click continue.
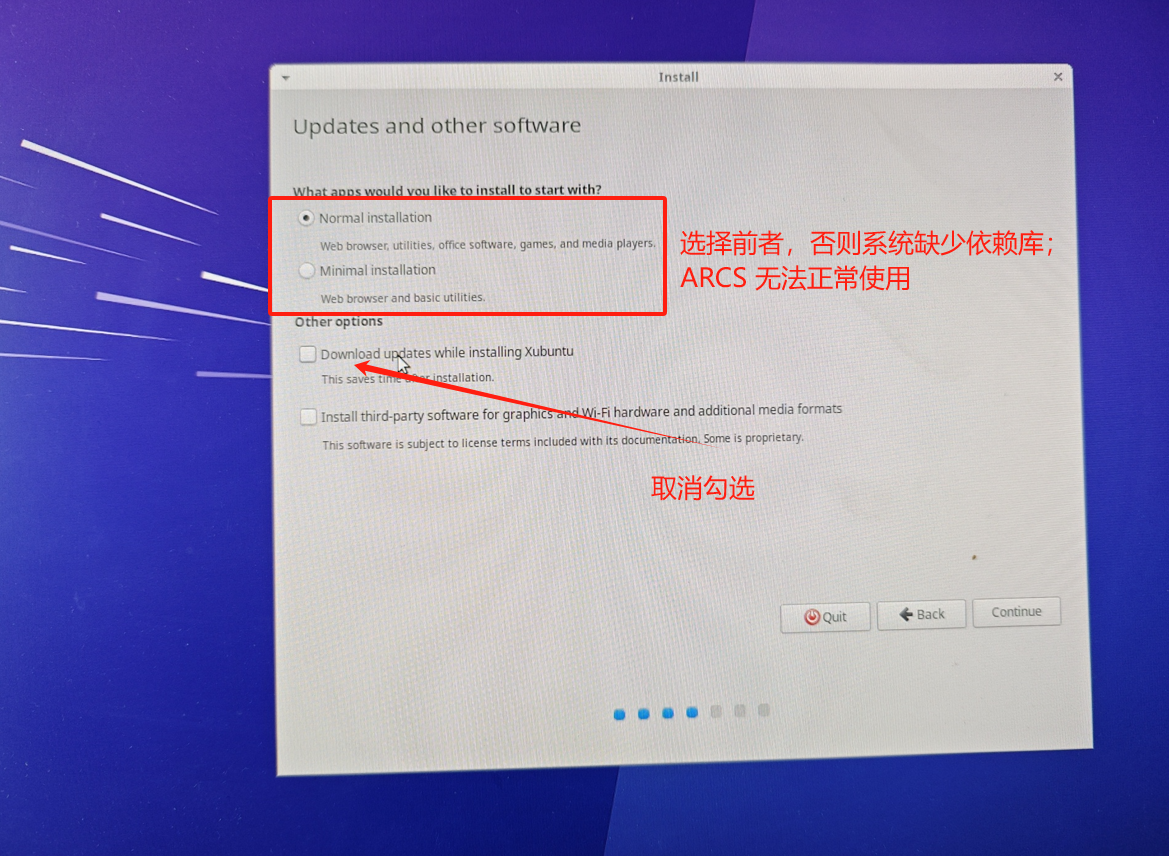
Select Normal installation to install, otherwise missing dependency libraries may occur;
Deselect Download updates while installing xubuntu to speed up the installation, and click continue.
Select Erase disk and install Xubuntu and click continue.
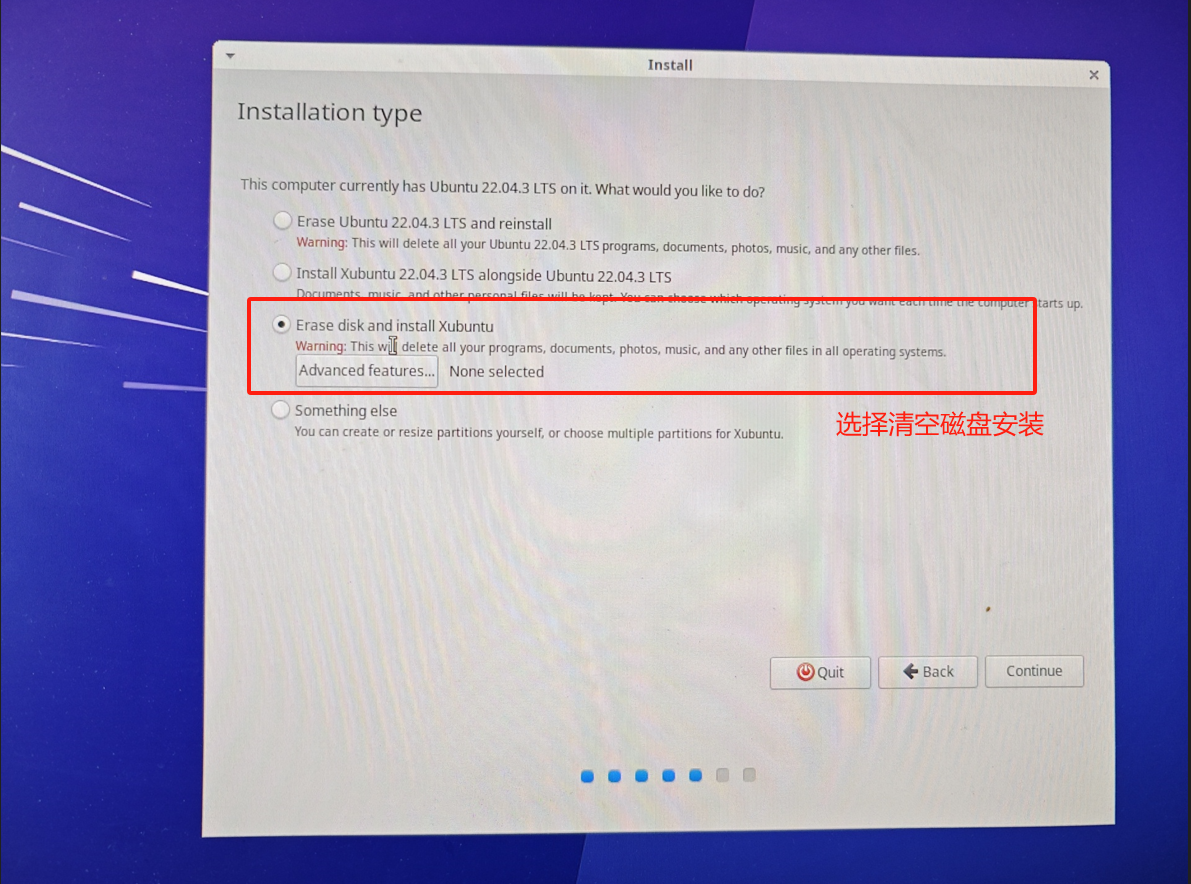
Note: Here select to install the system on the control cabinet hard drive, not on the inserted USB drive.
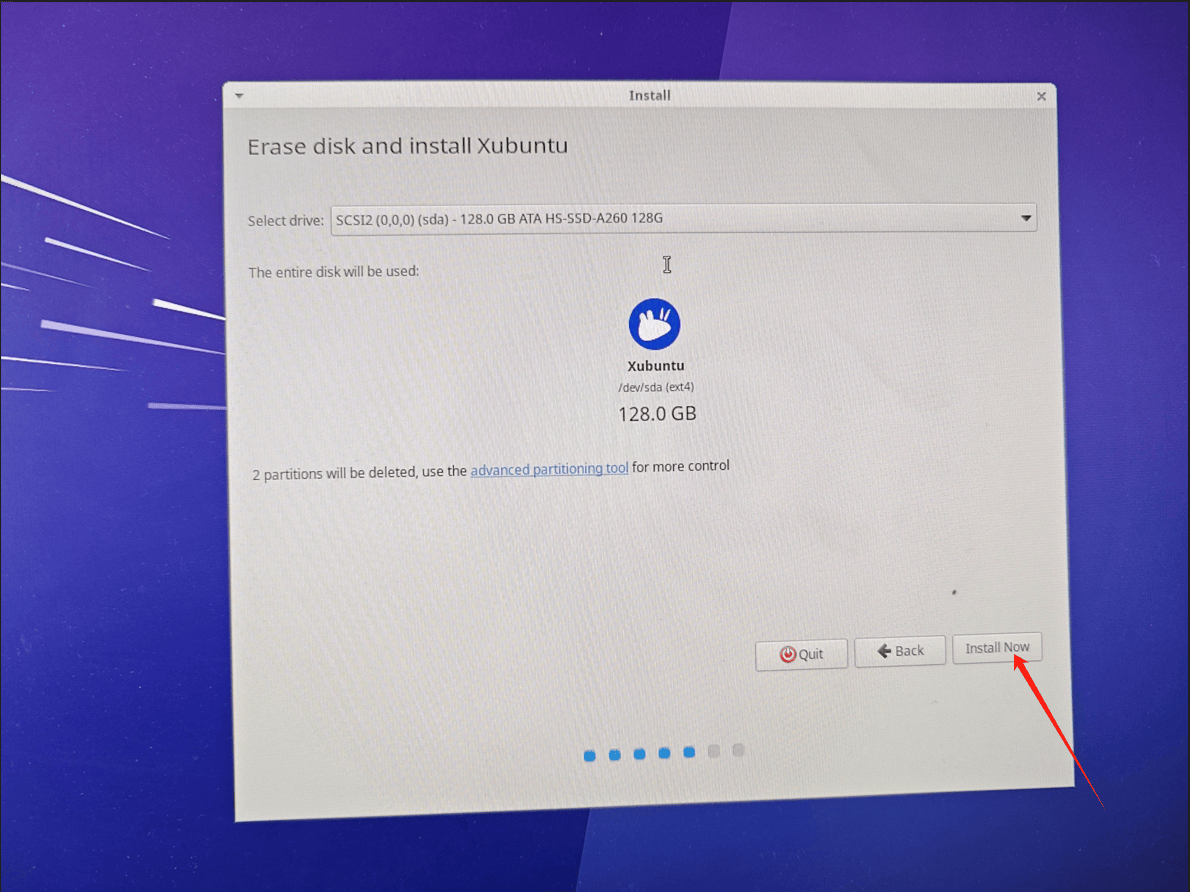
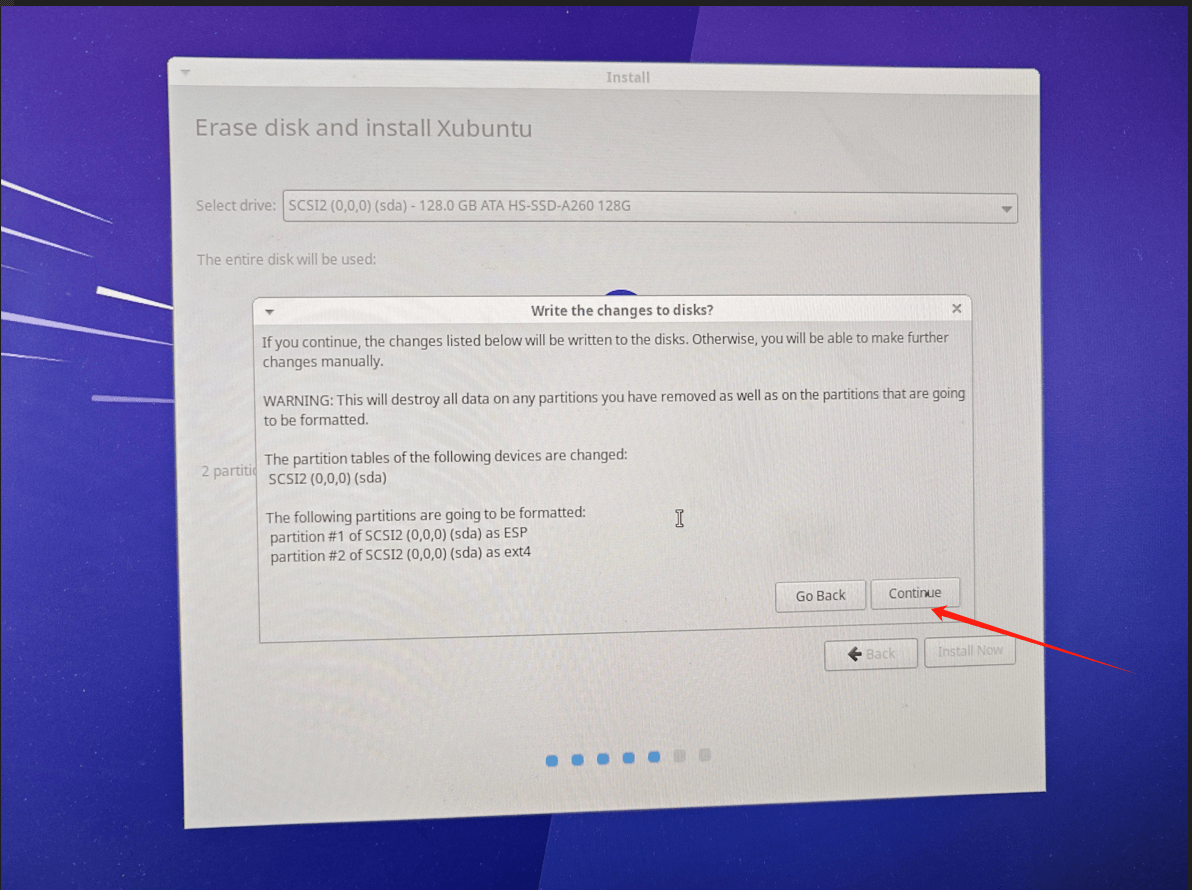
Click continue.
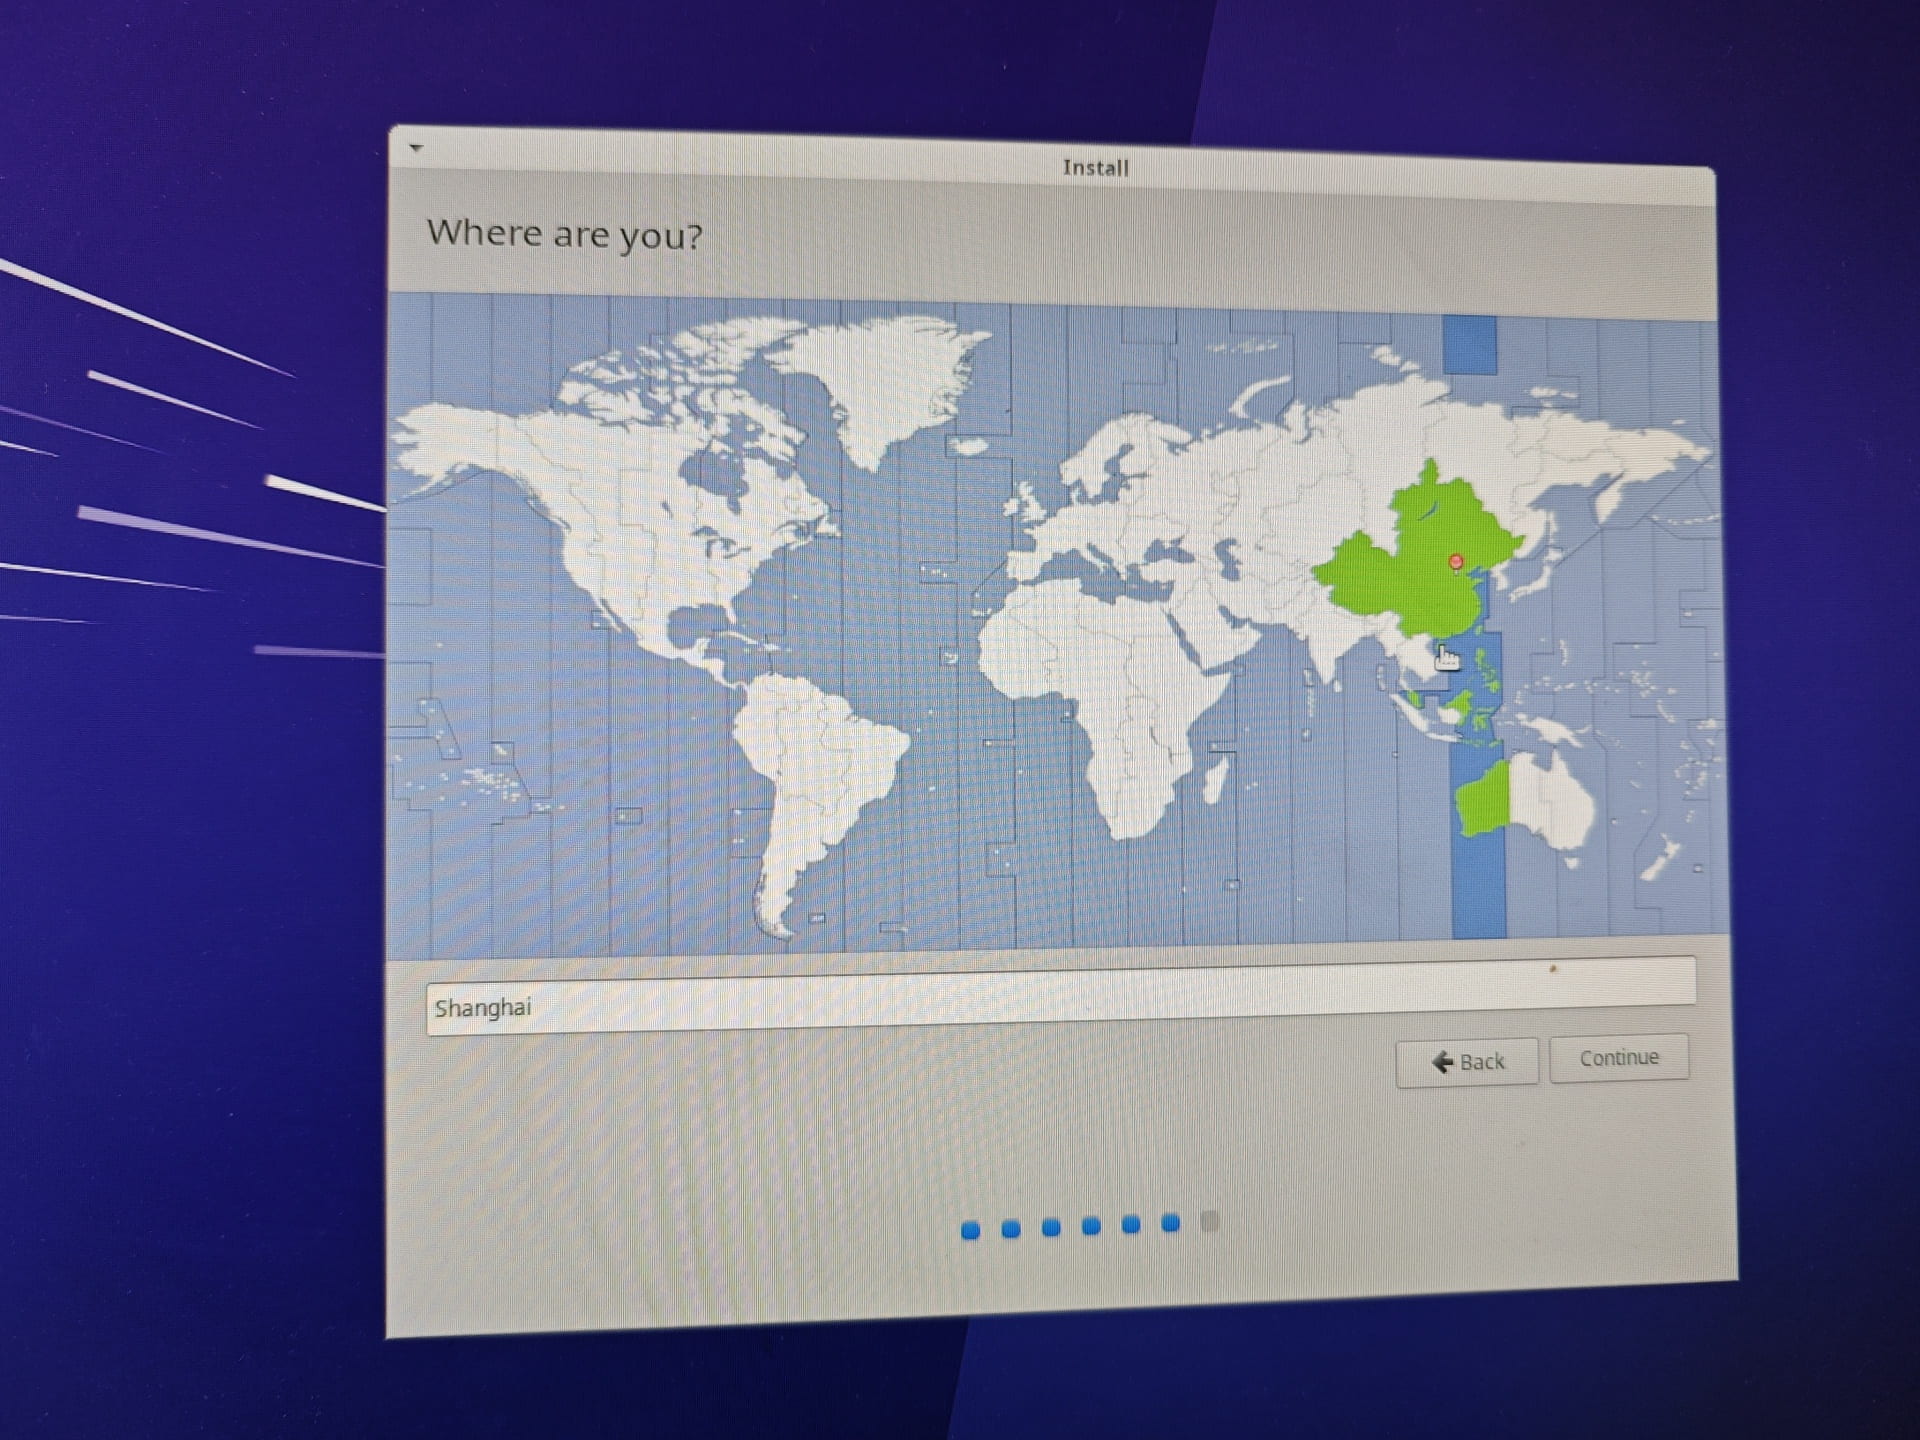
Select the region and click Continue.
Your name, Your computer's name, Pick a username, Choose a password, and Confirm your password can all be set to aubo. After setting them, click Continue.
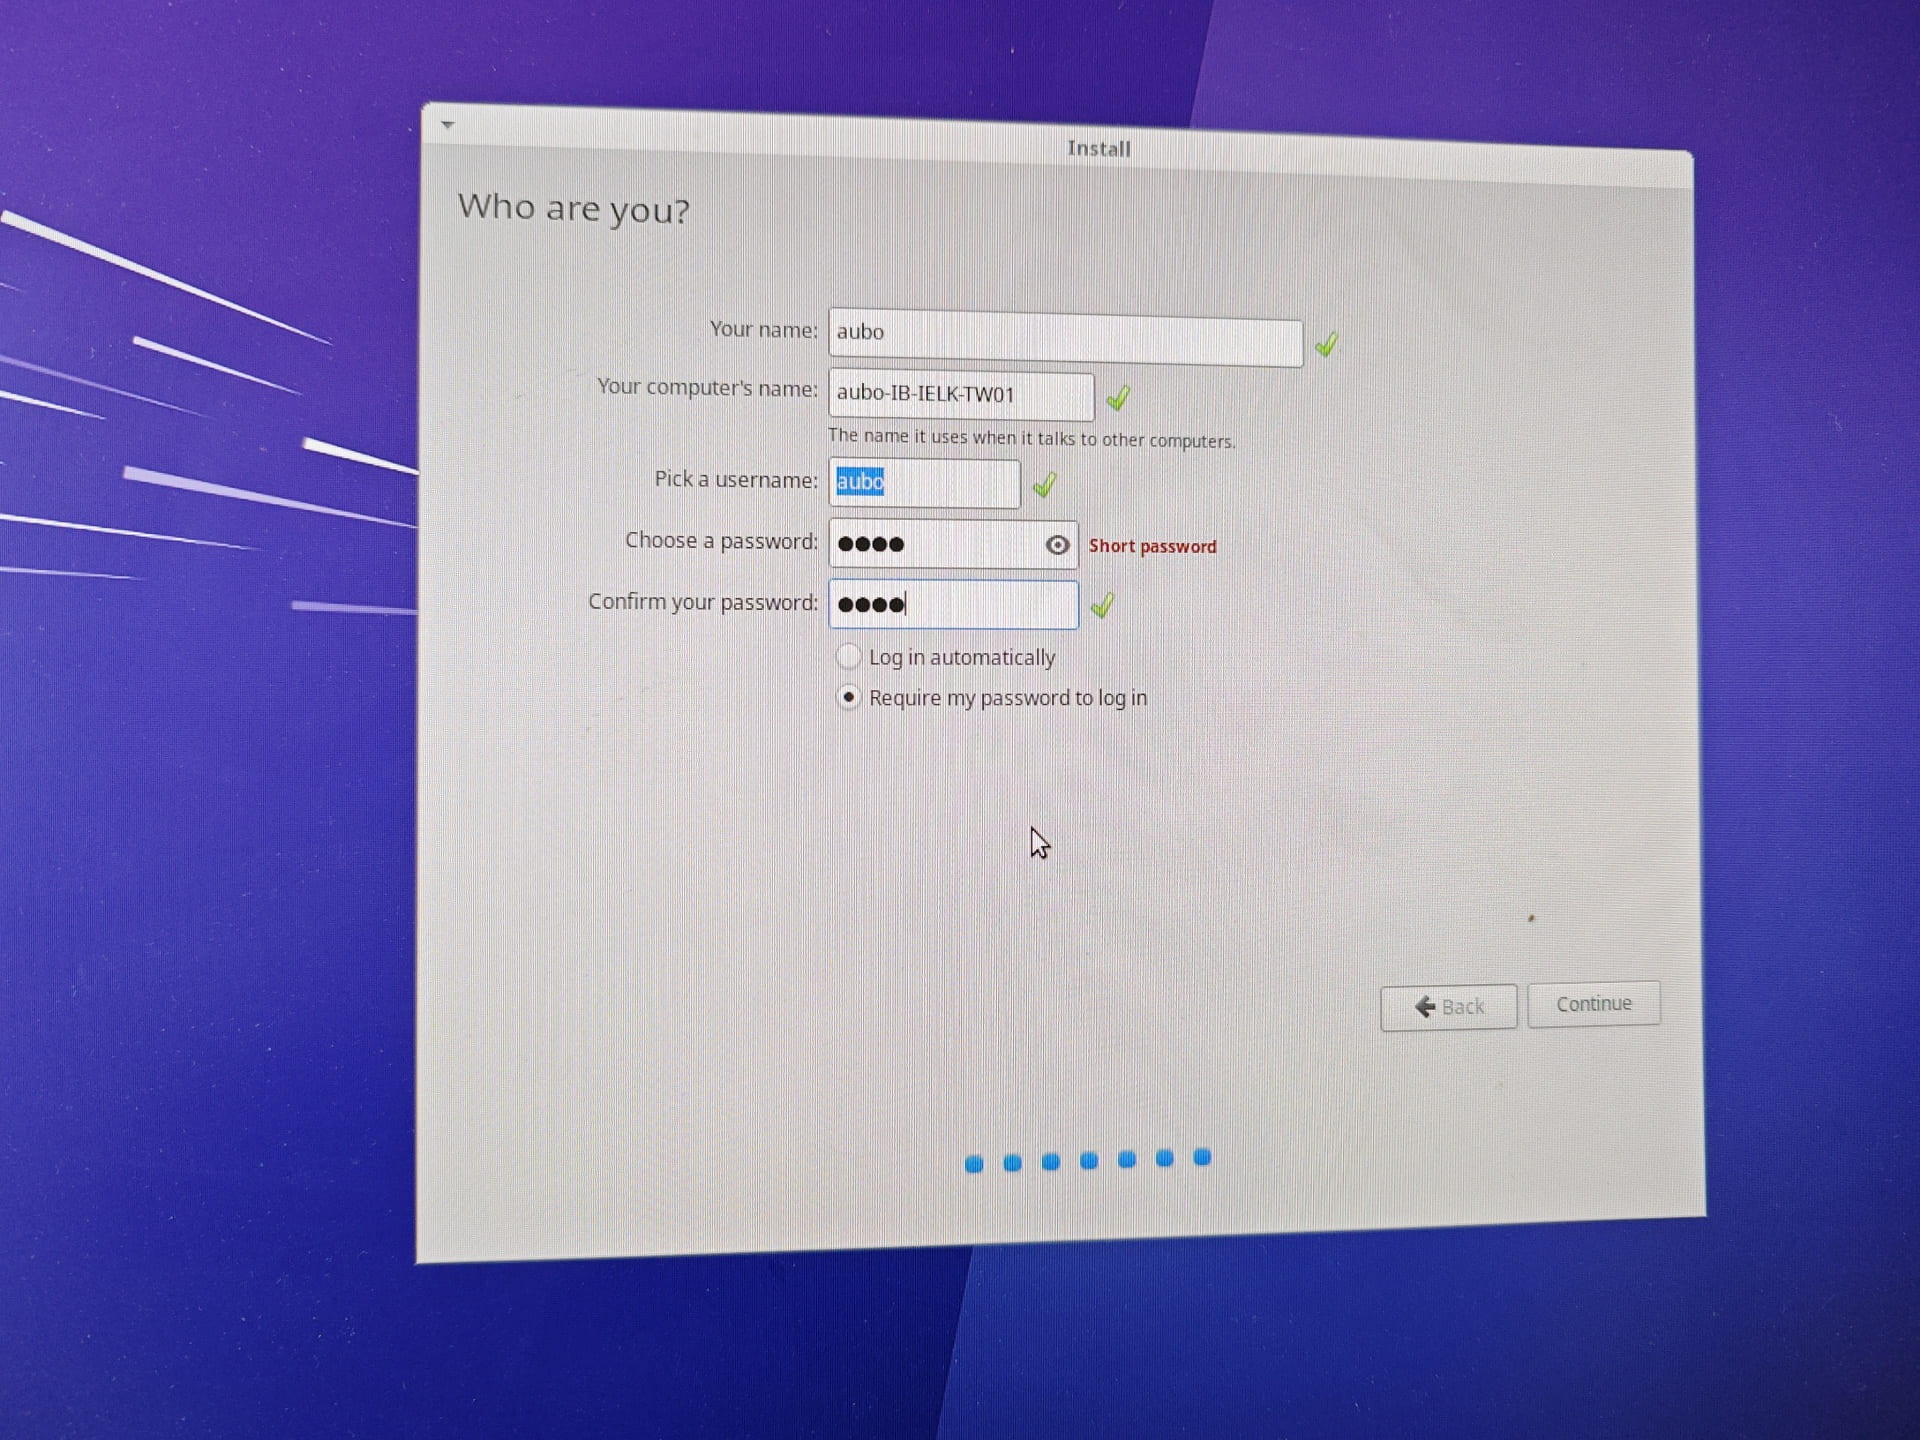
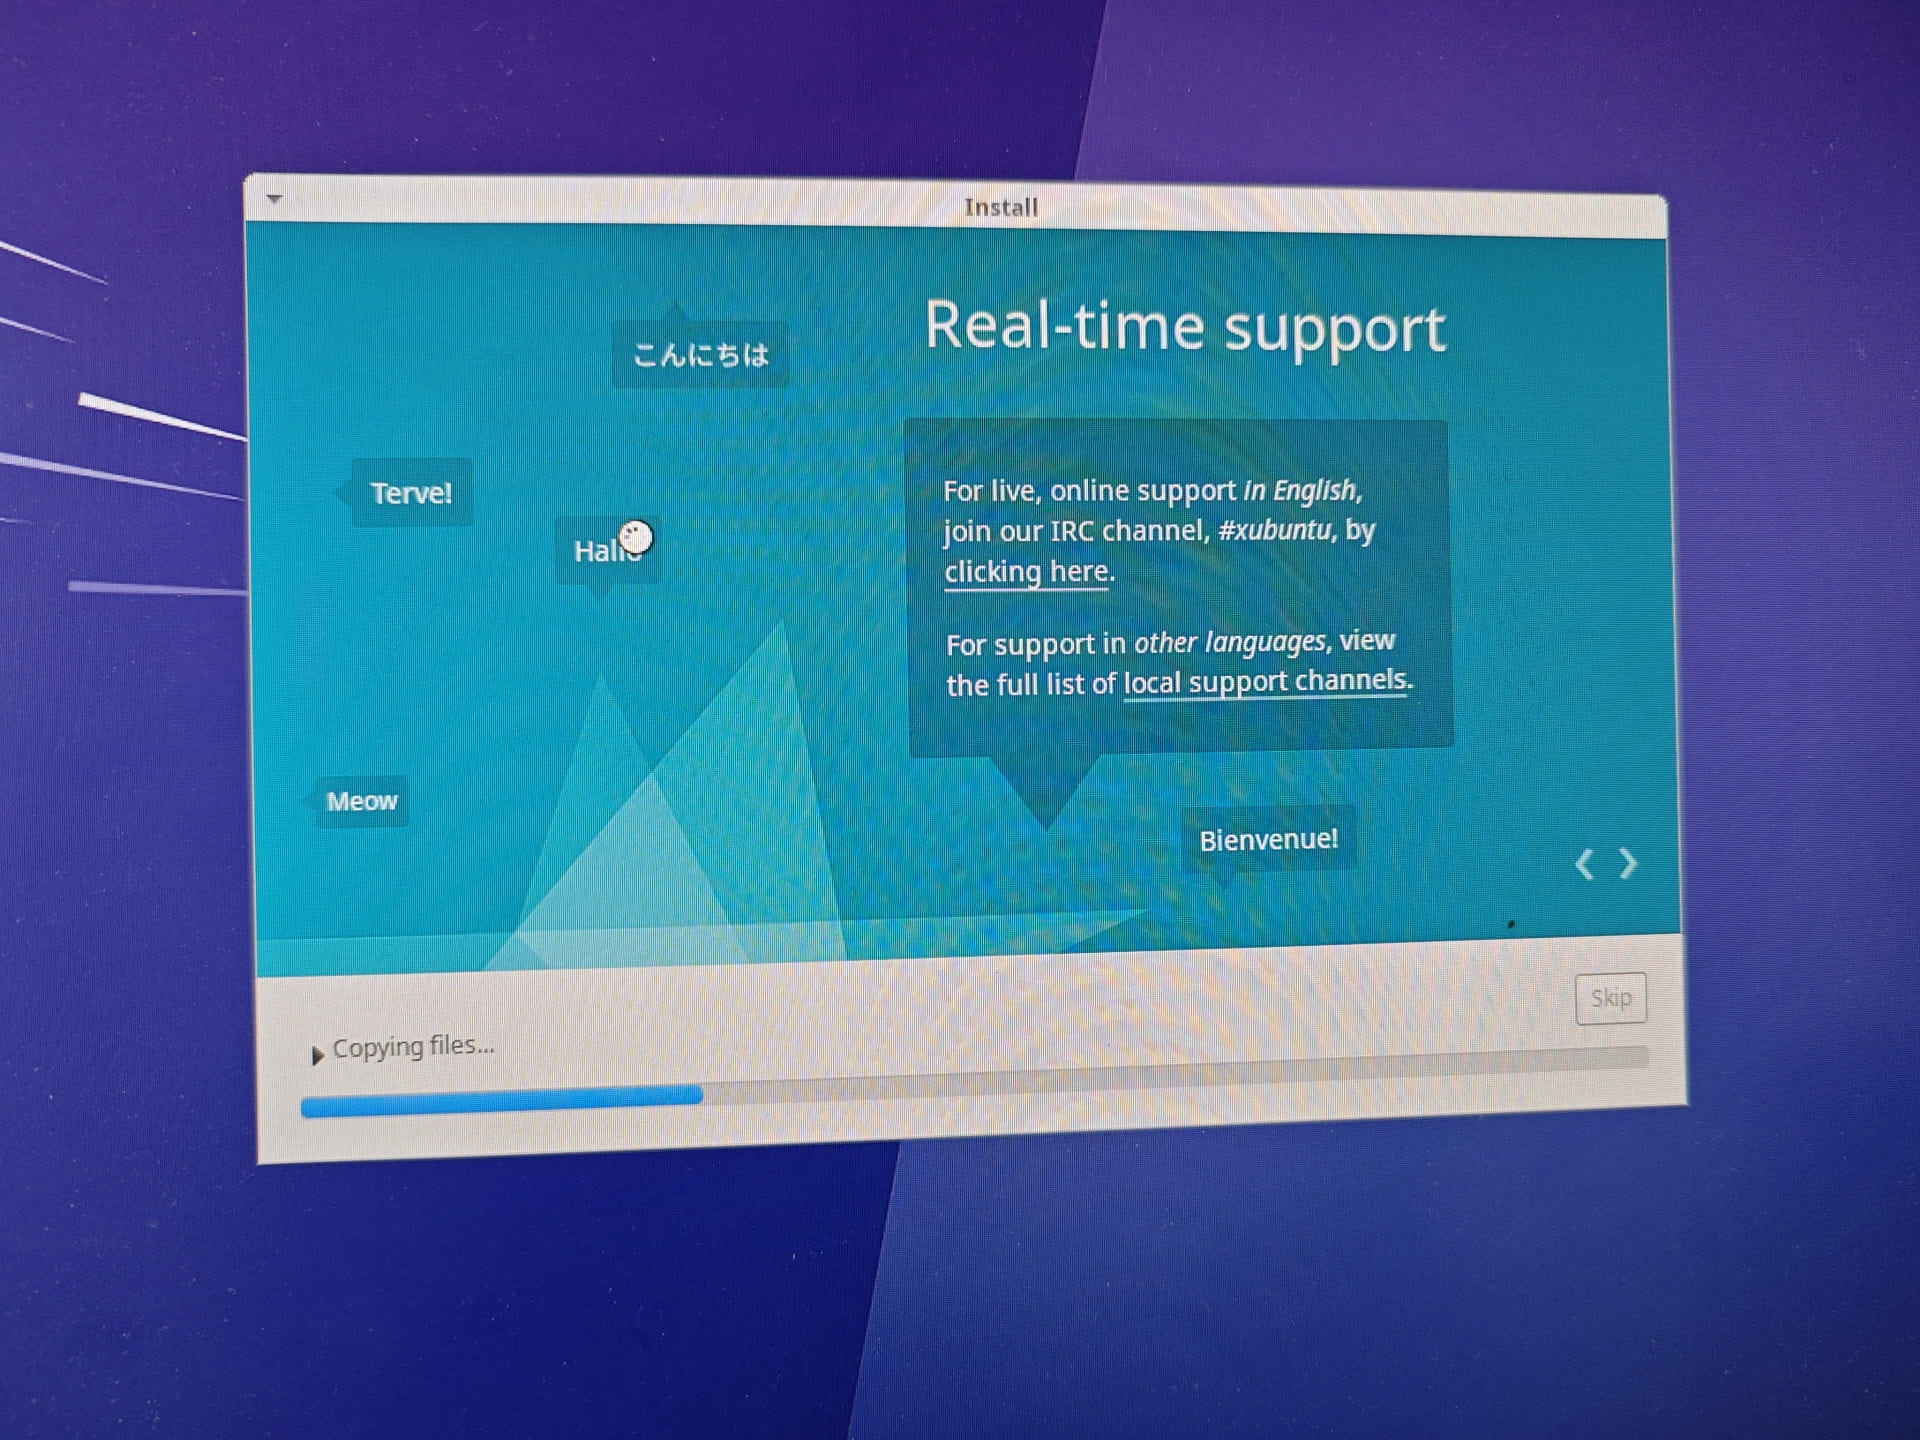
Wait for the xubuntu system installation to complete. If the screen turns off, tap the screen lightly.
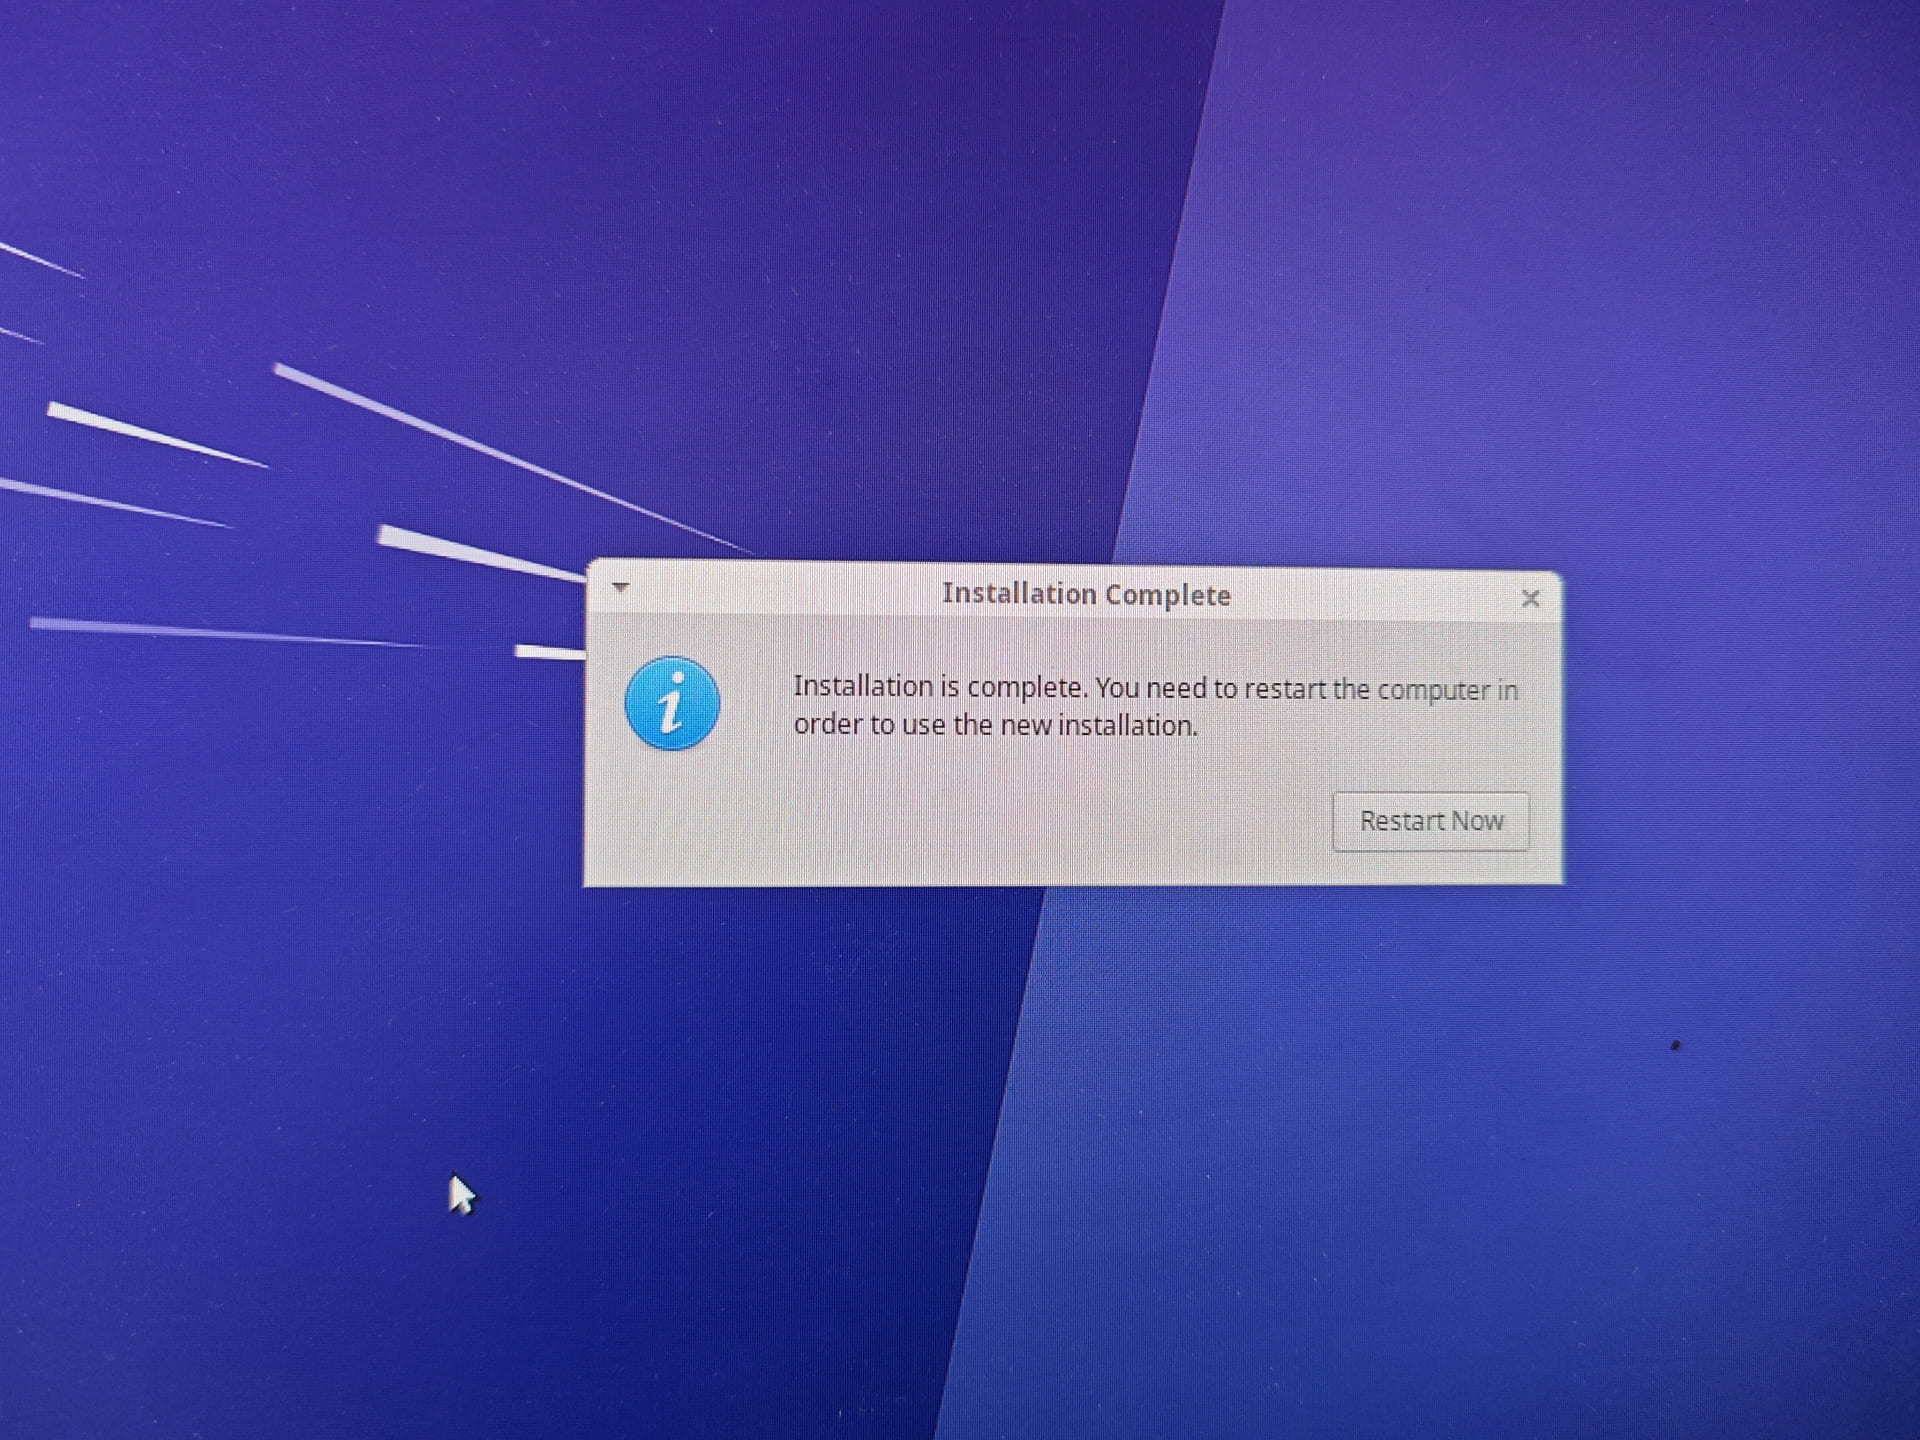
When the following image appears, click Restart Now; the teach pendant shuts down. Immediately unplug the USB drive from the control cabinet.
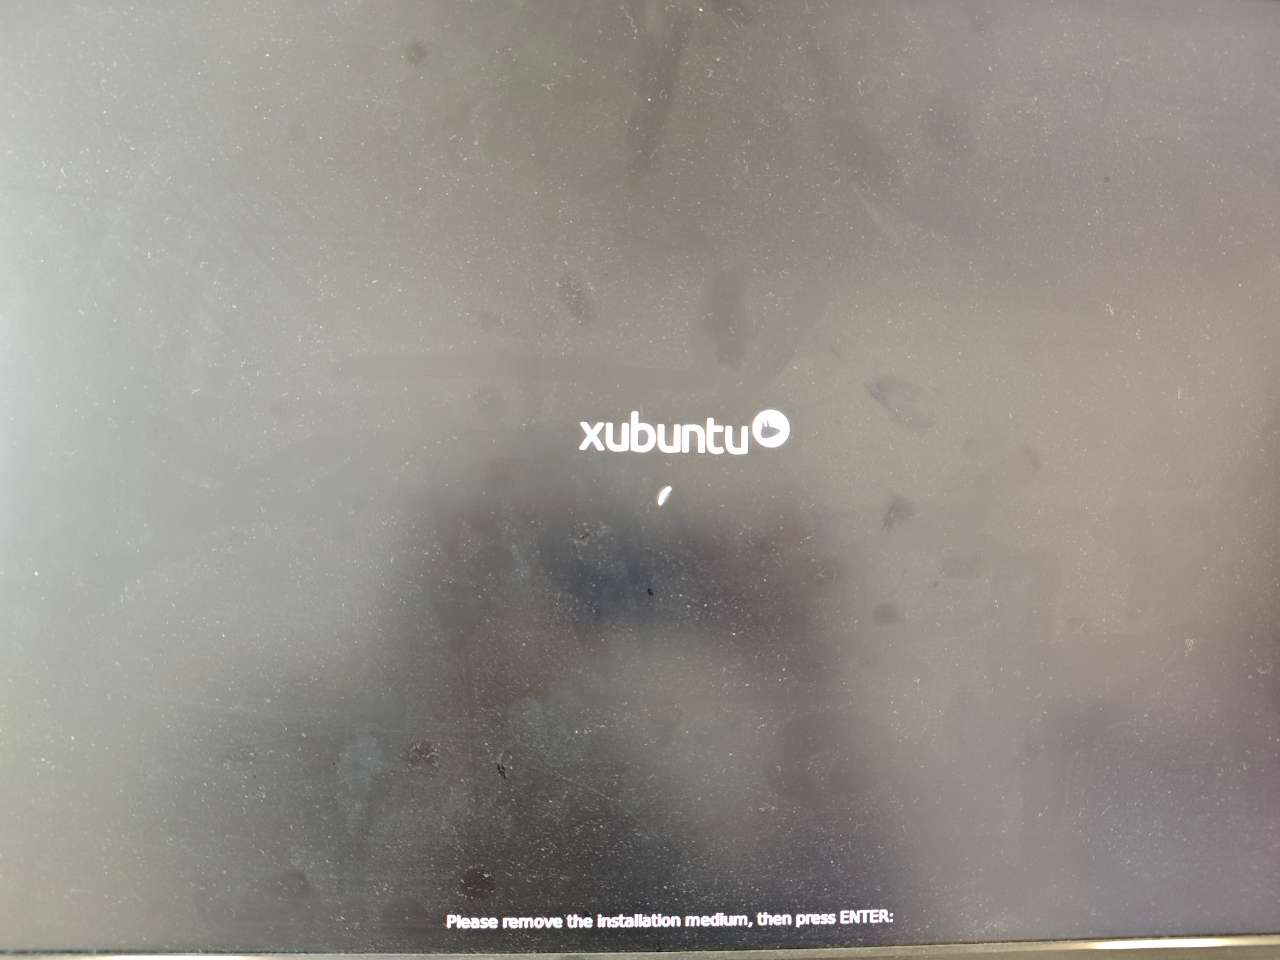
Click the screen and press Enter to enter the system.
Start the teach pendant again and enter the login password aubo to enter the xubuntu interface and complete the xubuntu installation.
3. Environment Deployment
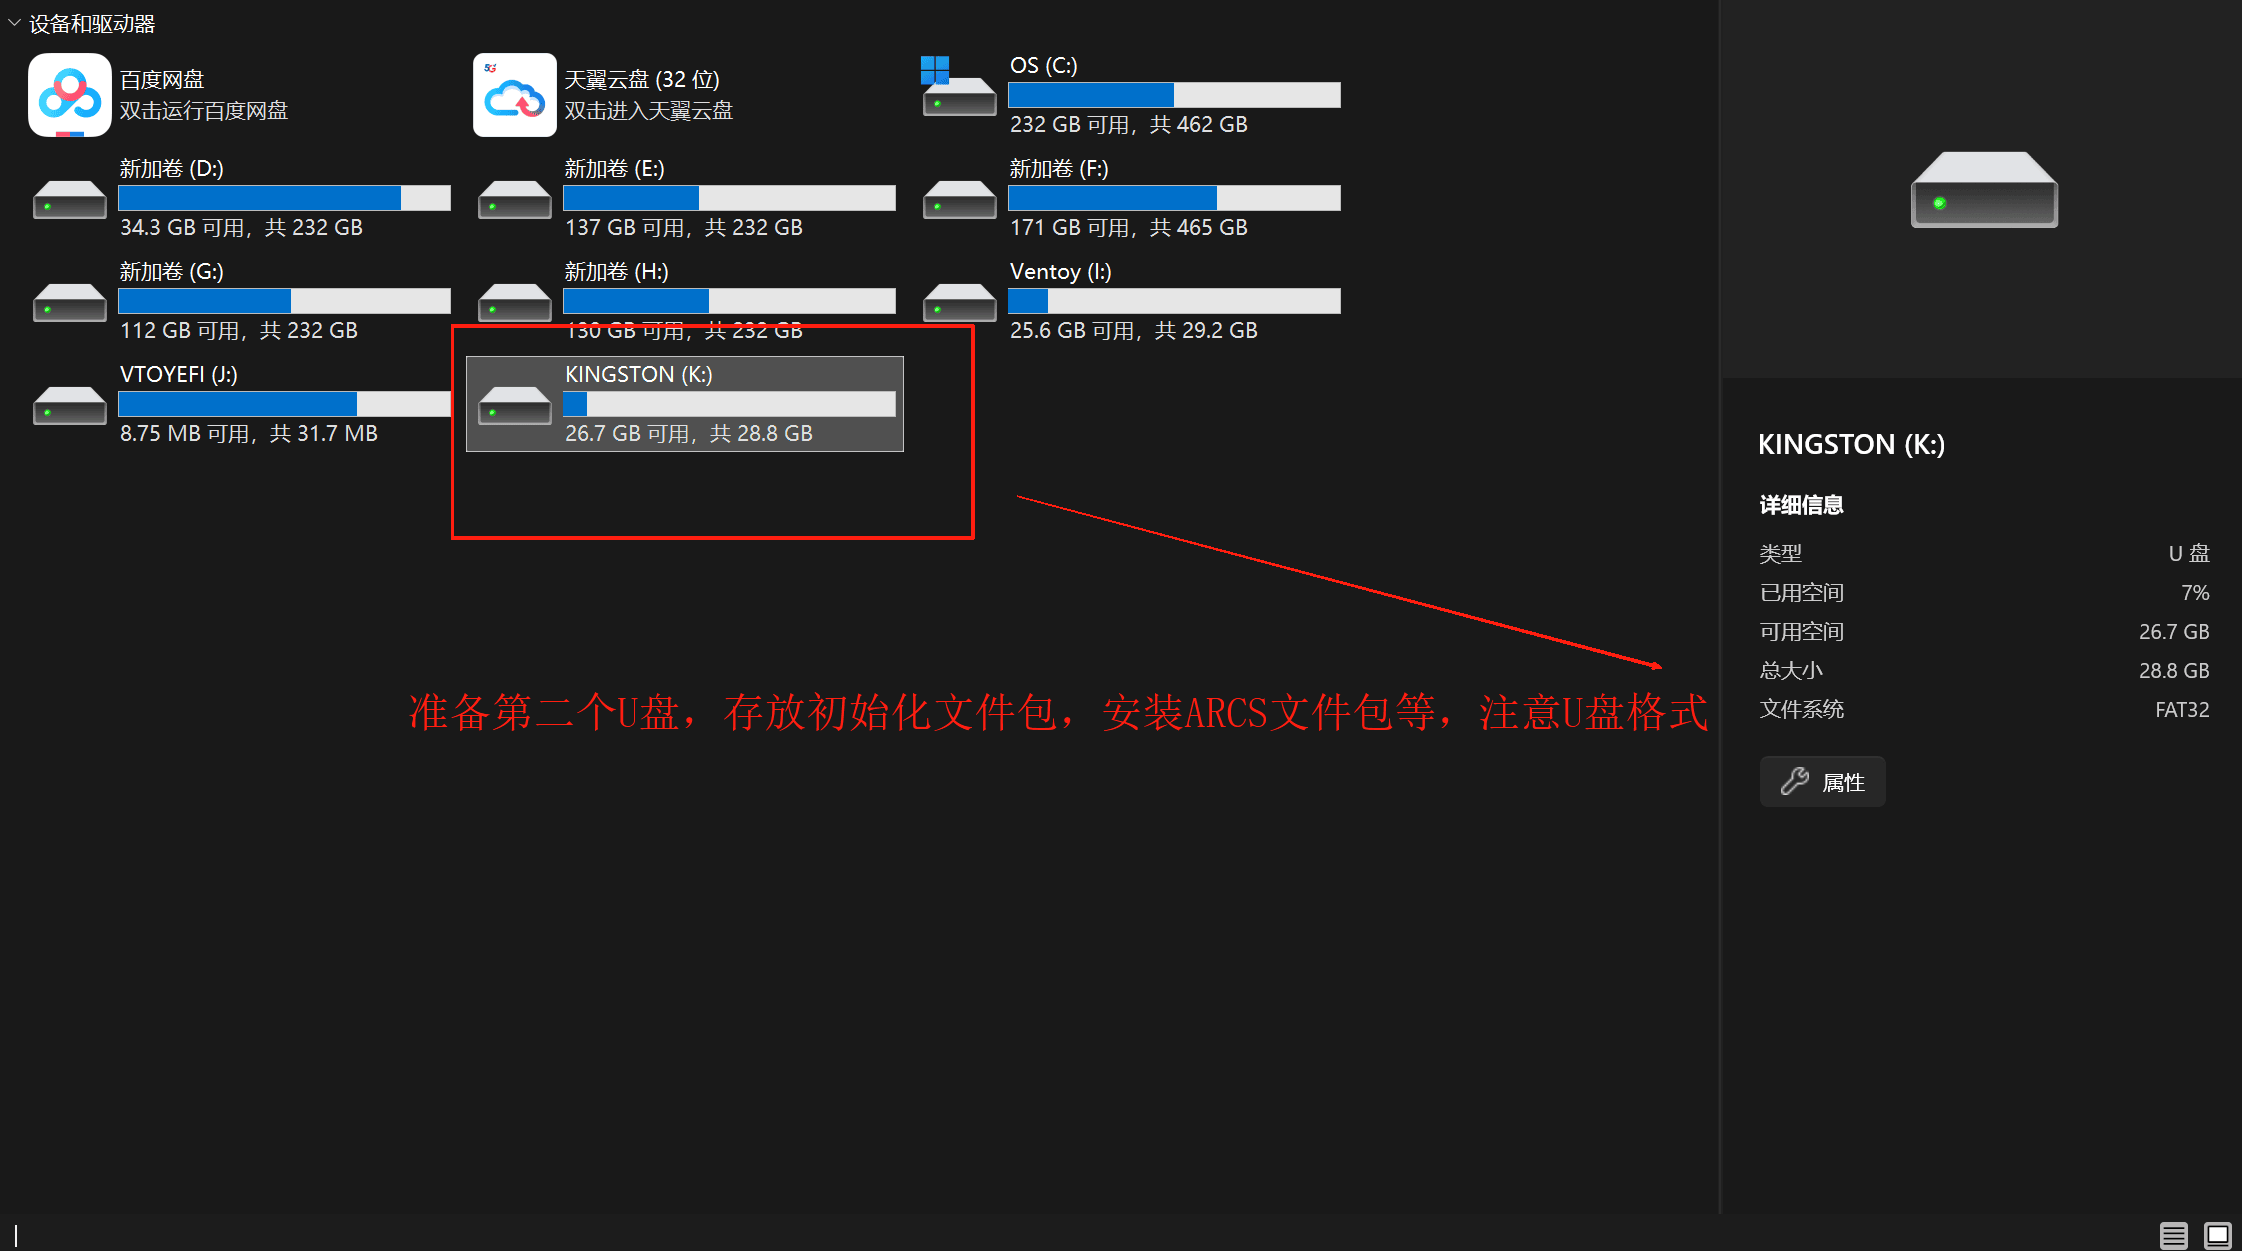
Prepare a second USB drive of 8 GB or more, with USB drive format: FAT32, used to store the initialization environment package, the arcs installation package, and the firmware upgrade package.
xubuntu 16.04.3 Initialization Environment
Download address: https://download.aubo-robotics.cn/deploy/build_system/
PS: The touchscreen driver is not installed at this time; please use the mouse to operate first.
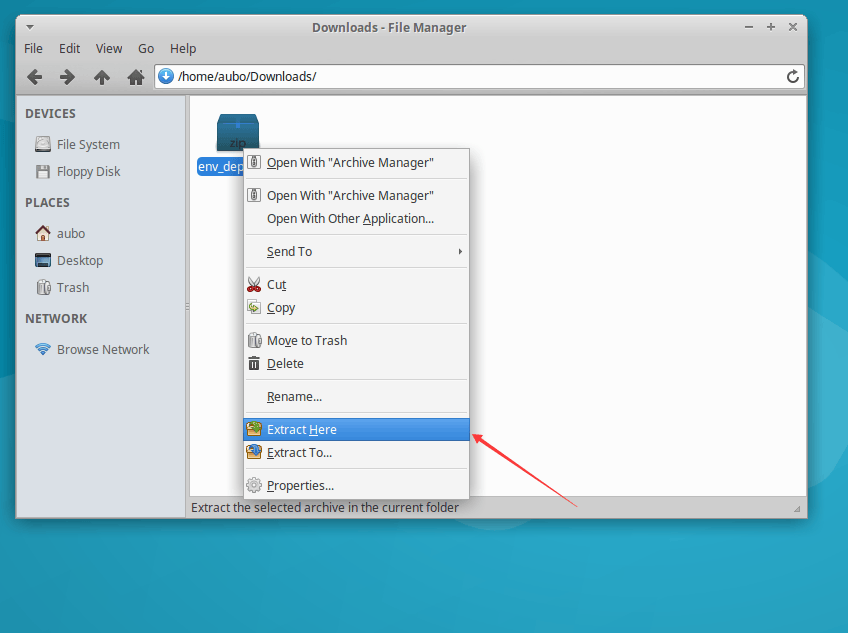
Copy the setup_ubuntu16.04_x.x.x.zip file to the target device, right-click and select Extract Here to extract it.
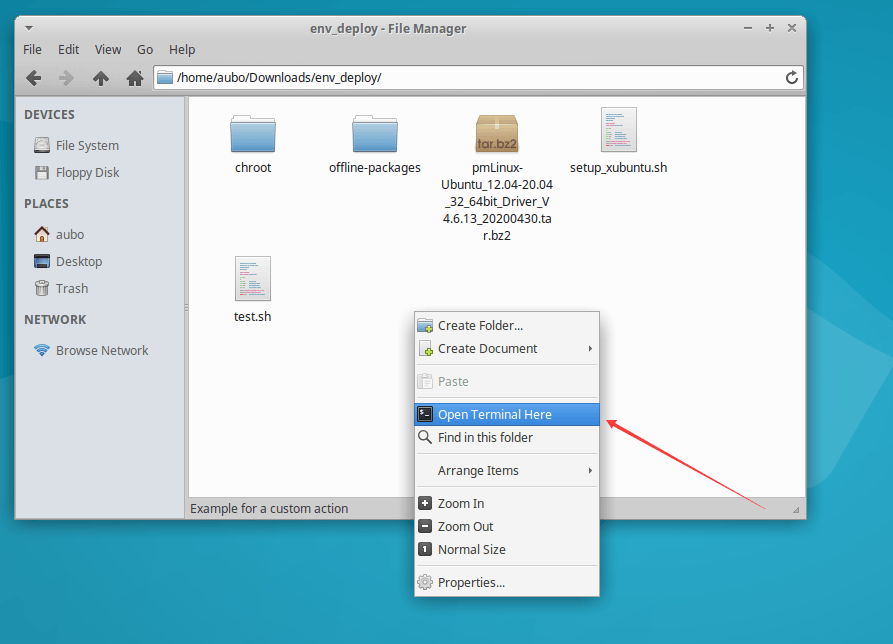
Click env_deploy to enter the folder, and right-click to open the terminal.
Enter the following command and press Enter:
sudo chmod +x setup_xubuntu.shEnter the password: aubo
Continue to enter the following command and press Enter:
sudo ./setup_xubuntu.sh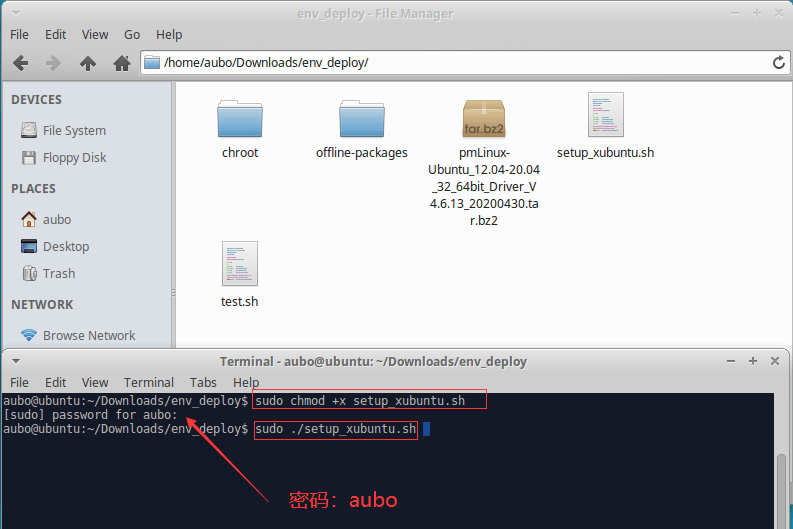
Wait until the script finishes executing.
The appearance of the following image indicates that the environment configuration is successful.
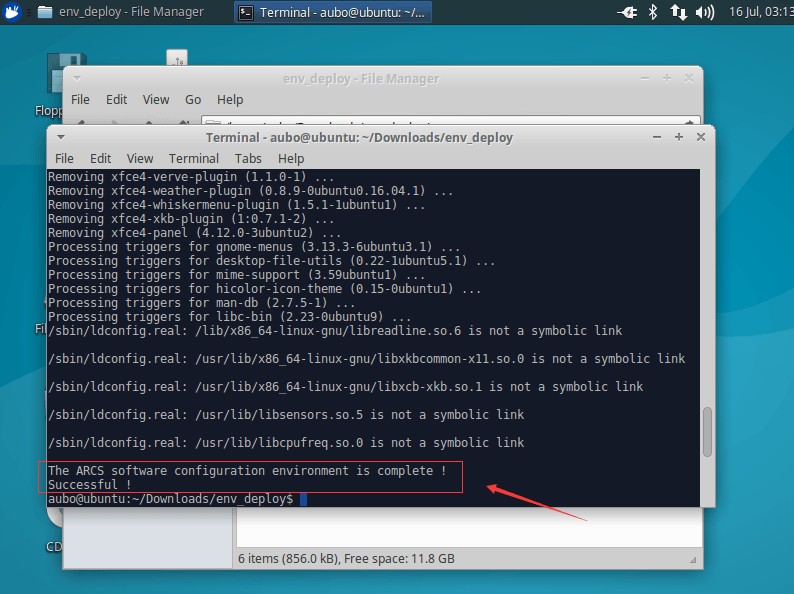
Shut down and restart the teach pendant to complete the environment deployment and make the touchscreen driver installation take effect, and enter the root user.
xubuntu 22.04.3 Initialization Environment
Download address: https://download.aubo-robotics.cn/deploy/build_system/
PS: The touchscreen driver is not installed at this time; please use the mouse to operate first.
Copy the setup_ubuntu22.04_x.x.x.zip file to the target device, right-click and select Extract Here to extract it.
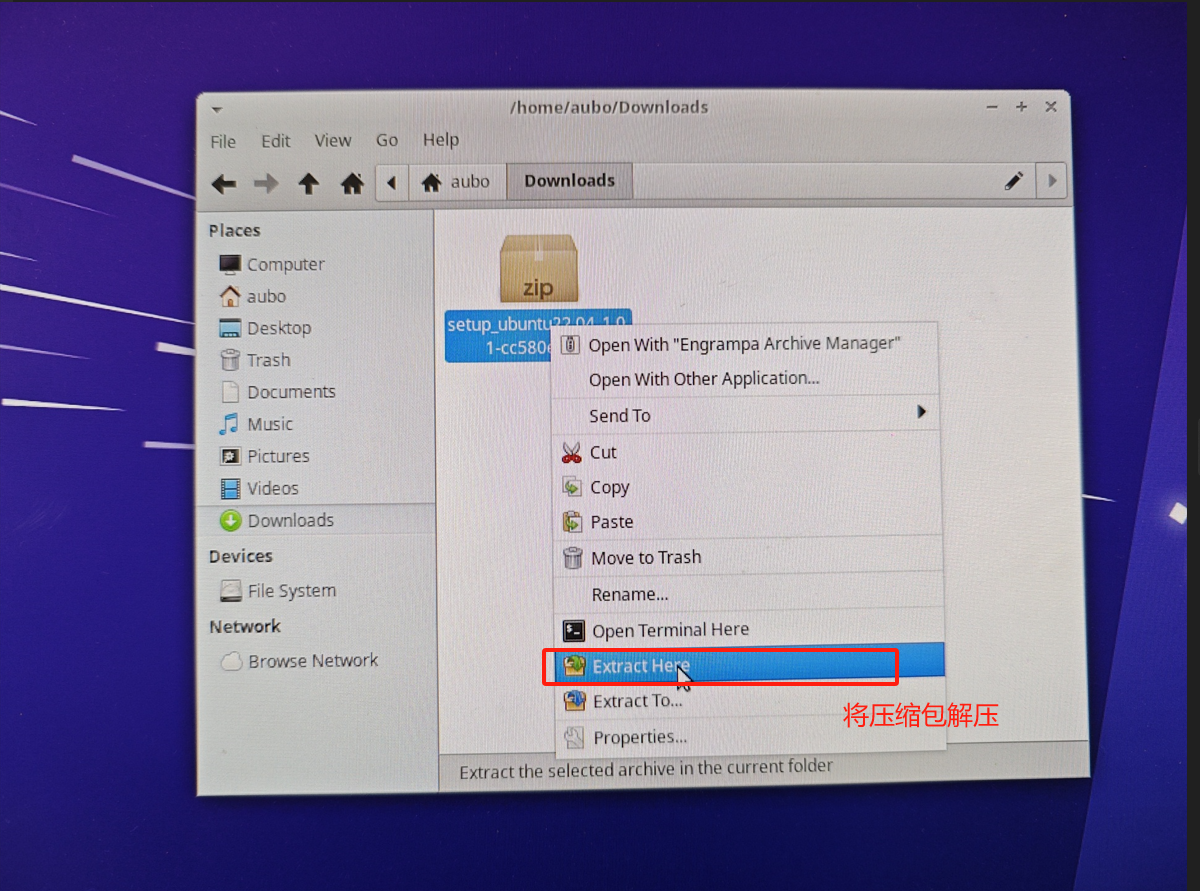
Click env_deploy to enter the folder, and right-click to open the terminal.
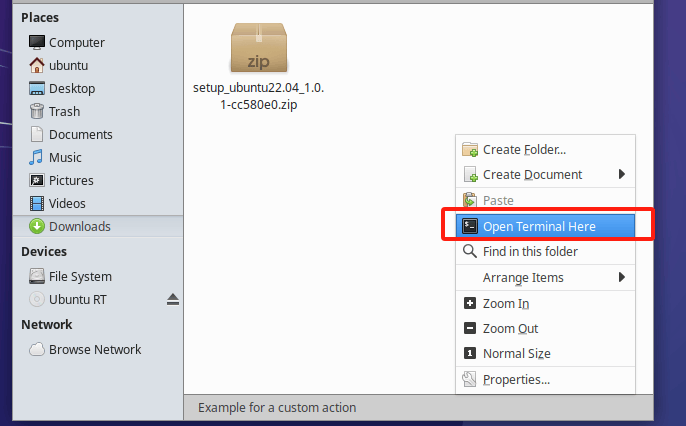
Enter the following command and press Enter:
sudo chmod +x setup_xubuntu.shEnter the password: aubo
Continue to enter the following command and press Enter:
sudo ./setup_xubuntu.sh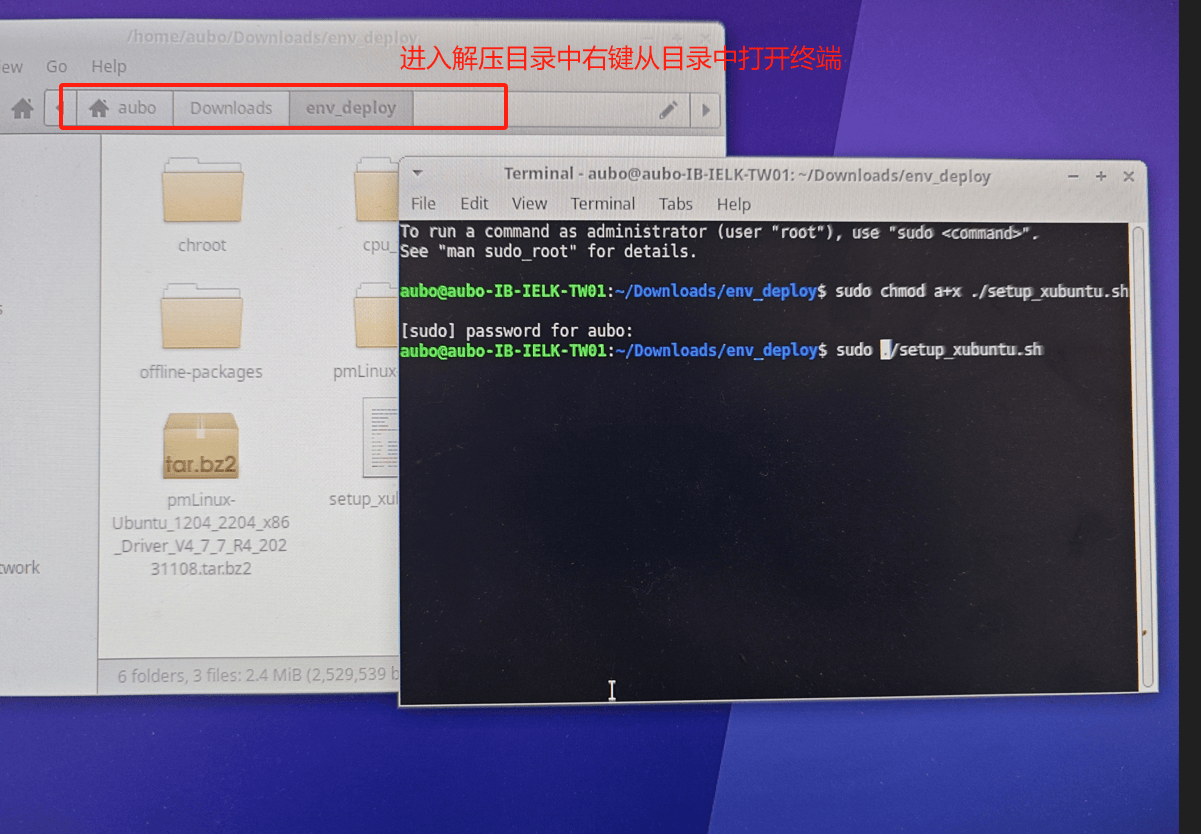
Wait until the script finishes executing.
The appearance of the following image indicates that the environment configuration is successful.
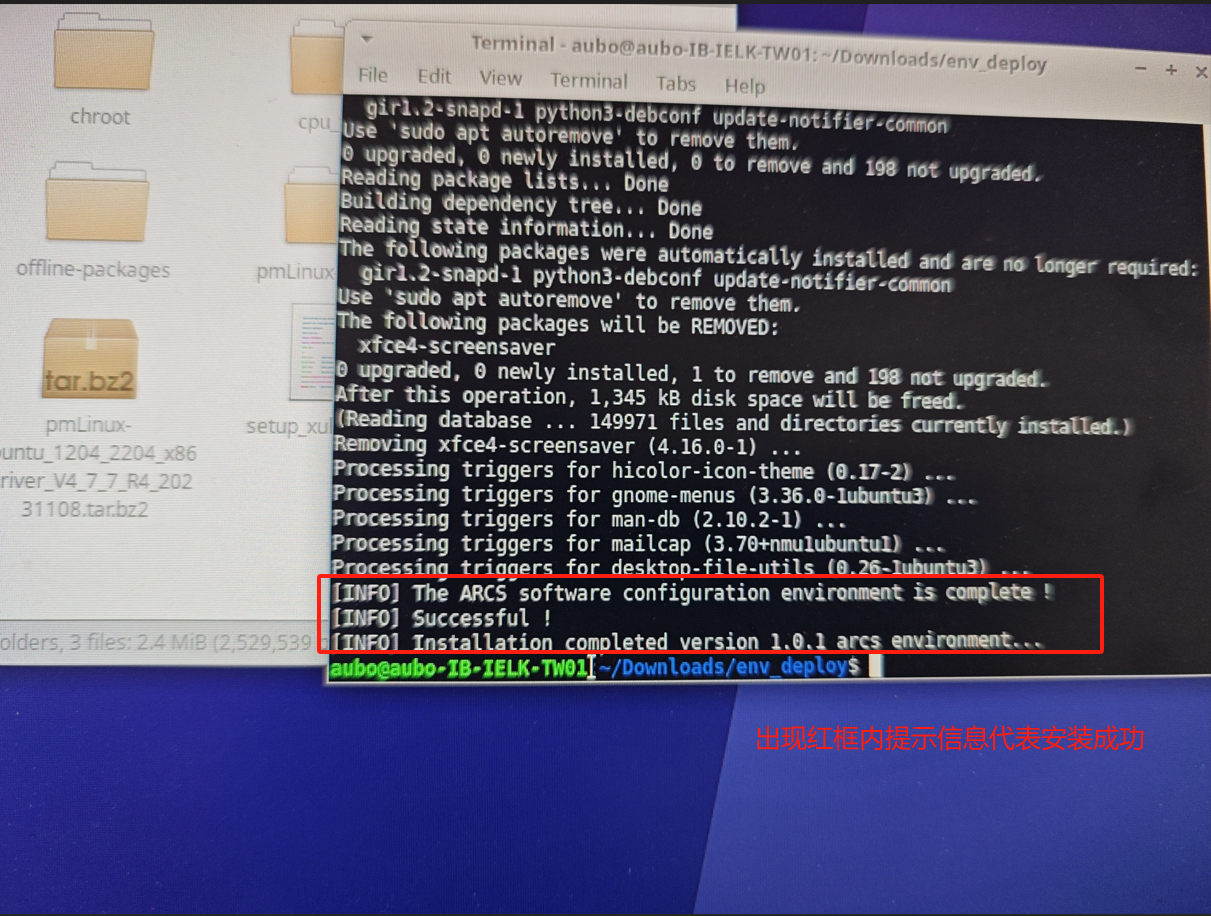
Shut down and restart the teach pendant to complete the environment deployment and make the touchscreen driver installation take effect, and enter the root user.
net-profiled Network Configuration Parameters (Production Installation Notes)
net-profiled is used to configure the network according to the control cabinet model and the NIC situation. The parameter file is /etc/default/net-profiled, installed by the initialization environment package. Production installation usually keeps the default values; only when the NIC model or the on-site network scheme is clearly different should it be modified as required by technical support.
When the Configuration Takes Effect
Note that when executing setup_xubuntu.sh, the net-profiled installation step within it only installs and enables net-profiled.service and net-profiled-port-wait.service; it does not immediately apply the network configuration when the script ends. Therefore, right after the script finishes executing and while aubo_control has not yet started, the network configuration does not change.
The processing order at device startup is as follows:
- When
net-profiled.serviceruns for the first time, ifENABLE_AUBO_CONTROL_MODE=1is enabled butaubo_controlis not yet ready or has not returned the control cabinet model,net-profiledprompts "skip network configuration" and exits normally, without modifying the current network. net-profiled-port-wait.servicewaits in the background untilNET_PROFILED_WAIT_HOSTandNET_PROFILED_WAIT_PORT(default127.0.0.1:9012) are connectable. After the port opens, it waitsNET_PROFILED_WAIT_DELAYseconds and then restartsnet-profiled.serviceonce; only at this point does it queryaubo_controlagain and apply the corresponding network mode.- If the port is still not opened within
NET_PROFILED_WAIT_TIMEOUT(default 60 seconds), this startup will not automatically apply the configuration. In this case, first confirm thataubo_controlis running normally, then manually executesudo systemctl restart net-profiled.service; alternatively, you can temporarily setNET_PROFILED_WAIT_TIMEOUTto0(which takes effect after restarting the wait service or the device) so that the wait service does not time out.
After modifying /etc/default/net-profiled, you must restart net-profiled.service when aubo_control is already ready, or restart the device and wait for the above startup process, for the configuration to take effect. If you only restart net-profiled.service but aubo_control is still not ready, the script will still skip the configuration. To troubleshoot whether it has taken effect, you can check:
systemctl status aubo_control.service net-profiled.service net-profiled-port-wait.service
journalctl -u net-profiled.service -u net-profiled-port-wait.service --no-pager| Variable | Default | Description |
|---|---|---|
ENABLE_AP_BRIDGE | 0 | Whether to allow configuring AP bridge (bridging the wireless hotspot and the wired NIC) when a Wi-Fi NIC is detected. 0 means off, 1 means on. After enabling ENABLE_AUBO_CONTROL_MODE=1, cb_G*-type control cabinets automatically enable this mode through the model identification logic. |
ENABLE_DHCP | 0 | Whether to enable the DHCP service on the fixed NIC when no Wi-Fi NIC is detected. This item is a manual switch and is not enabled by default; setting it to 1 only takes effect after automatic model identification is turned off (ENABLE_AUBO_CONTROL_MODE=0). In this case the NIC specified by NIC is used; if not specified, it defaults to enp4s0. |
ENABLE_AUBO_CONTROL_MODE | 1 | Whether to query the control cabinet model through the local aubo_control and automatically select the network mode. When set to 1, if the service is not ready or the model cannot be queried, the network configuration is skipped and the current network is not forcibly modified. |
AUBO_CONTROL_JSONRPC_URL | http://127.0.0.1:9012/jsonrpc | The JSON-RPC address for querying aubo_control. Do not modify it unless the control service port has been customized. |
AUBO_CONTROL_TIMEOUT | 2 | The connection and request timeout when querying aubo_control, in seconds. The smaller the value, the shorter the startup wait, but the more likely the query fails when the service starts slowly. |
NET_PROFILED_WAIT_HOST | 127.0.0.1 | The target address detected by the startup wait service, usually the local loopback address. |
NET_PROFILED_WAIT_PORT | 9012 | The TCP port detected by the startup wait service, corresponding to the aubo_control port by default. Only after the port opens is a net-profiled restart triggered once. |
NET_PROFILED_WAIT_DELAY | 1 | After detecting that the port has opened, how many seconds to wait before restarting net-profiled, in seconds. Used to leave initialization time for aubo_control. |
NET_PROFILED_WAIT_INTERVAL | 1 | The interval between two detections by the startup wait service, in seconds. |
NET_PROFILED_WAIT_TIMEOUT | 60 | The maximum startup wait time, in seconds. After timing out, this delayed restart is skipped; setting it to 0 means waiting forever. |
NET_PROFILED_CONNECT_TIMEOUT | 1 | The timeout for establishing a connection when detecting the target port each time, in seconds. |
MANUAL_ENABLE_AP_BRIDGE | 0 | Manually force-enable AP bridge and skip aubo_control model identification. When set to 1, it has the highest priority; use it only when explicitly required by technical support. |
NIC | (empty) | Manually specify the wired NIC name. When Wi-Fi exists, it serves as the wired side of the AP bridge; when there is no Wi-Fi and ENABLE_DHCP=1, it serves as the fixed DHCP NIC. When empty, it is automatically selected according to the scenario. |
CB_G_BRIDGE_NIC | enp1s0 | The wired NIC used by cb_G*-type control cabinets when NIC is not specified. If the on-site NIC name is not enp1s0, it should be modified after confirmation by technical support. |
AP_WLAN_IFACE | (empty) | Manually specify the physical Wi-Fi NIC used in AP mode. When empty, it is auto-detected; the virtual interface ap0 must not be filled in. |
EXTRA_UNMANAGED_NICS | (empty) | In AP bridge or fixed-NIC DHCP mode, specify additional NICs not managed by NetworkManager. Multiple interfaces can be separated by spaces, commas, or semicolons, for example enp2s0 usb1. Only fill in interfaces that really need to be managed by other services. |
FORCE_NET_PROFILED | 0 | Whether to force re-apply the network configuration. With the default 0, if the last target state has not changed, duplicate configuration is skipped; when troubleshooting, it can be temporarily set to 1, and should be restored to 0 after configuration is complete. |
Production On-Site Configuration Methods
Modify /etc/default/net-profiled according to the function you need to implement. Variables not listed in the table keep their default values.
| On-site Requirement | Configuration to Set | Effect |
|---|---|---|
| G-series control cabinet installation | No modification needed; keep ENABLE_AUBO_CONTROL_MODE=1 | The system reads the control cabinet model from aubo_control; after it is identified as cb_G* and a Wi-Fi NIC is detected, AP bridge is automatically enabled. By default enp1s0 is used as the bridged wired NIC, and the physical Wi-Fi NIC is automatically selected. |
| Non-G-series control cabinet installed in the standard way | No modification needed; keep ENABLE_AUBO_CONTROL_MODE=1 | After the system identifies the control cabinet model, it uses the basic network configuration and does not enable the AP bridge or fixed-port DHCP provided by net-profiled. |
| Non-G-series control cabinet needs to enable AP bridge | Set MANUAL_ENABLE_AP_BRIDGE=1, ENABLE_AUBO_CONTROL_MODE=0; when the NIC names do not match the default rules, also set NIC=<wired NIC name> and AP_WLAN_IFACE=<physical Wi-Fi NIC name> | Skip aubo_control model identification, directly connect the specified wired NIC and Wi-Fi hotspot to br0, and assign addresses through dnsmasq. AP_WLAN_IFACE must not be set to ap0. |
| IS welding Android wired version (fixed interface providing DHCP) | You must ensure these four items are configured as follows: ENABLE_AUBO_CONTROL_MODE=0, ENABLE_AP_BRIDGE=0, MANUAL_ENABLE_AP_BRIDGE=0, ENABLE_DHCP=1 | Turn off control cabinet model automatic identification and AP bridge, and enable fixed DHCP on the default wired NIC enp4s0. The NIC address defaults to 10.0.0.1/24, assigning 10.0.0.100–10.0.0.200 to external devices. If the NIC name is not enp4s0, you also need to set NIC=<actual wired NIC name>. |
| The device has multiple wired or Wi-Fi NICs and a specific interface needs to be used fixedly | In the AP bridge scenario, set NIC=<wired NIC name> and AP_WLAN_IFACE=<physical Wi-Fi NIC name>; in the fixed DHCP scenario, set NIC=<wired NIC name> | Avoid the system automatically selecting the wrong NIC. You can first execute ip link to confirm the actual NIC name. |
| Some NICs need to be handed over to other programs to manage | Set EXTRA_UNMANAGED_NICS="<NIC1> <NIC2>" | In AP bridge or fixed DHCP mode, the specified NICs are no longer managed by NetworkManager. Do not mistakenly fill in NICs used for daily internet access or remote maintenance in this item. |
| The configuration has not been re-applied and needs to be forcibly applied once | Temporarily set FORCE_NET_PROFILED=1 and restart the net-profiled service; after execution is complete, restore it to 0 | Ignore the last saved network state, regenerate and apply the configuration. This item is only used for troubleshooting and should not be set to 1 for a long time. |
Except for the IS welding Android wired version, which turns off automatic model identification as in the above example, for other versions, if automatic model identification does not take effect, first confirm whether aubo_control and port 9012 are normal. Only after confirming that the on-site needs a manual network mode should the mode switch be modified.
When checking the configuration, you can execute:
cat /etc/default/net-profiled
systemctl status net-profiled.service net-profiled-port-wait.service
sudo systemctl restart net-profiled.service
Checking the Ubuntu Version
Enter the following command in the terminal and check the output:
lsb_release -a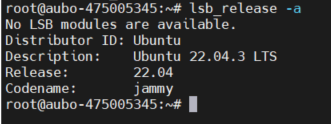
Description is the complete version description string; Release is the version number.
Checking the Initialization Script Version
Enter the following command in the terminal and check the output:
cat /etc/default/setup_env
Problem Solving
The Initialization Script Reports an rtw89 Driver Conflict
If the following error appears when executing setup_xubuntu.sh:
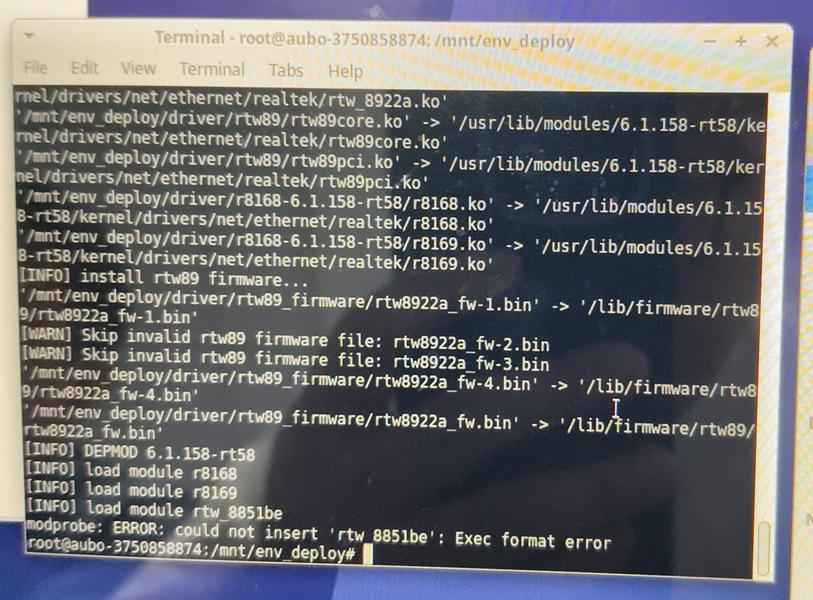
Please execute the following three commands in the terminal in order to delete the conflicting Realtek rtw89 driver files and update the module dependencies and boot image:
rm -f /usr/lib/modules/6.1.158-rt58/kernel/drivers/net/ethernet/realtek/rtw89_*
depmod -a
update-initramfs -u -k $(uname -r)
After the three commands finish executing, run reboot to restart the device. After restarting and entering the system, return to the directory where the initialization environment package was extracted and execute again:
sudo ./setup_xubuntu.shWait for the script to finish executing and display the success message, and confirm that the remaining steps of the initialization script have all been completed.
Touchscreen Calibration Issue
If the touchscreen calibration is incorrect after restarting, you can reinstall pmLinux. Enter the env_deploy directory and execute the following command text
cd ./pmLinux-Ubuntu16.04
# If 22.04 is installed, replace 16.04 with 22.04; after entering the directory, execute the following command
./install.sh
echo 127.0.0.1 $(hostname) >> /etc/hostsAfterwards, execute the following command again to install the touchscreen driver
cd ./pmLinux-Ubuntu16.04
# If 22.04 is installed, replace 16.04 with 22.04; after entering the directory, execute the following command
./install.sh
After the installation is complete, execute the reboot command to restart the machine and test whether the touchscreen driver takes effect.
4. Installing the ARCS Software
Download address: https://download.aubo-robotics.cn/arcs/
From the download address above, select the latest version of the ARCS software installation package (here taking arcs_update-0.29.0-alpha.87+b630244.nightly-x86_64.run as an example).
Copy the ARCS installation package to the target device, right-click and open the terminal.
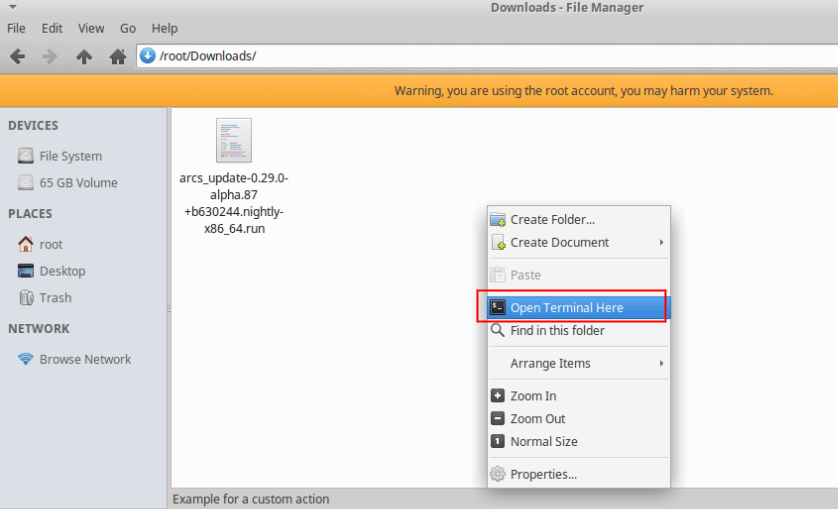
Enter the following command and press Enter:
chmod +x arcs_update-0.29.0-alpha.87+b630244.nightly-x86_64.runEnter the following command again and press Enter:
./arcs_update-0.29.0-alpha.87+b630244.nightly-x86_64.run install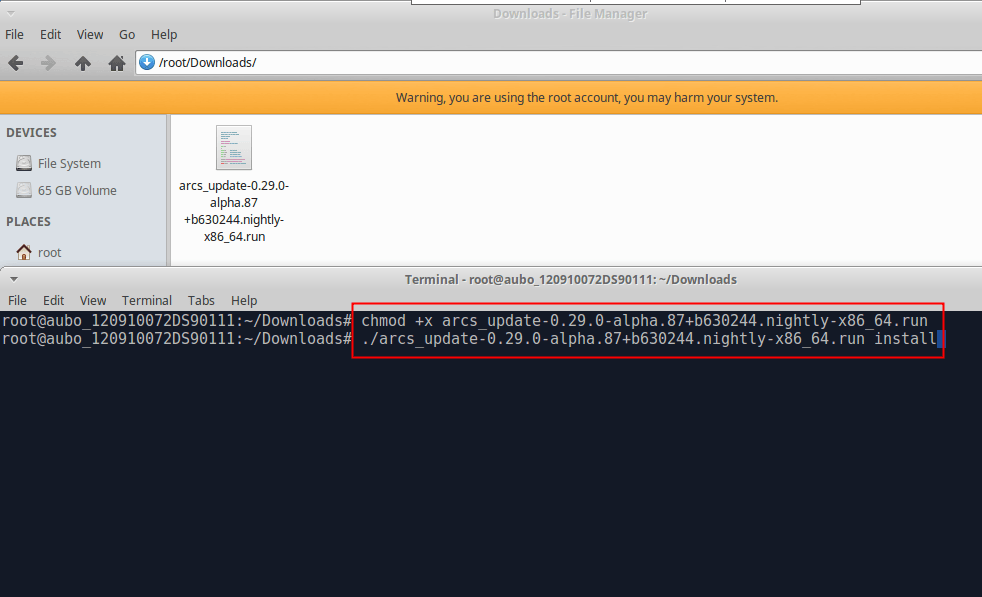
Wait for the ARCS installation to complete; the appearance of the following image indicates that the ARCS installation is successful.
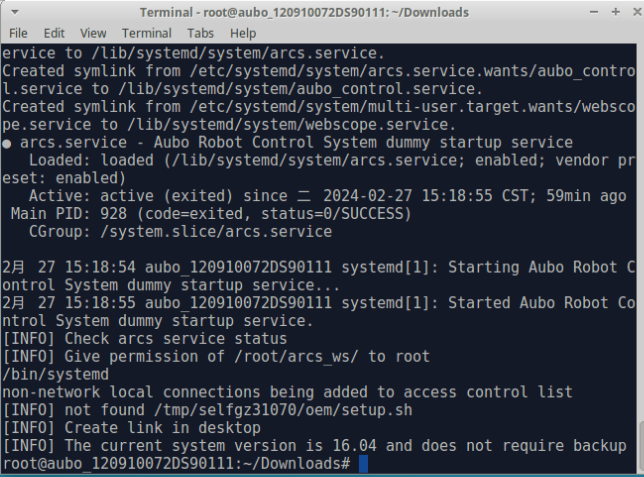
Restart the teach pendant again to complete the ARCS installation.
If it is a new-protocol robot arm, select the file corresponding to the robot arm type, copy it to the /root/arcs_ws/config/ directory, replace the aubo_control.conf file, and rename the file.
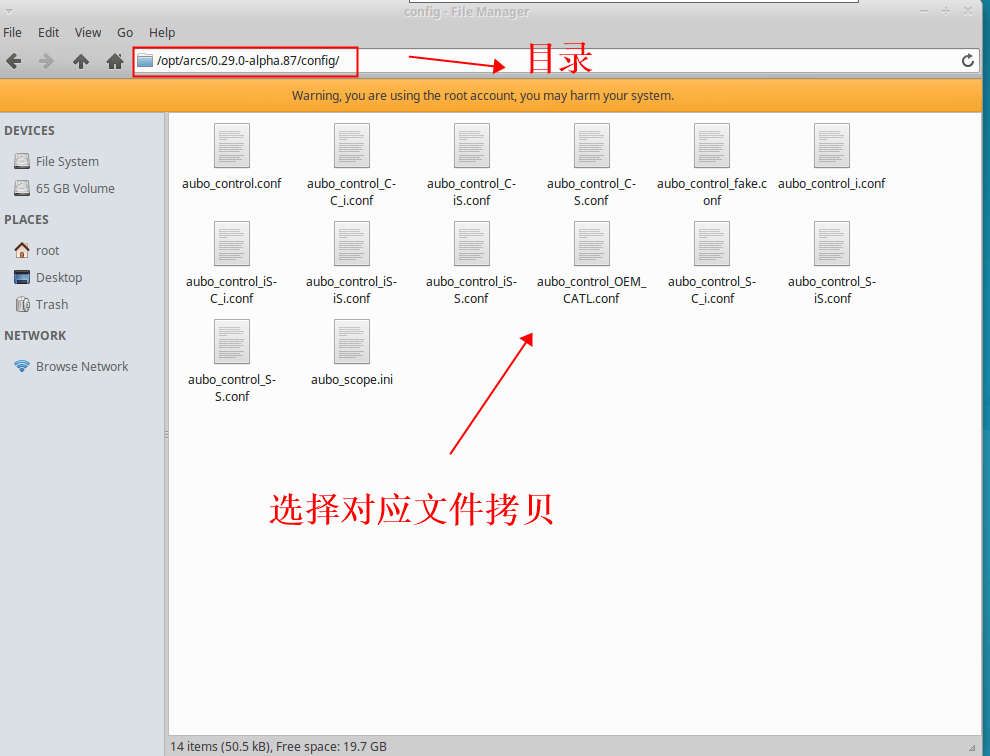
The correspondence between configuration files and models can be found in the following table:
| File Name | New Protocol / Old Protocol | Parameter Name | Device Type: Control Cabinet | Device Type: Robot Arm |
|---|---|---|---|---|
| aubo_control.conf | New protocol | New-protocol default configuration file | * | * |
| aubo_control_C-C_i.conf | New protocol | C-C_i | New C control cabinet | C series / i series / iH series |
| aubo_control_C-iS.conf | New protocol | C-iS | New C control cabinet | iS series |
| aubo_control_C-S.conf | New protocol | C-S | New C control cabinet | S series |
| aubo_control_i_i.conf | New protocol | i_i | Improved new-protocol control cabinet / Mini control box / AGV control cabinet | C series / i series / iH series |
| aubo_control_i-iS.conf | New protocol | i-iS | Improved new-protocol control cabinet / Mini control box / AGV control cabinet | iS series |
| aubo_control_i-S.conf | New protocol | i-S | Improved new-protocol control cabinet / Mini control box / AGV control cabinet | S series |
| aubo_control_iS-C_i.conf | New protocol | iS-C_i | iS control cabinet | C series / i series / iH series |
| aubo_control_iS-iS.conf | New protocol | iS-iS | iS control cabinet | iS series |
| aubo_control_iS-S.conf | New protocol | iS-S | iS control cabinet | S series |
| aubo_control_S-C_i.conf | New protocol | S-C_i | S control cabinet | C series / i series / iH series |
| aubo_control_S-iS.conf | New protocol | S-iS | S control cabinet | iS series |
| aubo_control_S-S.conf | New protocol | S-S | S control cabinet | S series |
| aubo_control_fake.conf | Simulation | fake | Virtual machine | Virtual machine |
| aubo_control_i.conf | Old protocol | i | * (old-protocol control cabinet) | * (old-protocol robot arm) |
| aubo_control_OEM_CATL.conf | Old protocol | OEM_CATL | Project-customized file | - |
Configuration file description:
The first uppercase letter of the configuration file name specifies the control cabinet type; the second and third uppercase letters after the connector "-" indicate the robot arm type.
For example:
aubo_control_C- C_i specifies a C control cabinet + a C-series robot arm or an i-series robot arm
aubo_control_iS-C_i specifies an IS control cabinet + a C-series robot arm or an i-series robot arm
You need to modify the field content in the configuration file aubo_control.conf according to whether the device is a new-protocol device or an old-protocol device. Incorrect modification will affect collision-related functions. New-protocol device: collision_detect_enable = true Old-protocol device: collision_detect_enable = false, or this line of code does not exist, or this line of code is commented out
For the firmware upgrade method and the method for converting from the old protocol to the new protocol, refer to https://docs.aubo-robotics.cn/application_notes/16-firmware-update/ Software/Firmware Upgrade Operation Instructions
5. Serial Number Input
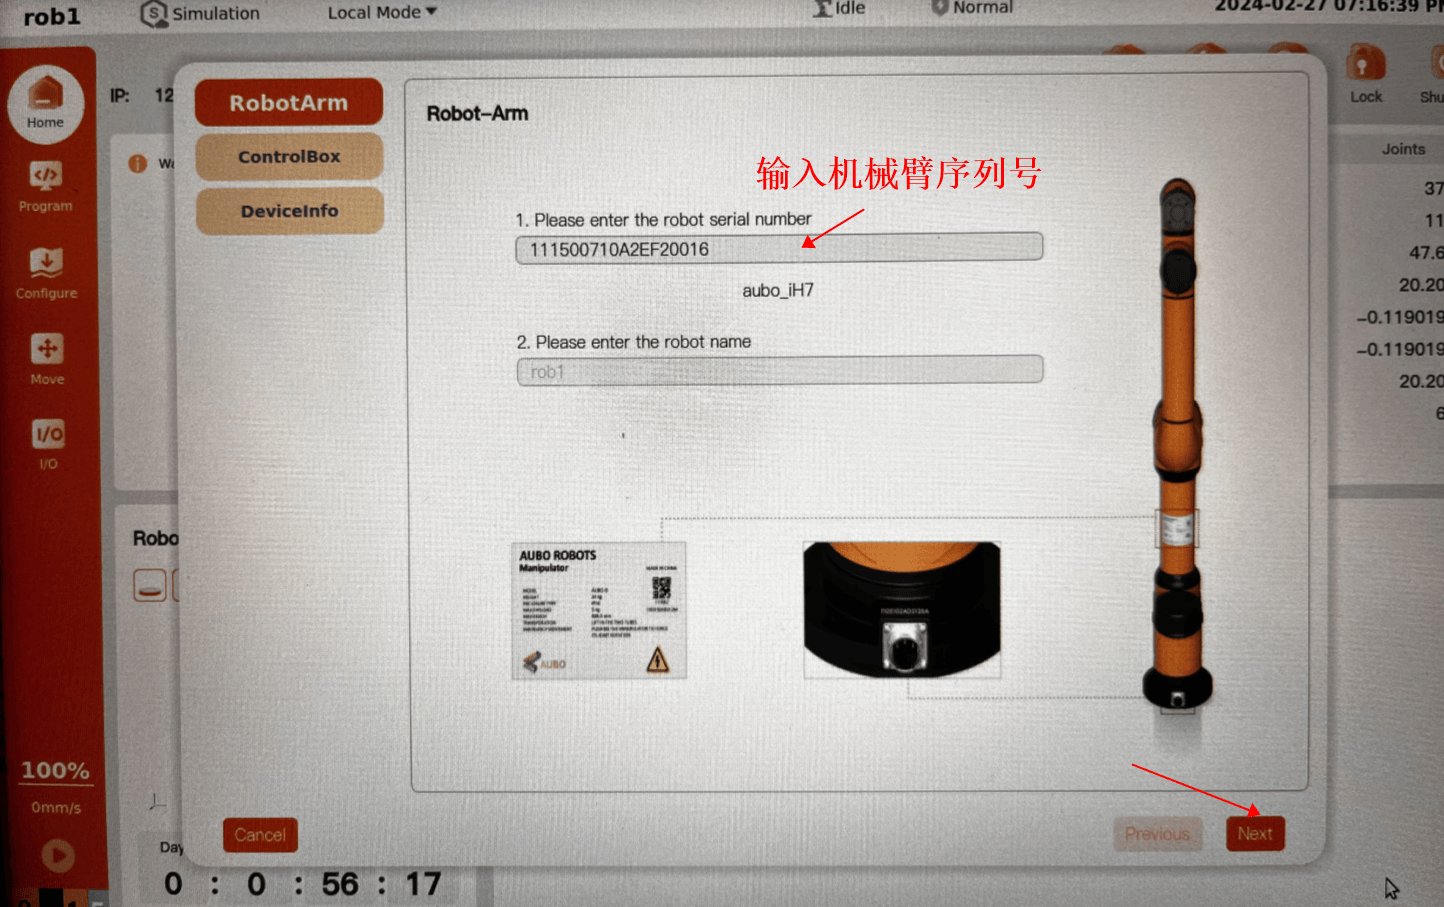
Select yes to enter the serial number input page.
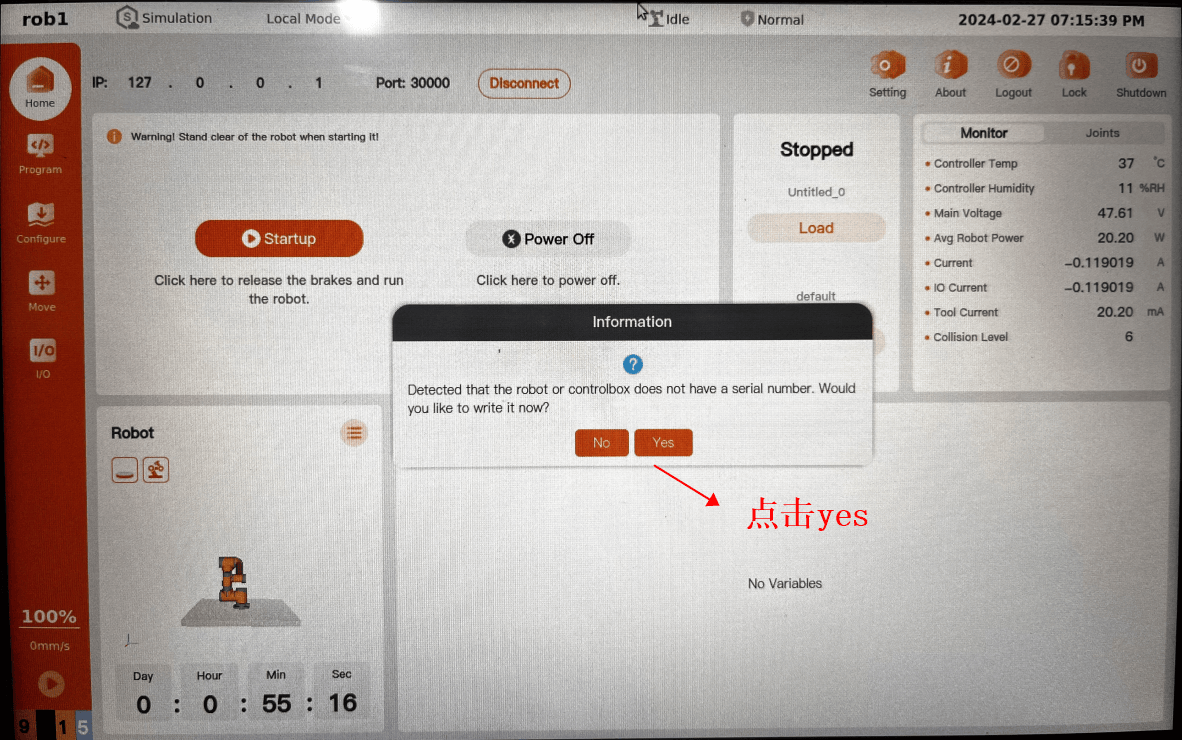
Enter the robot arm serial number robot serial number in turn, and click next.
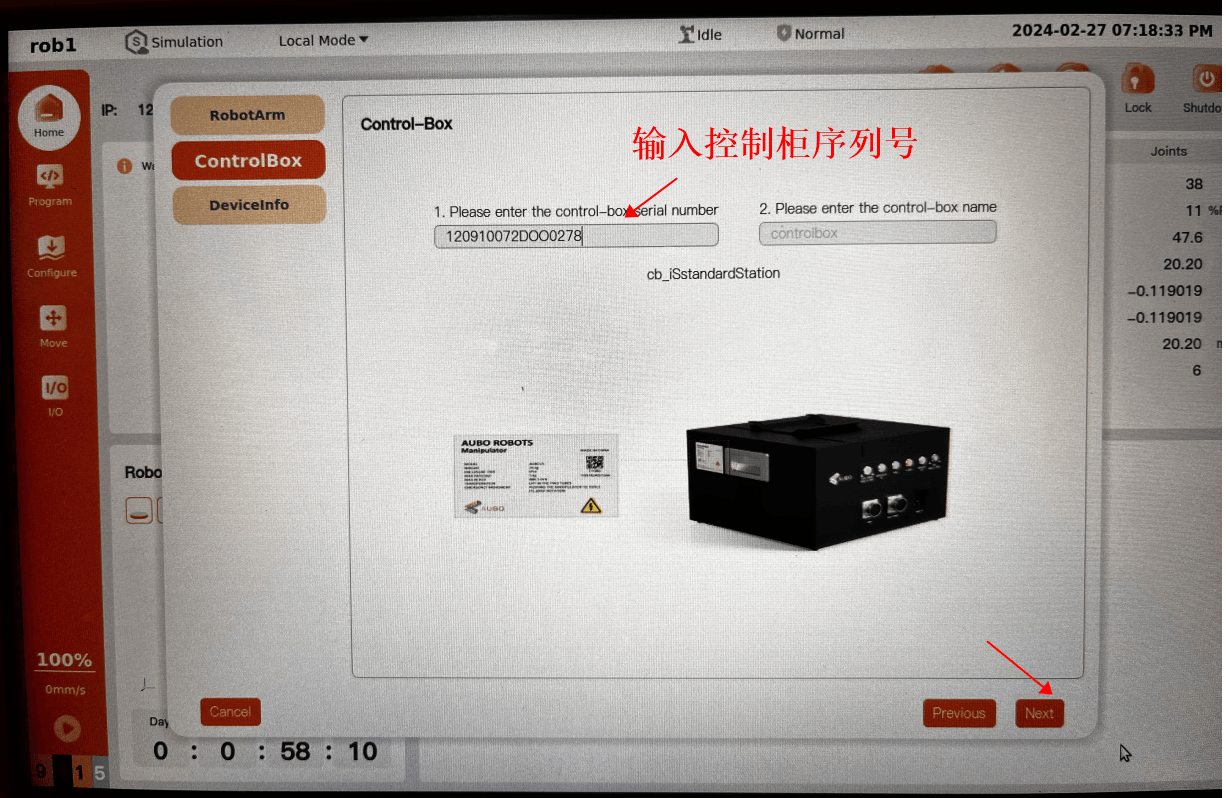
Enter the control cabinet serial number control-box serial number, and click next.
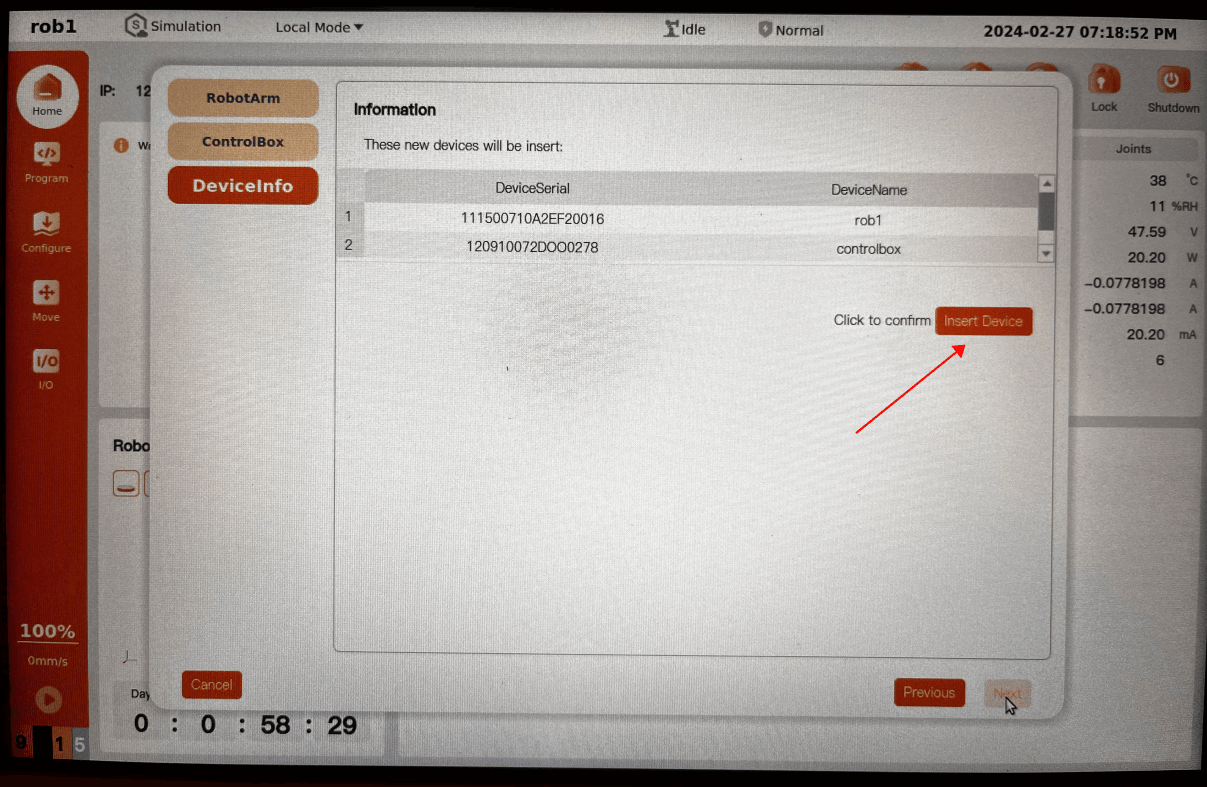
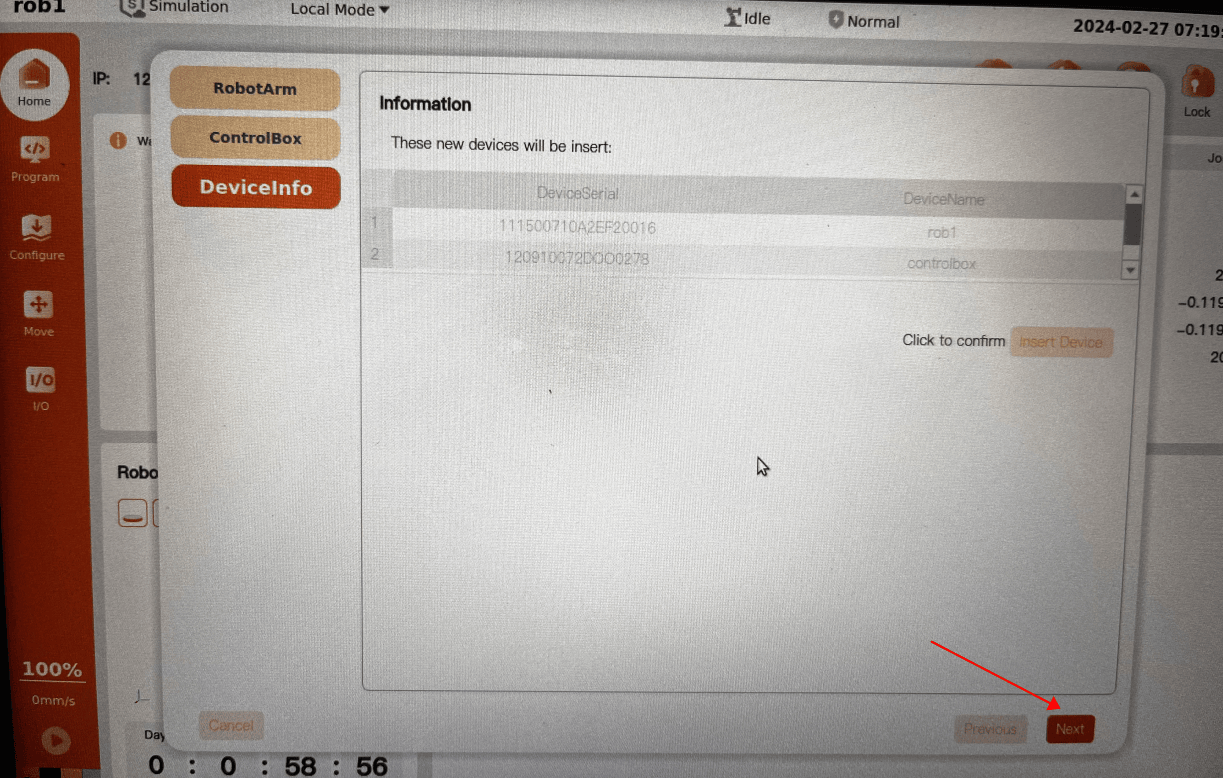
Click Insert Device Insert Device.
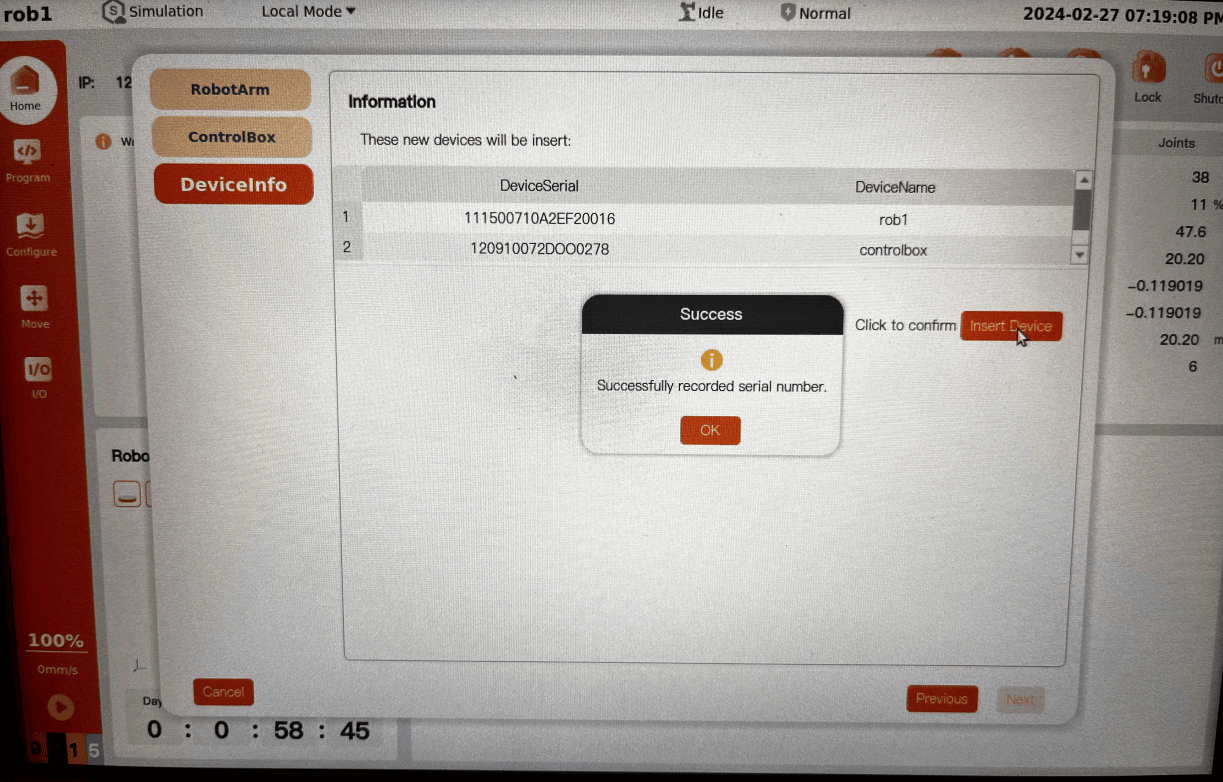
In the device-insertion-success dialog box, click OK.
Click next.
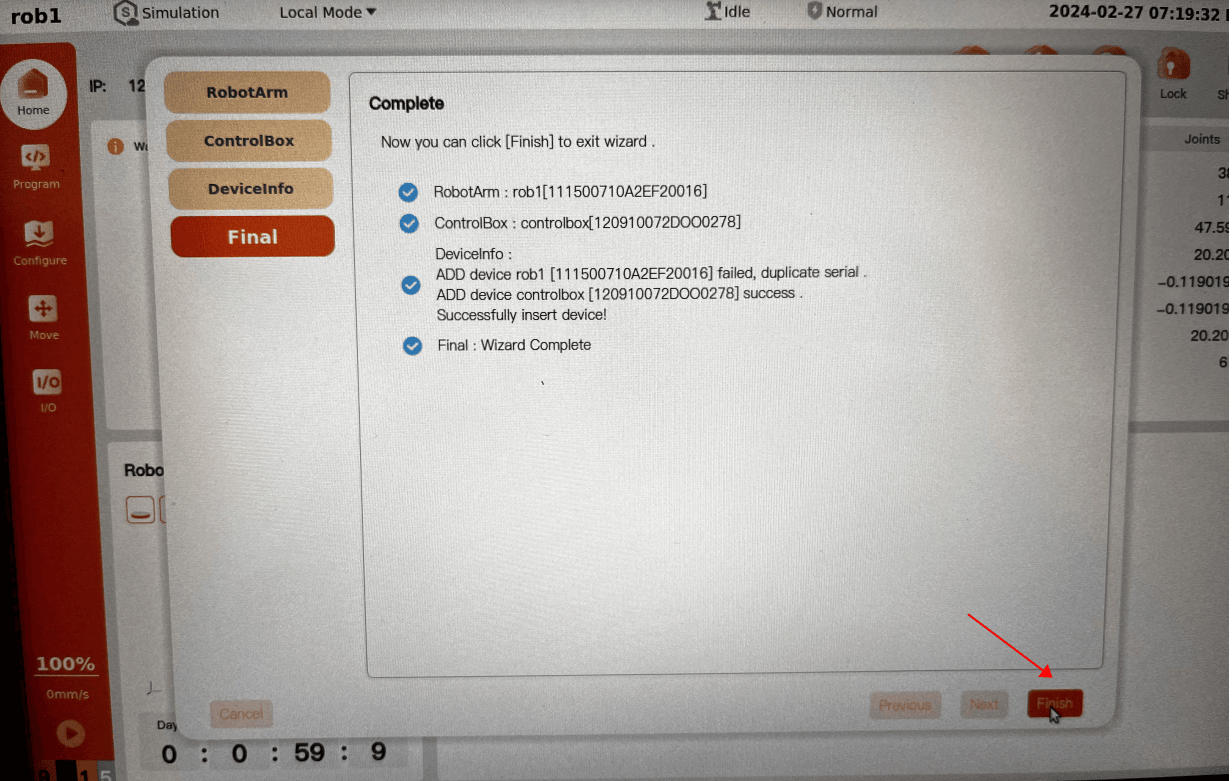
On the Final page, click Finish.
In the Success dialog box, click OK.
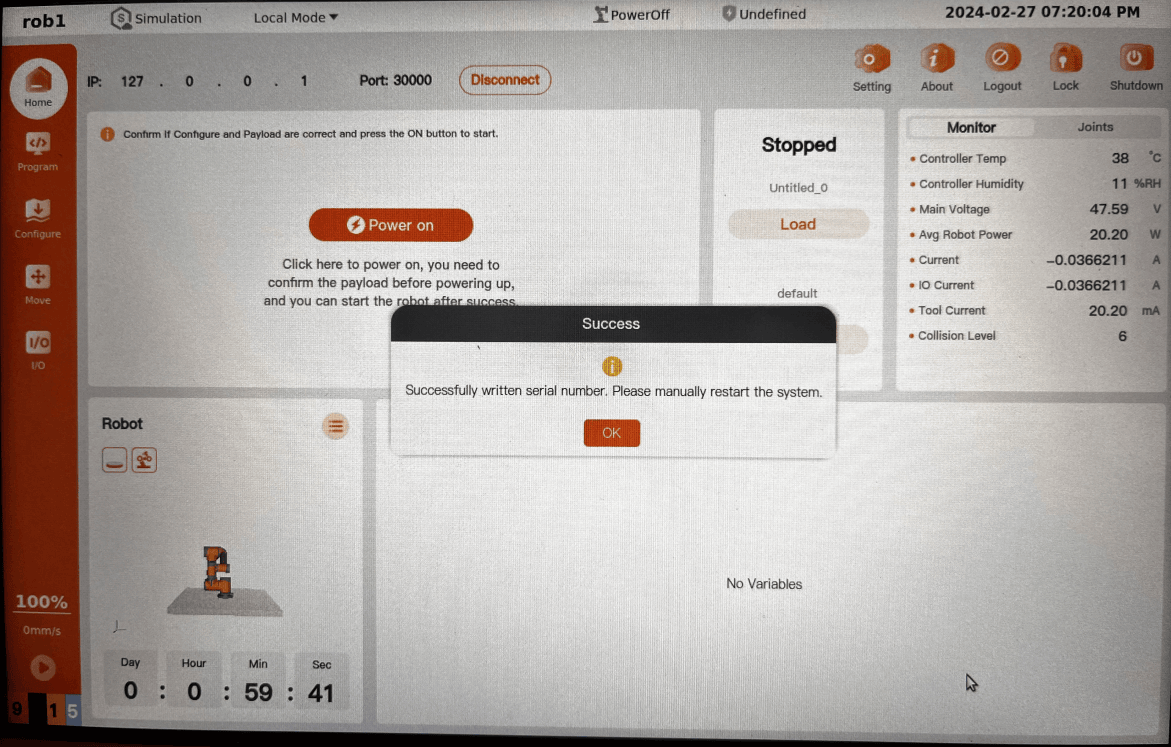
The serial number input is complete.
6. Backup and Restore
New C control cabinet (motherboard model: Yuankong): after completing the above operations, a backup operation is still required when making the master disk.
The link is as follows: http://arcs.pages.aubo-robotics.cn:8001/arcs_wiki/10-system-backup-and-restore/
Clearing the net-profiled State Before Making the Master Disk
Before making the master disk, you must delete the net-profiled network state saved by the current device:
sudo rm -f /var/lib/net-profiled/last-statelast-state records the network mode, NIC, and other states already applied by the current device. If this file is kept in the master disk, after the master disk is installed on another device, net-profiled may determine that the network configuration has not changed and skip the configuration. After deleting this file, the target device reconfigures the network based on its own control cabinet model, NIC, and the /etc/default/net-profiled configuration on its first startup.
After deletion, you can execute the following command to confirm that the file no longer exists:
test ! -e /var/lib/net-profiled/last-state && echo "net-profiled 状态已清除"Note: After deleting the state file, you should make the master disk directly. Before making the master disk, do not restart
net-profiled.service, and do not enter the installed system again to start the service, otherwiselast-statewill be regenerated and will need to be deleted again.