
AI Assistant Installation and Usage Guide
1 Preface
Verified versions:
- Software version: 0.32.3-rc.4 and later; subject to the officially released version. Download link: https://download.aubo-robotics.cn/arcs/
- Firmware version: 1.1.15-rc.14
- App version: 1.0.0-alpha.5
- Control cabinet model: IS_CE control cabinet
- Upgrade package (robot_ops.run): 0.13.0-rc.3
- Patch package (.sh): 0.13.0-rc.3
- teachagenthub plugin: 0.1.0-alpha.2
- AUBO MCP plugin: 0.0.1-alpha.3
2 Installation
Download the software upgrade package and patch package version 0.13.0-rc.3 from Index of /pre-release/robot_ops and Index of /pre-release/robot_ops/patch respectively. Note that the versions of the .run and .sh files must match.
After downloading, import the .run file into a USB drive, and then import it into the control cabinet through the USB drive.
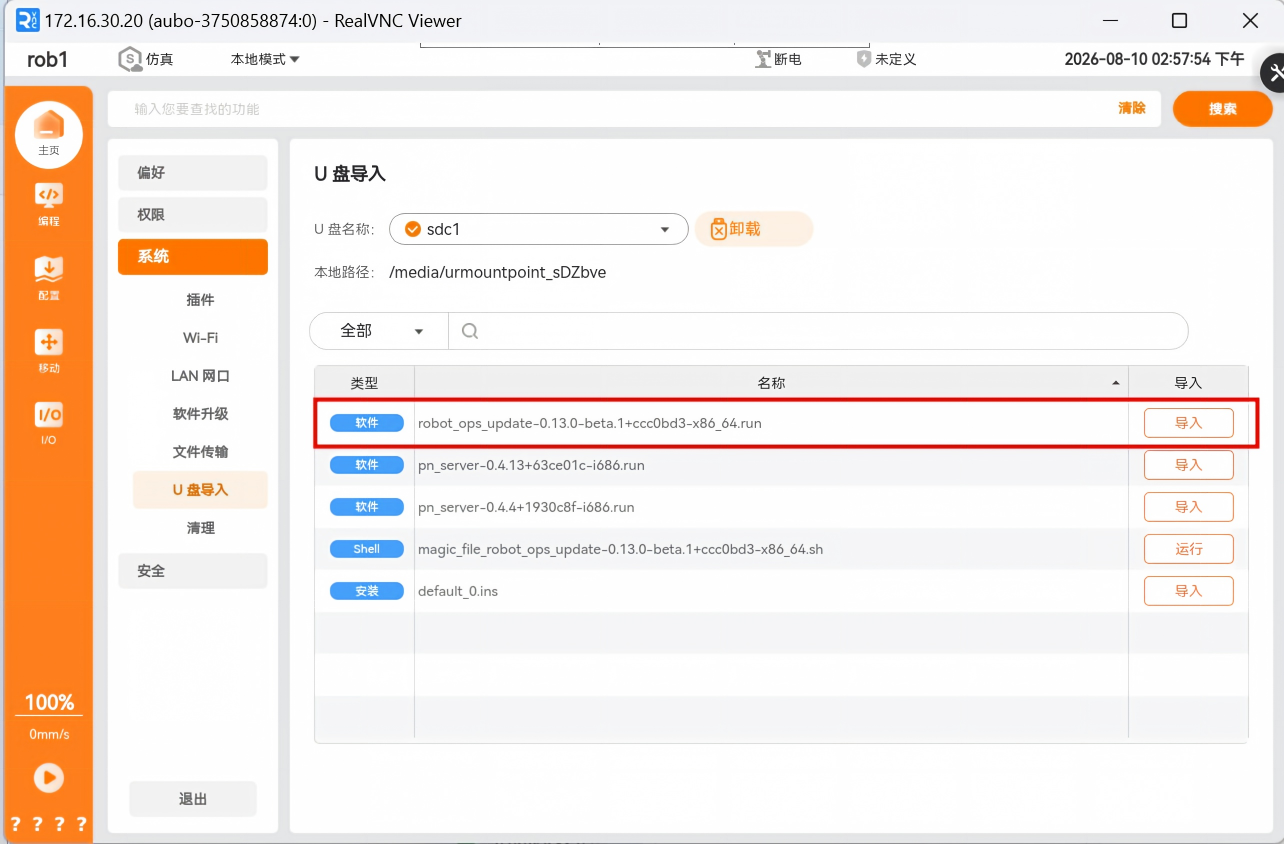
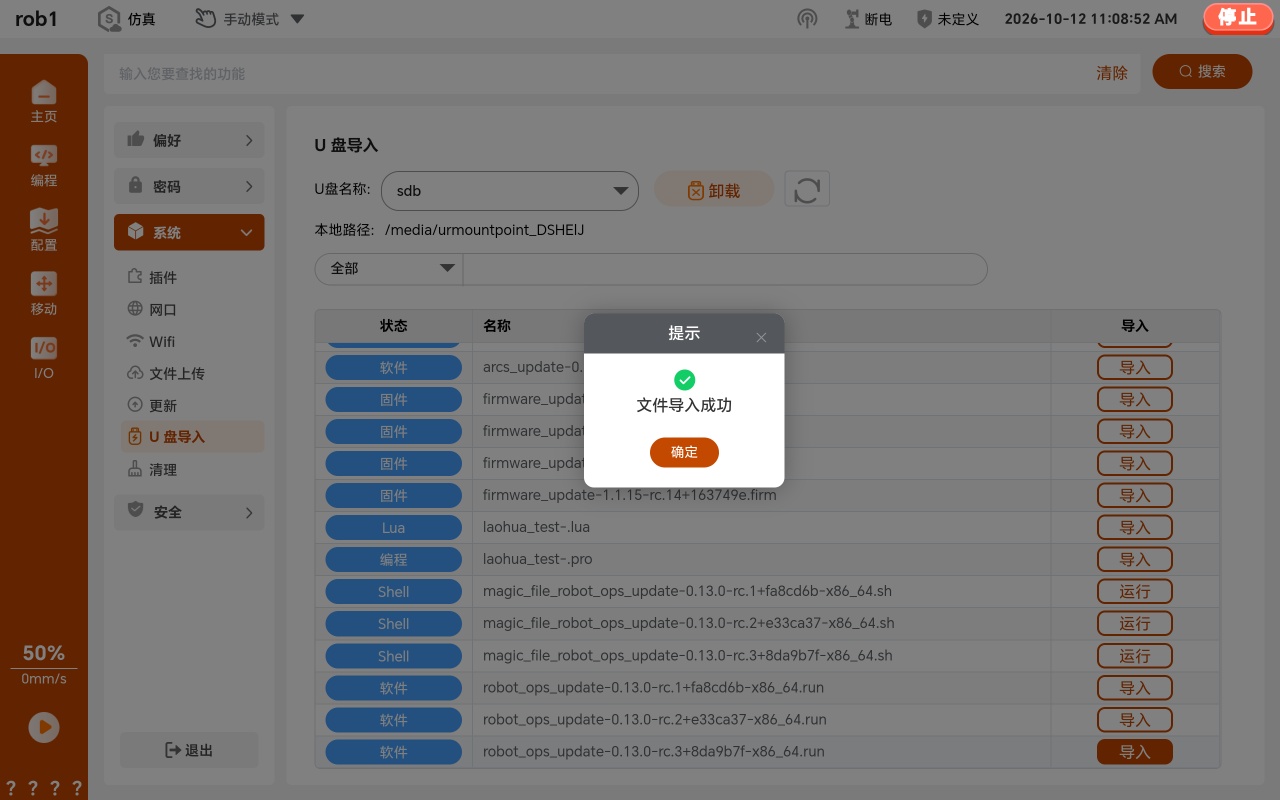
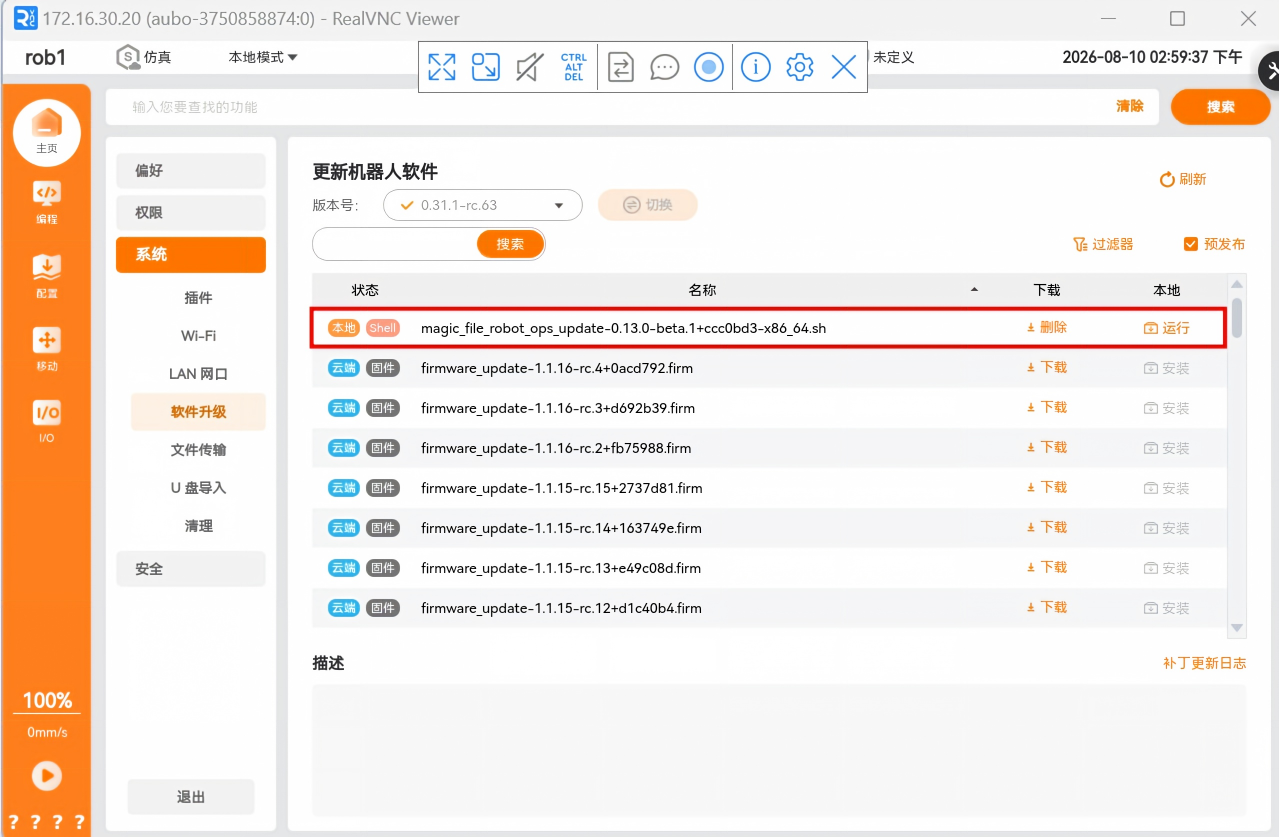
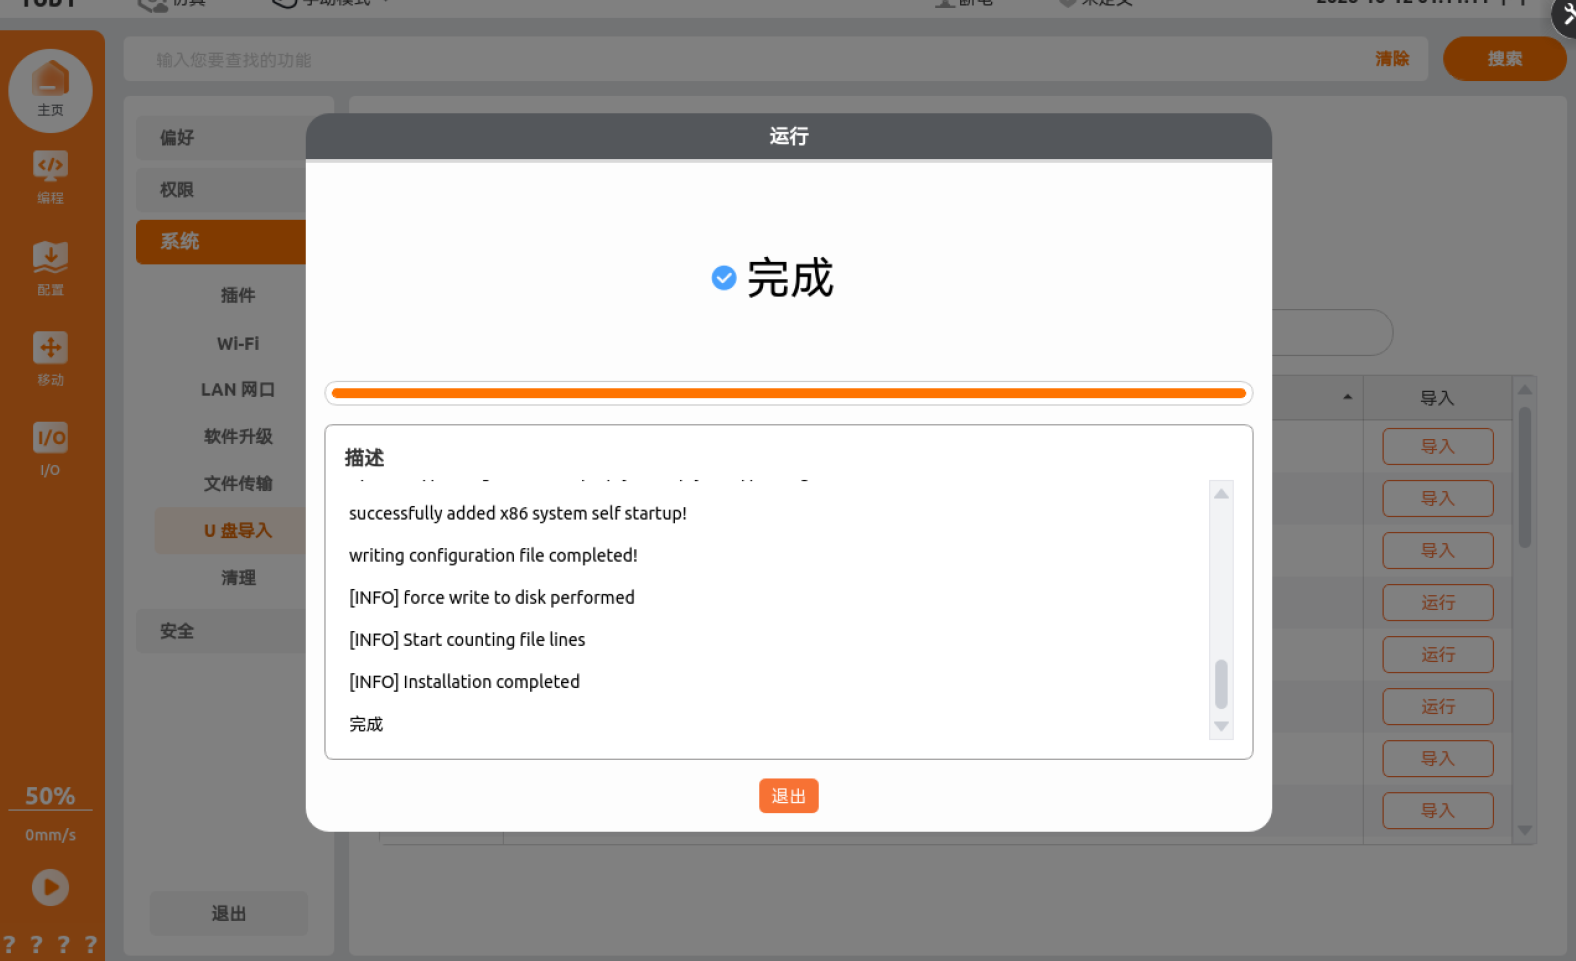
After the .run file import is complete, import the .sh file into the /tmp folder of the control cabinet terminal. After refreshing the software update page, the .sh file will appear; click "Run".
It is recommended to perform the first three steps on the wired teach pendant. After all of them are complete, simply switch to the wireless teach pendant, and a "Store" button will appear in the upper-right corner of the home page.
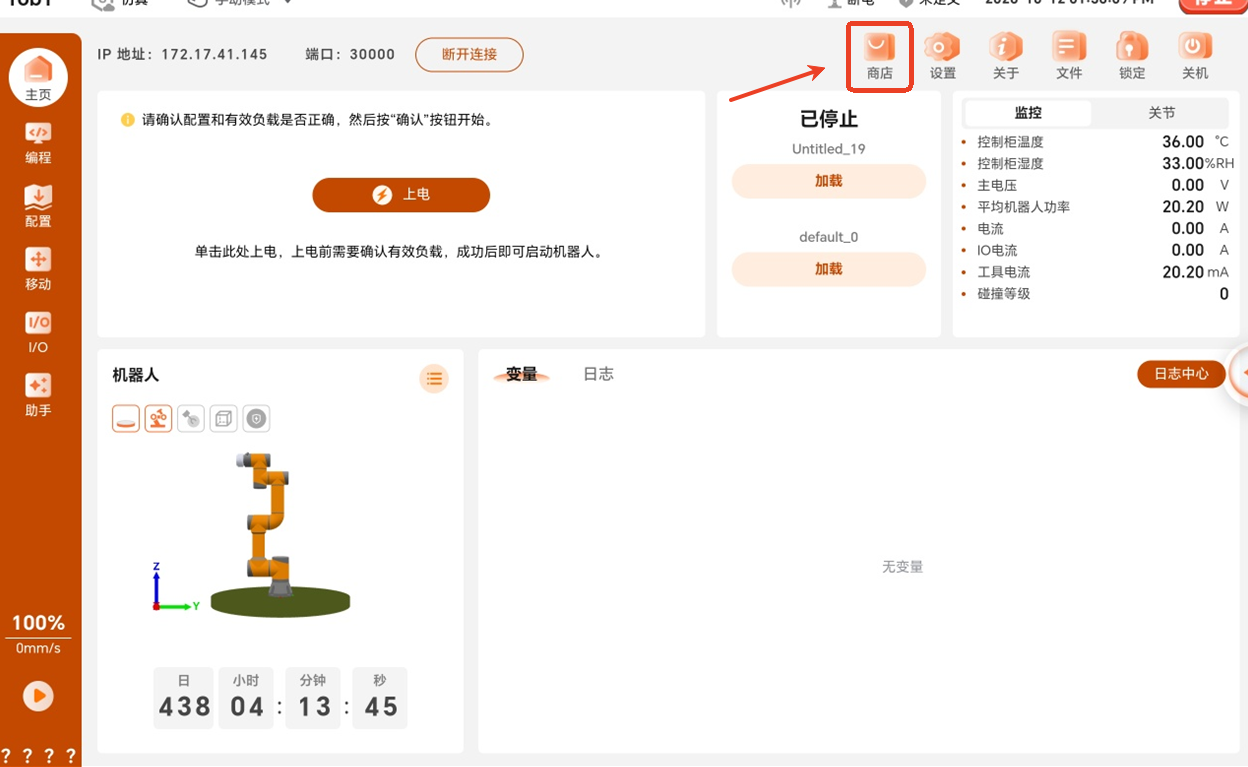
Click the "Store" button in the upper-right corner of the interface to enter the app store. In the "All apps" tab, install the teachagenthub and AUBO MCP plugins. After installation, enable both plugins in the "Installed" tab, and restart the teach pendant.
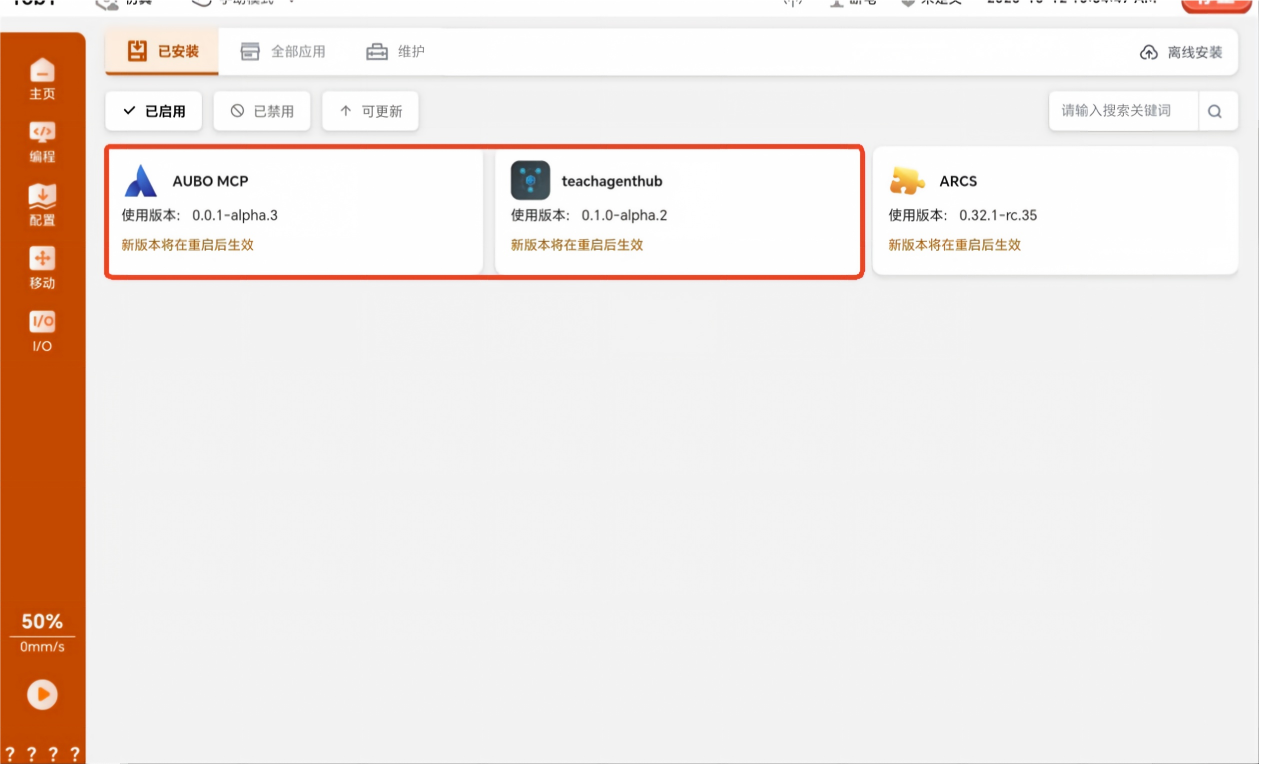
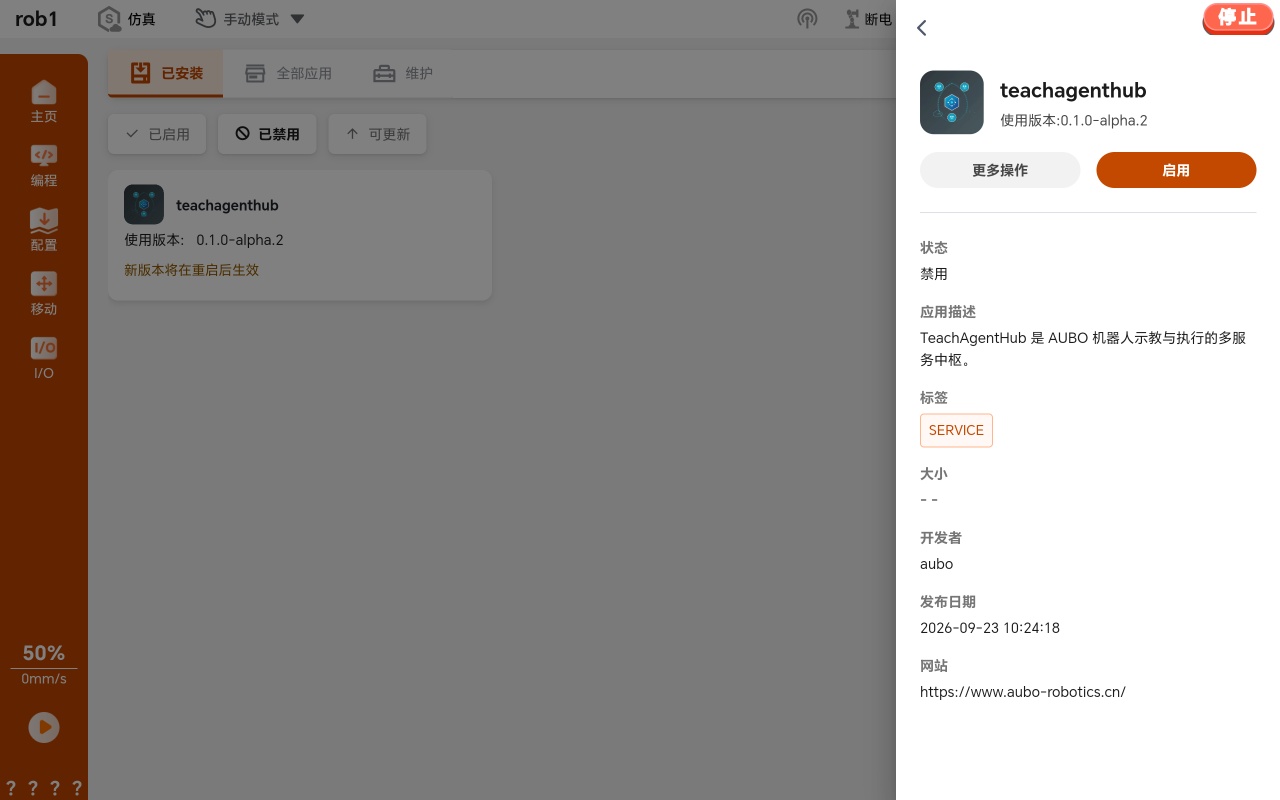
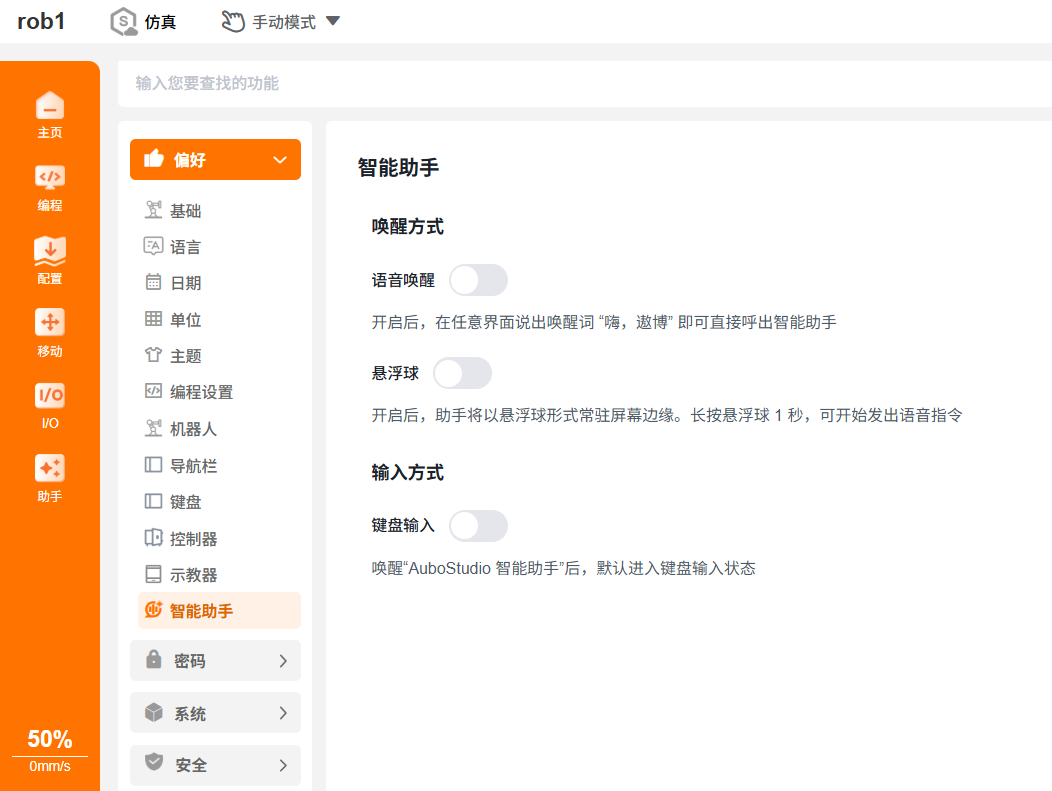
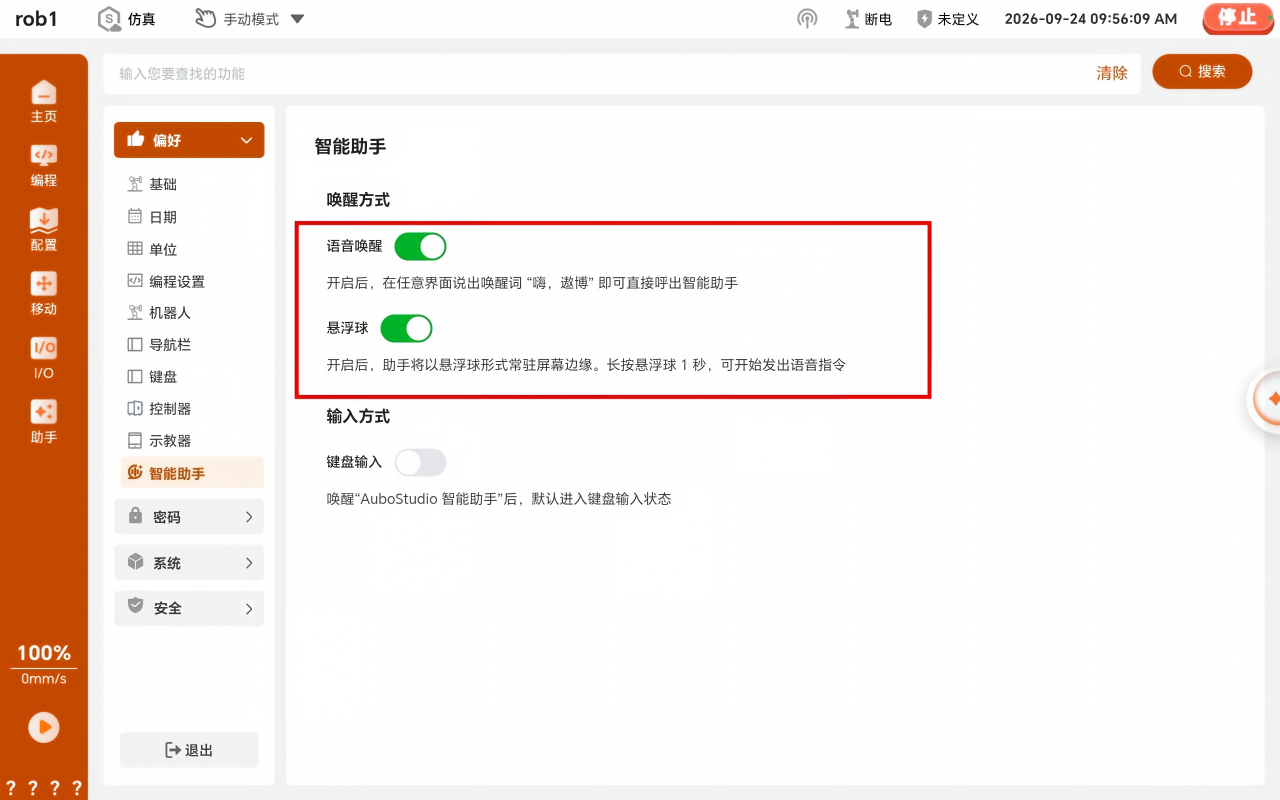
Restart and connect wirelessly. The left navigation bar of the interface will show the "Assistant" option. Enter the "Settings - Preferences - AI Assistant" page, which shows two wake-up methods: "Voice wake-up" and "Floating ball". At this point, the AI Assistant is successfully installed!
3 Usage
Enable the AI Assistant feature.
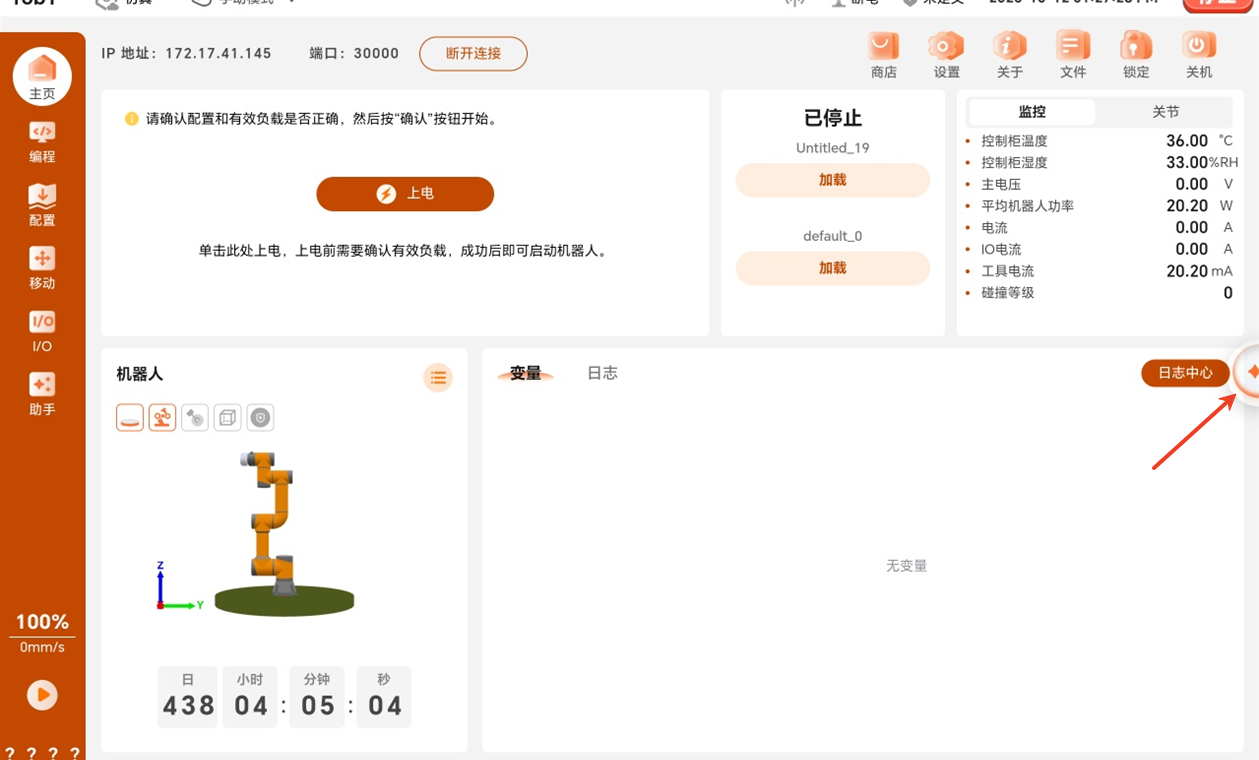
Wake up the AI Assistant.
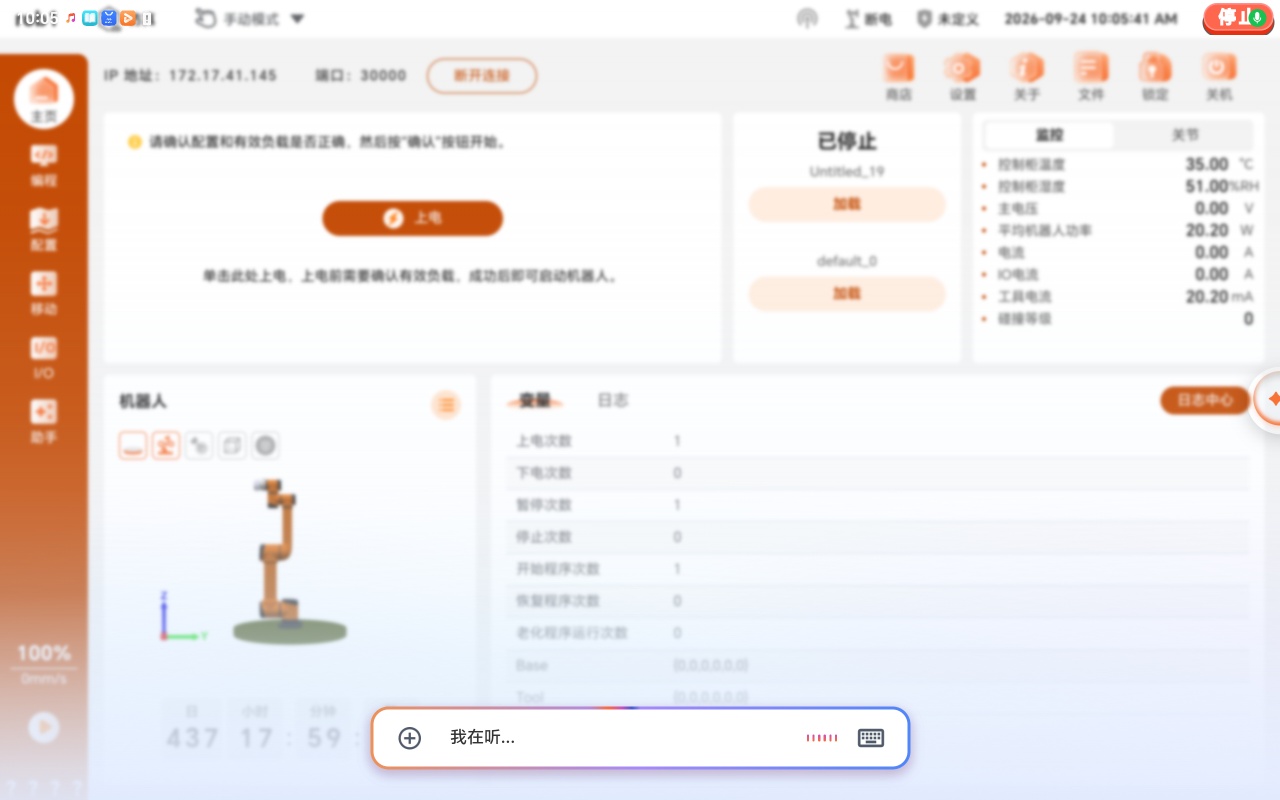
Method 1: Voice wake-up (say the wake-up word "Hi, AUBO")
Acceptance check: After saying the wake-up word, an input box appears at the bottom of the page showing "I'm listening...", and the page triggers a hazy glow layer effect.
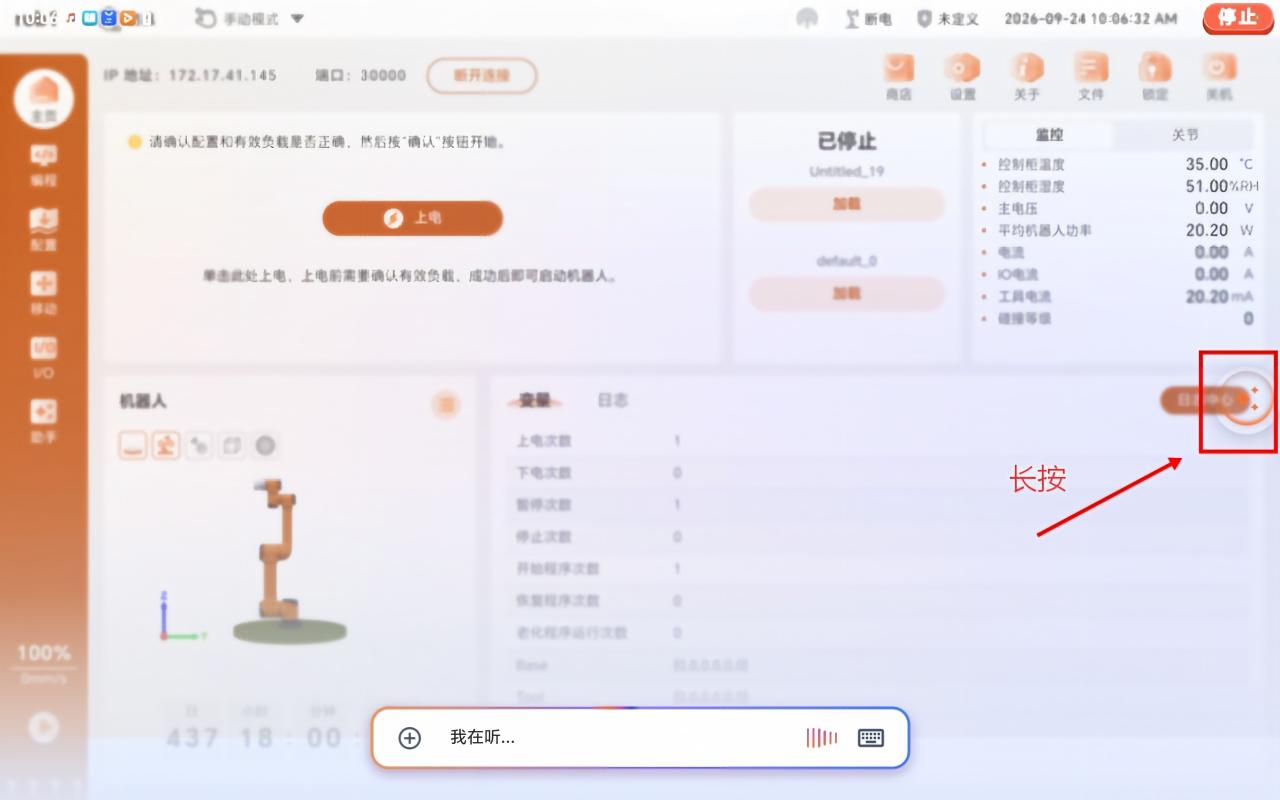
Method 2: Floating button wake-up (long-press the floating button)
Acceptance check: After long-pressing the floating button, an input box appears at the bottom of the page showing "I'm listening...", and the page triggers a hazy glow layer effect.
Ask the AI Assistant a question / issue a command.
Method 1: Voice question / command (after waking up the AI Assistant, ask it a question or issue a command by voice)
Acceptance check: After issuing a command by voice, a popup window appears on the page showing the issued command content and the AI Assistant's reply.
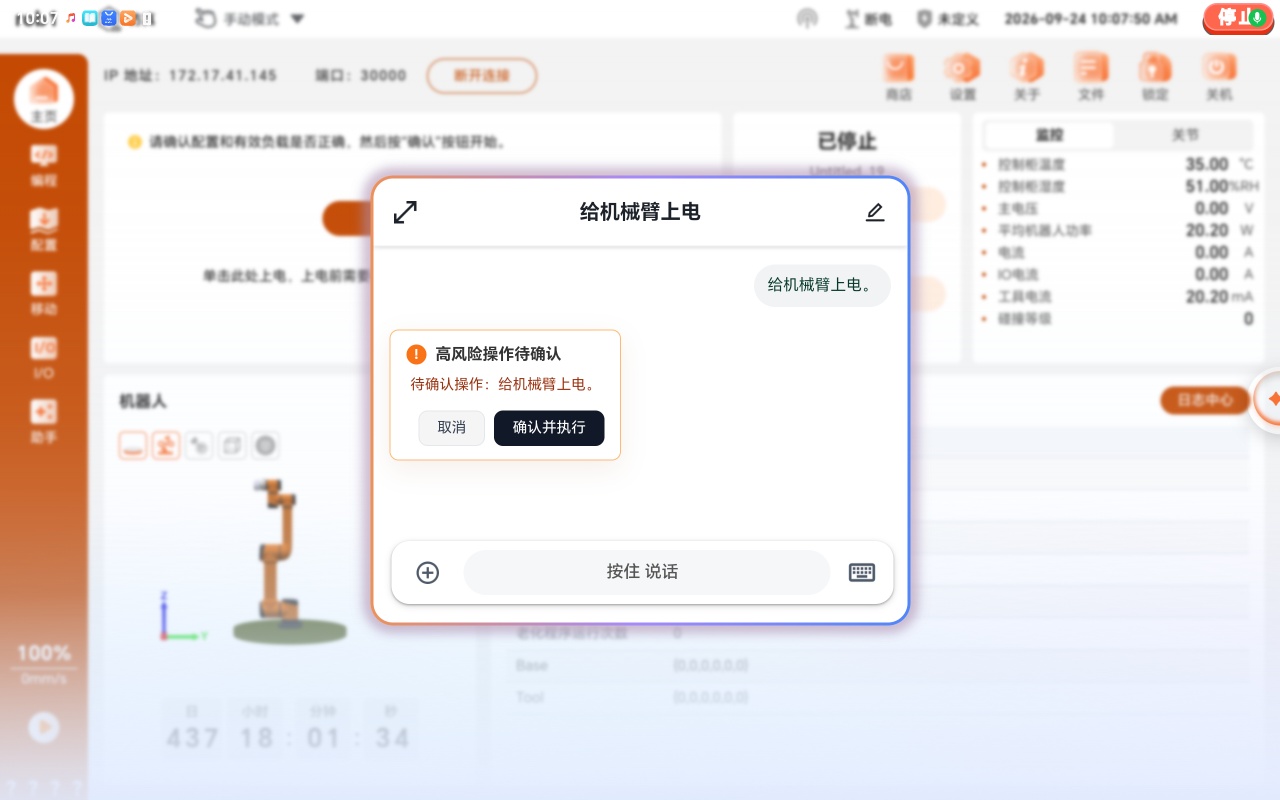
Method 2: Keyboard input question / command
Acceptance check: After issuing a command via keyboard input on the "Assistant" page, the AI Assistant dialog box shows the issued command content and the AI Assistant's reply.
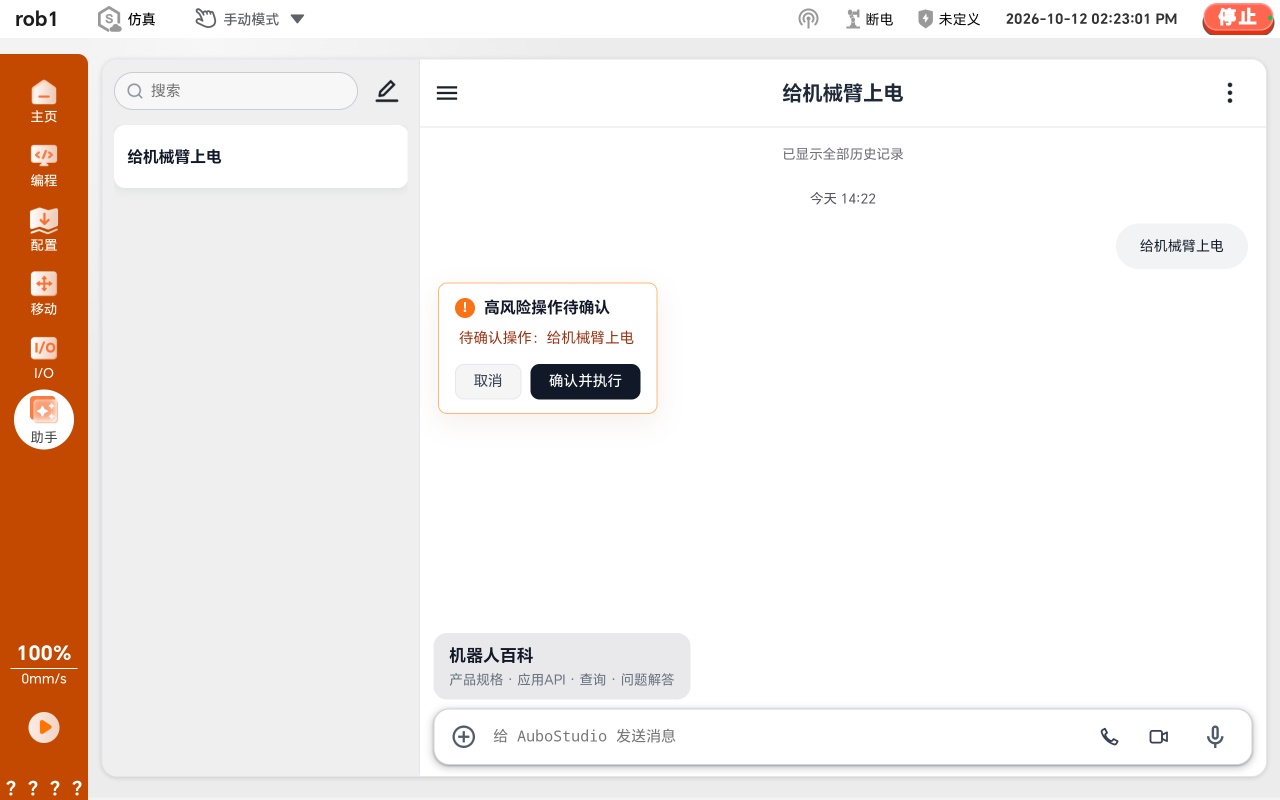
4 AI Assistant Feature Scope
Questions supported by the AI Assistant:
Category User Intent User Question Connection Connect to the robot arm Connect to robot arm 172.18.5.240 Connection Disconnect the robot arm Disconnect robot arm 172.18.5.240 Status Get controller time Get the controller time. The robot arm IP is 172.18.5.240 Status Get the robot arm serial number Query the robot arm serial number Status Get controller software version Query the robot arm software version Status Get the robot arm model Query the robot arm model Status Get safety mode Query the robot arm safety mode Status Get robot mode View the current robot arm status Status Get program status Query the robot arm program status Management Power on the robot arm Power on the robot arm Management Power off the robot arm Power off the robot arm Management Release the robot arm brake Release the robot arm brake Management Release protective stop Release the robot arm protective stop Management Reset robot errors Reset the robot arm errors Status Query collision status Query whether the robot arm has collided Telemetry Get the current TCP pose Query the robot arm's current TCP pose Telemetry Get the current joint pose Query the robot arm's current joint angles Telemetry Get robot voltage Get the robot voltage. The robot arm IP is 172.18.5.240 Telemetry Get robot current Get the robot current. The robot arm IP is 172.18.5.240 Telemetry Get joint voltage Get the joint voltage. The robot arm IP is 172.18.5.240 Telemetry Get joint current Get the joint current. The robot arm IP is 172.18.5.240 Telemetry Get joint temperature Query the robot arm joint temperature Register Read output integer register Please call the robot arm MCP tool "Read Output Integer Register" (get_output_int_register), parameters: Register Read output double register Please call the robot arm MCP tool "Read Output Double Register" (get_output_double_register), parameters: Register Read output bit register Please call the robot arm MCP tool "Read Output Bit Register" (get_output_bit_register), parameters: Script Get the program list Please call the robot arm MCP tool "Get Program List" (get_programs), parameters: Motion Execute joint motion Move the robot arm with movej to [0,-0.5,0.8,0,1.2,0] Motion Execute linear motion Move the robot arm with movel to [0.4,0.1,0.3,3.14,0,0] Motion Move linearly along the X direction Move the robot arm 50 mm along the X direction Motion Move linearly along the Y direction Move the robot arm -20 mm along the Y direction Motion Move linearly along the Z direction Move the robot arm 30 mm along the Z direction Motion Draw a circular trajectory Please call the robot arm MCP tool "Draw Circular Trajectory" (draw_circle), parameters: Motion Draw a square trajectory Please call the robot arm MCP tool "Draw Square Trajectory" (draw_square), parameters: Motion Draw a rectangular trajectory Please call the robot arm MCP tool "Draw Rectangle Trajectory" (draw_rectangle), parameters: Script Send a Lua script Please call the robot arm MCP tool "Send Lua Script" (send_script), parameters: {"ip":"172.18.5.240","script":"-- Sample script\ntextmsg("hello")"} Script Send a program script Please call the robot arm MCP tool "Send Program Script" (send_program_script), parameters: {"ip":"172.18.5.240","script":"-- Sample script\ntextmsg("hello")"} Data Analysis Start robot data recording Start recording the robot arm data Data Analysis Stop robot data recording Stop recording the robot arm data, session_id=record-001 Data Analysis Generate robot report Generate the robot arm diagnostic report Multi-Robot Collaboration Initialize multi-robot collaboration Please call the robot arm MCP tool "Initialize Multi-Robot Collaboration" (setup_multi_robot_coordination), parameters: Multi-Robot Collaboration Create a collaborative task Please call the robot arm MCP tool "Create Collaborative Task" (create_collaborative_task), parameters: {"task_name":"collaborative handling","robot_assignments":{"robot-01":"pickup","robot-02":"place"},"dependencies":{"place":["pickup"]}} Multi-Robot Collaboration Execute a collaborative task Please call the robot arm MCP tool "Execute Collaborative Task" (execute_collaborative_task), parameters: Trajectory Planning Generate a Bezier path Please call the robot arm MCP tool "Generate Bezier Path" (generate_bezier_path), parameters: Trajectory Planning Optimize the robot trajectory Please call the robot arm MCP tool "Optimize Robot Trajectory" (optimize_trajectory), parameters: Data Analysis Analyze robot data Please call the robot arm MCP tool "Analyze Robot Data" (analyze_robot_data), parameters: Data Analysis Compare robot performance Please call the robot arm MCP tool "Compare Robot Performance" (compare_robots_performance), parameters: WebScope Get the control cabinet name Get the control cabinet name. The robot arm IP is 172.18.5.240 WebScope Update the control cabinet name Please call the robot arm MCP tool "Update Control Cabinet Name" (webscope_update_control_box_name), parameters: WebScope Get the robot arm name Please call the robot arm MCP tool "Get Robot Arm Name" (webscope_get_robot_arm_name), parameters: WebScope Update the robot arm name Please call the robot arm MCP tool "Update Robot Arm Name" (webscope_update_robot_arm_name), parameters: WebScope Get WebScope system information Get WebScope system information. The robot arm IP is 172.18.5.240 WebScope Remotely call the WebScope SDK Please call the robot arm MCP tool "Remotely Call WebScope SDK" (webscope_remote_call_sdk), parameters: {"ip":"172.18.5.240","moduleName":"robot","functionName":"getRobotMode","params": WebScope Send a script via WebScope Please call the robot arm MCP tool "Send Script via WebScope" (webscope_send_script), parameters: {"ip":"172.18.5.240","script":"-- Sample script\ntextmsg("hello")","timeout_ms":5000} WebScope Call a WebScope app method Please call the robot arm MCP tool "Call WebScope App Method" (webscope_call_app_method), parameters: {"ip":"172.18.5.240","methodName":"refreshRobotState","params": WebScope Jump to a WebScope page Open the network menu of the WebScope settings page Usage restrictions:
The AI Assistant only supports questions related to robot operations (see "Questions supported by the AI Assistant" for the supported scope). Content unrelated to the robot will only receive a default reply (for example, "How much rain will Changzhou get today?" — the robot replies with the default "This question is a bit beyond me..........").
5 Troubleshooting and Precautions
- If the "Store" button does not appear in the upper-right corner of the teach pendant home page after importing the upgrade package and running the patch package, restart the teach pendant to resolve it.
- After the teachagenthub and AUBO MCP plugins are installed successfully, the "Assistant" button will not appear in the sidebar of the wired teach pendant page. You need to switch the tablet to a wireless connection before using the AI Assistant.
- For commands involving robot arm power-on and motion, before issuing a command, make sure no personnel are walking around the robot arm and no obstacles block the robot arm's motion path. Press the emergency stop button promptly when necessary to prevent accidents.